Learning how to open, save, and close documents is the most basic of the skills you'll need when using Word 2016. It's also one of the most important because it's how you'll create new documents, edit existing ones, and save the work that you do so you have it for later.
Opening a New Document in Word 2016
In the last lesson, we learned how to create a new, blank document when first opening Microsoft Word. You can also open a new, blank document with Microsoft Word already open.
For example, let's say you have already created the document titled Document1. That document is still open in Microsoft Word, but you also want to create and open a new, blank document.
To do this, click the File tab in Microsoft Word. This takes you to the backstage area.
Click New on the left side of the window, as shown below.
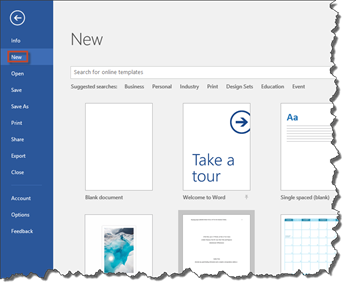
Click Blank Document as we did in the last lesson.
Opening an Existing Document
Now let's say that you have Document1 open, and you want to open an existing Word file that you have saved on your computer. To do this, go to File>Open.
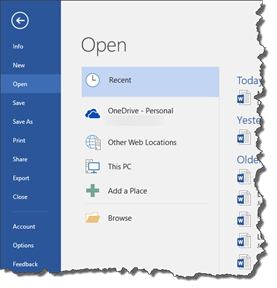
You can choose to open a recent document. If you click on Recent, you'll see the list of your recent documents to the right.
You can also open a document on your OneDrive, a document saved to other web locations, or a document saved to your computer.
Click on the name of the file to open it.
Opening a Document inside another Document
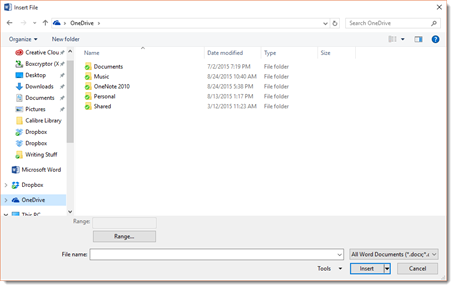
You can open one document inside of another document using Word 2016. Let's learn how to do it.
Go to the first document and insert the pointer � or cursor -- where you want to insert the second document.
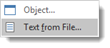
Next, go to the Ribbon. Click the Insert tab, then go to the Text group.
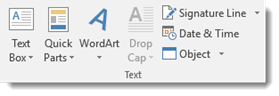
Click the downward arrow to the right of "Object" in the Text group. Select "Text from File."
Locate the document that you want to open. Select it by clicking on it, then click Insert.
Closing a Document
There are several ways to close a document in Microsoft Word. Most of the methods used to close a document, however, involve saving the document first. That said, if you haven't made any changes to a document � or you simply don't want to save it, you can simply close a document by going to File>Close.
You will see a dialogue box that reminds you that any changes you've made to the document have not been saved.
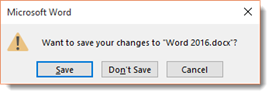
Click the Save button to save your document. This will save your file under its current file name and at its current location.
If you don't want to save the changes � or the document if it hasn't yet been saved, click the Don't Save button.
Click the Cancel button if you've changed your mind, and you don't want to close the document.
Saving a Document
As just mentioned in the last section, there are several ways to close a document, but most of the methods involve saving the document first.
Let's say that you've created a new document and wish to save it to your computer to use again later. You can do this quickly and easily in Word 2016. Click File, then choose either Save or Save As on the left.
-
Clicking Save will enable you to save the file under its current name and keep it saved at its current location. Keep in mind that if this is a new document, it will save the file by the default name of Document1. When you click Save, if another file of the same name exists, Word will prompt you to either enter a new file name or to replace the existing copy with the new version you are currently saving. If you want to save the file to a new location, you must choose Save As.
-
Clicking Save As gives you a lot more options to saving your work. First of all, when you click Save As, you must specify a file name. You must also specify the format that you want to save the file in. Word's default file format is .docx or Word Document. This is an acceptable and much-used format that should be satisfactory for most Word users, but you can select the format that you need depending on the work you need to save. Let's show you what we mean.
Click File, then choose Save As on the left.
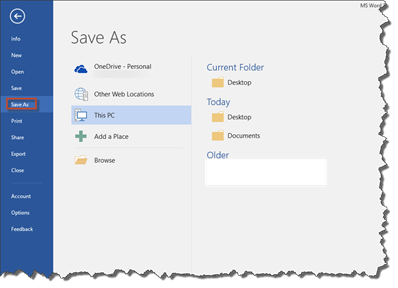
In the "Save As" column, choose where you want to save the document. You can save it to your OneDrive, which is your cloud storage. In addition, you can save it to other web locations, This PC � which is your computer -- or you can add a location by clicking "Add a Place".
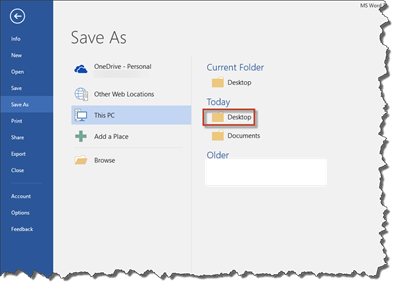
Let's click on This PC.
Choose the location on your computer where you want to save the file. You can also click Browse to find a location. We're going to choose Desktop.
Enter a name for the file in the File Name text field, as pictured below.
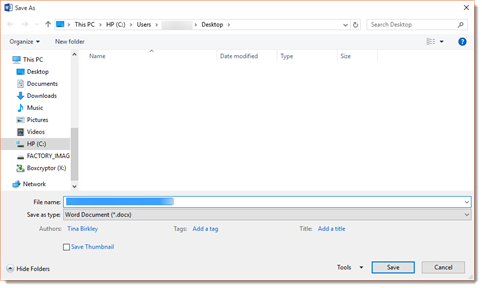
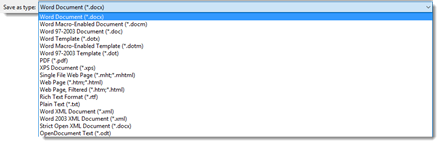
In the Save as Type field, choose the format in which you want to save the document.
NOTE: You can also save a document by clicking the picture of the floppy disk in the Quick Access Toolbar. This will save the file under the current name in its current location. It's a good idea to click this button every so often while working in a document to save it in case of a power outage, computer freeze, or anything else that may cause you to lose your work.

Recovering a Draft
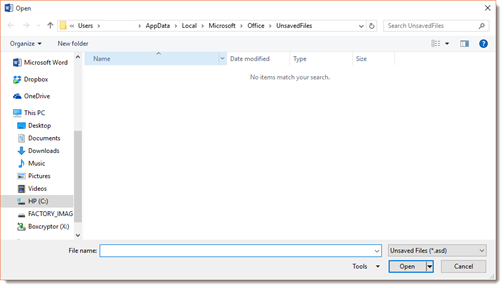
Although we do our best to make sure we save our Word documents, sometimes a computer crash or power outage will prevent us from saving the latest version of our work. If this happens, don't worry. There's a chance that Word saved it for you as a draft using the AutoRecover feature.
To find your draft, go to File>Open.
Select Recent Documents.
Scroll to the bottom of your Recent Documents list. At the bottom, you'll see the Recover Unsaved Documents button.

Click the button.
The Open dialogue box will appear. Choose the document you want to recover, then click the Open button.
Getting Help Using the New �Tell Me' Tool
Tell Me is a tool that allows you to tell Word what you want to do. This feature will guide you through the steps you need to take to complete a task. Consider it the new "help" tool on steroids, because it not only provides help, it provides instant access to the tools that you need to accomplish a task.
The Tell Me tool is located toward the left side of the Word screen above the ribbon.
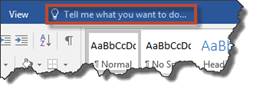
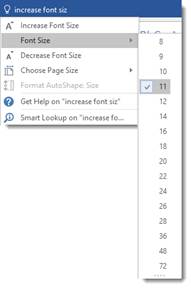
Simply type in what you want to do. For example, increase font size.
As you can see in the snapshot below, a dropdown menu appears. By selecting Font Size, we can change the font size right there from the menu. There's no longer a need to search help files or watch a video.
In the snapshot below, we wanted to format the selected text as a heading.
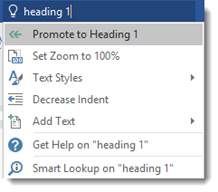
Once again, the Tell Me tool lets us perform the action right in the dropdown menu.
Using the Keyboard
Naturally, you'll use the keyboard a lot in Word 2016, just as you use the keyboard to surf the Internet or use other software programs. That said, the keyboard will help you format documents when using Word, so it's helpful to know the function of certain keys.
-
The Enter key on your keyboard is used to start a new paragraph of text.
-
The Spacebar inserts spaces between words.
-
The Tab key inserts a tab "character." When you click Tab, it shoves the text that you type over to the next tab stop.
-
Backspace and Delete are used to backup or erase text. Backspace backs up your cursor and will erase text to the left of the cursor (as you backspace over it). Delete will delete text to the right of the cursor. It deletes on character at a time for each time you push the Delete button on your keyboard.
-
Shift allows you to capitalize a letter.
-
Caps Lock makes all letters caps when you press the key on your keyboard. Press it again to turn Caps Lock off.
The Touchscreen Keyboard
If you're using Word on a tablet or other touch-enabled device, you can also use the onscreen touch keyboard. Instead of entering characters (letters, numbers, and spaces) by pecking away on your keyboard, you'll simply touch your finger or stylus pen to the keyboard on the screen. The touchscreen keyboard isn't ideal for typing or editing long documents because you can't gain the speed, but it can be handy for quick touchups or edits.
Make sure you enable Touch mode before starting to use Word from a tablet or touch device.
To use the onscreen keyboard, simply tap in the document area to see the cursor � and the keyboard.