When you start to create longer documents, being able to quickly and easily navigate through them will make it a lot easier to find what you need, make corrections, and add formatting.
The Vertical Scroll Bar
The most common way to navigate through a document is using the Vertical Scroll Bar. It is located on the right side of your document, as shown in the snapshot below.
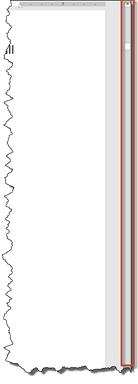
If you don't see it, move your mouse over some text, and it will appear.
To scroll up one line in a document, click the upward arrow, as highlighted below.
Click and drag on the Elevator button to scroll through the document.
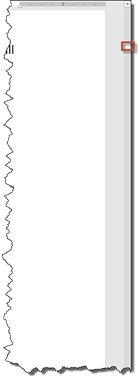
Click above the Elevator button to go up one screen. Click below it (in the gray) to go down one screen.
The length of the Elevator button also shows you the portion of your document that's visible on the screen. The Elevator button gets longer with the more of your document that's displayed.
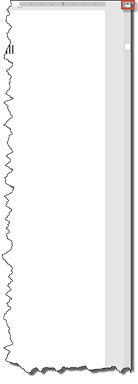
Click the downward arrow  at the bottom of the scroll bar to scroll down one line in the document.
Aside from the scroll bar, you can also use your mouse to scroll through the document. Just place your cursor anywhere in the document, then use the mouse wheel to scroll up or down.
Moving in Smaller Increments
Instead of moving through pages and windows of your document, you can also move from paragraph to paragraph � or line to line--by using simple keyboard shortcuts. Word 2016 will move your mouse pointer to the specified area for you.
To move your mouse pointer to a new area in your document, use the following keyboard shortcuts:
|
Press These Keys: |
Mouse Cursor Moves Here: |
|
The Up Arrow |
Up to the preceding line of text |
|
The Down Arrow |
Down to the next line of text |
|
Right Pointing Arrow |
To the next character on the right |
|
Left Pointing Arrow |
To the next character on the left |
|
Ctrl+ Up Arrow |
Back to the start of the previous paragraph |
|
Ctrl + Down Arrow |
Down to the start of the next paragraph |
|
Ctrl+ Right Pointing Arrow |
Right and to the start of the first letter of the next word |
|
Ctrl + Left Pointing Arrow |
Left and to the start of the first letter of the previous word |
|
End |
To the end of a line of text |
|
Home |
To the start of a line of text |
|
Ctrl + End |
To the end of the document |
|
Ctrl + Home |
To the very top of the document |
|
PgUp |
Up one screen |
|
PgDn |
Down one screen |
|
Ctrl+Alt+PgUp |
To the top of the current screen |
|
Ctrl+Alt+PgDn |
To the bottom of the current screen |
The Go To Command
The Go To command in Word lets you send the mouse pointer to a specific page, line, bookmark, header, and the list goes on. Just think of the Go To command as your teleporter. You tell it where you want to go within your document and it takes you there instantly.
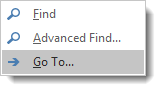
To use the Go To command, click the Home tab, then go to the Editing group.
Click the downward arrow to the right of Find.
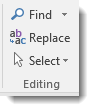
Select Go To.
You'll then see this dialogue box:
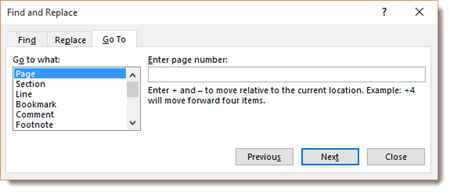
In the "Go To What" box, choose which element to go to. You can go to a page, section, line, bookmark, comment, etc.
We have selected Page.
Once you select an element from the left, you can then enter other relevant information. For page, we can enter a page number.
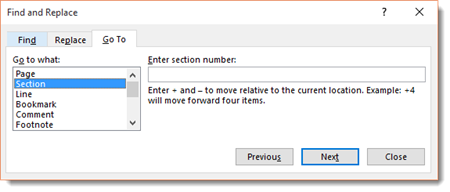
If we would choose Section as the element, it would then prompt us for a section number.
Keep this feature in mind when you start to create documents, then add bookmarks, comments, etc. It will be helpful in finding sections of text in your document.
The Navigation Pane
The Navigation Pane is a feature that was new in Word 2010. Its purpose is to make navigating through long documents easier. It can also make copying and pasting sections of text easier, because it takes away the need to scroll through paragraphs of text, then copy and paste sections manually. Instead, using the Navigation Pane, you can navigate through the document easily, then use drag and drop to move sections.
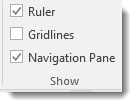
You can't see the Navigation Pane when you have Word 2016 open. It's hidden by default. To see it, click the View tab on the Ribbon, then check the box beside Navigation Pane in the Show group.
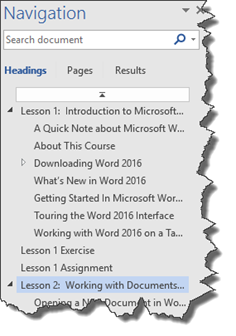
The Navigation Pane will then open on the left side of your screen, as shown below.
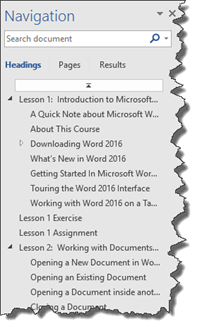
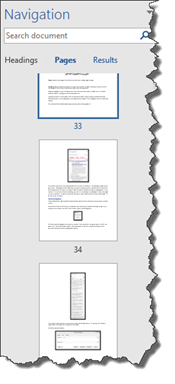
Toward the top of the Navigation pane, you'll see three tabs: Headings, Pages, and Results.
Headings allows you to browse the headings in your documents.
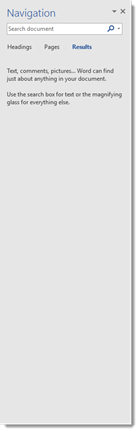
Pages shows you the pages in your document so you can browse page by page.
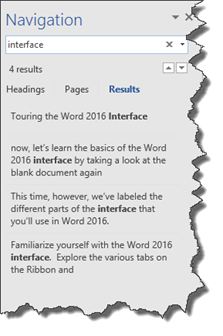
Results shows you results from search. You can enter a word or phrase in the search box at the top of the Navigation Pane, and the results will appear under the Results tab. As you can see in the snapshot below, we searched for the term "interface".
To move sections of text using the Navigation Pane, we can click on the Headings tab in the pane, then drag and drop a page or section to a new location in the pane.
Let's show you how it works.
We are going to drag and drop "Lesson 2: Working with Documents�" and place it above "Lesson 1: Introduction to Microsoft�".
To do this, we are going to click on Lesson 2.
While holding the left mouse button down, we are going to drag upward to Lesson 1. We will see a horizontal line appear that lets us know where Lesson 2 will be placed when we release the mouse button. We want that line to appear above Lesson 1.
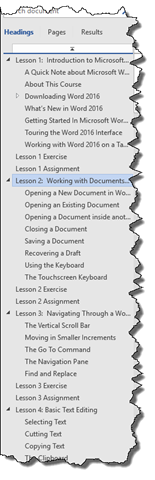
When the horizontal line appears in the location where you want to place the text, release the mouse button.
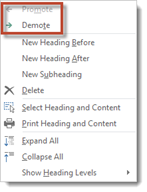
In addition to clicking and dragging sections by their headings, you can also right click on any heading in the Navigation Pane and either promote it or demote it.
To promote or demote a heading, right click on the heading in the Navigation Pane, then select promote or demote. Perhaps, for example, you want to make a section title a chapter title instead. To do that, you'd promote it.
NOTE: A heading is a style you can give to text. Headings are often used when you want to create chapters or sections within a document, and a requirement if you want to create a Table of Contents.
Find and Replace
Find and Replace can also be used to locate words or sections of your document that you want to edit or format.
If you want to find a certain word or phrase within your document, go to the Home tab, then click Find on the far right in the Editing group.
You'll then see the Navigation Pane open on the left. Enter the word or phrase you want to find in the search box. The results appear below it.

Each instance of the word or phrase that appears in your document will be temporarily highlighted.

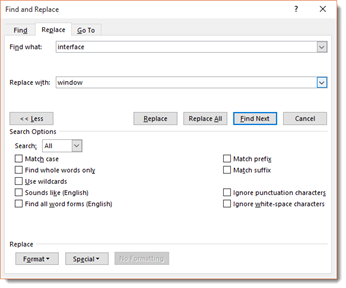
You can also replace words in a document with other words. You can do this by using the Replace feature. To use this, go to the Home tab, then click Replace on the far right in the Editing group.
You'll then see this window:

Next, type in the word or phrase you're looking for in the "Find What" field. This is the word or phrase that you want to replace.
In the "Replace with" field, type in the new word or phrase that you want to insert into your document in place of the current word.
Word will search your document for the word in the "Find What" field and replace it with the word in the "Replace with" field. However, if you want to set more search criteria than simply a word, click the More button in the Find and Replace dialogue box after you fill in the "Find What" and "Replace with" fields.
The Find and Replace dialogue box expands to include more options.
When you're ready for Word to search and replace, either click on the Find Next button to find the next instance of the words or phrase you want to replace, then click Replace. This gives you the power to make sure only the changes you want made are made.
Or click Replace All to have Word 2016 make all replacements for you at once.
Viewing Previous Versions of a Document
If you have SharePoint or OneDrive for Business, Word 2016 saves versions of your document files as you have them open and are working on them. To view the historical versions of your document, go to the File tab and click History on the left.
You will see the older versions of the document in the History pane.
Click a version to view it in a separate window.
If you want to restore your document to that version, click the Restore button in the message bar at the top of your document.