Journal entries are an advanced feature of QuickBooks Online. They should be done if you have accounting experience or are working directly with an accountant. They allow you to enter debits and credits manually, like in an older accounting system.
Journal entries are not required for most transactions. Usually, you will want to use QuickBooks Online's native tools to do things like pay bills or make deposits, rather than using journal entries.
Some things that journal entries can be used for are to correct errors or summarize depreciation of an asset. They can also be used to transfer money between an income and an expense account or transfer money from an asset, liability, or equity account to an income or expense account.
In this article, we'll look at how to create different types of journal entries. We'll learn how to reverse them, delete them, and make them recurring. We'll also see how you can view journal entries in reports and in the Transaction Log. First, though, it's important to understand about credits, debits, and balancing accounts. So, we'll discuss that first.
Understanding Credits and Debits
In order for your financial statements to be accurate, you need to keep a good record of credits and debits. Keeping track of all credits and debits will make sure that your accounts are balanced.
We can think of an accounting system as a journal. This journal keeps track of all transactions in chronological order, and each transaction is posted as a journal entry. Each journal entry will affect an account with either an amount to credit or debit.
Different types of accounts are affected differently be debits and credits.
Debits go on the left side of a journal entry. Account types that are assets or expenses are increased with a debit entry.
Credits go on the right side of journal entry. Account types that are liability and revenue accounts are increased with a credit entry.
The amount of each debit must equal the amount of credits. If debits and credits are not equal you will get an error from your accounting software. There can, however, de a different number of debit or credit entries in a journal entry. Each journal entry must, however, include at least one debit and one credit entry.
A Journal Entry Example
For example, if you were to purchase of a computer with $2,000 cash, your journal entry would include a debit to the equipment account for $2,000 and a credit to the cash account for $2,000. The equipment account is an asset account that is increased with a debit. The cash account is decreased with a credit.
Balance Sheets
Whether you use a debit or credit for each particular account is determined by the balance sheet formula. A balance sheet is one of three basic financial reports that is used to make financial decisions, with income statements and the statement of cash flow as others.
A balance sheet shows your company's assets, liabilities, and equity at a certain point in time. Assets refers to the things your company owns and which produce revenue. Liabilities are what your company owes to others and includes accounts payable and debt. Equity is difference between assets and liabilities, and is often considered the true value of a business.
Assets, liabilities, and equity are related by the formula: assets = liabilities + equity. This formula needs to stay balanced by having assets on the left side stay in balance with liabilities and equity on the right.
A Balance Sheet Example
If a company issues a bond for $50,000 and receives $50,000 cash for it, then the asset account of Cash will receive a debit, which will increase it by $50,000. On the other side of the equation, the liability account, which is Bond Payable, will receive a $50,000 credit. This is increased in a credit. So, the balance sheet will have a $50,000 increase on both sides, keeping the equation equal.
Remembering When to Debit and Credit
It can be tricky to remember when a particular type of account in is increased. Here is a brief summary of when to increase the account balances:
- Assets (cash, accounts receivable): Debit
- Liabilities (Accounts payable, long-term debt): Credit
- Equity (Common stock, retained earnings): Credit
- Revenue (Sales, gain on sale of an asset): Credit
- Expenses (Wage expense, cost of goods sold): Debit
For one more example, imagine that you are recording a $1,000 payment in cash from a customer. You will debit the cash account, which is an asset, so the account will increase. You will then credit accounts receivable, which is also an asset account, but decreases rather than increases. The balance sheet formula remains the same because the assets are increased and then decreased by the same amount.
Now that you've seen how debits and credits work, let's see with how you create a journal entry in QuickBooks Online.
Creating a Journal Entry
To create a new journal entry, you can start by clicking the New button in the left-side Navigation Pane. Then, choose Journal Entry under the Other category.
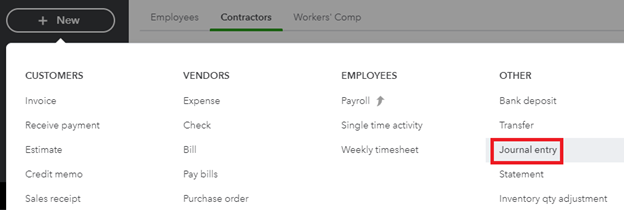
[Figure: Getting to the new Journal Entry page]
Once you get to the Journal Entry page, you will see that there is a date and journal number at the top. There is also a settings button where you can configure warnings if duplicate journal numbers are used.
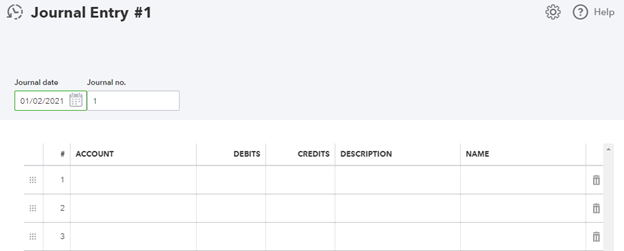
A journal entry has several lines in it. For a basic entry, you will take money out of one account and put it into another.
For this example, let's take $100 out of one account and put it into another. On the first line, pick an account from the Account dropdown and the enter $100 into the Debits field.

[Figure: Debiting an account using a Journal Entry]
Now on the second line, we will add $100 to another account. Choose another account from the Account dropdown and enter the same amount you debited from the first account into the Credit field.

[Figure: Crediting an account using a Journal Entry]
Now you have used a Journal Entry to transfer money from one account to another. The transaction is balanced because equal amounts left one asset account and entered another asset account.
There are numerous other things that you can do. Let's see how you can use a Journal Entry to show depreciation of an asset.
Using a Journal Entry to Show Depreciation
Many assets will lose value over time, so one of the most frequent uses of a Journal Entry is to report depreciation. We can record this in the Depreciation account. Create a new Journal Entry, and on the first line, choose the Depreciation account in the Account field.

[Figure: Choosing the Account in a Journal Entry]
Next, fill in the amount that you are depreciating in the Debits field. Also, write in a description of what you are doing so that you or another accountant will understand the transaction later.

[Figure: Entering the amount and description of a journal entry]
On the second line of the journal entry, you need to select the account for that asset that you are depreciating. In this case, it is a sub-account of the main asset.
Make sure that the same amount you debited in line 1 is in this line's Credits column. This and the Description field should be filled in automatically by QuickBooks Online for you.

[Figure: Entering the second line of the Journal Entry]
You can now click the Save and Close button at the bottom of the page to finish with the Journal Entry.
Now that you've seen how to make journal entries, let's see what you can do when you want to reverse one.
Reversing a Journal Entry
If you've made a mistake in one of your journal entries, you can reverse it.
First, go to the Chart of Accounts. You can find the Chart of Accounts by clicking on the gear-shaped Settings icon in the Header. It is under the Your Company heading.
At the Chart of Accounts, locate the account that you created the entry for. Select View Register from the Action column.

[Figure: Finding the account with the journal entry you want to reverse]
Once you get to the register, search for the journal entry. It will say "Journal" in the Reference Number Type column.
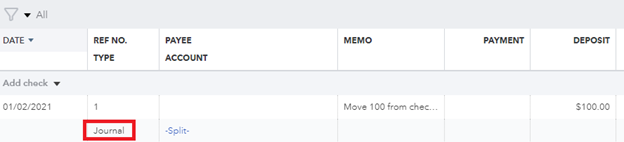
[Figure: Finding the journal entry in the register]
Click on the journal entry and you will be able to change some fields. Click on the Edit button to be able to make more detailed changes.

[Figure: Clicking the Edit button to make more edits]
Once you click the Edit button, you will see the Journal Entry page with the relevant journal entry data in it. To reverse the journal entry, click the Reverse button at the bottom of the page.
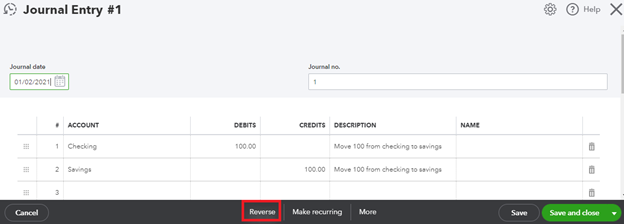
[Figure: Finding the Reverse button on the Journal Entry page]
After clicking the Reverse button, click the Save and Close button at the bottom of the screen to save your reverse.
Back at the register, you will see a new journal entry that reverses the previous one. It will have the same journal number, but adds the letter "R" to show that it is reconciled. It will also be dated the first day of the next month.

[Figure: The new journal entry reversing the previous one with "R" added and a new date]
Other information in the new journal entry, such as Account, Name, and Description, remains the same.
In addition to reversing a journal entry, you can also delete one entirely. We'll discuss that in the next section.
Deleting a Journal Entry
A journal entry that was made by mistake can be deleted, although you should be careful that you don't unbalance your accounts.
To delete a journal entry, go to your Chart of Accounts, just as you did to reverse a journal entry. You can find the Chart of Accounts in the Accounts tab in the left-side Navigation Pane.
At the Chart of Accounts, find the account that you are looking for and click View Register in the Action column. Locate the journal entry in the register. You can filter out other entry types by clicking the filter icon and selecting Journal Entry from the Transaction Type dropdown.

[Figure: Using the Filter tool to select only journal entries in the register]
Once you've found the journal entry, expand it by clicking on it. When it's expanded, you will see a Delete button at the bottom of the row. Click the Delete button to delete the journal entry.

[Figure: Deleting the journal entry]
If your journal entry is one half of a split transaction, you will receive a warning saying that the whole transaction will be deleted. Click the Yes button at this screen to continue. Your journal entry will now be deleted.
Although we previously made single, one-time journal entries, you can also make them recurring. We'll see how in the following section.
Creating Recurring Journal Entries
To make a recurring journal entry, start a new journal entry just like we previously did in this lesson. In the Journal Entry form, click the Recurring button at the bottom. That will change the page to a Recurring Journal Entry.
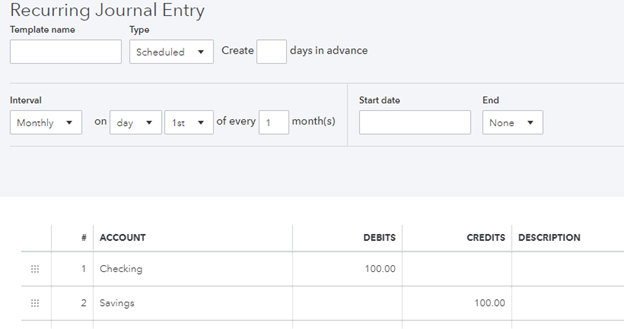
[Figure: A recurring journal entry form]
With this form, you can set the journal entry to occur on any schedule that you want. This can be used to automatically pay bills or, as in this example, move money into a savings account regularly.
Now that you have some experience creating journal entries, let's see how you can view them in the Transaction Journal.
Viewing Journal Entries in the Transaction Journal
Whenever you use QuickBooks Online, you are making a series of events that are added to a general ledger. This process creates journal entries behind the scenes.
For example, if you paid a check to someone, you would typically do that with the New button on the left-side Navigation Pane and selecting Bill from the Vendors category.

[Figure: Paying a bill with QuickBooks Online]
That process can be expressed in journal entries. After saving and closing your bill payment, you can see how the transaction looks by viewing it in the Transaction Journal.
To get to the Transaction Journal, click on the gear-shaped Settings icon in the Header and go to Audit Log under the Tools category.
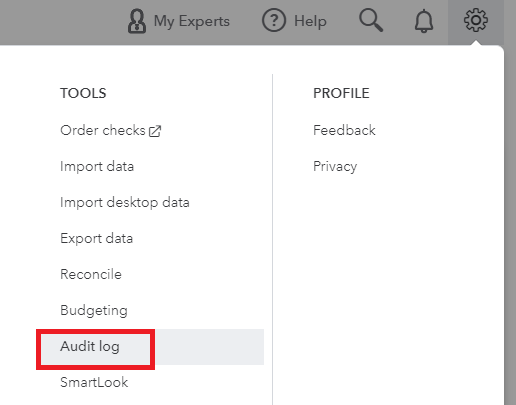
[Figure: Finding the Audit log]
At the Audit Log, you can view all the events that have occurred in the system. Events include things like sign ins and sign outs, budgets, recurring templates, settings, reconciliations, transactions, lists, time events, statements, sales customizations, and data exchange.
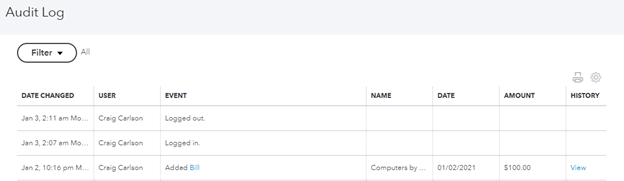
[Figure: Recent events in the Audit Log]
To see only the transactions, click on the Filter dropdown and select Transactions from the Show Only These Events radio button.
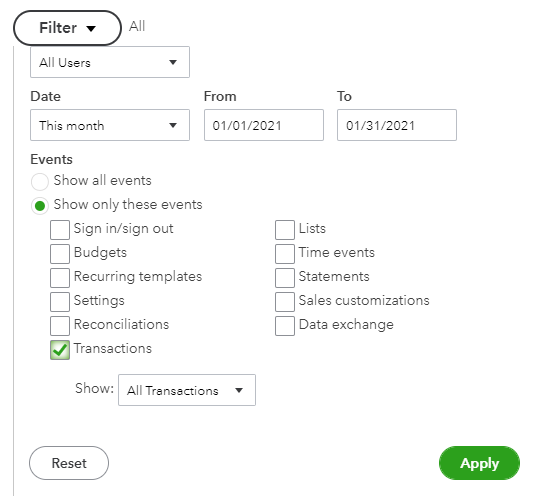
[Figure: Viewing only transactions]
Click the apply button and you will see that bill that was added in the table. The table includes a History column with a link to view the transaction.

[Figure: Viewing only transactions in the table]
Clicking on the View link opens up a detailed view of the transaction. You can see how the transaction affected accounts.
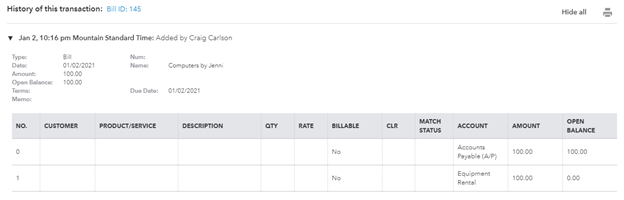
[Figure: View of the transaction]
In addition to seeing transactions in the Audit Log, you can also view journal entries in a report. We'll take a look at that right now in the next section.
Creating a Journal Entry Report
You can view a report of journal entries by going to Reports and scrolling to the report called Journal in the subsection For My Accountant. You can also just search for Journal from the search bar at the top of the Reports page.
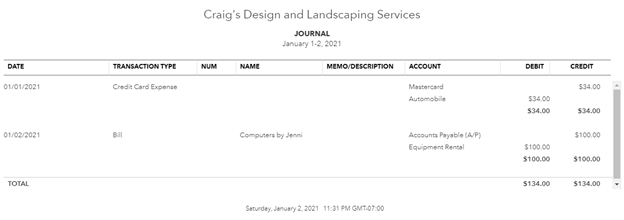
[Figure: The Journal report]
You can customize this report to only show journal entries by clicking on the Customize button at the top of the report. This will open a panel where you can set all sorts of options. Click on the Filter section and select Journal Entry to only show journal entries.
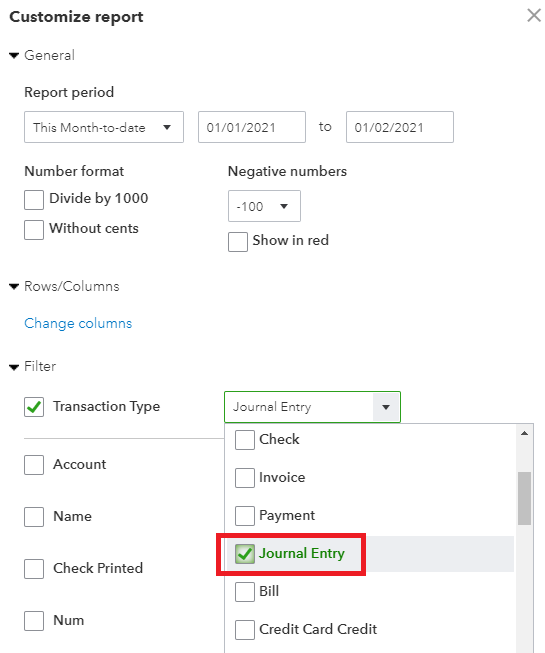
[Figure: Running only journal entries in the report]
Now that you've seen how to make a report with journal entries, we'll take a look at one more topic related to journal entries, which is importing journal entry files.
Importing a Journal Entry File
Being able to import journal entries is an important process because you may have transaction you want to import from other accounting software. Unfortunately, importing journal entry files is a process that isn't fully supported in every region that QuickBooks Online is available in.
If the process is not available to you, then you can import journal entries through a 3rd party add-on. One such add-on is called Transaction Pro. In this section, however, we will look at using QuickBooks Online's solution to importing journal entries, as it may be more widely available at a later date.
The file that you import should be a CSV or Excel file. Before importing a journal entry, make sure that you turn off account numbers in your Chart of Accounts. You can turn off account number by clicking on the gear-shaped Settings icon in the Header and choosing Accounts and Settings from the Your Company heading.
Then, go to the Avanced tab and click the pencil-shaped Edit icon in the Chart of Accounts Section. Make sure the Enable Account Numbers is turned off. Click the Save button when you are done.
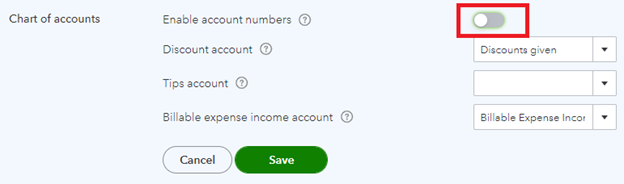
[Figure: Turning off account numbers for the Chart of Accounts]
Once you've confirmed that account numbers are turned off, make sure that your spreadsheet file is prepared correctly. The file that you are importing should have the following information:
- Journal number
- Journal code
- Account Name
- Debits
- Credits
- Select date format
Furthermore, check that you have every account mentioned in the file added to your Chart of Accounts already.
If you don't have the account already, you can create it from the Chart of Accounts. You can do this by getting to the Chart of Accounts by clicking on Accounts in the left-side Navigation Pane. Once there, click on the New button at the Chart of Accounts.
Choose the Type and Detail Type for the account, and make sure that the Name is the same as in the file.
Once you have everything set up to import, you can start importing by clicking on the gear-shaped Settings icon in the Header. From there, choose Import Data under the Tools heading.
From the Import Data screen, choose Journal Entries. On the next page, click Browse to find and select your CSV or Excel file. Select Open and then click Next.
Then, you will need to map your information. This involves matching the fields with the headers on the spreadsheet. Once everything is matched, click Next and then Start Import.
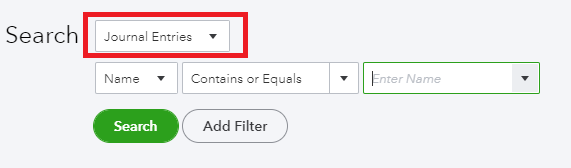
When you are done, you can use the Search function to search for the transactions. Click on the magnifying glass icon in the Header to pop up a search window. At the bottom of the search window, select Advanced Search. On the advanced search, you can limit your results to journal entries by selecting Journal Entries from the first dropdown menu.
You should see your imported journal entries here if everything imported correctly.
Conclusion
In this article, we learned all about journal entries. You learned what they are used for and how to add, reverse, and delete them. You also saw how to run reports on them and import them from files.