One of the most enjoyable parts of running a business should be when money starts coming in. In order to keep your business running, you will need a stead inflow of money. However, customers don't always pay you immediately upon receiving a product or service. So, you need a way to inform customers that they owe you for products or services that they received but have still not paid for.
We can use invoices to keep customers informed of the amount that they owe you. In this article we will look at how to QuickBooks Online lets us create invoices. We will start by looking at what is in the Sales section QuickBooks first, and then get into the nuts and bolts of invoicing.
Sales
You can find Invoicing in the Sales tab of the left-side Navigation Pane. So, before we look into creating invoices, let's take a look at what else we can find in the Sales section.
Overview
If you click on Sales in the Navigation Pane and then on the Overview link, you will be taken to a page which shows a general view of how much income your company has brought in this month at the top. This chart can be customized by changing the time frame from the drop-down arrow next to where it says This Month.
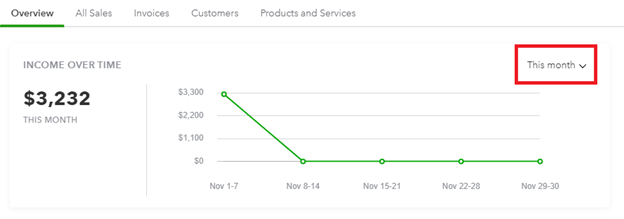
[Figure: Income over time]
Changing the time frame will you allow you to get a broad idea of your sales performance.
Below the income over time chart, you can also see a graph the shows information on your invoices. Your invoices will not always be paid on time or in full, so they can be in multiple states. The colored bar chart helps you get an idea of how well customers are paying their invoices.
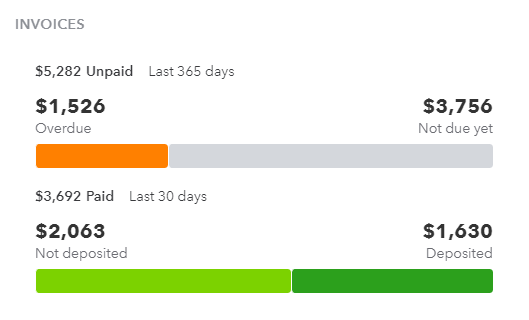
[Figure: Invoices chart in the sales overview]
The first of these graphs shows how many invoices are overdue compared to those that are not due yet. In the second chart, you can see how much money you have received but not deposited compared to how much has already been deposited.
Additionally on this page, you can see various other ways to accept payments, such as with using Apple Pay, QuickBooks GoPayment, or with additional services. Setting up as many additional payment methods can help you get paid quicker. In this lesson, however, we will be focusing on receiving payments through invoices.
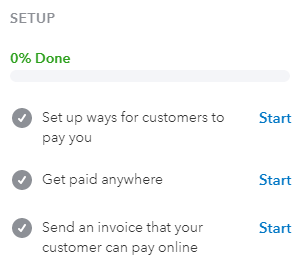
[Figure: Setting up additional payment methods]
All Sales
The next tab over from Overview is called All Sales. At the top you can see a graphic that shows dollar amounts for estimates, unbilled activity, past-due invoices, open invoices, and paid invoices. Clicking on any of the areas in the graphic will filter the sales transactions in the list below to only show those types of transactions.
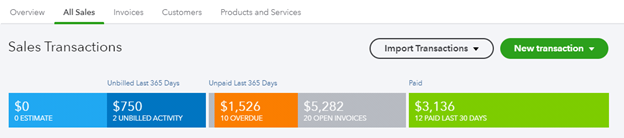
[Figure: All sales transactions graphic]
Below the graphic is the list of all the sales transactions that have occurred. These include transactions like invoices, payments, refunds, credit memos, time charges, estimates, and billable expenses.
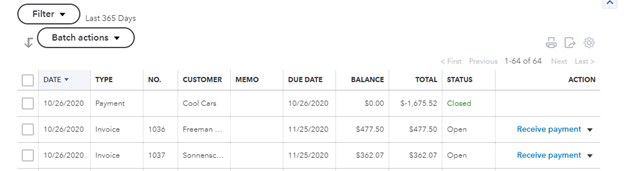
[Figure: Transaction in the All Sales tab]
You can see all sorts of information about these transactions in the list. By default, the transactions are sorted by date, however they can be sorted by almost any other type. Additionally, the settings menu allows for eight additional column types that can be added, allowing you to greatly customize this list.
You can also perform many functions from the Action column at the far-right. The types of actions available depends on the type and status of the transaction. For example, with an open invoice, you can choose actions such as receiving payment, sending a reminder, or voiding it.
Some transactions, such as payments and time charges that have been closed, don't have any actions that can be performed on them.
At the top of the page, many new types of transactions can be created using the drop-down menu. The new types of transactions that can be included are for invoices, payments, estimates, sales receipts, credit memos, delayed charges, and time activities. These transactions can also be created from the New button in the left-side Navigation Pane.
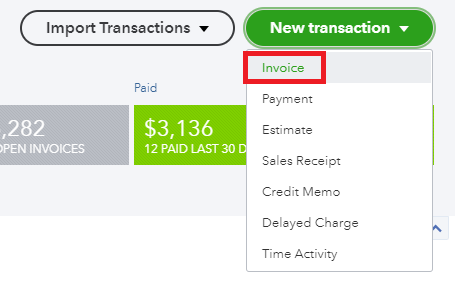
[Figure: Making new transactions]
While you can see all types of transactions from this list, the next list over is focused on just invoices. Let's now take a closer look at the Invoices tab.
Invoices
The Invoices tab is just to the right of the All Sales tab. At the top you can see the same chart as in the Overview tab, only larger. Below that is the list of all the invoices. You have many ways to sort the invoices and you can also perform numerous actions from the Action column. You can also create new invoices from this screen.
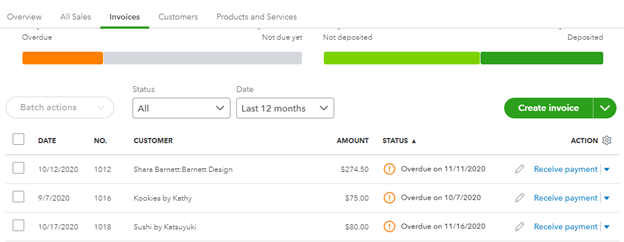
[Figure: The Invoices tab]
You may spend a lot of time in the Invoices section as you monitor the statuses of invoices and send out reminders for overdue ones.
The next two tabs are Customers and then Products and Services. As we've already discussed those in previous lessons, we will refrain from going over them again here.
Now that you've seen what's in the Sales tab, let's take a closer look at creating invoices.
Invoices
Making an invoice is one of the most fundamental aspects of running QuickBooks Online. That's because an invoice is how you request payment for your products and services. Without a proper invoice, your customers may not have a clear idea of how they should pay you.
It's important to note that invoices are different from sales receipts. That's because an invoice accepts payment at a later date, while a sales receipt receives payment immediately. Sales receipts will be looked at more closely in another lesson.
Let's now take a look at how to make an effective invoice in QuickBooks Online.
Making an Invoice
There are several different ways to start making a new invoice. You can go to Sales in the left-side Navigation Pane, then click Invoices, and then click the big New Invoice button there. You can also go to Sales, then Customers, and then find the New Invoice link in the customer's Action column. One more way to start making a new invoice is to click the New button and then click the Invoice link under the Customers heading.
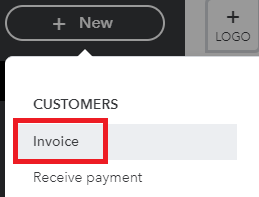
[Figure: Starting a new invoice ]
Once you do one of those methods, you will then see the window pop up for creating a new invoice.
The first field is where you can select the customer that you are invoicing. Once you choose a customer, some other fields like Customer email and Billing Address will be automatically filled in.
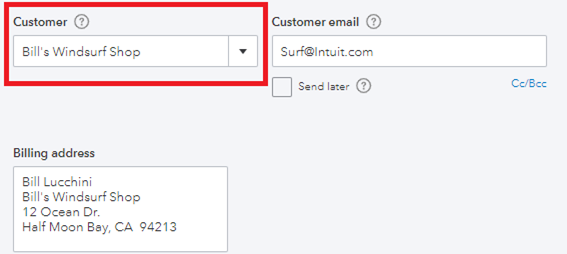
[Figure: Filling in the customer to invoice]
You can choose to add multiple recipients to the email by separating each email with a comma. You can also add Cc and Bcc recipients by clicking on the Cc/Bcc link.
If you don't want the invoice to be sent right away, check the Send Later checkbox. That may be useful if you are creating multiple invoices and want to send them out as batch.
The Billing Address field will be automatically filled out based on your saved information about the customer. If you edit the billing address here, you will be prompted to save it permanently after saving the invoice.
The next field is for Terms. Select a number of days that the customer has to pay the invoice, such as Net 30. You can add a new term by clicking Add New in the drop-down menu. You can also adjust terms settings in the Terms list by clicking the gear icon, then All Lists, then Terms.
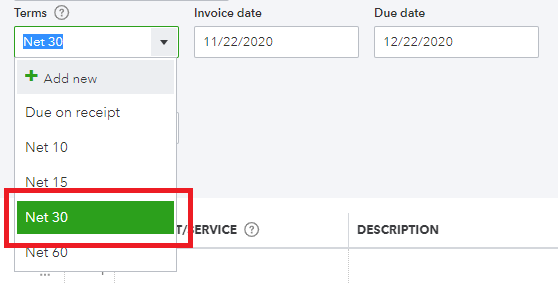
[Figure: Setting the terms]
Adjusting the terms date will automatically change the Due Date field to reflect the number of days.
You can now start filling out the list for the products and services that are being included in the invoice. The list has six relevant fields: Product/Service, Description, Quantity, Rate, Amount, and Tax.
On the first line in the Product/Service column, choose a product or service from the drop-down list that is being included in this invoice. After finding the appropriate product or service, the rest of the row will be filled out automatically based on the stored information for that item.

[Figure: Adding a product or service to the invoice]
You can manually change the other columns even though they were already filled out. You will need to determine if the item is taxable or not and select the tax checkbox if it is.
If you have any more items to add, you can click in the next row. Click the Add Lines button to add as many rows as you need. You can also reorder the rows by dragging the icon in the left-most column and delete a single row by clicking the trash can icon in the right-most column.
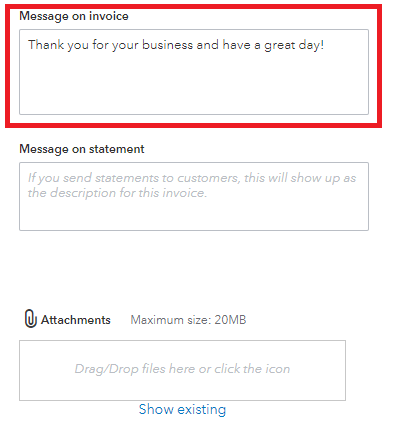
Once you are done adding items to the invoice, you can work on creating messages on the invoice and statement. Statements will be covered in a later lesson, and you may or may not use them, depending on how often you want to engage with customers.
You can also include attachments to the invoice that are no bigger than 20MB.
[Figure: Adding messages and attachments ]
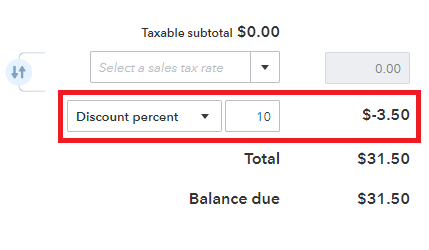
Now you can finalize the invoice by setting up the tax rate and deciding if the customer gets a discount. If you have a taxable item, then you can set the tax percent by choosing your region in the drop-down menu.
A discount can be either a percentage discount or a value discount. Clicking the up/down arrows button will change whether the discount is applied before or after tax.
[Figure: Applying a discount]
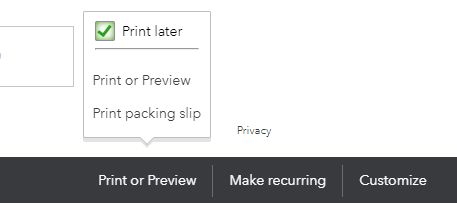
At the very bottom of the screen, you have a few more options for your invoice. You can choose to print or preview it, make it recurring, or customize it.
Print or Preview allows you to see what the invoice will look like on paper as well as make ready to send to a printer.
[Figure: Print or Preview Options]
Clicking on Print or Preview loads a PDF version of the invoice into your browser, from which you can directly print or download.
Choosing Pring Packing Slip generates a packing slip for your order.
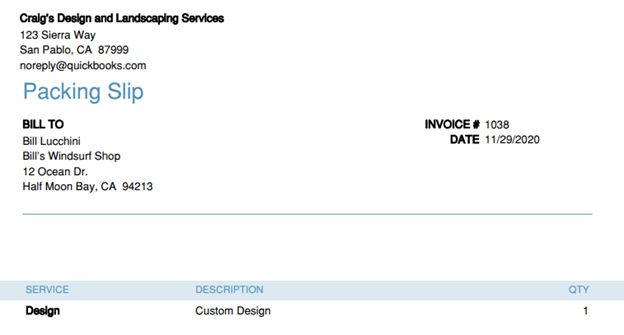
[Figure: A packing slip]
A packing slip is different from the invoice in that is intended to be shipped with the product. On the other hand, an invoice can be sent anytime.
Make Recurring lets you set up a schedule so that this invoice is automatically sent out whenever you want it to. This option will include many additional fields to fill out in your invoice.
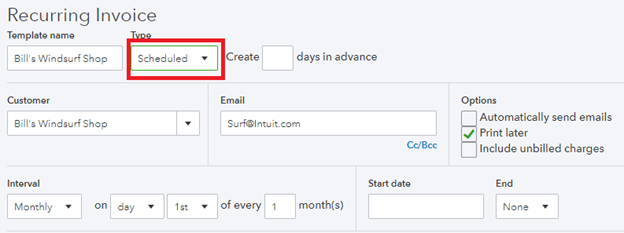
[Function: Making an invoice recurring]
With a recurring invoice, you can choose to make it scheduled, as a reminder, or unscheduled. When the invoice is scheduled or set as a reminder, you can specify how many days in advance to create it as well as the interval, start date, and end date.
Customize lets you add custom fields into your invoice. Based on your business, there may be more things you want to include.
Lastly, you have buttons at the bottom for Save, Save and Send, Save and New, Save and Close, and Save and Share Link.
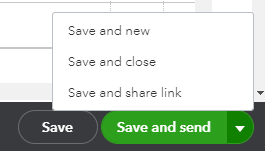
[Figure: Save options]
Clicking the Save button will save the invoice without closing or doing any additional actions. The Save and Send option will save the invoice and email it out. The Save and New option will save the invoice and open up a blank new invoice to work on. The Save and Close will save the invoice and then take you back to your previous page. The Save and Share Link option will save the invoice and then generate a link to it rather than sending it directly to the customer's inbox.
Viewing the Invoice
Once you have saved your invoice, it will show up in the invoices list. You can get to the list by clicking Sales in the left-side Navigation Pane and then Invoices. To see your new invoice, order the list by the Date column, rather than Status, which it may be on by default.

[Figure: The new invoice in the invoices list ]
The invoices list lets you see all sorts of details about your invoice. You can also click on the invoice row directly to see more details pop up. The invoice list has six columns: Date, Invoice Number, Customer, Amount, Status, and Action.
Sorting by Date or Invoice Number will get you the latest invoices created at the top of the list. Sorting by Customer can give you an overview of how frequently a customer is invoiced. Sorting by amount can let you quickly see which customers have made the biggest orders.
The Status column is important in planning your finances. Invoices statuses can be overdue, due at a later date, paid, or deposited.
Overdue invoices are marked with an orange exclamation mark. Invoices that are due at a later date have the later date marked. Paid invoices and deposited invoices both have green check marks next to them.
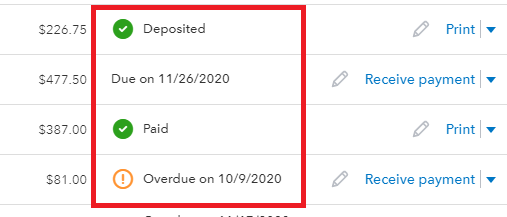
[Figure: Different types of invoice statuses]
In the Action column, all sorts of actions can be taken on the invoice. Clicking the pencil icon will allow you to edit the invoice. If the invoice is overdue or still due, you can click to receive payment when it is paid.
By clicking the triangle for the drop-down menu, you can see numerous other actions you can take, such as: View/Edit, Duplicate, Send, Send Reminder, Share Invoice Link, Print, Print Packaging Slip, Void, and Delete. You may want to send reminders on overdue invoices.
Now that you've seen how invoicing works within QuickBooks Online, it's worth the effort to see that there are other methods of making invoices which can be less time-intensive. In the next section, we'll quickly introduce two different ways to do it by taking advantage of add-ons called Invoice with Google Calendar and Invoicing for Gmail. Add-ons are available from the Intuit App Center.
Invoice with Google Calendar
Invoice with Google Calendar is a free add-on that you can grab from the Intuit App Center. The only costs incurred would be if your Google account pays for G Suite from Google Cloud.
With this app, you can integrate your QuickBooks Online account with your Google Calendar. Once connected, QuickBooks Online will let you fill out invoices from information already in your Google Calendar. You will see a Google Calendar icon on invoices which starts the process.
Clicking the calendar icon will bring in a side panel where you can set parameters to search for the exact job that you are invoicing for. When you find the correct event or events, you can automatically add them to the invoice. This will fill out information such as the title, description, hours worked, and date. The result saves a lot of duplicate data entry and the possibility of error.
QuickBooks Invoicing for Gmail
Another Google-created product to improve the invoicing process is QuickBooks Invoicing for Gmail. This add-on doesn't have a monthly fee, but it does charge a transaction fee each time.
This app works from inside the Gmail client. Once installed, you can select the QuickBooks log on the right side of the screen. After logging in to QuickBooks Online from there, you will be ready to create, send, and track invoices all from within Gmail. You can also see all your customers, products, and services from within Gmail. it also comes with easy ways for customers to pay online, such as through credit cards or QuickBooks Payments.
Conclusion
In this article, you have learned all about setting up invoices. You first looked around at the various options available in the Sales tab. You also learned about the importance of making invoices.
You then set up your own invoice, including recurring invoices such as scheduled, reminder, and non-scheduled. You've viewed your invoices in lists and learned to navigate around the invoices list and so you can see the status of each invoice.
Lastly, you saw how there are add-ons developed to make invoicing easier and to integrate with other products you may use. We specifically looked at Invoice with Google Calendar app and the QuickBooks Invoicing for Gmail app.