Two things that businesses need to manage is the tracking of time and mileage. QuickBooks Online has its own native way of tracking both. It offers some basic functionality for time-tracking, while also offering some more advanced features for mileage that involve the use of their mobile app.
In this article, we'll start off by looking at tracking time first, and the get into tracking miles. We'll also take a look at an app that is significantly more powerful at tracking time than QuickBooks Online is on its own.
Tracking Time
QuickBooks Online offers basic time tracking functionality to keep track of the number of hours that employees work. Before starting to track time in QuickBooks Online, you will need to make sure that you have turned on time tracking in the options.
To turn on time tracking, go to the Settings menu from the gear icon and then go to Account and Settings. In the Advanced tab, go to the Time Tracking section and make sure that both Add Service field to timesheets and Make Single-Time Activity Billable to Customer are enabled.
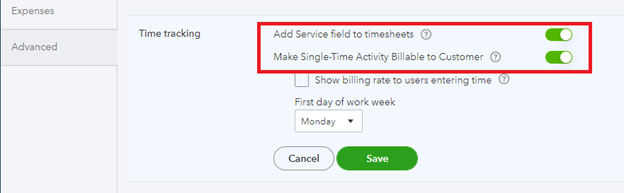
[Figure: Enabling time tracking from the options]
Once enabled, you can start tracking time. Time tracking has two options: single time activities and weekly timesheets. Both of them are accessed via the New button in the left-side Navigation Pane.
Single Time Activity
A single time activity is typically used if you have a vendor doing a job for your company. To start recording a single time activity, click the New button in the left-side Navigation Pane. Then, click the Single Time Activity under the Employees heading.
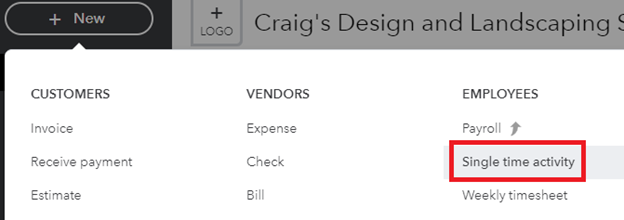
[Figure: Finding the Single Time Activity link]
That will bring up the page where you can enter in all the information for the activity. At the top of the page, you begin by entering the date and then the name of the employee or vendor. The name can come from a drop-down list that shows available employees or vendors.
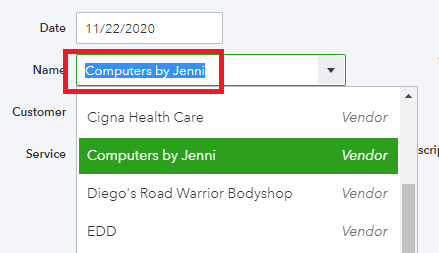
[Figure: Entering the name of the vendor]
If the employee or vendor was doing this work for a particular customer, then enter that into the Customer field.
Next, choose the service that they were performing.
If what they were doing is billable by hours, then check the checkbox for Billable and enter the rate.
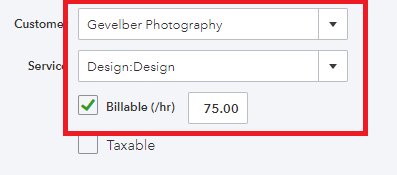
[Figure: The customer, service and rate]
You can then either enter the start and stop times, or just enter the amount of work done. If you enter the start and stop times, you are also given the option to enter how much break time you took. The total time spent will then show up in a Summary field that appears below the Description box.
In the Description box, write about the work that was done in the time period. This will show up in an invoice.
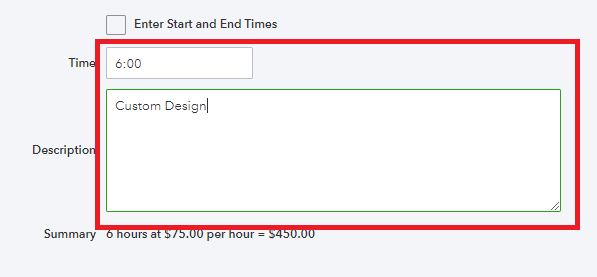
[Figure:
When done, you can click Save, Save and New, and Save and Close. Let's click Save and Close and check out another way to keep track of time worked.
Weekly Timesheet
Another way to record time is to use a weekly timesheet. This lets you keep track of the work done by an employee or vendor over the course of a whole week and is presented in a weekly grid format.
We can get to weekly timesheets in the same way that we get to single time activities. Click the New button in the Navigation Pane and then Weekly Timesheet under the Employees category.
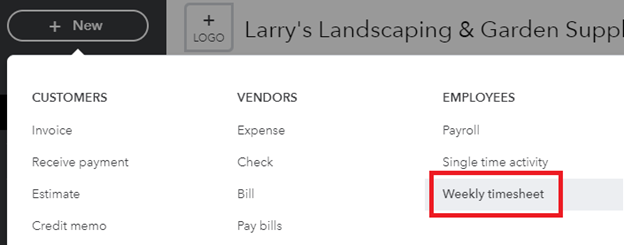
[Figure: Navigating to Weekly Timesheets]
You can start filling out the Weekly Timesheet by entering the employee or venders name and then choosing the dates of the work week.
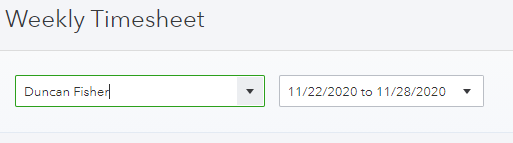
[Figure: Employee and dates for Weekly Timesheet]
Next there is a large table for filling out the details of the employee or vendor's work. In each row, you must choose if the work was done for a customer, and then select that customer from the drop-down menu in order for it to be billable to them.
You'll also select the service that was done, its class, and provide a description. You may also select whether the hours were done as part of regular pay, overtime pay, vacation pay, or sick pay.
If you choose for the work to be billable, then you will need to fill out the rate per hour.
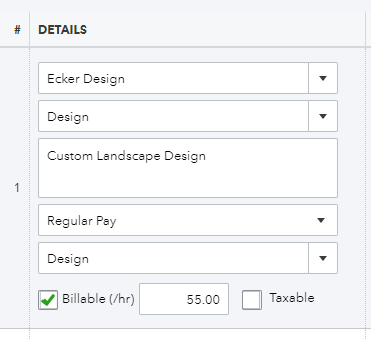
[Figure: Filling out the details for a work week]
Next, for each day that work was done, you will enter the billable hours for Sunday through Saturday in each cell. The total will be calculated for you at the end of the row.
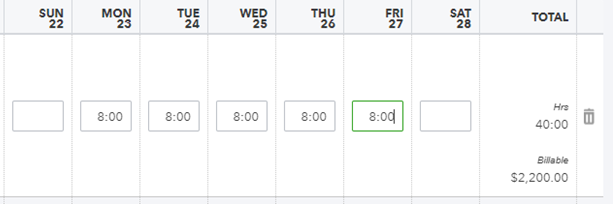
[Figure: Filling in the hours worked]
You can change the days viewable by clicking the settings icon that looks like a gear directly above the table. That's useful for removing Saturday and Sunday if you don't work those days.
You can also remove a row by clicking the trash can icon in the far-right column.
Another useful button is at the bottom that say Copy Last Timesheet. This can save time if a worker has the same schedule each week.
When you are finished, you can click either the Save and New or Save and Close buttons at the bottom. The Save and New button will open up a new Weekly Timesheet window, while the Save and Close will return you to your previous screen.
Now that you've made some timesheets, let's see where you can view them.
Viewing Timesheets
The time that you enter into the timesheets does not affect any of the accounts in QuickBooks Online. You can, however, track the time in reports.
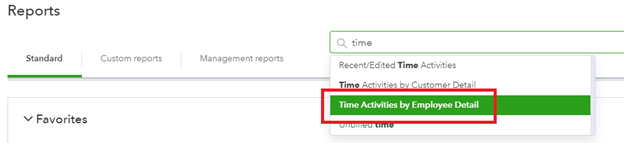
To view this, start by clicking Reports in the left-side Navigation Pane. Once you get to the reports section, enter the word "time" into the search bar to see reports that have "time" in the title.
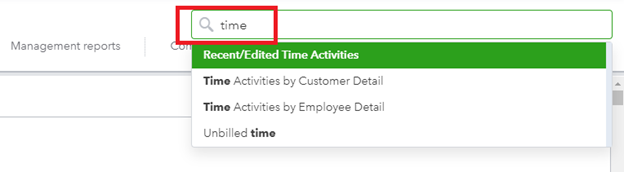
[Figure: Finding reports related to time]
Clicking on the first time-related report shows us recently entered or edited time activities. If we click there, we will see the results of the Weekly Timesheet that we just submitted.
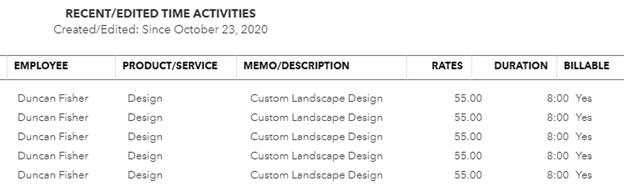
[Figure: Recent/Edited Time Activities]
The Time Activities by Customer Detail and Time Activities by Employee Detail will show the activities based on customer and employees, respectively. In the fourth report, Unbilled Time, we can see what hours have been reported but are unbilled.
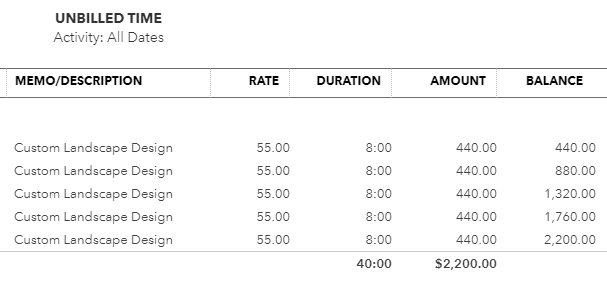
[Figure: Unbilled time report]
Now that we've seen how to add both types of timesheets, let's see how we can add billable hours to an invoice. We'll do this by going to the Customers list from the Sales menu item in the left-side Navigation Pane. Once at the list of customers, click on a customer to bring up their details page.
In the Transactions List for the selected company, you can see Time Charges in the Type column if there are any billable expenses for it.

[Figure: A Time Charge for a customer]
To turn this Time Charge into an invoice, just click the Create Invoice link in the Action column. That will automatically fill out the invoice with all the relevant information from the Time Charge such as the product/service, description, quantity, and rate.
Rather than looking through the customer's Transaction List, you can also add billable time entries from a standard invoice. If the customer has billable time entries, then QuickBooks Online automatically recognizes that and a side pane pops up where they can be added.
To try that, go to the New button in the left-side Navigation Pane and select Invoice. Choose the customer that you picked before that has a Time Charge in their Transaction List. You will see the side pane appear automatically.
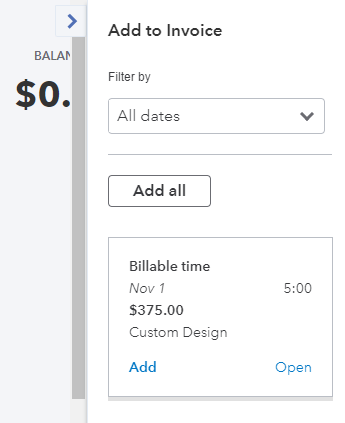
[Figure: Invoice side pane for billable time]
If there are multiple Time Charges, then you can take advantage of the Filter by drop-down to find what you are looking for. Clicking the Add button in each billable entry will add it to the invoice. If there are multiple Time Charges, then click the Add All button to add all of them. Each Time Charge will be added on its own line in the invoice.
Employees Using Timesheets
Entering timesheets can be a time-consuming process. If you are collecting timesheets from employees and then entering them into QuickBooks Online, then you are doing redundant work and could possibly introduce errors. There is a way that you can allow employees to directly enter their own timesheet information.
You will need to have a subscription level of at least QuickBooks Online Plus in order to allow employees to track their own time. To set up time-tracking users that can log in only to record timesheets, but nothing else, then click on the Settings gear icon and choose Manage Users from the Your Company column.
From the Manage Users screen, click the Add User button and a new window will pop up where you can add a new user. At the bottom of the page, you can see users that don't count towards your limit. From there, choose a Time tracking only user and then click the Next button.
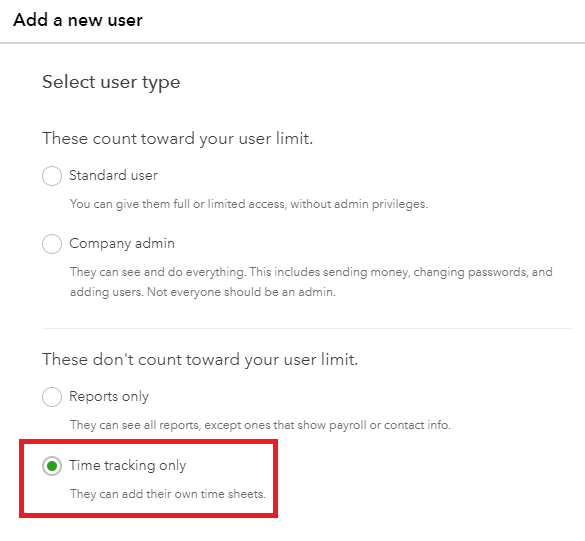
[Figure: Adding a time-tracking user]
In the following screen, you can add your employee if they have previously been added into your system. If not, you can add the employee by clicking the Add New option from the drop-down menu.
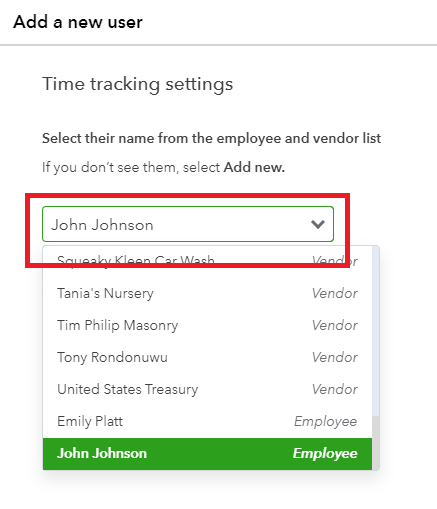
[Figure: Selecting the employee to be a time-tracking only user]
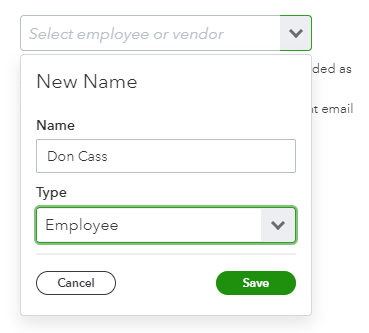
Adding a new user is a simple process of entering their name and role as either a vendor or employee.
[Figure: Adding a new employee]
After selecting the user, you will be asked to enter their email address so that they will receive an invitation to become a time-tracking only user. The user can then log in if they have a username and password already. Otherwise, they will have to create a new username and password.
This account can only add either Singel Activity Timesheets or Weekly Timesheets upon logging in. The created timesheets will then be available to be included in invoices to customers.
The timesheets that employees create can also be viewed in the Reports section. Go to Reports in the left-side Navigation Pane. Enter 'time' into the search bar to see relevant reports and choose Time Activities by Employee Detail from the drop-down list.
[Figure: Viewing timesheets filled out by time-tracking users]
The resulting report can be customized to show the employees and/or time frames required.
While adding this functionality to QuickBooks Online can provide a solution to billing customers for time spent on their projects, it's not a full-scale solution for keeping track of employee timesheets. Instead, Intuit has a separate product called TSheets that can be integrated with QuickBooks Online. Let's briefly go over Intuit's TSheets solution.
TSheets
TSheets is a full-featured time-tracking software package that can be integrated as an add-on to QuickBooks Online. It allows employees to track their time on any device and have it integrated instantly into QuickBooks Online. You can get it from https://TSheets.com. It currently has a 14-day free trial so you can test it out.
With TSheets, employees can manage their schedules by clocking in and clocking out, work from anywhere via the mobile app, work on projects in teams, and get detailed reports.
Now that we've learned all about timesheets, we'll take a look at how employees can keep track of their mileage.
Mileage
Tracking mileage can be a great asset when it comes to filing taxes, as many small businesses can get sizable deductions for their miles.
When tracking mileage, you can choose to do it manually or via QuickBooks Online's mobile app. We'll start here by showing how it's done manually, and then show how it's done with the app directly after.
Manually Tracking Miles
You'll need to start by clicking on the Mileage menu item in the left-side Navigation Pane.
Now you will be in the Mileage dashboard. You will be able to see how many miles you have traveled per month on the first screen.
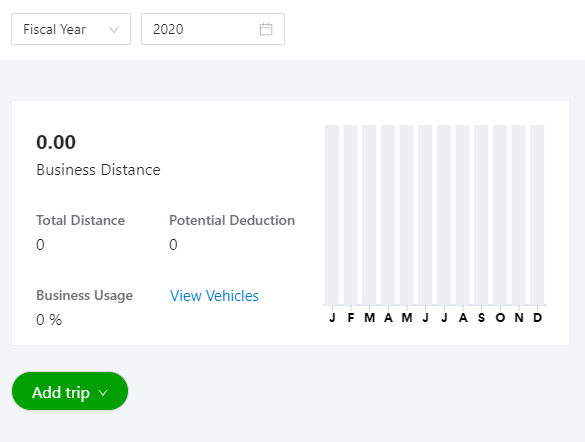
[Figure: Mileage dashboard]
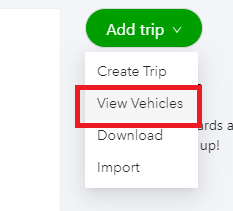
In order to get started, you will need to add a vehicle. You can add a vehicle by going to the vehicles screen. Navigate to the vehicles screen by clicking on the drop-down arrow in the Add Trip button and clicking on View Vehicles.
[Figure: Getting to the vehicles menu]
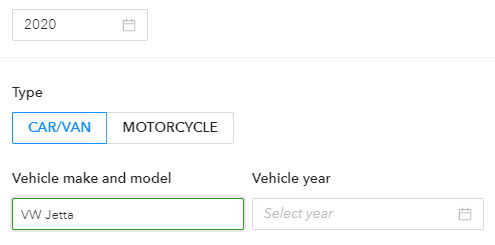
In the View Vehicles screen, there is an Add Vehicle button. When you click that, a new window will appear to add the vehicle.
At the top of the screen, you will select the Type, Vehicle Make and Model, and Vehicle Year. Enter these as per your vehicle.
[Figure: The Type, Vehicle Make and Model, and Vehicle Year for a new vehicle]
You will then be able to enter many more details about the vehicle, including ownership status, cost, purchase date, date put in service, odometer at the start and end of year, and total distance driven over the year. Lastly, you will select if it is your primary vehicle or not.
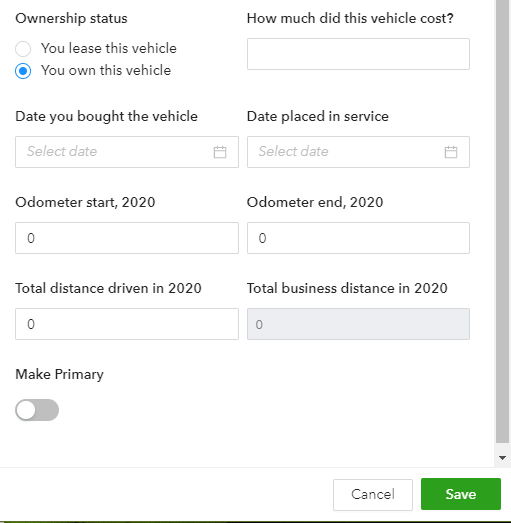
[Figure: More information to add when adding a vehicle]
When you finish, click the Save button at the bottom of the screen. You will now see your vehicle show up in the View Vehicles screen.
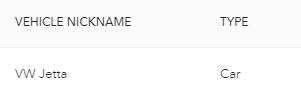
[Figure: A newly added vehicle]
From the View Vehicles screen, you can edit or delete your vehicle. Now that you have your vehicle set up, let's add a trip.
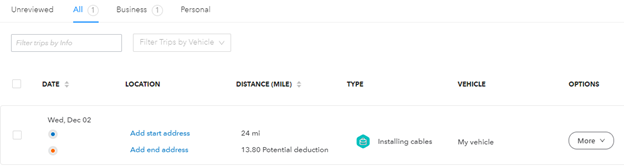
From the Mileage dashboard, click the Add Trip button. A panel will pop up where you can start entering the details of your trip.
At the top, enter the Trip Date and the Distance. You can enter the distance one-way, because at the bottom of the form you have the option to select a two-way trip.
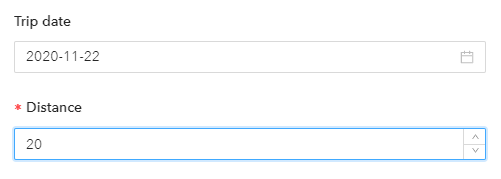
[Figure: Entering trip information]
Next, you will need to enter the Starting Point and Ending Point for your trip. You can enter these as addresses or just descriptions.
You will then need to specify if your trip was for business reasons or personal.
Include a short description for the purpose of your trip and specify the vehicle that you took.
Lastly, check if it was round-trip or not.
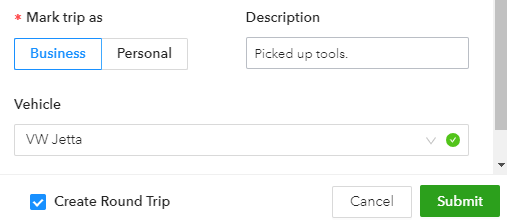
[Figure: Marking the trip as business or personal, making a description, choosing the vehicle, and selecting if it's a round-trip]
When finished, click the Submit button. You will now see that your trip has been added to QuickBooks Online and that it shows up in the graph on the dashboard.
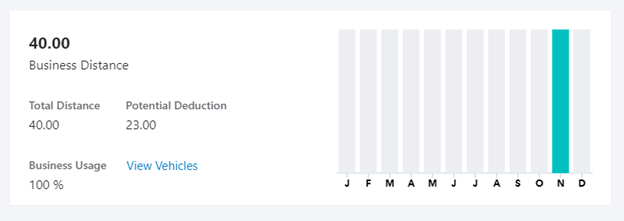
[Figure: Trip data shown in the Mileage dashboard]
You can see reports on trips taken in the table below the graph. You can toggle between all trips, just business trips, and personal trips from the top of the table, as well as use the search bar to filter results.
[Figure: Viewing reports on mileage]
Now that you've seen how to enter the data manually, let's discuss how you can use QuickBooks Online's app to have miles recorded automatically.
Mileage via the App
The mobile app can make mileage tracking simple.
The first thing you'll need to do is make sure that the employee who needs to track miles has the right permissions. Only a Master Admin in QuickBooks Online can track miles.
Check the user's permissions by clicking on the Settings icon that looks like a gear in the header and going to Manage Users under the Your Company category.
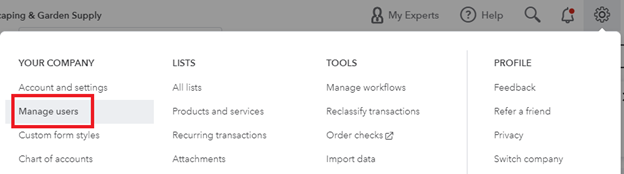
[Figure: Navigating to the Manage Users screen]
From the Manage Users screen, find the user to edit and click Edit in the Action column. Change the user's role so that they are a Master Admin.
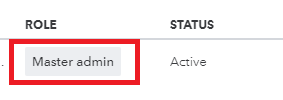
[Figure: Checking for the Master Admin role]
Once you have confirmed that the user has the correct permissions, you can proceed to set up the app.
On the app, you first need to make sure that you have location services enabled on your mobile device. That allows for accurate GPS information to be recorded by your device.
Next, in the QuickBooks mobile app, select the Mileage menu. From there, you need to switch Auto-tracking to ON.
Now, when you have reached your destination, go back to the Mileage menu and categorize your trip. You should swipe left if it's a business trip, and swipe right if it's a personal trip.
Once you're done reviewing your trip, tap the Save button and it will synchronize with QuickBooks Online.
Conclusion
In this article, we've looked at tracking both time and mileage. You've seen that there are two ways to track time: by using individual sheets and weekly sheets. We saw that employees can log in to QuickBooks Online as time-tracking only users and that TSheets can be used as another time-tracking option.
You also learned how to track mileage and add vehicles. You saw that mileage can be tracked either manually or through the QuickBooks Online's app.