
Connecting to Another Workbook
You can manually type references to another workbook, but newer versions of Excel offer a much more convenient way to query and consolidate data from external resources including other workbooks. This feature is called a power query. It's also referred to as the "Get and Transform" feature in most of Microsoft's documentation.
The "Data" tab contains every feature that incorporates importing, querying and working with external data. This is the tab that also contains the power query feature to connect to another workbook. This external workbook can be one that is located on your local drive, on a network drive, or any location where you have permissions to access it.
To test these features, you also need a second workbook stored on your computer. The file must be saved with data that can be used to query from another workbook. For these examples, a secondary "Expenses" workbook was created that contained values for last year's bills. Using external data queries, you could track your yearly expenses to see if they are going up or down each year.
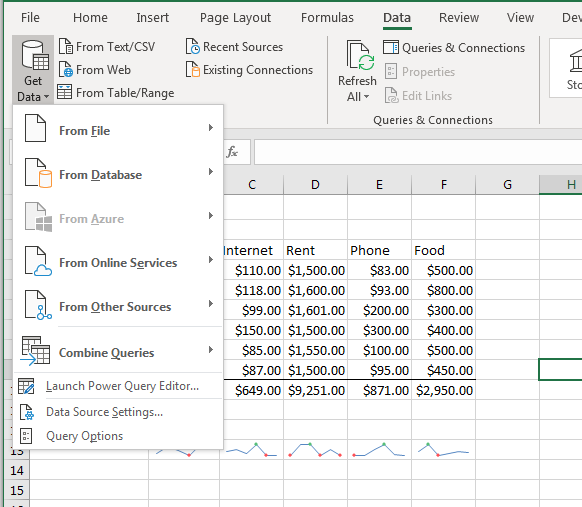
Click the "Data" tab and look in the "Get & Transform" section of the main menu. You'll see that this menu section has several buttons that indicate the external files and locations that can be used to retrieve data. These are just a few locations, but additional ones can be found by clicking the "Get Data" button.
The "Get Data" button displays additional external resources with submenus that specify the type of location where data will be imported.
(Get Data dropdown options)
You can retrieve data from online sources, databases and even use Excel's power query editor to create your own queries that will directly pull information from an external workbook to display in your local spreadsheet.
Click the "From File" and you'll see the file types compatible with Excel.
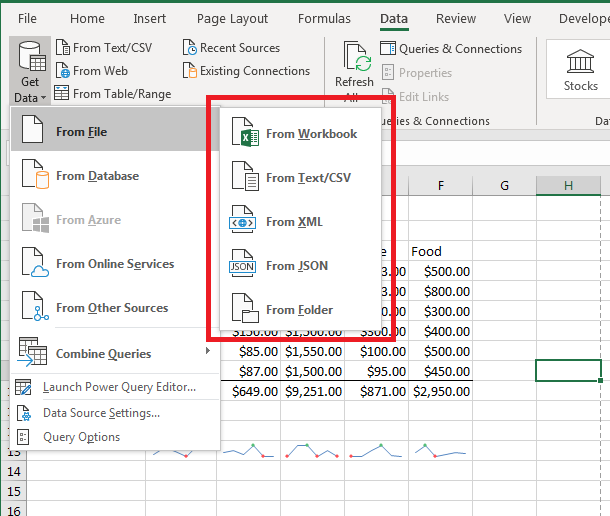
(Compatible file types)
The first option is "From Workbook." This option lets you specify an external Excel workbook that can be used to query data, and then you can use each sheet stored in the file to consolidate and use in your current worksheet. Click this option to open a window where you select the external workbook that you want to use. This window is the standard open file Windows dialog, but the window is labeled "Import Data."
After you locate the file, double-click it to load it in your Excel 2019 workspace. A window opens where you choose the worksheet and data that you want to use.
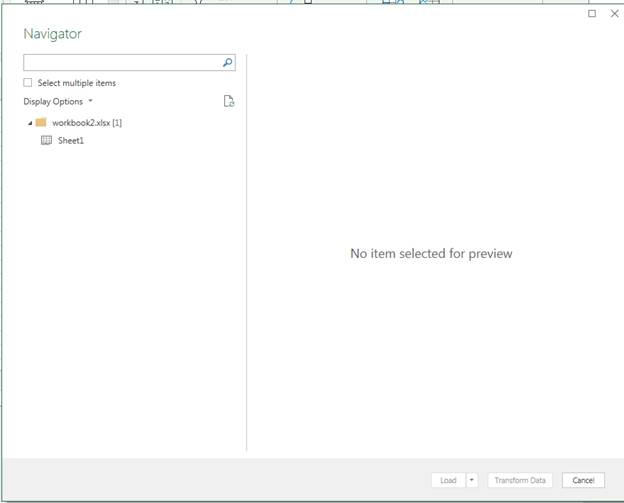
(Import data from external workbook)
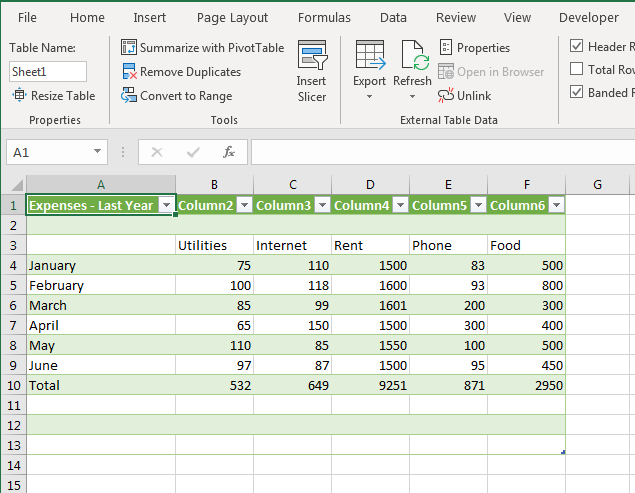
The example workbook only has one sheet, so you can only see one worksheet named "Sheet1" in the list of workbook options. When a new workbook is created, the default initial worksheet created is always named "Sheet1" by default. You can rename worksheets, which is useful when you have multiple sheets with different data, but most small workbooks only contain one worksheet with the default Sheet1 name.
Click the worksheet that you want to use. The preview pane on the right will display the data stored in the worksheet. Click the arrow next to the "Load" button to see a dropdown of options. Clicking "Load" will load data to the active worksheet, but this will mix your external data with the data stored in the local worksheet. It's best to load data to a different location, which can be done by clicking the "Load To" option.
After clicking "Load To" in the submenu, a configuration window opens asking where you want to load the data.
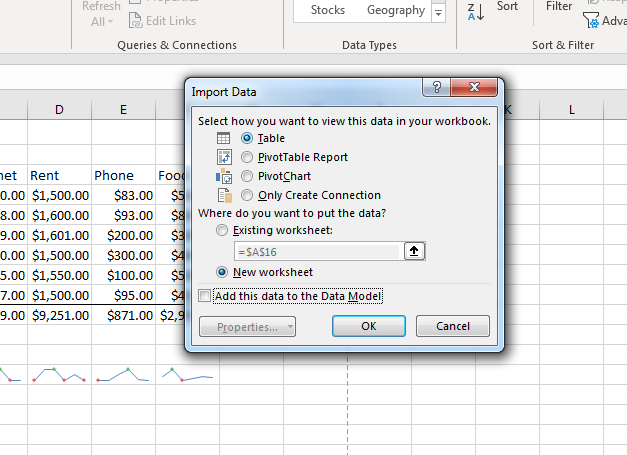
(Load To import data options)
When you load data, you can immediately load it into a pivot table or a pivot chart, but this example loads data into a separate spreadsheet. Notice that the default option is "New worksheet," but you can also import data to a specified worksheet in specified cells that you configure in the "Import Data" window. Since we want to load data into a new worksheet, click "OK" and let Excel 2019 create a new worksheet with the loaded data.
When you use Excel's "Get and Transform" feature, the data you import is automatically formatted. Excel attempts to automatically understand your data and what should be done with the formatting options, including empty cells.
(Formatted data import)
Since the import includes headers, any columns with data will have formatting even if the original worksheet did not have any information in these cells. This can be seen in the example worksheet import where columns next to the main header are labeled with "Column2," "Column3," etc. Using the import feature might take some clean up and manual formatting, but the ease of use with this feature makes it worth importing data using Excel's tools rather than manually copy and pasting data from one workbook to another.
After the data is imported to a new worksheet, you can now use the secondary worksheet data to build reports in the original worksheet. You can either copy the data to the original, current worksheet or use Excels functions to reference the secondary sheet. For large workbooks with several worksheets, consolidating data into one long worksheet is not feasible. Your workbook is probably better kept separate with worksheets that keep data in compartments so that you can distinguish the current data with the imported data. You can continue to create new worksheets to use with any other data that you import into the current workbook, and then use Excel's internal functions to reference data across the entire workbook.
Linking to Worksheets
After you've imported data to another worksheet, you can now reference the data located in the other sheet. When Excel creates a new worksheet, it automatically gives the sheet its own name. The first sheet is named Sheet1. When you create a new sheet during the import process, the next worksheet is given the name "Sheetx" where "x" is the next number in the series. Excel just increments the number from the previous sheet and appends it to the name "Sheet."
With the new example spreadsheet, you'll notice that the first sheet named Sheet1 is let intact, and now there is a second sheet named Sheet2. This worksheet name is important when you work with workbooks that have several sheets stored in them, and you want to reference data in the other sheets.
When referencing data in another sheet, you use the following syntax:
<sheet name>!<cell reference>
- Sheet name: the name shown in the worksheet tab at the bottom of your workbook.
- Cell reference: the cell reference name in the sheet that contains your data.
Notice that the separator between the sheet name and the cell reference is an exclamation point. This is an important character when referencing sheets and their stored data.
In addition to referencing external sheets, you can also reference external workbooks. Referencing external workbooks does not import the data, but it's useful when you do not want to import data to the local workbook. However, this type of referencing can cause errors if you ever move the workbook or move the referencing workbook to a new directory.
The following is the syntax to reference an external workbook, sheet and cell:
[myworkbook.xls]Sheet1!cell
The name in brackets is the workbook file name. The sheet name is after the brackets (no spaces), an exclamation point, and then a cell name reference. When you type any formula or function into an Excel worksheet, the workbook and worksheet name are implied. You don't have to specify them, but Excel assumes that when you type just "A4" (for instance) in a cell, you mean to reference the current workbook name and the current worksheet name. This assumption lets you eliminate the need to manually type the workbook name and worksheet name each time you type a formula or calculation into your Excel spreadsheet.
Now you can reference data in the second sheet. Suppose that you want to get a total from the previous year's expenses. You can either import the subtotals from the previous sheet, or you can perform a calculation from using a range of cell data in Sheet2. In either scenario, Excel 2019 will update data and dynamically change values for every change that you make in the selected cells that make up the calculation.
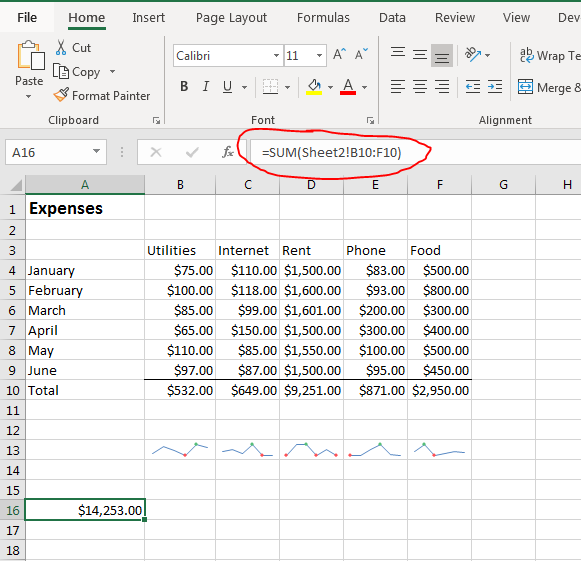
(Formula calculation with an external sheet reference)
In this example, the values in the Sheet2 cells are summed up and displayed in the first sheet. Notice that the SUM function still works the same. It requires a range of cells as its only parameter. The difference between this formula and a standard calculation is that this SUM function calculation has the sheet referenced in the parameter. With a sheet referenced, Excel knows that you intend to sum data in another worksheet rather than use cells included in the current worksheet.
When you use external worksheets, it's tedious to manually type the sheet name and the sheet cell references. You'll have to switch back-and-forth between your current spreadsheet and the one that you want to reference to identify the cells that you want to work with. You can avoid this tedious manual typing by using the mouse.
Type the equal sign in a cell, and then type "SUM(" in the active cell. When you type the opening parenthesis, Excel prompts you for the function's parameter. You can then use your mouse to select a range of cells. Instead of choosing a range of cells in the active worksheet, you can instead click the sheet tab at the bottom of your workbook and then select the cell range. When you do this, the function is automatically filled with the sheet name and the cell range. You no longer need to remember the cells or flip back-and-forth between sheets to identify the cells that you need. Type the closing parenthesis and press "Enter." Go back to your active sheet and you'll see the final product.
Importing data and working with data in external sheets is useful when you need to consolidate your data and don't want to reference multiple external spreadsheets. It also eliminates errors when you move a spreadsheet that's reference in your main workbook. Use the "Get and Transform" Excel option when you have important data in an external source such as a workbook and want to use it in your calculations.