Taking iPhone Photography: Long Exposures & Time Lapse
A traditional photograph represents a single moment in time. But what if, instead, you could show a passage of time? What if you could show movement in a still image? What if you could capture several moments in one?
Long exposure and time lapse photography are two methods for using photography to show movement or the passage of time. The terms are also widely misunderstood and new photographers often confuse the two. So what's the difference? Both long exposure and time lapse photography cover a longer time span than the traditional millisecond image. But while a long exposure creates an image, time lapse photography creates a video of several still images together.
Everything that moves while the camera's shutter is open will result in blur. In most instances, fast shutter speeds are used to prevent blur and create sharp images. But long exposure turns that concept around-instead of using shutter speed to prevent blur, long exposure photography uses slow shutter speeds to creatively use blur.
Long exposure photography is a popular method for photographing waterfalls. With a fast shutter speed, the water will be crisp and frozen in place. But, with a longer shutter speed, that water will blur, turning into a smooth white stream.
Waterfalls may be one of the most popular subjects to shoot with long exposures, but far from the only one. Traffic turns to streaks of light in long exposures. Crowds of people turn into ghost-like figures. The ocean waves become smooth and reflective. A flashlight or light drawing device even allows you to draw into the air and create unique images. The best subjects for long exposure photography have consistent movement that's often predictable-from there, the only limit is imagination.
Long exposure photography requires a bit more gear and some patience when using the iPhone. A tripod is essential to long exposure photography, no matter what camera you are using. With such slow shutter speeds, you won't be able to hold the camera steady enough not to introduce blur to the entire image.
The iPhone is also a bit limited when it comes to shooting long exposures. Remember, the iPhone has an electronic shutter-a surge of electricity triggers the image and not an actual physical shutter. Because of that, even with manual mode apps, the iPhone's slowest shutter speed is a half a second. While that speed will introduce some blur, to get traffic streaks and creamy waterfall blur, you need exposures that are several seconds, or even minutes, long.
So is long exposure photography impossible on the iPhone? Not exactly. Using layering techniques allows the iPhone to produce long exposure effects despite the half second limit on the actual shutter. Using a tripod, the motion between frames will blur when several images are merged together.
The best way to create long exposures with the iPhone is to use an app that automatically merges several half second exposures into one image. There are a number of different options out there, but the Slow Shutter Cam is one of the highest rated and produces some of the best results.
Ready to give it a try? Good-here's the step-by-step instructions for taking a long exposure with the Slow Shutter Cam app.
1. Choose your composition and set up a tripod. The compositional "rules" don't change when using the long exposure method. Determine what part of the scene you would like to shoot. Remember, consistent movement typically creates the best long exposures. Once you've decided what to shoot, set your iPhone up on a tripod. Tripods are essential for shooting long exposures or the entire image will blur and not just the moving subject. (Tripods don't have to be extremely expensive.).
2. Choose your shutter release method. Touching the camera to trigger the photo will introduce blur, even with the tripod. To prevent that, choose whether to use the timer or a remote. A timer will trigger the photo seconds after you touch the release, so there isn't any added blur. Using the volume button on the headphones that came with your iPhone will trigger the shutter instantly, but since the button isn't on the camera, you won't introduce any extra shake. For access to both options, touch the settings icon in the lower right corner of the Slow Shutter Cam app. To use a timer, select a time under the self-timer option-three seconds is usually plenty of time to get your hands off the camera. To use the headphones as a remote, leave the self-timer at 0 and turn the option that says "Volume Shutter" on. Click done to return the camera screen.
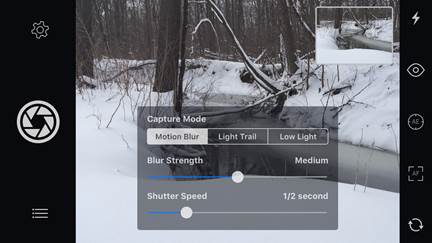
3. Adjust your exposure settings. Just how blurry the movement in the image is depends both on how fast the subject is moving and how slow your shutter speed is. To set your shutter speed, tap the gear icon in the bottom left corner. For most images, use the Motion Blur capture mode at the top. (Use Light Trail for blurring traffic or other light sources and low light for shooting long exposures at night). Adjust the blur strength slider to customize how smooth you'd like the motion to be-start with medium then experiment to find what works best. Drag the bottom slider to choose your exposure speed-speeds longer than � seconds will combine multiple images until the total time in each image is what you've selected. For example, a 30 second exposure will combine 60 half second images. Bulb mode is available by sliding the shutter speed all the way to the right. Bulb mode will continue taking the photo until you press the shutter release button a second time to stop the image.
4. Focus. In Slow Shutter Cam, you can tap the screen to select where to focus, just like in the native camera app. You can also tap the AF button at the top to lock the focus and prevent it from changing. The AE button will lock the exposure so that it doesn't change, even if the lighting changes.
5. Shoot. If you are using the remote, plug in the headphones and press the volume button. If you decided to use the timer instead, press the shutter button in the bottom center of the screen. Remember, you're shooting a long exposure so wait and don't touch the phone until the image is complete-you'll see the "clear, edit, save" options pop up when the image is complete.
6. Evaluate your shot. Your image will pop up on the screen once it's complete-time to see how you did. If you like your shot, tap the save button. If not, press clear to make a few adjustments and reshoot. Is there enough blur? If not, try increasing the shutter speed. Too much blur? Decrease the shutter speed. Out of focus? Try the shot again, this time tapping where you would like the focus to be. Don't be afraid to experiment a bit, with some practice you'll be able to get the shot right the first time.

While long exposure photography shows motion through a still image, time lapses illustrate how something changes over time in a series of images put together into a short video. A slow motion video will make something quick appear slow, while a time lapse will make something slow appear quick.
Time lapses help illustrate how something changes over time. A tree throughout a snowstorm. Cookies baking in the oven. The sunset. Anything that changes over a period of several minutes-or even several hours-makes a good subject for a time lapse. Just be ready to loose the use of your phone while the time lapse is recording!
Shooting a time lapse is simpler than it sounds-the iPhone does all the stitching for you, automatically creating a video from still photos. But getting a striking time lapse video takes a bit more creativity.
1. Choose your subject. Identifying what to include in your time lapse is the first step. A good time lapse will show an object that changes over a short or even long span of time. Even subtle changes can work, since increasing the passage of time will emphasize them. Find something that changes that inspires you and start from there. Or, choose something that's often overlooked or taken for granted and use a time lapse to present it in a new way. Time lapses can also be a good tool for creating a video tutorial, such as how to cook something or how to make something.
2. Compose your shot. The same techniques for creating a great single photo can work to create an interesting time lapse. Look within the scene for leading lines or patterns. Watch for interesting colors that could be included. Consider how you'll place the subject-centered, off to the side or even at one edge. Check the scene for any distracting elements that you could eliminate by moving in closer or shooting from a different perspective. Since you'll be creating a video, using the horizontal orientation is preferred, since computer and TV screens are also horizontal.
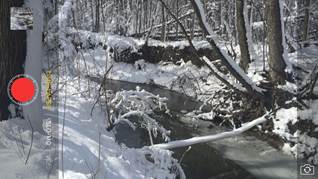
3. Swipe to time lapse mode. Tell the iPhone you want to shoot a time lapse-swipe from the photo mode over to time lapse. You'll see a timer circling the shutter release button when you switch.
4. Set your focus and exposure. In time lapse mode, you can touch the image to set the focus and exposure, just like with still images. Tap the subject to set the focus and exposure. If the screen is too dark or light, swipe up or down next to the sun and yellow box to adjust the exposure. Take some time to make sure both your focus and exposure are perfect-time lapses are harder to fix, and tougher to reshoot since you have to wait for the scene to complete the changes again.
5. Set up on a tripod and shoot. A tripod is ideal for shooting time lapses to prevent shaky footage. If you don't have a tripod, you can do a handheld time lapse or prop the phone up on a surface. You don't need a remote release for a time lapse-you are shooting still images at faster shutter speeds, so camera shake within the individual images isn't usually an issue. The tripod helps keep the iPhone still between the shots, so there's no change between them besides the change that your subject is undergoing.
6. Wait. Taking a time lapse requires some patience-once you've captured the change that you wanted, press the shutter release again to stop the recording. Your time lapse video will automatically be stitched and saved to your camera roll.
The time lapse feature on the iPhone is an excellent tool, and there's usually no need to purchase a separate app. But, if you want more control over your time lapses, apps like Hyperlapse and Osnap offer more control-you can choose how many images to take while you are recording, so time appears to move slower or faster.
Time lapses are an excellent creative tool-and they can also be used for instructional videos as well. By applying the same concepts used to compose, focus and expose a single photo, you can take great time lapses without needing to manually stitch all the images together yourself.