In the snapshot below, you will see the main Photoshop CS4 window. This is what you will see whenever you open the program.
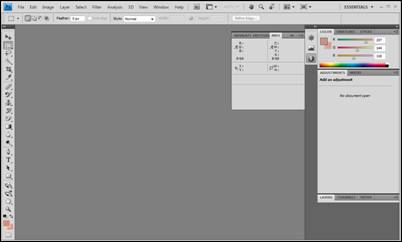
At the top of the window is the menu bar (pictured below).

In this article, we will use this menu bar to perform functions, utilize features, and execute commands.
The menu bar includes the following menus:
- File
- Edit
- Image
- Layer
- Select
- Filter
- Analysis (Extended version only)
- 3D (Extended version only)
- View
- Window
- Help
In Photoshop, panels help you edit or modify your work. There is a different panel for different tasks that you want to accomplish.
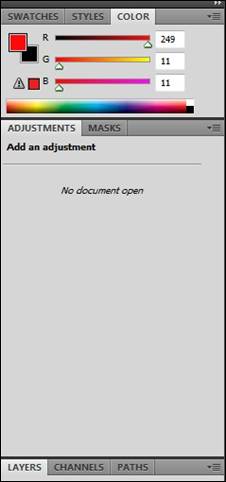
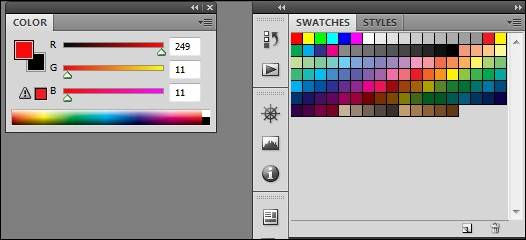
Below, you can see the Color panel, which is open by default in Photoshop CS4. The Color panel opens on the right side of the Photoshop workspace.
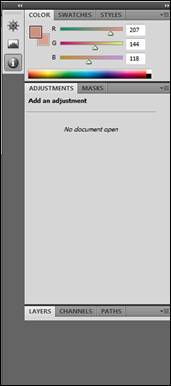
If you look at the Color panel above, you will see tabs for other panels. These tabs appear as a darker gray.

If you wanted to open the Swatches panel, for example, you would simply click on the Swatches tab.
To open a panel that is not showing the workspace, go to Window in the menu bar, then select the panel you want to open.
NOTE: Any panels that you have open will have a check mark beside them in the Window menu.
Collapse a Panel
If you want to collapse a panel to an icon, click the  in the upper right hand corner of the panel.
Close a Panel
To close a panel, click  and select Close.
Show all Panels
If you want all panels to show in the workspace, press Tab.
Hide All Panels
To hide all panels, press Shift+Tab
Display Panel Options
To display the options for the panel, click in the upper right corner of the panel.
To open a new file in Photoshop CS4, go to the menu bar and select File> New.
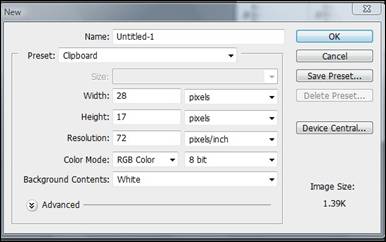
1. In the Name text field, enter the name for the new file. "Untitled-1" is the default name Photoshop CS4 gives a new file.
2. Next, you will determine the size of your new file. You can click on the downward arrow in the Preset field and choose a preset size, or you can specify the dimensions yourself. When you specify the dimensions yourself, you can specify whether you want the size to be measured by pixels, inches, centimeters, millimeters, points, picas, or columns. In this article, we will use pixels to measure dimensions.
3. Next, select the color mode.
Bitmap creates a bitmap image. A bitmap image uses rectangular elements (or pixels) to create the image.
Grayscale. Choosing Grayscale means that the image you create will be in black and white.
RGB images contain three color channels: red, green, and blue. RGB should be used for any images that will be displayed on screen, such as on the web or in a slide show.
CMYK should be used for images that will be printed. CMYK contains four color channels: cyan, magenta, yellow, and black.
Lab Color contains all the colors of RGB and CMYK. This is good to use when you are going to individually edit luminance and color values. It is also useful when creating images when working with photo CD images.
4. Now, let's choose a bit depth. The bit depth tells how much color information is available for each pixel in an image. The more bit depth you have, the more accurate your colors will be.
Here is an example of bit depth:
- A bit depth of 1 means the pixels have two color choices: black and white.
- A bit depth of 8 has 2 to the eighth power, or 256 color choices.
The larger your bit depth, the larger the file. For this article, we will choose 8.
5. After you select the color mode and bit depth, you can then choose a background color by selecting a color in the Background Contents field.
6. If you click on the Advanced tab, you can further specify color and pixels.
7. When you are finished, you have two options.
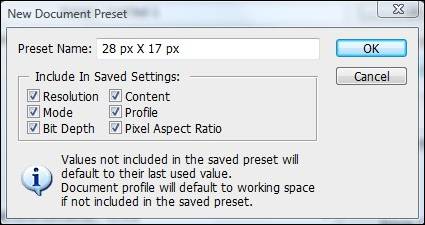
1. You can click Save Preset to save the new image size as a preset image. This is helpful if you will be using this size frequently. Click Save Preset, select a name, then check the aspects of the new image that you want to save. Click OK.
2. If you do not want to save the new image as a preset, you can just click OK. It will then open in the Photoshop workspace.
Open an Existing File
You can easily view what documents you have open, as well as toggle back and forth between multiple files. All documents that you currently have open will appear in the Document Bar, pictured below. The Document Bar is located beneath the Menu Bar, but above the workspace.

The Photoshop Toolbox is located on the left side of the workspace, as shown below. Every tool in the Toolbox allows you to edit, paint, view, or alter images or documents open in the workspace.

Each tool in the toolbox is represented by an icon. Beside each icon is a downward arrow. By right clicking a downward arrow, you can see variations of the tool that basically have the same purpose, but perform slightly different functions. For example, there is a Rectangular Marquee Tool. An Elliptical Marquee tool is grouped with it, and is accessible by right clicking the downward arrow. Even though they are both marquee tools, one produces a rectangular marquee, and the other an elliptical.
Learning all the tools in the Toolbox can seem like an overwhelming task because there are so many. For that reason, Photoshop broke up the tools into different sections to make it easier to get a basic idea of which tools perform what functions, as well as to make them easier to find.
In the first section (at the top), you will see all of the selection tools. These are tools that you will be able to use to select areas of an image. The selection tools are pictured below.
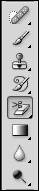
Below the selection tools, you have all of the paint tools. The paint tools allow you to paint, change the colors in an area of an image, or even erase colors all together.
The paint tools are pictured below.
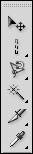
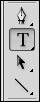
Next, are all of the path, shape, and text tools. You will use these to add shapes and text, and to determine paths.
Lastly, the bottom section of the toolbox contains the different view tools that allow you to view your image, as well as the background/foreground color tool.
The Options Bar is located in the upper left hand corner of the workspace, below the Menu Bar, and above the Toolbox. It contains preferences and settings for the different tools. For example, if we select the Text tool, the Option Bar would contain options and preferences available for the Text tool. See the snapshot below.

The Applications Bar is located directly to the right of the Menu Bar. It contains a workplace switcher to view different images or documents that you have open, as well as other application tools. The Applications Bar is pictured in the snapshot below.

Let's cover each aspect of the Applications Bar, going from left to right.
 Launches Adobe Bridge, another Adobe application
 Allows you to view extras, such as color samples from the Color Sampler tool
 Shows the zoom level applied to the current image
 This is the Hand Tool. The Hand Tool moves the image in the preview window.
 The Zoom Tool allows you to zoom in on an image, or an aspect of an image.
 The Rotate View Tool allows you to rotate the image without distorting or damaging it.
 This allows you to arrange all open documents or images in the workspace, so you can view them all at once.
 This allows you to choose if you want Photoshop to appear in standard or full screen mode, and if you want the menu bar to be displayed in full screen mode.
Exploring Panels and Context Menus
As we discussed in the last lesson, you can edit, or modify, your work by using any of the several panels that Photoshop provides. All panels can be found by clicking Window in the Menu Bar. To make a panel appear in the workspace, simply place a check mark next to it.
Whenever you select a panel to appear, it will be docked to the right side of your workspace, where it is grouped with other panels. However, there may be times when it would be more efficient and convenient to have that panel closer to your image. For that reason, you can undock panels and place them elsewhere on the Photoshop screen.
In the snapshot below, the Color, Styles, and Swatches panels are docked together.
Let's say that we want to undock the Color panel and move it onto our workspace. To do this, we are going to click our mouse on the Color tab and then drag it to the area on the workspace where we want to place it (as shown below). In other words, drag and drop.
When we want to dock the Color panel again, we simply drag it back to the docked panels, until the Color tab is over the active panel (the Swatches tab), then release the mouse button.
Context Menus
Context menus are different than the menus located in the Menu Bar. Context menus show commands that are relevant to the tool, panel, or selection that you are currently working with.
To view a context menu, right click on the image whenever you are using the tool, selection, or panel to apply changes or modifications to an image.
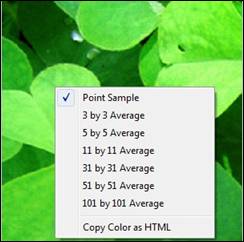
For example, in the snapshot below, we were using the Eyedropper tool (from the Toolbox) and right clicked.
The Context Menu gives you more options for whatever feature or tool you are using.
Photoshop CS4 gives you several options that allow you to customize the workspace. We have already learned how to close and collapse panels, as well as how to create floating (or undocked) panels.
In addition, you can use the Applications Bar to set your document view. This will allow you to view all images that you have open in Photoshop.
Go to View> Screen Mode and select the option you want to view the standard screen or the full screen. You can also use the screen mode button on the Applications Bar.
The preferences that you choose will determine a variety of settings within the program and will also affect the way Photoshop operates. That said, the best way to show you the preferences that you can set, is to go ahead and show you how to set them.
To edit or set general preferences, go to Edit>Preferences>General. The dialogue box pictured below will appear.
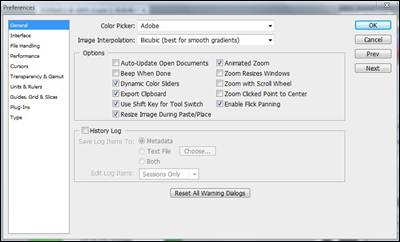
- The Color Picker allows you to choose between Adobe's Color Picker or the one supplied by your operating system.
- Interpolation Whenever you transform a selection, the Photoshop program has to add or subtract pixels, so that the new size conforms to the resolution. Bicubic interpolation looks at the pixel color values surrounding the selection to determine what color to make the new pixels. This produces the highest quality for photographic images. Bilinear interpolation only uses adjacent pixels. It is faster than bicubic, but not as high quality. Nearest Neighbor is faster than either of the other two, but should not be used for photographic images. However, it is the most effective for images that have large areas that are the same color.
When you are finished setting your general preferences, click OK.