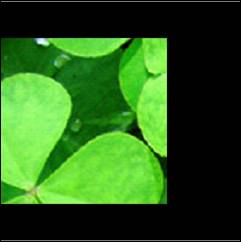
About Pixels and Resolution
The pixel dimensions (width and height) of an image are simply the number of pixels, along with an image's width or height. Resolution is the amount of detail in an image. It is measured by pixels per inch, or PPI. Naturally, the more pixels per inch, the better your resolution will be. Images with a higher resolution produce better printed images.
To resize an image in Photoshop, go to Image>Image Size. This dialogue box will open:
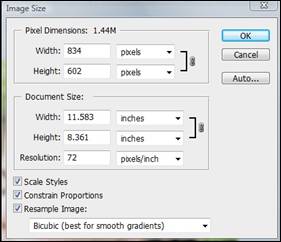
As you can see, the Pixel Dimensions section at the top shows the current image size in pixels. The next section shows the document size in inches. We can change the pixel measurement to percent, or the document size measurement to picas, columns, centimeters, millimeters, percent, or points. For this article, we are going to leave the measurements as they are.
Below the document size width and height, you will see Resolution. Here is where you determine how many PPI you want. Remember, the higher the pixels, the better the resolution.
Make sure the Scale Styles box is checked for the correct proportions when you resize.
To maintain the current height-to-width ratio, make sure that the Constrain Proportions box is checked. Otherwise, your image might be distorted from stretching or shrinking.
For better results when you resize your image, uncheck the Resample box. Resampling involves changing the image's data. You take away from it when you resample an image you have downsized, and you have added to it when you rescale an image you have enlarged. Whenever you resample, the image quality degrades a bit.
Here is why.
When you resize without resampling, you are changing the image's dimensions, but you are not changing the pixel dimensions. If you resize and resample, you are changing both the image and pixel dimensions. A lot of people find that when they resize and resample, the resized image turns out blurry or distorted. This is because of the change in the pixel dimensions.
Resizing for Print and the Web
When resizing for print, you may want to have a higher PPI than you would with images that are going to be used only for the web. This is to obtain the best picture quality possible. The more PPI you have, the clearer the image is going to be when you print it. 72 PPI suffices for most web uses.
Interpolation Methods
If you do choose to resample an image, the pixels will be changed using a process called interpolation. The interpolation method you use will help determine the quality of the image after resampling.
- Bicubic interpolation looks at the pixel color values surrounding the selection to determine what color to make the new pixels. This produces the highest quality for photographic images.
- Bilinear interpolation only uses adjacent pixels. It is faster than bicubic, but not as high quality.
- Nearest Neighbor is faster than either of the other two, but should not be used for photographic images. However, it is the most effective for images that have large areas that are the same color.
- Bicubic Smoother is what you can use when you are increasing an image's size.
- Bicubic Sharper can be used when reducing an image's size. It helps to retain sharpness and detail.
Whenever you crop an image, you essentially cut away the outer edges of the images. It is kind of like taking the hole out of a doughnut, keeping the hole, and throwing away the rest. However, when you crop an image, you always crop away square or rectangular sections.
To crop an image, we are going to go to the Selection section of the Toolbox and click on the Crop tool  . The image that you want to crop should be open in the workspace. After you click on the Crop tool, click on your image.
Place your mouse in the utmost upper left hand corner of the area of the image that you want to keep. Anything to the left of that corner will be cropped away.
When you do this, a rectangular box will appear. The area inside of the box is what will be left of your image once you crop it. You will notice that inside the rectangular box, it is lighter than outside of it. This allows you to better determine how much you want to crop out of the image, as well as to see what you are keeping.
Drag the rectangular box across the image until you are happy with the area that will be cropped.
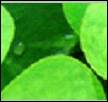
Your image will now look like this:
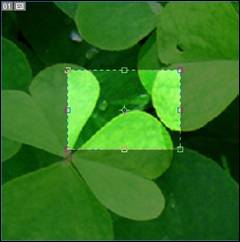
You can use the handles on each side, (as well as in the corners), of the rectangle to expand or shrink the cropped area.
When you are finished, double click inside the rectangle.
Once you double click, only the area inside of the rectangle will appear in the workspace. This is your new image.
Keep in mind that the size of your new image will be smaller than the original. Photoshop does not automatically resize an image to match the original after it is cropped.
Using the Options Bar When Cropping Images
You can also use the Options Bar to crop your image to a certain size. The Options Bar for the Crop tool looks like this:

Using the Options Bar, you can specify the width and height for the cropped image. You can also specify the resolution, or PPI.
Once you drag the rectangle across your image as pictured below, the Options Bar will change.
At this stage, the Options Bar will look like it does in the snapshot below.

From here, you can decide if you want to delete, or hide, the area you have cropped away.
You can also determine the color of the shaded (darker) area, as well as the opacity. If you increase the opacity, the shaded area will become darker.
In addition to adjusting or resizing the image size, you can also adjust the canvas size. The canvas is the full editable area of an image. When you expand the canvas size, you do not resize the image. Instead, you add space around the image. The image size stays the same, but the canvas size gets larger. If you decrease a canvas size, you crop the image.
To adjust the canvas size, go to Image>Canvas Size.
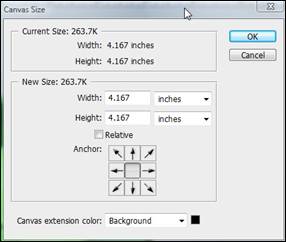
Next, you can either enter the dimensions for the canvas, using the width and height boxes, or select Relative and specify the amount you want to add (or subtract) from the current canvas size.
Select an Anchor by clicking a square. This will indicate where to position the existing image on the canvas after it is resized.
Then, choose a color for the new canvas.
Click OK.
In the example below, we have expanded the canvas and anchored the original image to center-left  .
.
Working with Basic Selections
If you have ever selected text in a word processing document, email, or web page to copy and paste, then you already know what selections in Photoshop entail. When you make a selection in Photoshop, you select an area of an image, or an entire image. You can then cut, copy, paste, paint, or otherwise edit the image.
Photoshop CS4 gives you several tools that allow you to make selections. We are going to cover the basic tools in this article.
 . Using this tool, you can select an area of an image, (or highlight it), so that you may make additional changes to it.
As you can see, we have selected a rectangular area in the snapshot, below.
Now that we understand what the Rectangular Marquee tool does, let's learn how to use it.
The first thing you want to do when using any tool in the toolbox, is to set your options and preferences on the Options Bar.
The Options Bar for the Rectangular Marquee looks like this:

The first icon you see simply lets you select which marquee tool you want to use. We already know we are using the Rectangular Marquee tool.
The next set of icons lets you specify what kind of selection you want to make.
- Click on the first icon
 for a new selection.
 - Click
 to add to an existing selection.
 - Click
 to subtract from an existing selection.
 - Click
 to intersect with an existing selection.
Next, set your feathering to soften the edges of your selection. You can choose to turn Anti-aliasing on or off for the Elliptical tool only. We will discuss that next.
Select a style.
Normal. When you choose normal, your marquee proportions will be determined by dragging.
Fixed Ratio. This option establishes a height to width ratio. Remember, this is a ratio, not actual measurements. If you want your marquee to be three times as wide as it is high, enter three for the width, and one for the height.
Fixed Size. This option will allow you to set values for the height and width. Make sure you enter pixel values. They must be whole numbers.
When you are finished setting your options, it is time to draw your marquee. To select a rectangular area, simply click on the tool, then drag your mouse across the image. Let go of the mouse when you have the area you want selected.
All tools in the toolbox are grouped into sections, then further broken down into groups. Beside each toolbox icon you will see a downward arrow. By right-clicking on the downward arrow, you will see all the tools for that group.
If you right-click the down arrow beside the Rectangular Marquee tool, you will see the Elliptical Marquee Tool  , the Single Row Marquee Tool
  , and the Single Column Marquee Tool
  . These are similar to the Rectangular Marquee Tool, except that you will create elliptical shapes, rows, or columns (respectively).
Right-click on the Quick Selection tool  to locate the Magic Wand tool
  .
.
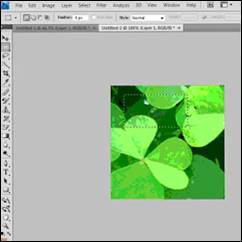
The Magic Wand Tool allows you to select an area that is colored consistently, such as a green leaf.
Before we learn how to use the Magic Wand tool, let's set our options on the Options Bar (pictured below).

The first icon you see is the Magic Wand icon. This lets us know that we have the right tool selected.
Next, we are going to choose the type of Magic Wand selection we are going to make.
- Click on the first icon for a new selection.
- Click to add to an existing selection.
- Click to subtract from an existing selection.
- Click to intersect with an existing selection.
Then specify the following:
Tolerance. This determines how different or similar the selected pixels will be. Enter a value between 0 pixels to 255 pixels. If you enter a low number, the few colors that are very similar to the pixel you click will be selected. A higher number, on the other hand, will give you a broader range of colors.
Anti-Aliased is smoother edges.
Contiguous means that only adjacent areas that use the same colors are selected. If you do not check this, all pixels in the image that have the same color are selected.
Sample All Layers. If you check this, Photoshop will select colors based on data from all visible layers. Otherwise, only colors from the active layer will be selected.
Now we are ready to use the Magic Wand Tool. Click on the color, or the consistently colored object, that you want to select.
As you can see in the following snapshot, we have clicked on a leaf.

Simply select the Magic Wand Tool, then select the color, or consistently colored object, that you want to select. It is that easy.
Click the Refined Edge in the Options Bar to further adjust the boundary, view the selection against different backgrounds, or as a mask.
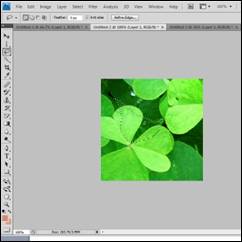
The Quick Selection tool allows you to paint a selected area using an adjustable brush tip. As you move the brush tip out, the selected area will expand.
Before using the tool, set your options on the Options Bar.

The first icon is the Quick Selection tool icon.
Next, select if you want to create a new selection, add to an existing selection, or subtract from an existing selection by clicking the respective icon.
Then, you are going to select your brush size. For small areas, select a smaller brush. We are going to select a leaf, so we have chosen a larger brush.
Finally, to use this tool, drag your mouse over the area that you want to "paint," or select. Move it out and away to expand the area.

The Lasso Tool
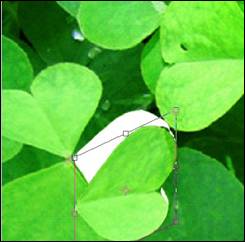
You can use the Lasso tool  to draw free-form selections. To use the Lasso tool, click on it, then drag the mouse over the image. You have to close the image for the Lasso tool to work. In other words, your starting point and ending point must connect, as shown below.
However, before you use the Lasso tool, set your options on the Options Bar.

Choose the type of selection you want to make:
- Click on the first icon for a new selection.
- Click to add to an existing selection.
- Click to subtract from an existing selection.
- Click to intersect with an existing selection.
Then, set your other options as we did with other tools in this article.
Now you are ready to make your selection.
The Magnetic Lasso and Polygonal Lasso Tools
You can right-click on the downward arrow on the Lasso Tool to access the Polygonal Lasso Tool  and the Magnetic Lasso Tool
  .
.
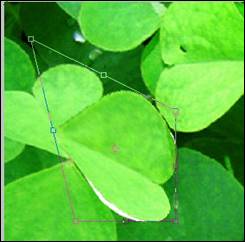
The Polygonal Lasso tool allows you to draw polygonal shapes.
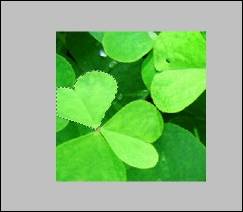
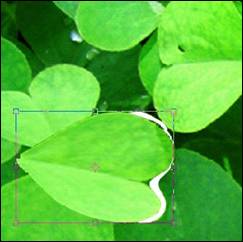
The Magnetic Lasso tool will snap around the edges of aspects in an image when you drag your mouse along the border. Take a look at the snapshot below, in which we selected a leaf.
To use the Magnetic Lasso tool, set your options on the Options Bar.

Set the type of selection you want to make, then set the Feathering and Anti-aliasing options.
Next, set a detection width. Photoshop will only detect edges within the specified distance of the mouse pointer.
Set the contrast. This will specify the lasso's sensitivity to edges in your image. If you set it to a higher value, the lasso will only detect edges that have a sharp contrast to their surroundings.
Specify the frequency. This is the rate that the lasso sets fastening points. If you select a higher value, it will anchor the selection border in place more quickly.
If you have a stylus tablet, select (or deselect) the Stylus Pressure option  . If it is selected, you can increase the stylus pressure to decrease the edge width.
With the Free Transform tool, you can apply transformations to selections, such as rotate, scale, skew, distort, and perspective. You can do this in just one continuous operation, because instead of using a whole bunch of different commands, you simply press a key on your keyboard to toggle between transformation types.
Start out by selecting what you want to transform.
Go to Edit> Free Transform .
Then, select the Move tool icon in the toolbox  if you are going to transform a selection, a pixel-based layer, or a selection border. Now select the Show Transform Controls on the Options Bar. We are going to apply transformations in this article by transforming selections we have made in our image.
 . Then check the Show Transform Controls on the Options Bar.

To scale by dragging: Drag a handle. You can press Shift to scale proportionately.
To scale numerically: Enter percentage values in the width and height box of the Options Bar (show below). To maintain the aspect ratio, click the  .
.

- To rotate by dragging: Simply move your mouse pointer outside the border. When you move your mouse pointer over it, it becomes a curvy, two-sided arrow. Drag your mouse.

You can press Shift to keep the rotation to 15 degree increments.
-
To rotate numerically: Go to the rotation text box
 on the Options Bar and enter degrees. To distort, and have the distortion relative to the center of the border, press Alt, and then drag a handle.
 - To distort freely: Press Control and drag a handle.
- To skew: Press Control+Shift and drag a side handle.
- To skew numerically: Enter values for degrees in the H and V text boxes located on the Options Bar.
- To apply perspective: Press Control+Alt+Shift, then drag a corner handle.
- To warp: Choose Switch Between Free Transform and Warp Modes icon
 on the Options Bar, then drag control points or choose a warp style from the Warp menu on the Options Bar (shown below).


Change the reference point by clicking on a square in the Reference Point Locator  on the Options Bar.
To commit to a transformation, click the  on the Options Bar.
To cancel a transformation, click  on the Options Bar.
There is not a doubt that sometimes you will make a selection, only to realize that you need to either expand it, or change it. Photoshop makes that really easy to do.
Whenever you need to modify a selection, press the Shift key. Just make sure something is already selected before you do this. You will see a plus (+) sign appear next the cursor. Now you can modify your selection. To subtract from a selection, push the Alt key.