Photoshop is one of the best paint programs that you will ever use. When you combine the selection tools with the paint tools, changing and editing colors becomes easier than you could ever imagine.
It is only natural that when you think about painting, you think about a paint brush. That is why it only seems fitting that we start out this article by teaching you how to use the Brush tool. The Brush tool  is located in the toolbox, and it allows you to paint like you were using a paint brush.
As with all tools, use the Options Bar to set brush stroke size and other preferences before you start painting. The Options Bar for the Brush tool is pictured below.

First, set your brush size. Then, determine the mode you want to use. The mode you choose will affect how your colors appear. Modes are essentially brush types. Experiment with these to become familiar with the different brushes that you can use.
Next, select the opacity, or transparency. A higher value will be darker than a lighter value.
The Flow sets the rate the color is applied as you move your mouse over the area.
The Airbrush tool  simulates painting with an airbrush.
The color used with the brush will be the foreground color that you have set. You can find your foreground and background colors in the toolbox in the last section . The top color is the foreground color, and the back color is the background color.
To paint, simply drag your mouse over the area in the image that you want to paint.
Remember, you can make selections, then use the brush to paint single aspects of an image.
The Pencil tool  is grouped with the Brush tool. If you do not see the Pencil tool in your toolbox, right-click on the downward arrow beside the Brush tool.
With the Pencil tool, you can draw just like you would if you were using a regular pencil.
Before you draw with the Pencil tool, make sure to set your preferences in the Option Bar. You will notice that the Options Bar for the Pencil tool is the same as for the Brush tool.

The only difference is that you can set Auto Erase. Auto Erase paints the background color of areas that contain the foreground color. You will need to select the foreground color that you want to erase, as well as the background color that you want to change it to.
The Eraser tool  changes pixels that you erase, either to transparent, or to the background color. You can use the eraser to change to a previous state in the history panel, or to just erase areas of an image by specifying your preferences in the Options Bar.

Set your brush size as well as the mode that you want to use. You can choose from Brush, Pencil, or Block.
Opacity sets the transparency.
Flow determines how quick the eraser will erase aspects of the image that you move your mouse over.
The Airbrush tool allows you to use the eraser as if it were an airbrush.
You should check Erase to History if you want to erase and restore to a previous state.
In the snapshot below, we erased aspects of the image using 100 percent opacity, and 55 percent.
The Background Eraser tool  is grouped with the Eraser tool. This tool erases background pixels and makes them transparent as you drag your mouse.
Let's learn to set our options in the Options Bar for the Background Eraser tool. The Options Bar is pictured below.

The first thing we need to do is select our brush size.
Next, choose the sampling method:
 Contiguous: samples colors continuously as you drag.
 Sample Once: erases the first color that you click.
 Background Swatch: erases only areas that contain the background color that you have set.
The sampling method will determine what colors are erased.
We are going to choose Contiguous.
Choose a Limits mode for erasing.
- Discontiguous will erase the sampled color wherever it occurs under the brush.
- Contiguous will erase areas of the sampled color that are connected together.
- Find Edges will erase the connected areas that contain the sampled color, but it will also preserve the sharpness of the edges.
Set your tolerance. You can enter a value or drag the slider. A low level means that areas that are very similar to the sampled color will be erased. A high level will erase a broader range of colors.
If you select Protect Foreground Color, Photoshop will make sure that areas that match the foreground color in the toolbox will not be erased.
Drag through the area that you want to erase. You can also click on individual aspects in the background to erase the colors.

To add a new color swatch:
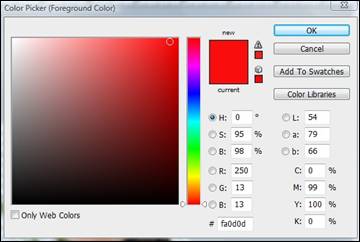
- Make the color you want to add the foreground color. Remember, the foreground and background color both appear in the toolbox.
- You can create a new color by clicking on the foreground color, moving the circle inside the color preview box, or adjusting the slider. Make sure you make this new color your foreground color.
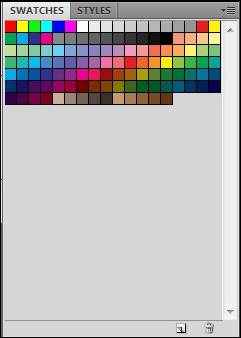
- Add the new color to your color swatches by clicking the New Swatch button from the Swatches panel, then put your pointer over an empty space in the bottom row of your Swatches panel. When you do this, the pointer turns into the Paint Bucket tool. Click to add the color. Add a name for the color, then click OK.
To delete a color from the Swatches panel:
- Drag a swatch located in the Swatches panel to the
 located in the lower right-hand corner of the panel.
A gradient is defined as a blending of shades from light to dark, or from one color to another, instead of just a solid color. In that respect, a rainbow is a gradient.
To create a gradient, you first need to click on the Gradient tool  in the toolbox.
Go to the Options Bar (pictured below).

Click inside the gradient sample box  . The Gradient Editor will then be displayed.
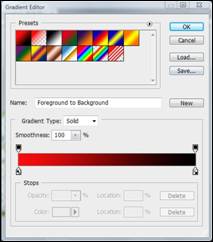
Photoshop provides some gradients for you to use. However, you can create your own.
If you want to base the new gradient on an existing one, select the existing gradient from the Presets section, then choose Solid from the Gradient Type drop down menu.
Now it is time to define the colors of your new gradient. Click on the left color stop  under the gradient bar. The gradient bar looks like this:

When you do this, the triangle above the stop turns black. This indicates that the starting point is being edited.
Select the color you want to use by choosing a color from the Stops section.
Next, define the ending color by clicking the right color stop under the gradient bar. Choose the color you want.
Here are some additional tips for creating gradients:
- You can adjust the starting or ending point by dragging the corresponding stop to the location that you want.
- To adjust the midpoint, drag the diamond
 that appears below the gradient bar to the left or right.
- If you want to add more colors, just click the gradient bar in the place where you want to add another color. This will add another color stop.
- You can control how gradual the transitions are between bands of color in the gradient by changing the value in the Smoothness box.
- When you are finished, enter a new name for the gradient. If you want to save it as a preset, click New after you have finished creating your gradient.
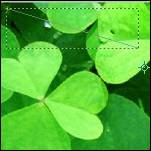
To fill an area with a gradient, you drag in the image. Where you start to drag, and where you finish the drag, will affect how the gradient appears.
To fill in part of an image, select the area of the image where you want the gradient to appear, as we have done below, using the Rectangular Marquee tool.

Now, select the Gradient tool again.
Choose your gradient in the Options Bar. If you have just created a new one, you can select that.
Choose an option for applying the gradient fill:
 Linear gradients have shades that go from the starting point, to the ending point, in a straight line.
 Radial gradients go from the starting point, to the ending point, in a circular pattern.
 Angle gradients have shades that go in a counter-clockwise sweep around the starting point.
 Reflected gradients have shades that use symmetric linear gradients on both sides of the starting point.
 Diamond gradients have shades that start from the starting point and go outward in a diamond pattern. The end point becomes one corner of the diamond.
Next in the Options bar, specify a blending mode and opacity for the paint colors you use.
If you want to reverse the order the colors appear in the gradient fill, click Reverse.
If you want a smoother blend and less banding of colors, select Dither.
If you want to use a transparency mask for the fill, select Transparency.
Now you can position the mouse over the spot in the image where you want the starting point for the gradient to be, then drag to the ending point, as shown below in the diagonal line.
Release to add the gradient.
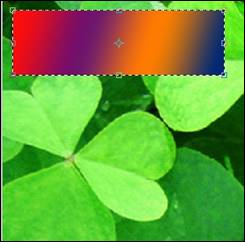
Photo Retouching
Photoshop gives you the tools you need to take your worst-looking photo and make it look good. In fact, a lot of professional photographers use Photoshop to crop out bad places, and otherwise clean up their photos before presenting them to their customers.
In this section, we are going to learn photo retouching techniques that you will be able to use with just a few clicks of the mouse.
The Red Eye  tool allows you to fix red eye problems in your images. The Red Eye tool is grouped with the Spot Healing Brush tool
  in the paint section of the toolbox.
Using the Red Eye tool is probably one of the simplest things you can do in Photoshop.
Set the pupil size you want from the Options Bar (pictured below).

Simply click on the tool, then on the problem area that you want to fix.
Then select how dark you want the pupils from the Darken Amount box. 100% will create black pupils.
To correct red eye in a photo, simply click on the center of the pupil.
The Clone Stamp tool  allows you to clone an area of an image, and place it somewhere else on that image.
Click on the Clone Stamp tool, then select an area of the image that you want to clone.

Next, specify how you want to align the sample pixels:
Aligned. This samples pixels continuously and does not lose the current sampling point, even if you release the mouse button.
Sample. This samples from only the layers that you specify.
Alt+click on the area that you want to sample, then click on the area in the image where you want to place the clone.
Use the Spot Healing Brush  tool to remove blemishes or other imperfections from images. To use it, click on the tool, then press your mouse button down as you move it over the area of the image that you want to repair. The Spot Healing Brush tool will sample pixels near that area to fix your image.
Before you use the Spot Healing Brush tool, set your options in the Options Bar (pictured below).

We have covered all options given in this Options Bar, except for type. You should be familiar enough with all of the other options to make the selections.
For type, you can either choose Proximity Match or Create Texture. Proximity Match will make repairs using the closest surrounding pixels. Create Texture will create a texture based on the pixels you are repairing.
The Healing Brush tool is grouped with the Spot Healing Brush tool and is very similar to it. The only difference is that with the Healing Brush tool, you get to pick the pixels that you want to sample, then use, to repair the image.
To use the Healing Brush tool, start by selecting your preferences in the Options Bar.

Select your brush size and the mode.
Then, select the source:
- Sampled uses pixels sampled from the image.
- Pattern uses a pattern of pixels that you can select from the dropdown box.
Check Aligned if you want to sample pixels continuously, even if you release the mouse button.
Choose the Sample you want to use. You can choose which layer you want to sample pixels from.
When you are ready to use the Healing Brush, click an area in the image that you want to use as a sample. Press Alt+click.
Then press your mouse button down and drag over the area that needs to be repaired.
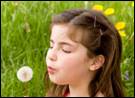
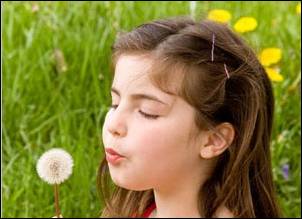
In the picture below, we are going to treat the wisp of hair that hangs down by her eye as a blemish, and remove it. Since it is a small area, we have set our brush size to six pixels.
Here is the result:
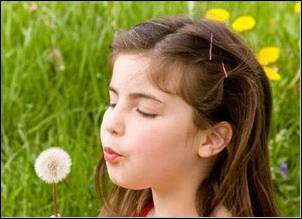
The Healing Brush tool is fun to use. We can also remove the bobby pins from her hair. By doing this, we can better show you how the Healing Brush actually works.
We will start out by sampling the area nearest to the first bobby pin. If we start from the bottom of the bobby pin, then we want to sample the area by the bottom of the bobby pin. As we move up the bobby pin, the Healing Brush will follow beside us, continuously sampling the pixels.
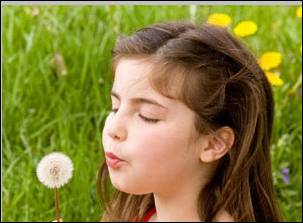
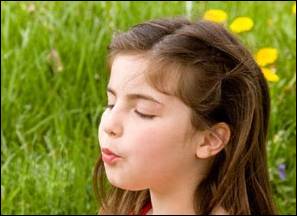
We can also remove the dandelion by following the instructions above. First, we will increase the brush size.
The Patch Tool
The Patch tool  lets you repair an area with pixels from another area or pattern.
To use the Patch tool, click on it, then drag your mouse over the image to outline the area of the image that you want to repair.
Go to the Options Bar.

Make sure Source is checked after you outline the area that you want to repair.
Next, drag in the area you want to use to repair the image. Then, click Destination in the Source Bar.
Drag the destination area to the area that you want to repair.
The Color Replacement tool  is grouped with the Brush tool. It allows you to replace colors in your image using the foreground color you have selected. Simply select the foreground color, then drag the mouse over the area where you want to change the color.
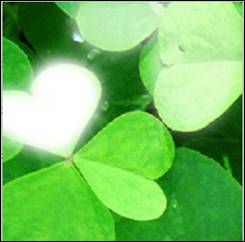
In the snapshot below, we have used the Color Replacement tool to change a green leaf to red.
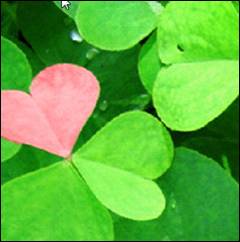
The new color will blend with the existing color.
Before you use the Color Replacement tool, make sure you set your options in the Options Bar.

Set the brush size and the mode.
Select if you want Continuous Sampling, to sample once, or use a Background Swatch by selecting the respective icon.
 Continuous. Continuously samples colors as you drag.
 Sample Once. Uses the first color you click as the sample.
 Background Swatch. Only replaces areas that contain the current background color.
Next, set your limits.
- Discontiguous will erase the sampled color wherever it occurs under the brush.
- Contiguous will erase areas of the sampled color that are connected together.
- Find Edges will erase the connected areas that contain the sampled color, but it will also preserve the sharpness of the edges.
Select a value for tolerance. A lower level will replace with colors very similar to the ones you have clicked. A higher number gives a broader range of colors.
Check Anti-Alias to smooth the edges.
The History Brush tool  allows you to fix mistakes that you have made in your image, without destroying the image, or starting over. However, to use the History Brush tool, you also have to use the History panel.
To access the History panel, go to Window> History. You will then see a history of all changes you have made to the image.
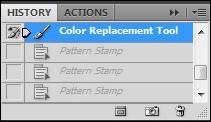
The History Brush tool works much the same as the Brush tool, except now you are going to select a state that you want to paint using the History panel, then paint it on.
To select a state, click on the empty box beside the state, then start painting on your image.