A color mode is defined as the colors that we see, and work with, in an image. Different color modes are RGB, CMYK, or HSB. These modes are different methods for describing the colors used.
A color space, however, is simply a variant of a color mode. A color space has a range of colors. There are color spaces inside color modes. For example: the RGB model has Adobe RGB, and sRGB color spaces, to name a few.
Color spaces become important when we are talking about your printer or monitor. Your printer and monitor have their own color spaces; therefore, they can only reproduce colors that are in their range. When you move an image from one device to another, such as from your monitor to your printer, you may notice changes in the image colors, because the different devices will interpret the colors according to the color spaces they have.
Whenever you move images from one device to another, it is important to use Photoshop's color management features. This way, you can make sure the colors are at least very similar, so they stay consistent.
It is important that you consider what color mode you use in your images to ensure the most consistency in colors.
Here is a reminder of the color modes:
Bitmap creates a bitmap image. A bitmap image uses rectangular elements, (or pixels), to create the image.
Grayscale. Choosing Grayscale means that the image you create will be in black and white.
RGB images contain three color channels: red, green, and blue. RGB should be used for any images that will be displayed on-screen, such as on the web or in a slide show.
CMYK should be used for images that will be printed. CMYK contains four color channels: cyan, magenta, yellow, and black.
Lab Color contains all the colors of RGB and CMYK. This is good to use when you are going to individually edit luminance and color values. It is also useful in creating images when working with photo CD images.
You use the Variations command to the adjust color balance, saturation, and contrast in an image by viewing thumbnails of alternatives.
To use the Variations command, go to Image>Adjustments>Variations.
You will see the dialogue box, below, with variations of your image displayed.
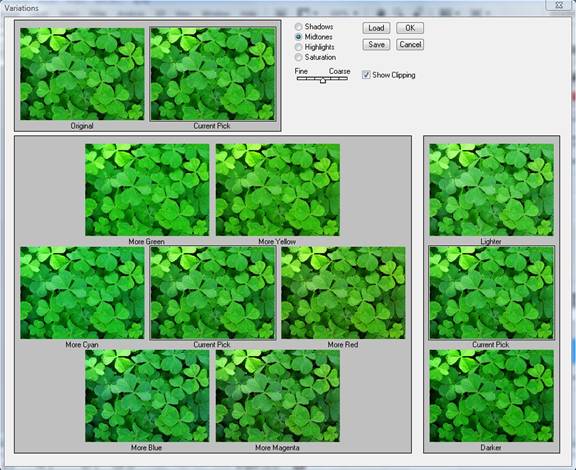
If you look at the top of the dialogue box, you will see a thumbnail of your original image, and a thumbnail of your image with the adjustments that are currently selected. The second thumbnail is the "Current Pick" image.
If you click on any adjustments below these thumbnails, such as "More Blue," the Current Pick will change to show your selections.
Leave the check mark beside the Show Clipping option, if you want to see a preview of areas in the image that have been clipped by the adjustment.
Now, choose what you want to adjust in the image:

Shadows, Midtones, or Highlights adjust the dark, middle, and light areas.
Saturation will change the hue in the image.
Next, use the Fine/Coarse slider to set the amount of each adjustment that you make.

When you have done that, you can adjust the color and the brightness. You adjust brightness on the right-hand side of the dialogue box, (pictured below).
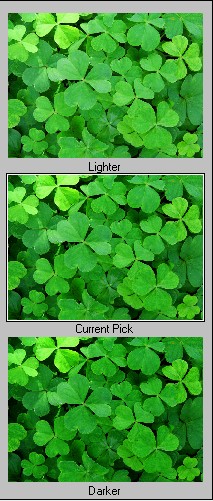
Whenever you click on an adjustment more than once, it doubles the adjustment amount. For example, clicking on the "Darker" adjustment once will darken the image, but if you click on it again, it will double the darkening effect.
Click OK when you are finished.
The Auto commands include the Auto Tone, Auto Contrast, and Auto Color. All three are found under Image on the Menu Bar.
Auto Tone
When you click on Auto Tone, Photoshop automatically adjusts the tone for you.
Take a look at the before and after snapshots when we use Auto Tone
Before
After
You can use the Adjustments panel to further correct colors, if necessary.
Auto Color
The Auto Color command will automatically adjust the color levels in your image. To use it, go to Image> Auto Color.
You should always use Auto Color before Auto Tone.
Auto Contrast
Auto Contrast will automatically adjust the contrast levels in your image. The alternative is using the Adjustments panel to do it yourself.
To use Auto Contrast, go to Image>Auto Contrast.
Another way to adjust color in your images is to adjust the levels. The way that you do this is by going to the Adjustments panel, (pictured below).
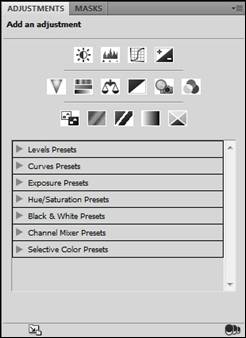
Click the Levels icon in the Adjustments panel. It looks like this: 
You will see the following window open inside the Adjustments panel.
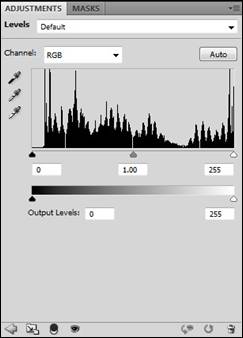
Now you can adjust the levels of color in the color channels. Remember, RGB has red, green, and blue channels.
You can change the color and tonality of your image by adjusting the curves in the Adjustments panel, using the Curve button .
You will then see this window in the Adjustments panel:
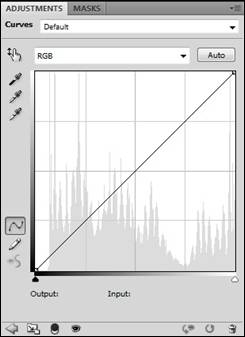
In the Curves Adjustment, the straight diagonal line represents the tonal range for your image. This is your baseline, and it will still appear, even after you adjust the curve.
The horizontal lines in the graph represent input levels. The vertical lines are output levels.
You can move your mouse over the diagonal line and drag it either up or down to adjust the curve. The tonality of your image will change as you drag.
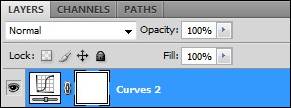
Photoshop automatically creates an adjustment layer to reflect the adjustment to the curve.
If you look at the Layers panel, you will see it displayed:
If you adjust a curve, but are not happy with the changes you have made, you can easily undo it. Just click the  in the bottom right hand corner of the Adjustments panel.
Masks are basically just areas that you can isolate from the rest of an image, to protect it from editing. For instance, say you have a picture of a vase on a table with flowers behind it, but you want to blur and fade the flowers a bit so the vase stands out more. You can easily do this by masking the vase. In fact, if the vase is isolated, you could do just about anything to the table and the flowers, from adjusting the hue or saturation, to adding watercolor effects, without affecting the vase.
Since masks are treated like grayscale images in Photoshop, you can edit them just like you would any other grayscale image. You can add effects and filters, paint them, draw in them, etc.
The Masks Panel is another new and useful tool to Photoshop. Let's take a minute to familiarize ourselves with it.
If the Mask Panel is not visible, click Window > Masks.
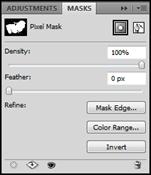
 Use this button to select a pixel mask.
 Use this button to select a vector mask.
 Loads a selection of the mask.
 Applies the mask.
 Disables or enables the mask.
 Deletes the mask.
The items in the refine section give you even more control over your mask. This is the Refine Mask dialogue box that you see when you click Mask Edge:
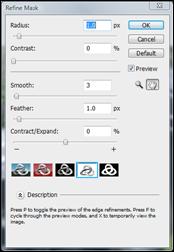
Before continuing with this article, you should familiarize with these options. Try out different combinations of radius and contrast and feathering, and see how they affect the edges of your mask.
Quick Mask is a powerful and incredibly intuitive feature of Photoshop CS4. Quick mask allows you to quickly, (and easily), select certain portions of an image to prevent it from being edited. Let's see how it works.
Locate the Quick Mask button on the toolbar, but do not click it just yet. We just want you to be familiar with where it is. It is usually located at the bottom of the toolbar, and it looks like this: . Now select the marquee tool
  . We are simply using the marquee tool to select the portion of our image we want to mask. You can use any of the marquee tools, the lasso tool, the paintbrush tool, or even the pen tool, to use the Quick Mask feature. We will show you how, in a minute.
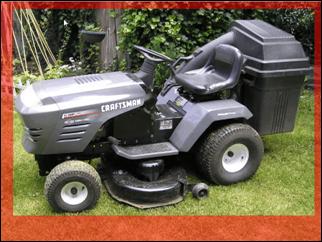
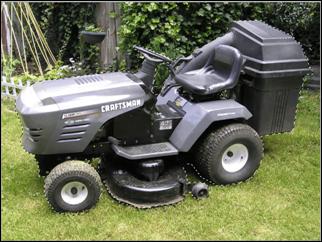
Now let's take a look at our image.

We are going to use the Quick Mask function to isolate the lawnmower, and then add an artistic effect to the background.
First, check the layers palette to make sure the layer is not locked. If it looks like this, you will have to unlock it before going on.
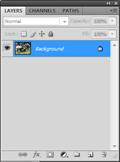
To unlock the layer, just double-click it and enter a new name. In this case, we will call it, "Lawn Tractor."
You can use any selection tool to select the items you would like to isolate. We are going to use the rectangular marquee, and then use the brush tool to fine-tune it.
So select the rectangular marquee tool and drag it over the Lawn Tractor. Now click the Quick Mask button in the tool bar. Your image will look something like this:
The red shaded areas represent the portion of the image that will not be edited. As you can see, the marquee tool selected too much of the background for our purposes. Remember, we wanted to isolate only the lawnmower. But this is easily remedied with the paintbrush tool. So let's select it.
Now look at the color box at the bottom of the toolbar. . The colors available are now only black and white. With the black selected, you will be able to use the paintbrush tool to remove areas from the selection. And the white is to add areas to the selection. This feature makes it incredibly easy to correct mistakes if you get overzealous with the paintbrush tool. You just click the little two-headed arrow to switch between the two colors.

Now that we have our image isolated, we will click the Quick Mask icon again. The image will look like this, with the lawn mower selected:
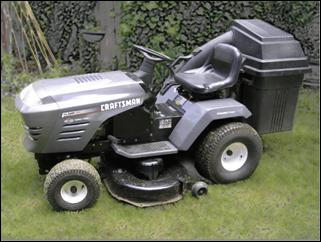
But remember, we want to edit the background, not the lawnmower, so we must go to Select > Inverse. Now we will add our filter, or artistic effect. Click Filter > Artistic > Colored Pencil. Select some options, and then click okay. This is what our image will look like:
Quick Mask Options
You can change some Quick Mask options by double-clicking the Quick Mask tool on the toolbar. See the illustration below.
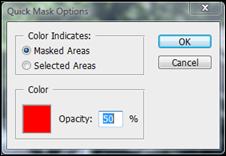
With this panel, you can choose whether that red color indicates a masked area, or the selected area. You can also change the color and its opacity. Click okay to make changes take effect.
Another new feature to Photoshop is the Vibrance Color Correction panel. This feature allows you to easily make your image, or just selected portions of your image, more vibrant. You can find the Vibrance button on the Adjustments palette. (Note: If the Adjustments palette is not visible, click Window > Adjustments.
When you click the Vibrance button, Photoshop automatically creates a new mask. You can see this for yourself by checking the Layers panel. Notice the new layer called "Vibrance 1 Mask."
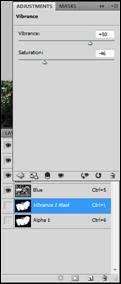
You can change the values for Vibrance and Saturation by either clicking and dragging the sliders, or typing a new number. Values range from -100 to +100. Take a minute to experiment with different values and see how it affects your photographs or other images.
Now let's take a look at the small toolbar along the bottom of the palette and we will explain what each button does.

 This button takes you back to the list of Adjustments you can quickly and easily apply to a selection, or an entire image.
 Expands the palette.
 Applies the adjustment to all the layers below the selected layer.
 Toggles layer visibility.
 Allows you to quickly, and easily, compare the current state to the original.
 Resets all adjustments to their default values. Deletes the adjustment layer and returns you to the list of Adjustments.