The Zoom feature allows you to essentially get a closer look and magnify your image, without resizing it. It is like looking at your image through a microscope. When you zoom in, you can better see changes that you have made.
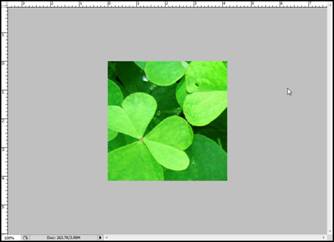
The two snapshots below show an image before and after we zoomed in.
BEFORE

AFTER

To zoom in an image, you will use the Zoom Tool in the bottom section of the Toolbox. It looks like this:  Click on the Zoom Tool, then click on your image. You can also go to View>Zoom In. You will see a magnifying glass with a (+) inside it. Each time you click on the image, the Zoom Tool will magnify it by 100 percent.
The Applications Bar will show you how much you have magnified your image. You can use the Applications Bar to zoom out your image and view it in the actual size, or even smaller, or you can go to View>Zoom Out.
NOTE: It is important to remember that using zoom does not resize the image.
Panning an image is a different than zooming in on an image. Panning an image means moving the image to get a better look at different aspects. This is especially helpful with large image files.
 in the bottom section of the Toolbox. Drag your mouse to pan over the image. If you are using another tool, but need to pan the image while you use it, press and hold down the space bar as you drag your mouse. Rulers, Guides, and Grids
 When working with Photoshop, there may be times when you need to align graphics, measure certain aspects of an image file, or insert text in line with a graphic. Although you could do these things by just using the appropriate tool, it is much easier to create professional images and graphics when you use the rulers, guides, and grids that Photoshop CS4 provides. These features make it easy to align aspects of a web page, for example, or add text that is perfectly in line with a graphic.
We are going to learn about each one of the features individually. You will find that they are very simple to use, and make working with Photoshop even easier.
Rulers
Rulers appear along the top and left sides of the document window, or where your image appears. To use the rulers, go to View>Rulers.
They look like this:
These rulers will help you scale images, position graphics, and position selections. They will be especially useful when you are putting text with a photo, (such as with a greeting card), and want to make sure that you perfectly align the text with the image. They can also be helpful when you are going to place two images in one document, (such as with a web page).
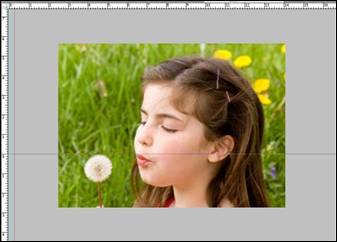
The ruler units start at zero and go up from left to right, then from top to bottom, at the point where the two rulers intersect. To measure an image -- or any area in the image -- you have to move the zero point to the area where you want to measure. In the example blow, we want to measure the dandelion.

To move the zero point, first place your pointer over the crosshairs in the upper left corner of where the rulers intersect. They look like this: 
Drag the zero point to where you want the new zero point to begin. A line will appear across the image to help you set the point exactly where you want it.
Release to set the new zero point.
NOTE: To change the units of measure, or other preferences, go to Edit>Preferences>Units and Rulers.
We could use this measurement to determine the size of additional graphics, the text, or use it for placement and/or alignment.
Guides
Guides are a lot like rulers. The big difference is that you do not use them to measure. Instead, you use them to align different aspects of your image such as text, layers, etc.
To use guides, go to View>Show>Guides.
You will see the vertical guide on the left side of your document area, or the area where the image appears. It is a light teal line that looks like this:

You can click on the line, then drag and drop it over your image.

In the snapshot above, you can see the vertical guide. A guide is useful when placing a couple rows of text. You can use the guide to make sure it is in perfect alignment.
To create a horizontal guide, drag and drop from the horizontal ruler.
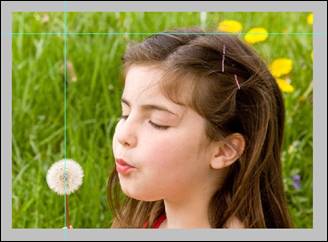
You could use the intersections of the horizontal and vertical guides to place graphics as well. Let's say, for example, that you wanted to place text that begins directly over the dandelion. The guides would help you accomplish this.
To remove a guide, simply drag it off the image, or go to View>Show>Guides and remove the check mark beside the option.
Grids
Grids are non-printable, which means that you can use a grid, leave it in your image, but when you print or save the image, it will not appear to anyone who views it outside of Photoshop. It appears as an overlay. You use a grid to position items, or to keep symmetry in your design.
To use the grid, go to View>Show>Grid.
Below is a snapshot of a grid on an image.

NOTE: To change the measurements used in the grid, or other preferences, go to Edit> Preferences> Grid.
Any edits or changes you make to an image or graphic can be easily undone in Photoshop CS4. There are two ways that you can accomplish this.
The first way is to go to Edit>Step Backward. By selecting this, Photoshop will undo the most recent action that you took. For example, if the last thing you did was change the color of an image, Photoshop will undo the changes you made. You can click Step Backward as many times as you want, and Photoshop will undo all the steps that you have taken to edit or modify the graphic or image.
However, let's say that the last four steps you did, the first being the most recent, were:
� Change color
� Change image size
� Create a layer
� Crop image
You may want to keep the color changes, and even keep the new image size, but you may want to get rid of the new layer and the cropped version. If you simply use Step Backward for this, you will have to first undo the color and image size. This just means that you will have to redo it later. That can be a hassle!
Instead, you can use the History panel to undo any changes made to the image.
To view the History panel, go to Window>History.
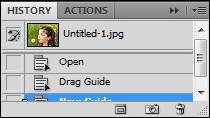
In the History panel, you can view all states of your image. Every change you have made to your image created a new state.
The Adjustments panel is new to Photoshop CS4, and makes it easier than ever for you to adjust color in your images.
The Adjustments panel is open by default in the lower right-hand side of your workspace. It looks like this:
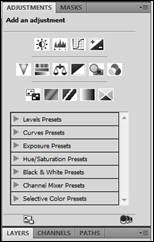
You can click on an adjustment icon or an adjustment preset. The presets are listed below the icons. If you hover your mouse above an icon, it will tell you exactly what that icon does.
Let's use the first icon as an example. We will apply it to the image below.
Before

The first icon is the Brightness and Contrast icon. It looks like this: 
When we click on it, we see sliders that allow us to adjust the Brightness and Contrast. Simply press and hold your mouse over the slider and drag it to the position you want.
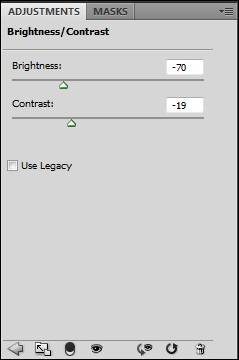
Our image now looks like this:

To return to the other options on the Adjustments panel and exit out of Brightness and Contrast, click the  on the bottom left of the panel.
Other options for the Adjustments panel:
- Toggle the visibility of the adjustment by clicking
 .
. - To return to an original adjustment setting, click the Reset button
 .
. - To delete an adjustment, click
 .
. - If you want to expand the width of the Adjustments panel, click Expand View.
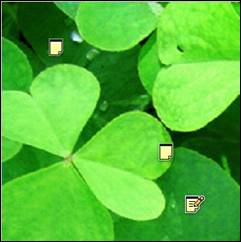
The Note tool allows you to add notes to your image. You can add as many notes as you want. Each note is marked by a note icon  .
.
To add a note, go to the Toolbox. The Note tool is grouped with the Eyedropper tool  in the selection section of the Toolbox.
Right click the downward arrow and select Note Tool.
To add a note, click on the area in the image where you want to add the note, then write your note in the text box that appears (shown below).
The note icons will appear in your image wherever you place notes.
NOTE: These notes do not appear when you save or print the image.
You can save your images and graphics on Photoshop so that they are optimized for the web or other devices. This way, you get the best picture quality possible for however the images will be viewed.
To save for the web or other devices, go to File>Save for Web and Devices.
The following dialogue box will open:
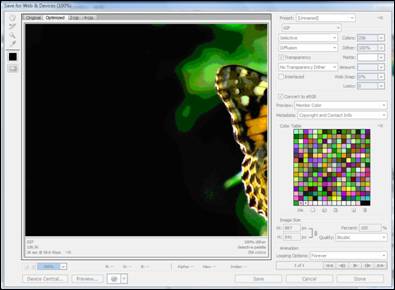
You can preview your image in the dialogue box. Select and click on a tab at the top of the display area to choose how you want to view your image.
- Original. This will display your image without any optimization.
- Optimized. This displays your image with the current optimization settings.
- 2-Up. This displays two versions of your image. They will appear side by side.
- 4-Up. This displays four versions side by side.
If you can not view the entire image or graphic, then use the Hand tool to view other areas. You can also use Zoom to magnify or reduce the view of the image.
There is an annotation area below each image.

This shows the type of image (GIF), the file size, and the time it will take to download the image using the modem speed that has been selected.
When you change any of the options to the right of the preview area, the file size and download times will change accordingly.
For mobile devices, you want smaller file sizes and download times.
For the web, you want to use a bit depth of 8 or 256 colors. Anymore will make the file too large.
You can experiment with the different options to learn how to make file sizes larger and smaller, then also use the 2-UP or 4-UP views to see how different options will optimize the image. This is the best way to learn what works best for you, and the reasons that you use Photoshop CS4.
When you are finished, click Save.
Photoshop CS4 also gives you the ability to edit existing 3D graphics in much the same way that you would using Flash. Just open the 3D drawing in Photoshop, then edit using the 3D menu on the Menu Bar.
If you want to create your own 3D rendering, you can do so by wrapping 2D layers around shape presets, then use the 3D menu on the Menu Bar to bring them to life.