As a business, you should be receiving regular payments from customers. You may be receiving multiple smaller payments per day, or just occasional larger payments every few days or so. When those payments are recorded in QuickBooks Online, they go into an account called Undeposited Funds.
When payments go into the Undeposited Funds account, they are not immediately put into your bank account. For bookkeeping purposes, it is better to accumulate payments and then deposit them at once, such as at the end of the day. That makes it easier to keep track of which payments went into which back deposit when you receive invoices from your bank each month.
So, when making a bank deposit, you will be taking multiple payments that you have received during the day and combine them into a single deposit. In this lesson, one of the main topics we will be learning about is making those deposits to your bank account.
We'll also look into making credits and giving refunds. There are various reasons to do either, and we'll cover each in detail.
Deposits
Putting funds into your bank account is a task that should be satisfying and, hopefully, free from complications. Following the strategy of keeping your payments into an Undeposited Funds account until the end of the day should help alleviate any problems you may have when trying to match up your books with your bank's invoices. Let's now take a look at making deposits ot the bank.
Making a deposit
To record a deposit, click the New button in the left-side Navigation Pane. Then, in the Other column, click on the link for Bank Deposit.
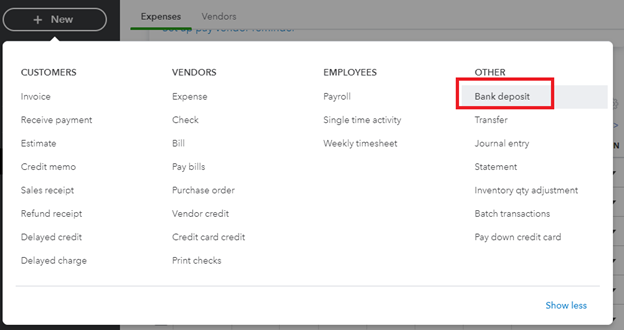
[Figure: Navigating to the Bank Deposit screen]
You will then be on the Bank Deposit screen. This is the screen where you can enter in all the relevant information for your deposit.
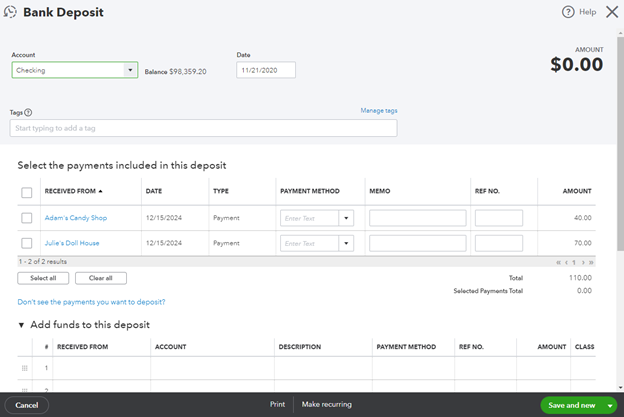
[Figure: The bank deposit screen]
The first thing you want to do here is to select the right bank account at the top left. You will see the balance of that account to the right of it and also the date that you want the funds deposited.

[Figure: Selecting the right account]
You may also see a section called Tags. This is a section where you can track money any way that you want because tags have no other impact on your books. When put into groups, tags can give you more insight into your business' performance.
Next, you will see a table with a list of payments that can be included in the deposit. The table includes 7 columns: Received From, Date, Type, Payment Method, Memo, Reference Number, and Amount. To include a payment in the deposit, check the checkbox in the left-most column. You will see that the total amount is updated in other sections of the form.
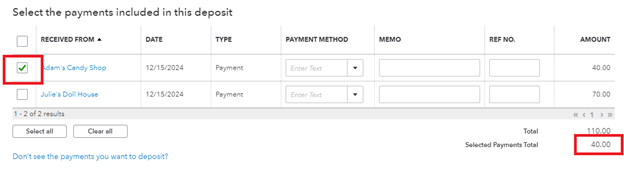
[Figure: Selecting payments to deposit]
The payments that appear in this list automatically come from your Undeposited Funds account. You should be able to confirm that they are there if you go to your Chart of Accounts and view the register for Undeposited Funds.
If you recently received a payment and you don't see it here, then it is possible that you put it into a different account. You can retrace your steps to see if that's the case.
To verify that a recently received payment was put into the Undeposited Funds account, go to Sales in the left-side Navigation Pane. Click on the All Sales tab.
In the All Sales list, find the invoice or sales receipt that isn't showing up in the Bank Deposit form. Click on that transaction to open up the form window. Check that in the Deposit To field, you have Undeposited Funds as your account.
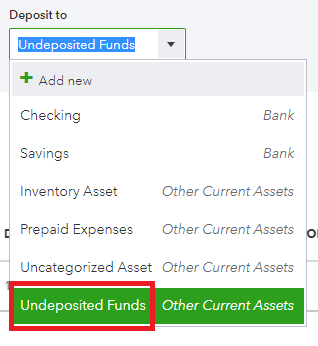
[Figure: Verifying that a payment was deposited to the Undeposited Funds account]
With the Undeposited Funds account selected, save and close the form. You should now see the payment show up when you create a new Bank Deposit form.
If the payment still doesn't show up, then you will want to check that you didn't already deposit it in a previous Bank Deposit. To check if the payment was already deposited to the bank, go back to the All Sales list in the Sales section.
Find the payment in question and click on it to get to its form. If the payment was already deposited, you will see it noted underneath. It will say the amount and date that it was deposited.
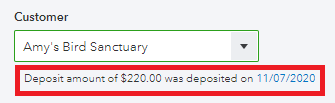
[Figure: A payment that has already been deposited]
If this is the case, and you want to instead include the payment in the current deposit, then you can change it. Click on the date in the blue text to open up the bank deposit slip where this payment was deposited.
You will then see the previous bank deposit form open up where that payment was put. Deselect the payment by unchecking its checkbox.

[Figure: Taking a payment off of a previous bank deposit]
Click the Save and Close button at the bottom of the screen. Once removed from this bank deposit, you many now enter into the current bank deposit.
Returning to the original Bank Deposit form, you should now see all the payments that you want to include in the bank deposit. You can see more about the customer's payment if you click on their link in the table.
In the Payment Method column, you can update the payment type if that wasn't entered when receiving the payment. If it's a credit card payment, then the credit card company may deposit all credit card transactions into a daily deposit into your bank account. In that case, to make bank reconciliation as simple as possible, you should put your credit card transactions for each type of card that you accept into their own separate bank deposits.
You can also add a memo for your personal records and a reference number. These are optional.

[Figure: Adding the payment method, memo, and reference number]
Below the payments table there is a section where you can add funds to the deposit. You will need to click the drop-down arrow to see the table. You may want to use this table if, for example, you received a rebate that you want to add to the deposit. Do not add funds related to outstanding invoice here.
This table has seven columns: Received From, Account, Description, Payment Method, Reference Number, Amount, and Class. There is also grid icon in the left-most column for changing the order of the rows in the column and a trash can icon in the right-most column for deleting a row.
In the Received From column, add where you received the money from, such as a customer. In the Account column, enter the account where you want the funds.
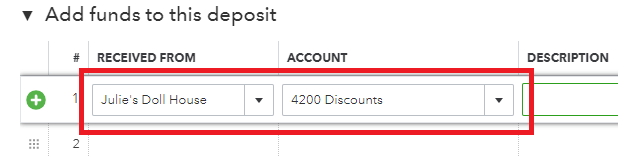
[Figure: Adding additional funds to a deposit]
Finish filling out the rest of the row in the same way you filled out the payments in the previous table. If you need additional rows, there is a button below the table where you can add them.
You can also add a memo for the whole deposit or include any attachments. An attachment could include a scanned copy of the deposit slip.
There is also a section at the bottom where you can record cash back from the deposit. Select an account where the funds should go and also write a memo about it. Finally, type in the amount that you want returned as cash back. The amount included here will be deducted from the total deposit.
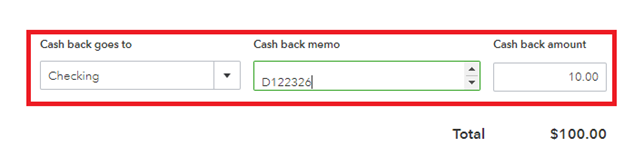
[Figure: Getting cash back from the deposit]
At the bottom of the screen, you have the option of printing or making the deposit recurring. You may want to make the deposit recurring if you have a customer that pays every month.
When you are done, select the Save and Close button at the bottom. You can confirm that the deposit shows up in your account by going to your Chart of Accounts and clicking View Register on the account you deposited to. The Payee Account will say Split if the transaction included multiple payees.

[Figure: Confirming the deposit]
At this point, you can take the cash and checks to the bank for actual deposit. If your bank supports it, you can also remotely deposit checks through your smartphone.
In the next section, we'll look at working with credits.
Credit Memos
You may be in a situation where, for one reason or another, you need to give credit to a customer. For example, a customer may return merchandise. In this case, will want to issue a credit memo. On the other hand, you can also refund money by giving a refund receipt. But ideally, a credit memo is better for the business.
In this section, we will look at credit memos. Credit memos are basically the opposite of an invoice.
To make a credit memo, you should first look up the original invoice. You can find invoices by clicking on Sales in the left-side Navigation Pane, and then clicking Invoices. Choose the customer's invoice that you want to make a credit memo for.
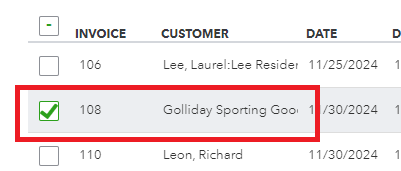
[Figure: Select an invoice for a credit memo]
Clicking on the invoice lets you see what they were charged for. In this case, the customer was charged for monthly gardening services in addition to tree and shrub trimming. Let's say the customer actually didn't have the tree and shrub trimming, so they need to be credited for that.
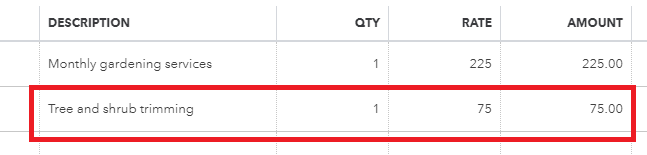
[Figure: Locating a service for a credit memo]
The credit memo has to be for the same product or service that was in the invoice. Now that we know the service details, we can start making the credit memo.
To make the credit memo, click the New button in the Navigation Pane. Then, click Credit Memo under the Customers category.
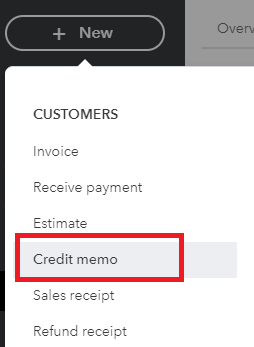
[Figure: Finding the Credit Memo page]
At the Credit Memo form, start by adding the name of the customer. Entering the name will auto-fill the rest of the form, such as the Email and Address fields. The Credit Memo Date will also be filled in with today's date.
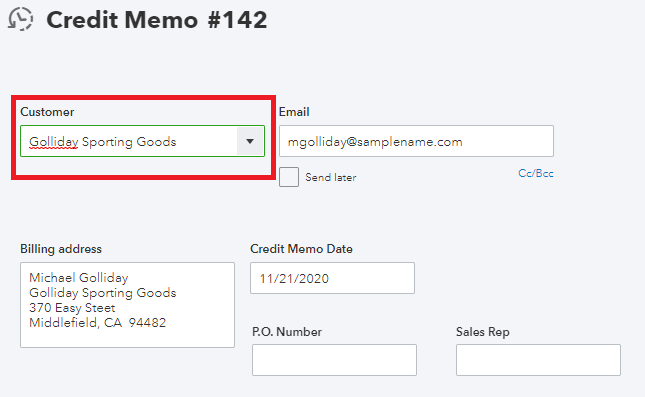
[Figure: Enter the customer name in the Credit Memo form]
You can then start entering the product or service that you will be crediting in the table. In the table, first enter the date, then choose the product or service from the drop-down menu. The description, quantity, rate, and amount should automatically be filled after selecting the product or service. You can change any of that information after it is automatically filled in.

[Figure: Choosing the product or service will cause other fields to be automatically filled in]
Make sure that the amount is the same that you want to credit the customer for, then click either the Save and Close button or the Save and Send button at the bottom of the screen.
If the customer doesn't have any outstanding invoices, then the new credit memo will be applied the next time that the customer gets a new invoice.
If the customer does have outstanding invoices, then the credit is applied to the customer's latest invoice. If they have multiple invoices, then QuickBooks Online will make a new payment to the customer. Click on the payment and then you can choose which invoice to apply it to.
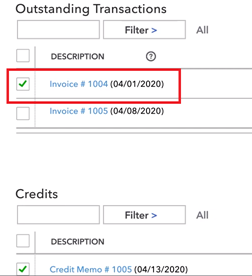
[Figure: Selecting the Invoice to apply the credit memo to]
You can change the default behavior of how QuickBooks Online handles credit memos. To do so, go to Account and Settings in the Settings menu that is shaped like a gear symbol. Then, go to Advanced and scroll to the Automation section. Here you can choose to automatically apply credits or not.
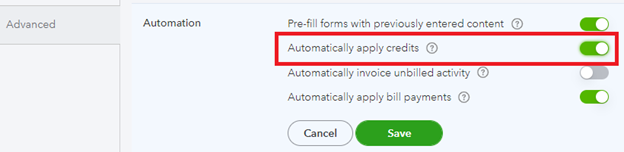
[Figure: Credit memo option in settings]
Invoices that have credit memos applied, but are not paid in full, will have their invoice status set to "Partial" to indicate that they are not fully paid. Now that we've taken a look at working with credits, we'll take a look into issuing refunds in the next section.
Refund Receipts
Refunds are similar to credits except that with a refund, a customer is paid their money back rather than just given credit. While a Credit Memo is like the opposite of an Invoice, a Refund Receipt is like the opposite of a Sales Receipt.
To make a refund, first find the customer that you want to give the refund to. You can find customers by clicking on Sales in the left-side Navigation Pane and then on Customers. You will be taken to a list of all the customers you have entered into your system.
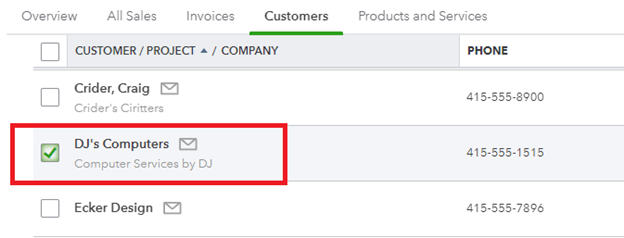
[Figure: Locating a customer for a refund]
In this example, we will give a refund to DJ's Computers. To start giving a refund, click the New button in the Navigation Pane. Then find the Refund Receipt link under the Customers heading.
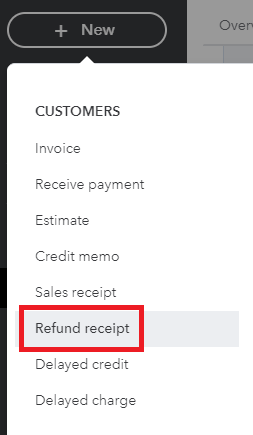
[Figure: Finding the refund receipt link]
Once you are at the refund receipt, enter the customer's name into the Customer field. That will cause other fields like Email and Address to be automatically filled in.
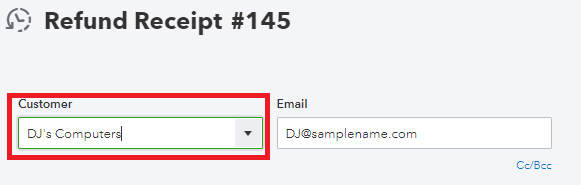
[Figure: Entering the customer's information into the Refund Receipt]
When you get to the Payment Method field, you will enter the method that the customer used when they originally paid. In the Refund From, you will choose the account that you will be sending money back to the customer from. If it's a checking account, then you can choose the check number.

[Figure: Choosing the customer's payment method and where you will refund from]
Now you need to enter the product or service information into the table at the bottom. The table has eight columns: Service Date, Product/Service, Description, Quantity, Rate, Amount, Tax, and Class.
Enter the date of the original invoice into the Service Date.
If the customer is returning a product, then for the Product/Service column, you can click the drop-down menu next to the input field to browse for right product or service. Once it is selected, it will automatically fill out most of the remaining fields in the row.

[Figure: Filling out the refund information]
If the customer is not returning a product, check below. Otherwise, check that you have the correct quantity and rate. Then, you will need to check the Tax checkbox if the customer paid tax on the original purchase, so that the tax may be refunded as well.
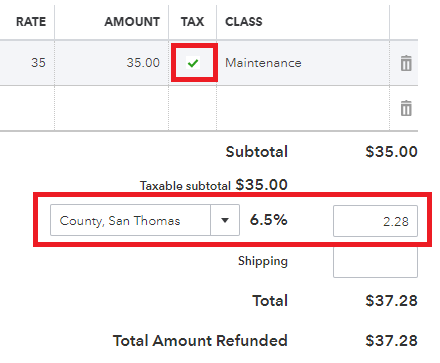
[Figure: Adding tax to the refund]
If the customer is getting a refund without returning something, then you should set the product or service to Refunds & Allowances. If you don't have a Refunds & Allowances product, then you can create one in your Products and Services list. When creating it, assign it to the Income account of Refunds-Allowances. Make sure that the service is not taxable.
Below the table for products and services, you can enter a message to appear on the refund receipt and on the statement. You can also attach a file if you wish. In this case, we'll leave those blank.
Now that the refund form is complete, you can click the Save and New button at the bottom of the screen. When you return to the customer's details page, you will see that there is a new item there of type Refund.

[Figure: The refund on the customer's details page]
You can now print a check and also send an email of the refund receipt to the customer.
One more topic to mention that is related to crediting customers is Delayed Credit transaction, and we'll talk about that in the next section.
Delayed Credit
Sometimes, a client prefers to be given credit towards a future invoice rather than receiving a refund. In this case, either a credit memo or delayed credit will suffice. We've already discussed credit memos, so how is delayed credit different?
With a credit memo, a customer can use all or a portion of it to pay off an invoice. You can also apply the credit memo when recording a customer's payment. These credit memos impact sales reports even when they aren't applied to invoices.
Which a delayed credit, they can be added to invoices as a line item that can reduce its balance. Delayed credits, unlike credit memos, do not impact sales reports until they are applied to an invoice. So, using delayed credit is good for tracking a customer's future use but doesn't affect their current balance.
To create a delayed credit, click the New button in the left-side Navigation Pane and choose Delayed Credit. Then, enter the customer's name as well as the date, product/service, quantity, and amount.
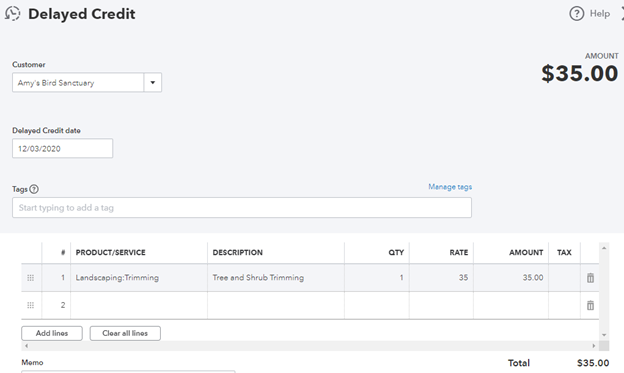
[Figure: A Delayed Credit form]
Click the Save and Close button to create the delayed credit and return to the previous screen.
You can now apply the delayed credit the next time you start a new invoice. Start a new invoice from the New button and select Invoice. In the form, select the same customer as the one which you assigned the delayed credit to.
Once the customer's name is selected, a side panel will show up which contains information about the delayed credit.
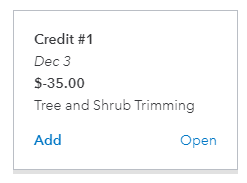
[Figure: Side panel showing delayed credits available]
Click Add to apply the delayed credit to the invoice. To finish the invoice, click the Save and Close button.
You can verify the invoice by going to Sales in the left-side Navigation Pane and choosing Invoices. Sort the invoices by date to see what you just created. Clicking on the invoice you just made will open up a side panel that shows the details.
In the side panel, click the More Actions button at the bottom and select Print from the drop-down menu. This will load the invoice in a printable view where you can see that the delayed credit has been applied.
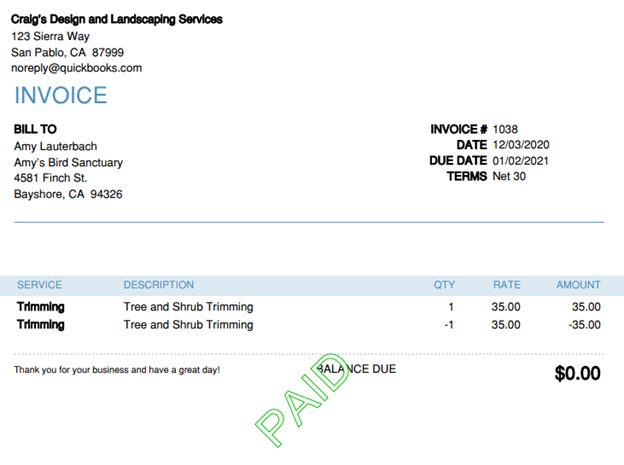
[Figure: A delayed credit applied to an invoice]
Conclusion
In this article we learned about making deposits. We saw why it is important to keep payments in the Undeposited Funds account and why we should deposit multiple payments at once.
We also looked into giving credit and refunds. We learned the different situations where each apply, and also examined the use of delayed credits.