One essential feature of QuickBooks Online is the ability to track expenses and pay bills. There are many different ways to pay vendors. Sometimes you want to use bills, while other times you should record checks or expenses. In this article, we will take a look at various ways that you can keep on top of your company's expenses.
Bills
When paying for a good or service, you can choose to do so immediately or pay later. It's usually better to pay later. In a situation where we pay later, we use bills.
It's important to enter bills from vendors so that your Accounts Payable remains accurate. It's also necessary to track vendor balances so that you always know how much each vendor is owed.
When you receive a bill from a utility, such as your internet provider, you should enter it into Bills even if it is not due until the end of the month. You can then use Pay Bills to create a check and clear off the bill.
Entering a bill
New bills from a vendor should be recorded as soon as possible so that you can pay them later when they are due. To add a bill, you should first select the New button from the Navigation Pane. Then, select Bill from the Vendors category.
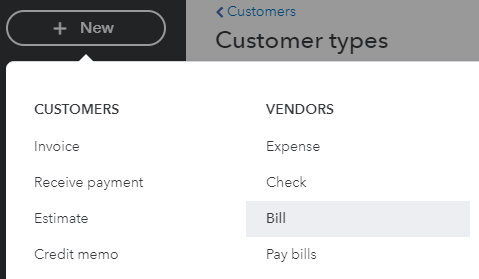
[Figure: Adding a new bill]
You will now be at a screen where you can add your new bill. The first thing it will ask you for is the vendor. Select the vendor from the Vendor drop-down.
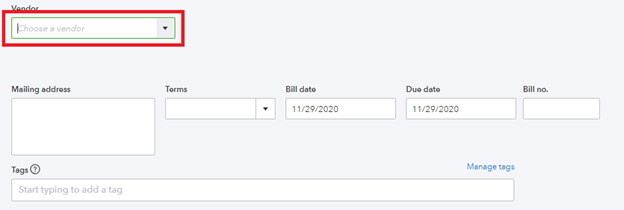
[Figure: Selecting the billing vendor from the drop-down menu]
If the vendor has not been added yet, you will need to click on the Add New option in the drop-down menu. In this case, let's choose to add a new vendor.
Selecting the Add New option will pop up window where you can enter details about the vendor. In the first field, enter the name of the vendor.
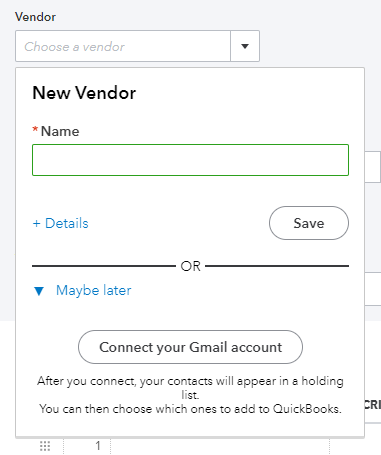
[Figure: Adding a new vendor]
Once you add the vendor, you will need to decide how you will add details about it. If you click the Details link, you will be taken to longer form where you can enter various information about the vendor.
Alternatively, you can add the vendor from your Gmail account if you choose to link it. For this example, we will click on the Details link and enter information manually.
Clicking the Details link will open a bigger window. Here it is important to enter the Display name.
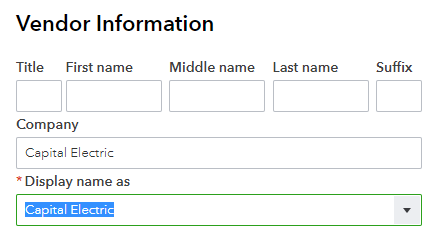
[Figure: Entering vendor information]
Above the company name you can enter information about a contact at the company. Just below the Display name is checkbox for determining if the display name is the same as the name for writing on checks. Confirm with the vendor what name checks should be made out to for this field.
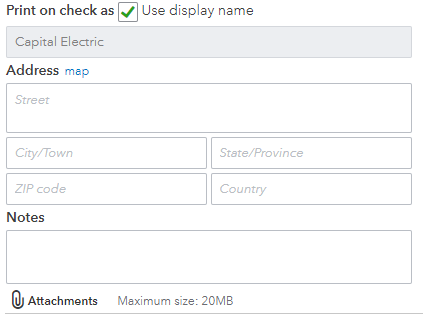
[Figure: Adding the name for checks, address, notes, and attachments]
Following the name for checks is a field for the address. Entering the address correctly is important if you visit the vendor using QuickBooks Online's mobile app because it will load up on your phone's map.
Next is a section for adding your own notes about the vendor as well as including an attachment.
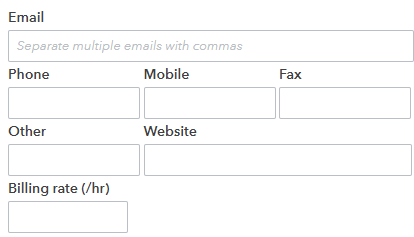
More contact information including email, phone, mobile, fax, website, and billing rate can be filled out on the form.
[Figure: Filling in more vendor information]
More information can be added about the vendor including their terms, opening balance, account number business number, whether or not payments should be tracked, and the default expense account.

[Figure: More vendor information]
Once you have entered all the vendor information that you need, click the Save button to return to the form to add a bill.
This time, if you select a vendor, information such as the mailing address and terms will show up automatically.
The fields for the bill date and due date will be automatically filled in based on the day's date. These should be changed to reflect the real dates you were billed and when it is due.
If the bill has a reference number, enter that into the bill number field.
Below the vendor information, you can enter the category information for the bill. For category, choose the expense account that it fits. You can add a new category by clicking the Add New option in the category drop-down menu. You will then add a description and the amount that it's for. The amount will update
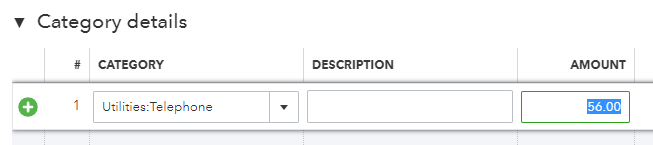
[Figure: Entering bill category details]
Updating the amount will cause the total amount for the bill to change automatically. More category details can be added on other lines, and more line can be added if needed.
Below Category Details are Item Details. Here you can enter any products or services included in the bill in much the same way that you did with Category Details. Item details have extra fields for Quantity and Rate.
At the bottom of the bill, you can add a memo as well as an attachment. The attachment can be a PDF of the bill.
Once you are finished with the bill, you have several options for sharing it. First of all, you can make it a recurring bill by choosing Make Recurring from the link at the bottom. If you choose this, extra options will appear to schedule the bill.
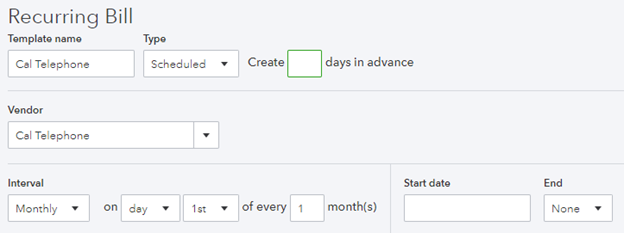
[Figure: Making a bill recurring]
Here you will have the options to set the type of recurring bill you want, such as scheduled, reminder, or unscheduled. If its scheduled or a reminder, then you will also choose how many days in advance it should be created. Additionally, you will also choose the interval, start date, and end date if it is scheduled or a reminder.
If you don't wish to make the bill recurring, then choose from the other save options: Save and Schedule Payment, Save and New, or Save and Close.

[Figure: Save options]
The Save and Schedule button will save the bill and go to the Bill Pay screen. The Save and New button will save the bill and create a new, blank bill to work on. The Save and Close button will save the bill and return you to your previous page.
Once you have saved your bill, you can view it by going to Expenses in the left-side Navigation Pane and then clicking on Vendors. In the list, you will be able to see the amount that you owe in the bill.

[Figure: Viewing the bill amount due in the Vendors list]
From the vendors list, you can then click the Make Payment link to start paying the bill. You can also make new bills for this vendor as well as new expenses.
In the next section, we'll look at paying bills, such as the one that we've just created.
Paying a Bill
When you have a bill recorded in QuickBooks, you can pay it off by using the Pay Bills functionality. This lets you print out a payment check or pay via credit card. Using this method, you can be sure that the Vendor balance decreases. Using Check or Expense instead of Pay Bills means that the bill may still show up as unpaid.
To start paying a bill, click the '+ New' button in the left Navigation Pane. If the pane is hidden or you are accessing from a mobile device, click the '+' icon at the top of the screen. After clicking the New button, click Pay Bills under the Vendors heading.
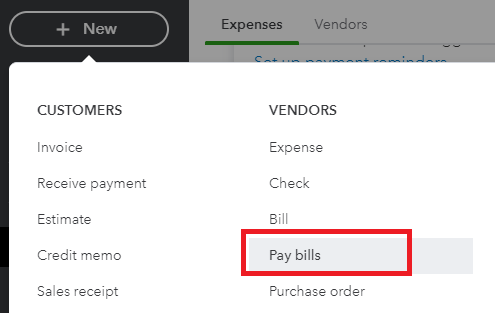
[Figure: The Pay Bills link]
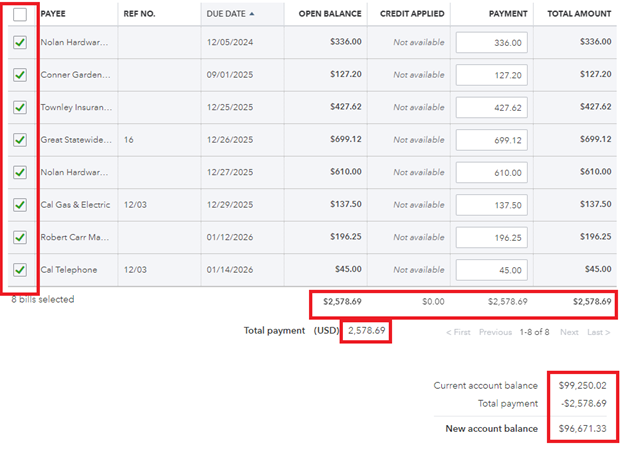
You will now be at the Pay Bills screen. Here you will see a table of past and upcoming bills that are due.
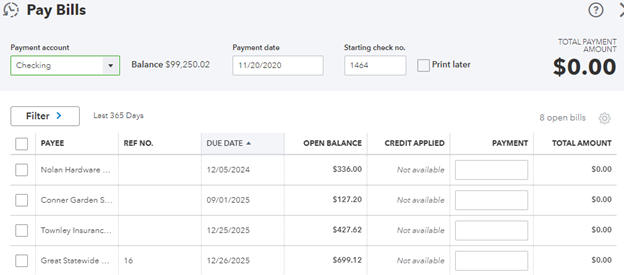
[Figure: The Pay Bills Screen]
Above the table you can choose the payment account to pay the bills with. Next to the account is your current balance with that account. If you are paying with a checking or savings account, you can choose what the next check number will be. For electronic payments, you can enter EFT in the check number field. If you are paying with a credit card, you won't have the options for starting check number or to print later.

[Figure: Context-sensitive payment account area]
In the table, you can see all of your active bills. There are seven columns in the chart: Payee, Reference Number, Due Date, Open Balance, Credit Applied, Payment, and Total Amount. They are originally organized by Due Date. Any overdue bills have a red exclamation mark next to them.
To start paying a bill, you can check the box in the column to the left of the payee. Once checked, the open balance for that payee will be automatically filled into the payment column and total amount column for that payee.

[Figure: Checking the payee for the bill]
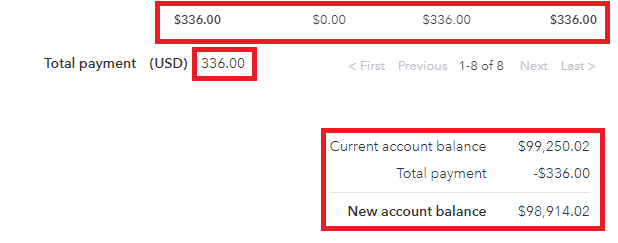
The amounts at the bottom of the screen will update as well. There you can see the total amount being paid in addition to your remaining balance afterwards.
[ Figure: Updating the balance]
You can add more checkmarks next to payees to pay as many bills as you want at this time. Each time you check another payee, the total amounts will update.
[Figure: Total amounts being updated]
You can also choose to only pay part of the open balance. In that case, change the value in the payment column to the amount you want to pay.

[Figure: Only paying part of the balance]
Once you have selected all the bills you want to pay, you can finish the process by clicking the Save button at the bottom of the screen. This will mark the bills as paid and update your new balance.
If you are using checks, then you could instead choose Save and Print from the Save button at the bottom. This will print out the checks on check pages instead.
To complete the payment when using a credit card, click the 'Schedule payments online' button at the bottom of the screen.
Using Expenses
Unlike bills, which are received items or services that are paid for later, Check and Expenses are for items and services paid for immediately. For an expense that has already been paid for or that needs to be paid immediately, you can use Check or Expense. These types of transactions report an expense and payment at the same time.
If your expense requires printing a check, then use Check instead of Expense. If using a credit card, then use Expense.
As an example of an expense, if you buy a shovel at a hardware store and pay for it there, then it is an expense because you don't owe the store anything afterwards.
Paying an Expense
Not only will you need to pay your regular bills, but you also need to keep track of expenses that you pay from time to time. If you have a receipt for something your business paid for, you can log it in your expenses to keep your accounts up-to-date.
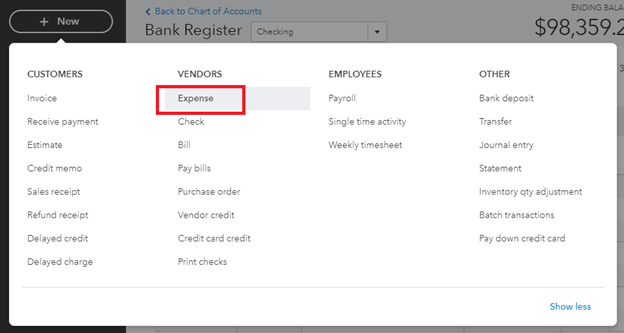
To write down one of your expenses, click on New button in the Navigation Pane. Then go to Expense under the Vendors category.
[Figure: Adding an expense]
You will now be at the page for entering expenses.
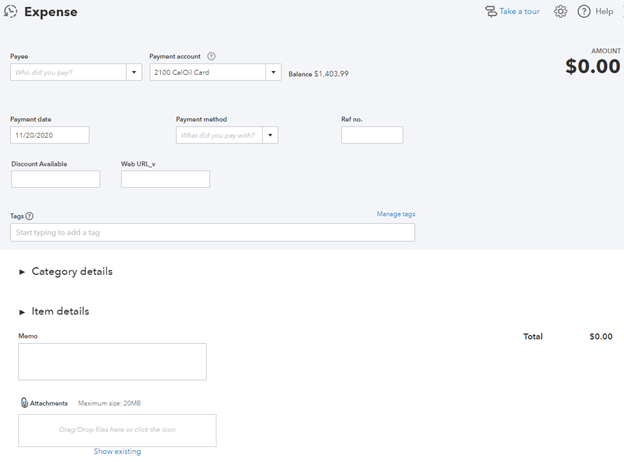
[Figure: Form for adding an expense]
First, you can choose who you want to pay. In the Payee drop-down, you can select from among the vendors and customers in your database. Let's say that we want to pay for oil, so we choose the correct company from the list.
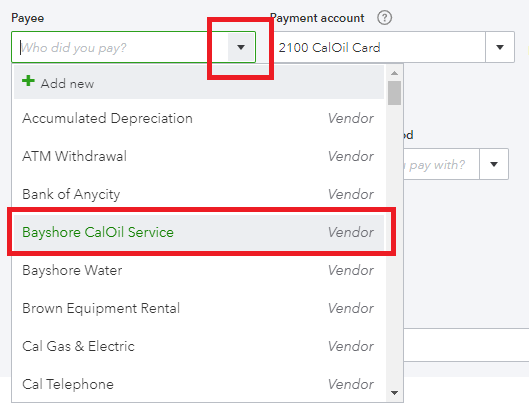
[ Figure: Selecting a payee]
Next, you need to choose the account that paid for the expense. In this example, we have an account with the oil company.
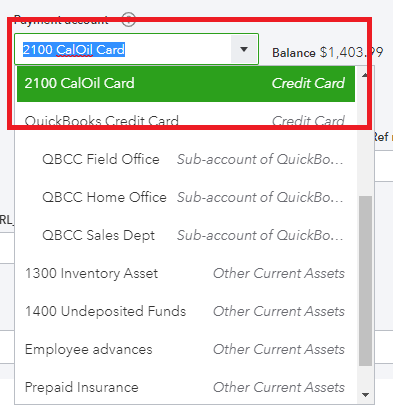
[Figure: Choosing the payment account used for the expense]
You then will add the payment date and payment method. The date is when the expense occurred. For this transaction, we used our American Express card.
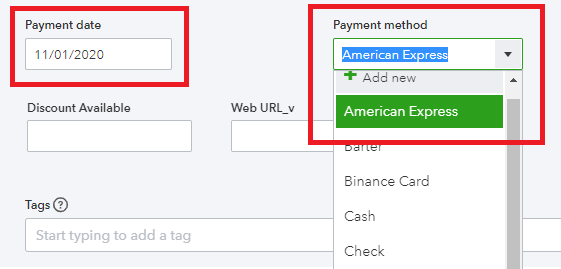
[Figure: Payment data and payment method]
If you have a reference number, discount, or web URL, you can enter those in the following fields. Following that is a section where you can add tags. Tags are not currently available on to all QuickBooks subscribers; however, they are being rolled out and used as a way to get better insight into your finances.
You then need to categorize your expense. We will put this in the category of Automobile: Fuel. We can then add a description and the amount we paid. Your totals at the top and bottom of the page will change to reflect the amount that you entered.
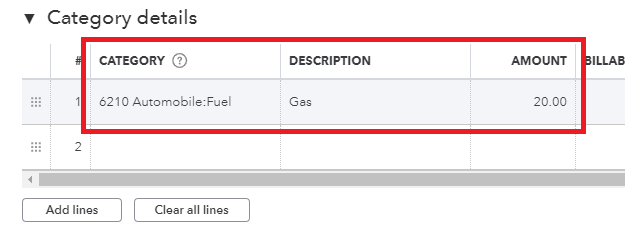
[ Figure: Adding the category, description, and amount]
Furthermore, in the category details section, you can specify is the expense should be billable. Marking the expense as billable will enable you to add a markup percentage in the next field.
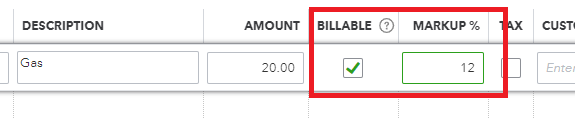
[Figure: Making an expense billable and adding a markup percentage ]
You can also specify that tax was paid, assign the expense to a customer for tracking, and put the expense into a class for organization.
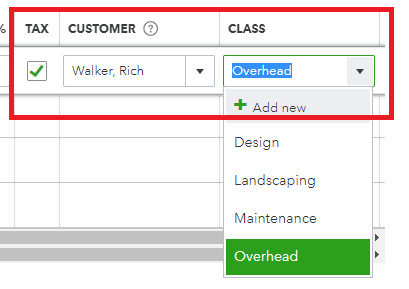
[Figure: Adding the tax, customer, and class]
If you have more category details to add, you can click the Add Lines button to add more blank lines. You may also reorder lines by dragging on the dotted icons in the far-left column. An individual line can be deleted by clicking on the trash can icon in the far-right column.
If you are making an expense for a product or service, you can fill out the Item Details section that comes up next. This is similar to the Category Details section, and the total amount of your items will be added to the total of all the expenses.
At the bottom of the form is a space for a memo and attachment. Add any extra instructions or reminders here and then click the Save and Close button to finish reporting your expense. You can then see your new expense in your Expenses list.

[Figure: New expense result]