Being able to easily navigate your way around an application is essential for working effectively. Good navigation can make your work a smooth and enjoyable experience, while a bad navigation system can make things frustrating and lead to mistakes. Luckily, QuickBooks Online has a well-tested navigation system that gives you quick access to everything you need.
One of the most important aspects of QuickBooks Online's user interface is that it is responsive. That means that the layout changes depending on the width of your screen. So, if you are viewing the site on a smartphone which has a narrow screen, then the layout will be different from when you view it on a computer, which has a wider screen. Despite the layout changing, the actual content of the pages will be the same. You can actually see how QuickBooks Online looks on a mobile phone by reducing the width of your browser window on your computer.
[Figure: Viewing QuickBooks Online from a desktop with a narrow window]
For this tutorial, we will assume that you are viewing QuickBooks Online through a browser window on your computer. When you get to your landing page, you will notice that there are two contrasting areas. There is the area on the left with a dark background which is called the Navigation Pane, and there is a main area with a white background called the Dashboard.
We'll start this lesson by taking a look at the Dashboard first. Bear in mind that Intuit frequently reorganizes the user interface, so there may be small discrepancies in the layout when you view it.
The Header
The Header is the thin, static area at the top of the screen that has three horizontal bars on the left side and a series of icons on the right. At the top in the main window area, you will see your company's name next to the three horizontal bars.

[Figure: The header]
When you click the horizontal bars, you will notice that the Navigation Pane on the left side disappears. When you click it again, it reappears. On a mobile device, you will need to click the three bars in order to see the Navigation Pane at all.
One thing to notice is that when the Navigation Pane is hidden, a '+' button appears at the top of the Dashboard to replace the New button that was in the Navigation Pane. These buttons have the same functionality. They are used to add all sorts of new things to your company, such as customers, vendors, employees, and bank accounts.

[The plus button appears with the left-side Navigation Pane is collapsed]
The next icon on the Heading looks like a person and is for My Experts. This is where you can grant access to your own accountants to your QuickBooks Online account. You can also have QuickBooks search for a qualified accountant in your area.
After the My Experts button, there is a help button. Here you can enter a query and will be directed to a recommended response from their community site. You can also ask a question directly to QuickBooks Online's support staff by clicking Contact Us at the bottom of the window.
The next icon in the Header pane is the Search icon, which looks like a magnifying glass. This is for searching through your company file. You can search for all sorts of things, including a customer or vendor's name or address, specific transactions, specific monetary amounts, or for transactions on a certain date. There is also an Advanced Search for help in narrowing down what you're looking for.
Next you will see the Notifications icon, which looks like a bell. This is where new notifications can be accessed. You can receive notifications for all sorts of things, such as for when a new bill is received or when a customer pays an invoice.
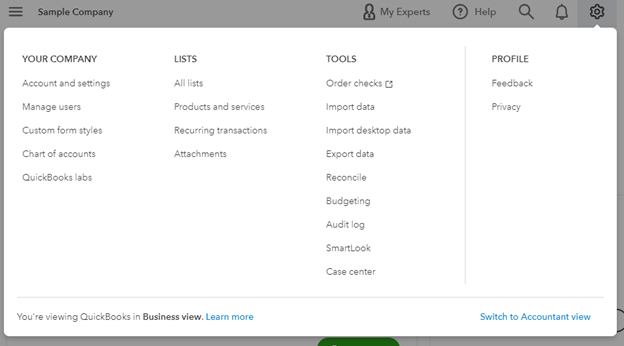
The next thing in the Header pane is the Settings icon. It's shaped like a gear. Clicking this icon opens a window which links you to all sorts of settings that you can adjust. The main categories here are Company, Lists, Tools, and Profile.
[Figure: Clicking the gear icon ]
Company
Within the Company category in the settings, you can adjust your Accounts and Settings, where a lot of your information such as address, business type, and tax number are found. You can go to Manage Users, where you set up users who can use QuickBooks Online and also configure their privileges in the application. You can customize how forms will look, such as changing colors and adding your logo. You can also jump to the Chart of Accounts to see your company's financial standing. You can also check out new and experimental plug-ins for QuickBooks by clicking on QuickBooks Labs.
Lists
Within Lists, you can see all sorts of useful information about your company. This includes an inventory of your products, lists of recurring transactions, accepted payment methods, terms for things like payment due dates and discounts, and file attachments that can be added to transactions.
Tools
There are also numerous tools that can be accessed from this menu item. You can order checks, import data, export data, and reconcile data so that it is consistent. There are also tools for creating a budget, auditing usage of QuickBooks Online by user, sharing a SmartLook code with a QuickBooks Online expert so they can see your screen during a support call, and a Case Center for document requests.
Profile
The last category in the settings menu is Profile. Here you can send feedback which may include attaching screenshots or files. You can also view QuickBooks Online's data privacy policies.
Additionally, from the settings screen you can also change your view back and forth from Accountant View to Business View. Switching between views will not change any data. Business View is for users that are new to accounting, while Accounting View is for more experienced accountants and uses more appropriate terminology. Business View includes the Cash Flow chart, which is only accessed from QuickBooks Labs if in Accountant view. The order of Navigation Pane items is also slightly different between views.
The last thing in this static pane is an icon for your Intuit account. Clicking here will let you update your account and also allow you to sign out.
In various screens throughout QuickBooks Online, you may see the search, help, and settings icons reappear. In those cases, be aware of which one to use. The icons here will be stated as residing in the Header area.
Navigation Pane
The navigation pane is the vertical area on the left side of the screen. This area is not scrollable. You can toggle it on and off by clicking the menu icon in the Heading.
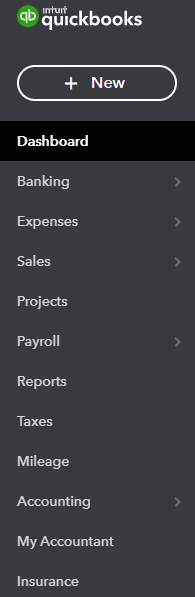
[Figure: The Navigation Pane along the left side of the window]
The Navigation Pane's main components are a New button and several rollover menu items. Hovering your mouse over a menu item with an arrow will reveal more menu choices.
The New button gives you quick access to creating all sorts of new business documents. These are organized into four categories: Customers, Vendors, Employees, and Other. We'll be learning more about the various functions listed here in later lessons.
The next item in the Navigation Pane takes you to the Dashboard screen. The Dashboard view is the default when you log on, but clicking here while in any other view will return you to the main Dashboard window.
The second menu item is Banking. From here you can see securely see all your linked banking and credit card transactions. This is useful for categorizing transactions so that you know exactly what each transaction was for.
The next item is Expenses. This is where you can see all the money that is going out of your business. You can also manage all the vendors that you have to pay.
After Expenses is Sales. This is where your invoicing is located and where you will set up all the ways that your company gets paid. You can set up all your customers here as well as what you sell.
In Projects, you can track profits and expenses based on individual projects. This is available if you are subscribed to QuickBooks Online Plus or QuickBooks Online Advanced.
The following menu item is Payroll. This is where you can manage your employees and contractors. You can pay their salaries and stay compliant with workers' compensation requirements.
Reports is where you can access the numerous detailed reporting features of QuickBooks Online. Choose between standard reports and also make your own custom ones.
The Taxes menu item is where you can set up your sales taxes. You can record all your tax payments in addition to viewing tax reports.
The Mileage menu item is where you can keep track of all the miles you spent driving. You can monitor this through an app or enter in miles manually.
The next menu item is for Accounting. Here, you can access the Chart of Accounts, which is a detailed look into the finances of your organization. You can also reconcile accounts, which is the process of keeping your local books in synch with bank records.
Next is the My Accountant menu item. You can add an accountant here by sending an invitation by email. You can also use QuickBooks Online's directory to help find an accountant if you don't have one.
The last menu item is Insurance. You can find information on all types of insurance that your organization may need, including auto, cyber, and workers' comp.
The Dashboard
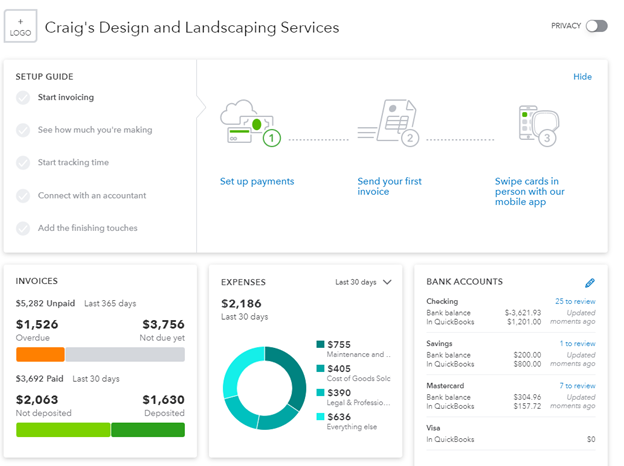
Below the Header and to the right of the Navigation Pane is the scrollable main area of the Dashboard. In the Dashboard you can see an overview of the most important parts of your business, including your cash flow, invoices, expenses, profit & loss, and sales. Additionally, you can see information on bank accounts once they have been linked.
You will see the company's name in a large font right next to a button to add a logo. To the far right of the company name is a toggle button for privacy. Clicking the Privacy toggle will hide all information in the dashboard. This can be useful if someone visits your desk who shouldn't have access to this sort of information.
[Figure: the Dashboard]
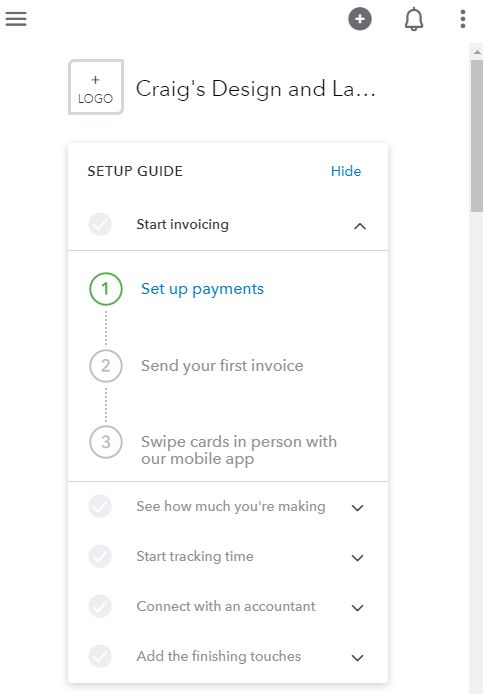
Below the company name, you will see the Setup Guide. This area can be hidden with the Hide button on the right side. We will now take a look at this guide, even though everything here can be found in other parts of the application.
The Setup Guide
The first item in the Setup Guide is for invoicing. You will be able to set up payments, send your first invoice, and also swipe cards in person if you have enrolled in that service.
In the next part of the Setup Guide, you will be able to see how much you're making. This section will let you connect your bank. You can also review your transactions here and see profits.
The third option is to start tracking time. This will lead you to a link to enroll in TSheets. TSheets is separate from QuickBooks, but it does have a free trial.
The fourth option in the Setup Guide is to connect with an accountant. In this section, you can invite an accountant to access your company data by entering their email. There's also a link here to a directory that will search for certified accountants that are nearby your location.
The fifth and last option is to put on the finishing touches. In this section, you can polish your profile, start accepting online payments by agreeing to their Merchant Agreement, and set up sales tax information.
Depending on the width of the browser window in which you are viewing, the remaining window areas on the main screen may show up in different sequences. At the smallest screen width, such as when viewing from a smartphone, the first section is the Bank Accounts pane.
Bank Accounts will show all the debit and credit accounts that you have entered. If they are linked to your bank, then they will be up-to-date with the latest transactions. If not, you will have to update transactions manually. You can click on each account in the list to see your transactions in that account.
The next window to show up is the Invoices window. This shows your accounts receivable. Unpaid funds are shown above paid funds.
After the Invoices window is the Expenses window. This is for your accounts payable. These include the bills that you have entered.
The following window shows a summary of your profit and loss. Your income is shown above your expenses, along with the number of transactions to review for each.
The last pane is for Sales. You will see a line chart where you can click on each data point to be taken to a report.
Additionally, if you are in Business View instead of Accountant View, you will see one more chart in the Dashboard. This is the Cash Flow chart. You can choose to see how much money is coming in and out for the selected time period, or you can choose to see the cash balance.
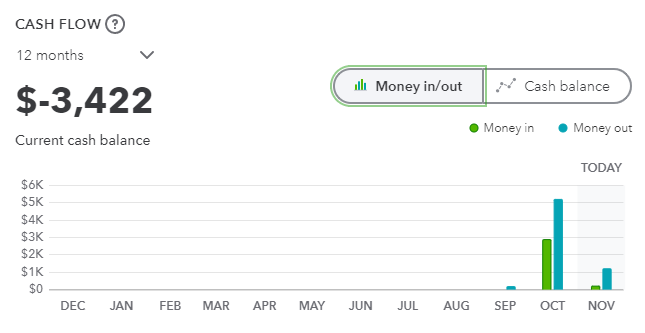
[Figure: Cash Flow chart]
Now that you've seen how the user interface works in the browser, it's also worth checking out the interface of the mobile app. We'll take a quick look at the mobile app in the next section.
Mobile App UI
The mobile app has much of the same functionality as what's available in the browser. You can easily do things like email invoices, receive payments, and reconcile transactions. The layout of the information is a little different, however.
You can switch between the dashboard and activity at the top of the mobile app's home screen. The Activity tab shows events like invoices payments.
You can start a new activity by tapping the Plus button at the bottom-middle of the screen. From there, you can make a sales receipt, expense, bank deposit, estimate, invoice, or payment.
Tapping the menu icon at the top-left will slide in menu that is similar to the Navigation Pane on the browser. The app has some unique functions that take advantage of the fact that it's on the phone. If you tapping the Customers menu and go to a customer's details screen, you can call them directly from the phone icon or view a map to their location by tapping on the map icon.
You can also track expenses by taking pictures of receipts. This is reached by tapping the Expenses menu item and then tapping Create expense at the bottom of that screen.
Conclusion
In this article, we have thoroughly examined the QuickBooks Online user interface. We have identified the three main areas: the Header, the Navigation Pane, and the Dashboard. We have discussed what each menu item links to as well as looked at the default Dashboard screen.
We've also seen how the interface can be both dynamic and static. The Navigation Pane, and even the dashboard, can be hidden by pressing a button. The Header, however, always stays at the top. Furthermore, the layout changes as the screen width changes, which makes the site work well on both computer screens and mobile devices.
Additionally, we saw that there are two distinct view types in QuickBooks Online: Business View and Accountant View. Each has slightly different terms and layouts, and we saw how Business View includes the Cash Flow chart in the Dashboard.
Lastly, we saw that the mobile has is laid out a little differently than the browser version, while also allow for unique functionality.