
Busy employees or business managers can potentially receive hundreds of emails a day. These emails pile up in your inbox, which makes it disorganized and difficult to find important emails. You can easily miss a critical email among the dozens of spam messages. If your email service doesn't have good spam detection, you could spend hours deleting emails with the potential to accidentally delete legitimate ones. Outlook rules make it much easier to organize email by automatically sending your messages from your inbox to a folder.
You aren't limited to just working with your inbox. You can automatically delete messages, flag ones that contain specific words, mark it as read and even print it. Outlook rules provide a level of automation in your inbox, so you can stop spending hours should you receive too many email messages to keep up with organization.
Viewing Your Current Rules
After you create a few rules, they accumulate and can do unexpected changes to your inbox organization. To create a new rule or review the ones already in place, you need to open the window where a list of rules is shown. The button to open this list can be found in the "File" tab in the "Info" section.
Select the email account that you want to configure in the "Account Information" dropdown, and then click the "Manage Rules & Alerts" button.

(Button to open a window to manage rules in Outlook)
When you click this button, a window opens and displays any currently configured rules.
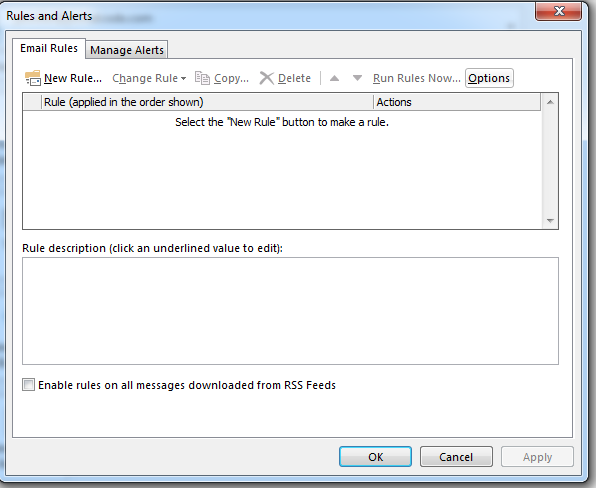
(Window with list of rules)
If you want to change a rule, click it and click the "Change Rule" button. You can also copy a rule and create a new one from the copied rule. Click the "Delete" button to remove it.
The "Options" button shows you two options: Export and Import. If you've moved your account to a new computer, you can import rules from your old computer to the local copy of your Outlook installation. You can also export the rules you've configured on your local computer. When you export rules, you store them to a file that you can use to import rules to another computer. This file can be sent in an email, or you can store it on a network drive where you can import rules from any computer that has access to the network drive.
The "Run Rules Now" button executes all rules shown in the list immediately. Use this button if you need to run rules that don't automatically run on their own and need to mass delete or re-arrange your email organization folders.
Creating a New Rule
We covered one rule in chapter 8 for users that do not have an Exchange server to manage messages. Using rules, you can emulate out-of-office replies that an Exchange server offers. This is just one way to use rules. There are hundreds of variations that can be used to organize email based on your own configurations.
To create a new rule, click the "New Rule" button in the "Rules and Alerts" window that you opened in the last section. Because rules have so many configurations and options, Outlook has a wizard that helps you configure rules and takes you through the steps one-by-one to help you set up a rule that organizes your emails.
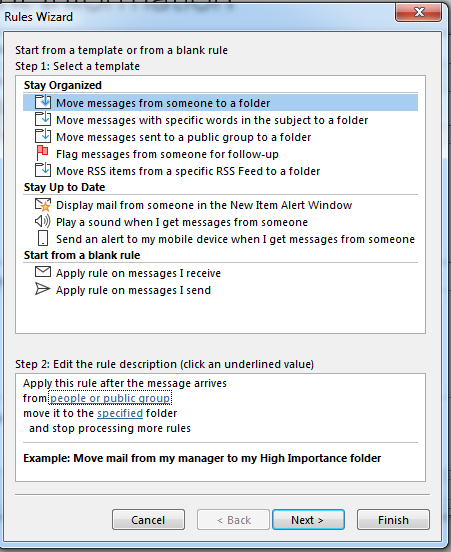
(The first configuration wizard to configure a rule)
The first window asks you what type of rule that you want to set up. The first section "Stay Organized" helps you move messages to designated folders or flag them for follow-up. The "Stay Up to Date" section sets alerts for emails that you consider important and must have a notification when they arrive in your inbox. The "Start from a blank rule" option lets you create a rule with any option and any setting available in Outlook, so it gives you more freedom to organize your email. The only restriction is that you must choose to place the rule on the email that you send or email that you receive. For this example, we'll use a rule on email that you receive, because this is the most common reason to use a rule.
In this example, we'll use a rule for email from a sender that you consider important and must send it to a folder where you can review messages. This folder can be any folder you configure in your Outlook inbox.
To configure a folder in Outlook, go to the email view. Right-click the "Inbox" folder in your personal folders and a context menu displays. Select "New Folder" to create a new folder in which you can send your important email.
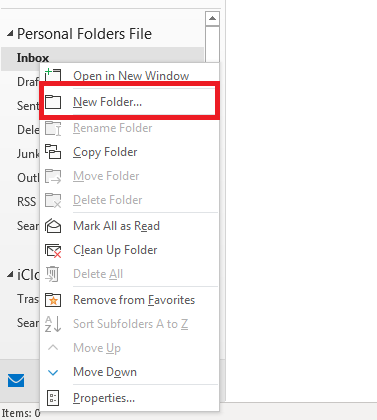
(Create new folder menu choice)
Name the folder anything that allows you to quickly identify it and save it. We'll use this folder to send emails.
With the new folder created, select "Apply rule on messages I receive" option in the first rules wizard window and click "Next." The next window has several options that set the initial rule when an email is received in your inbox.
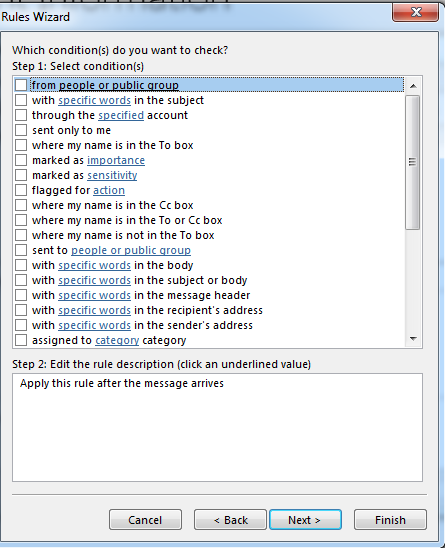
(Rules wizard step two)
This next step sets rules in the type of email that you receive. You might want to filter email based on words within its content. You might want to filter email based on words in the subject. You can filter email based on its importance or number of recipients. To organize an email based on importance, it is usually based on sender as well. In this example, we'll choose the option "from people or a public group." For this choice, you must then click the "people or public group" link and choose a contact in your list. Click "Next" after you've chosen your option.
The next window decides what you will do with an email if it falls into the previous rule that you set.
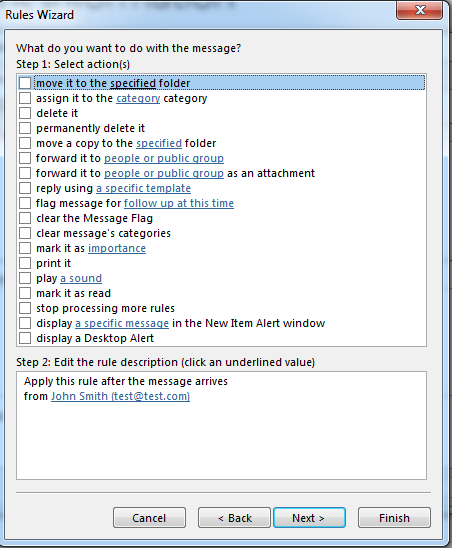
(Rules wizard step three)
This wizard step decides what happens should email fall into the first email rule. For instance, select the first option to "move it to the specified folder," which would send email to a folder that you created and designated.
In this example, since you decide to set the incoming email to a specific folder, you must first set the folder before you can continue. Click the "specified" link in the rules text and choose a folder to store emails when they match the first rule option.
Click "Next" and the window that displays is any exceptions to your rule.
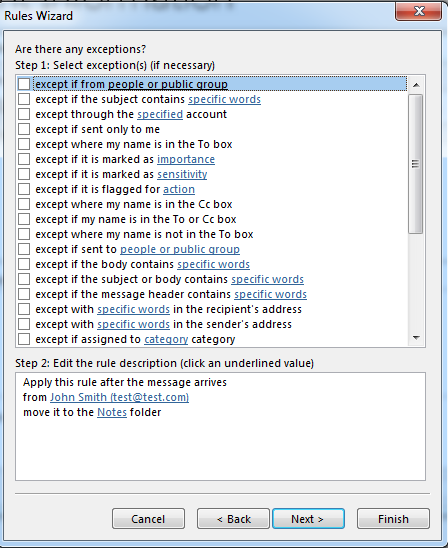
(Exceptions to your rule)
You can exclude people, content, flags or categories using this option. Remember that any settings in this window will exclude rules, so email messages can bypass your main rules. When you choose an exclusion, you must also choose the contacts to exclude, so click the link for this exclusion rule, choose your contacts and then click "Next."
After you select a rule, click "Next." The final part of the rules wizard is to name your rule and save it.
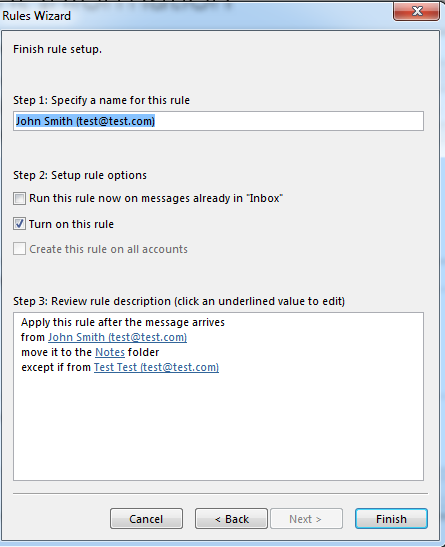
(Final rules window)
Notice that you have a few options before saving your new rule. You can run the rule immediately after saving it. You also have the option to turn on your rule or leave it off until you're ready to enable it.
After you've made your decision, click "Finish" and the rule is stored in Outlook. Should you enable the new rule, it will take effect immediately. If you do not, it will only run when you manually execute the rule or you must enable it later.