Parameter Queries in Microsoft Access 2013
Whenever you want a query to ask for input each time you run the query, you create what's called a parameter query in Access 2013. Don't worry if that doesn't make a bit of sense right now. We'll teach you exactly what a parameter query is and how you can create them.
As you already know, you use criteria to narrow down the results you receive in a query. Criteria eliminates the expression "looking for a needle in a haystack."
But let's say when running a query, you want to know (using our book collection database as an example) how many books you've recently added to your collection because you share this information with friends who might want to read them. So, you want the query to show all the new books that you've added SINCE you last ran the query and sent out the list to your friends. To do this, you add criteria to a DateAdded field. This shows the date you purchased the book. The criteria tells Access that you want all books added after a certain date (the date you last ran the query). However, wouldn't it be a lot easier if Access prompted you to enter a date? The good news is that you can do this using a parameter query.
Creating a Parameter Query
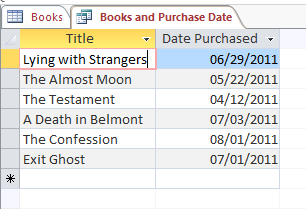
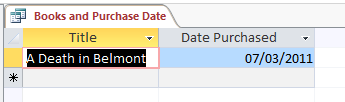
The first thing you do is select the query for which you want to add a parameter to. You can see the one we've selected below. It contains the title of the book and the date it was purchased. This was the query we ran to see purchased books.
You will need to add a Date Purchased field to the Books table, and enter some data.
Now, switch the Design view.
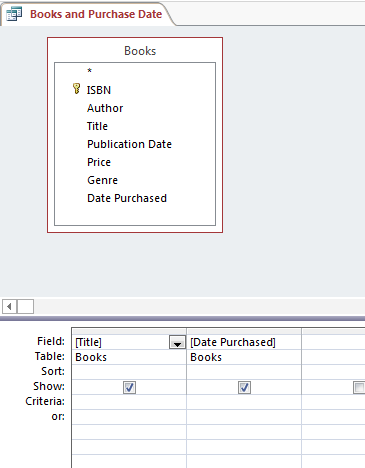
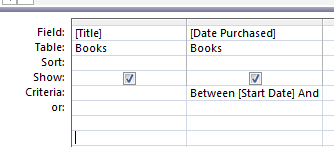
We can now add our criteria in brackets. The brackets indicate that Access should look for a field, or ask the user for a field if there is none.
We're going to enter: Between [Start Date] And [End Date] to see all books purchased within a specified time frame. We enter that in the Date Purchased field.
You can resize the columns by clicking and dragging on the edge of the column to make it wider, to see the full values.

Now, go back to Datasheet view to run the query.
Access now prompts you for values for your parameter in a dialogue box, as shown below:
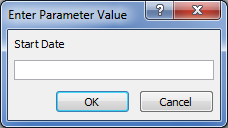
Enter the Start Date for the query.
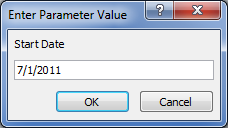
Click OK. Enter an End Date.
![]()
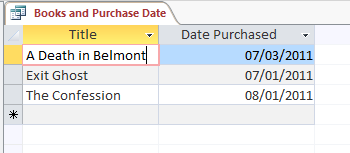
Click OK.
Access now shows us the results of our query:
Changing Parameter Prompt Order
When you enter parameters for your query, the prompts appear the way they do in Design view, from left to right. You'd see the prompt from the first parameter that you entered, etc. But what if you want to change the order in which they appear?
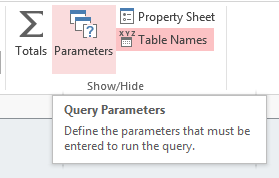
To do this, go to the Design view of your query, then click the Design tab.

Now click Parameters in the Show/Hide group.
This form will appear. 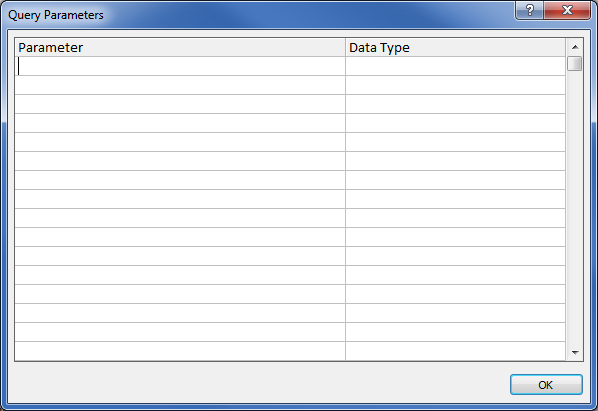
You can enter the names of the parameters, and the data types, in the order that you want them to appear.
Using Wildcards in Parameter Queries
If you want to add variability into your parameter query, you can use wildcards. An example is if you want a query to match a text string in any part of a field. You can do this using Like with wildcard characters.
To do this, open a query, then go to Design view.
Go to the field where you want to apply a parameter. You will type:
Like "*"&[type the text you want to use as a prompt here.]&"*".
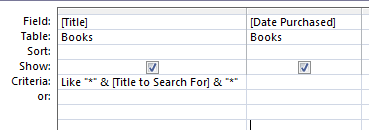
So, if you wanted to search for titles in the query, you would enter:
Like "*" & [Title to Search For] & "*"
When you switch back to Datasheet view to run the query, Access prompts you, but without the brackets, the word Like, or the wildcard characters. Access will now match values that contain the parameter string.
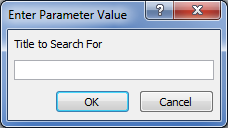
Enter a value, then click OK.
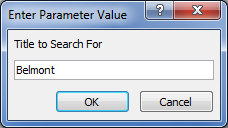
Any records that contain this sequence of characters within the Title field will be displayed.
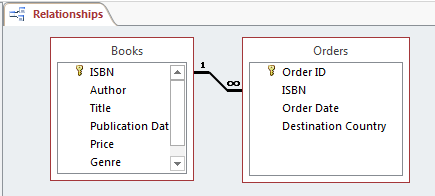
Relationships
When you define a relationship in Access, you relate data from one table to another. By doing this, you are linking your tables together so you can perform queries and extract specific data from multiple tables all at once.
Access 2013 gives you three types of table relationships to use. Let's learn about these relationship types.
- A one-to-many relationship refers to the sides of the relationship. For example, if we have a Customers table that contains customer names, this is the "one" side of the relationship. Let's say we also have an Orders table that contains orders at the primary key and the customer ID number as the foreign key (it's the primary key in the Customers table). There may be several orders for one customer in the Orders table. This is the "many" side of the relationship. To create a one-to-many relationship, take the primary key on one side of the relationship, and add it to the "many" side of the relationship. That said, when you learned to create tables, you automatically learned how to create primary and foreign keys, and you already have those established in your tables, such as the Orders and Books tables.
- A many-to-many relationship can be best defined by an example. Let's say you have a Products table and an Order table. The products table has many products, and the order table has many orders. You can have the same product on many orders, and you can have many orders for the same product. This is a many-to-many relationship. To define that relationship in Access, you need to create a third table. This is often referred to as a junction table. A junction table breaks down the many-to-many relationships into two one-to-many relationships. Place the primary key from each of the tables into the third table. This results in the third table recording each instance of the relationship.
- A one-to-one relationship means that a record in the first table can have only one record that matches it in the second table. Also, each record in the second table can only have one matching record from the first table. This is an uncommon type of relationship in Access 2013.
Introduction to Joins
Sometimes in Access, you'll need to view information from two or more tables from different database tables. For this, you will need to create what's called a join. A join does as the name implies. It temporarily joins two tables together.
Whenever you run a query to find data in tables that are related, Access will look for records on both sides of the relationship that have matching values. By learning what type of query join to use, you can determine what records will be displayed as the results. When you do this, you can find the exact data that you need without sorting through data that you won't. Let's delve a little deeper so that this makes sense to you.
In this section, we're going to talk about the two types of joins:
- An inner join
- An outer join
Inner Joins
An inner join is defined as a join that only selects records from tables that have matching values. You can select one or more fields to serve as the join fields. This is the default join type in Access. You don't even need to do anything most of the time to create an inner join if relationships are already established.
Access creates an inner join between related tables when you add them. When you create primary keys and foreign keys, have the same field in more than one table, Access creates that relationship for you and creates the inner join. You can create an inner join by dragging a field from one table to another in query design view. There will be a line displayed to show that a join has been created.
Outer Joins
An outer join informs a query that the query needs to include all rows from one table, then rows from the other table too that share a value on both sides of the join.
That said, outer joins can be left or right outer joins. Left outer joins include all rows from the first table, then rows from the other table that contains values that are the same in both tables. A right join is vice versa with all rows from the second table included and only those rows with matching values included from the first table. You can click any join to see the Join Properties dialog box to see if it was a right or left join.
Creating a Join
To create an inner or outer join, first create a relationship.
Double-click on the line that illustrates the relationship in Design View. You can see the line below.
The following dialogue box will appear:
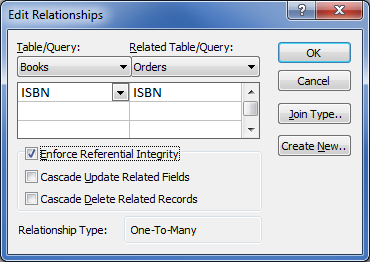
Now click Join Type.
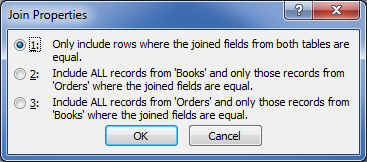
- #1 is an inner join.
- #2 is a left outer join.
- #3 is a right outer join.
Click OK.
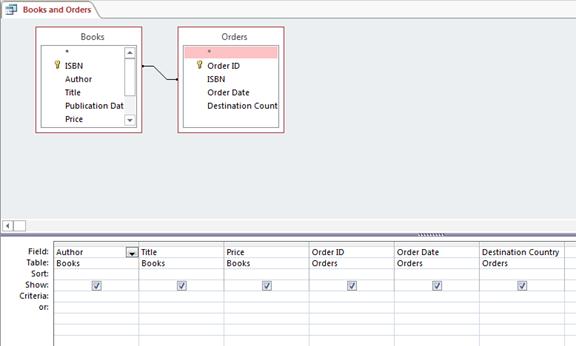
Create a Query on Multiple Tables
Now that we have a join set up with two tables, we can create a query on these two tables. This is often done to get data from more than one table and display it in one place.
In this example, we are going to show details of the Books and Orders table in the one query.
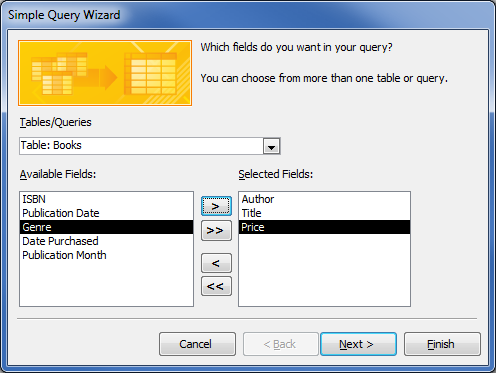
Create a new Simple Query using the Query Wizard.
In the drop-down box that appears on the field selection screen, select "Table: Books".
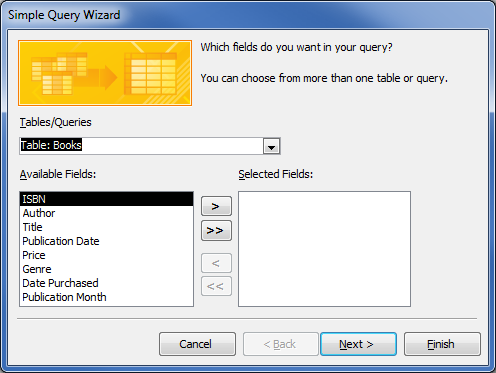
Select the Author, Title, and Price fields, and add them to the Selected Fields section.
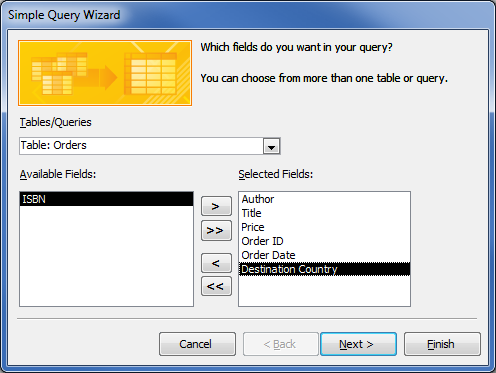
Now, select the "Table: Orders" from the drop-down menu.
Add the Order ID, Order Date and Destination Country fields to the Selected Fields section.
Click Next, and Next again. Name your query and click Finish.
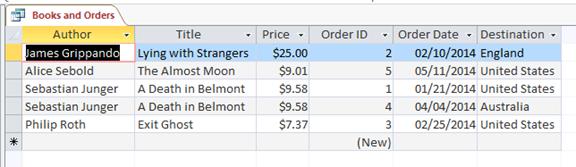
The query will now show the results from both tables.
If you go to Design view, you can see the fields listed, as well as the two tables and the relationship between them that was created.
Creating Calculated Expressions
Calculated Expressions
Expressions in Access 2013 are used to do mathematical calculations, combine or extract text, or validate the data in your database. Expressions use all or some of the following elements: functions, identifiers, operators, and constants.
The plus and minus sign are operators, for example. However, before we move forward, let's talk briefly about the definitions of functions, identifiers, and constants before continuing. It's important that you understand what everything is before you begin to use it.
Below is an example of an expression:
=Sum([Retail Price])*.08
In this expression, Sum() is the function, [Retail Price] is the identifier, the asterisk is the operator, and .08 is the constant.
- A function is defined as a procedure that returns a value that's used in an expression. In the example above, the procedure is to add (mathematical addition).
- An identifier is defined as a part of an expression that represents the value of a field, property or control. In the example above, the identifier is [Retail Price], and it represents the field "Retail Price."
- A constant is defined as a value that's not calculated and doesn't change.
When you use expressions in Access 2013, you can use them to do any of the following:
- Specify criteria for a query. This is something you've already learned to do, and we supplied you with several expressions you can use.
- Create validation rules. A validation rule controls what users can enter into a field.
- Calculate values that don't exist in your database. For example, maybe you want to calculate the total amount of orders for one customer.
- Set default values for fields and/or controls. These are the values that you see when you open the table, form, or report.
Calculated Detail Fields
A calculated field is defined as a column that contains an expression. Whenever you enter a record into the table, Access will use the expression to calculate what data will appear in that field.
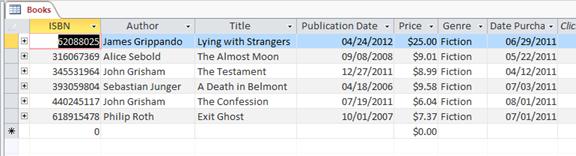
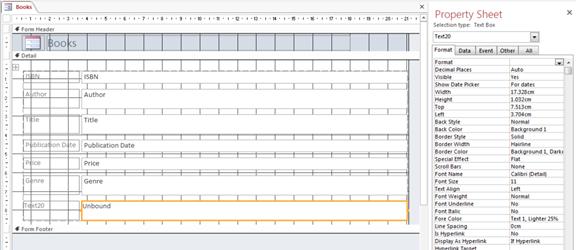
To create a calculated field, open a table in your database. We've opened Books, as you can see in the snapshot below.
Let's add a new field. We'll make it a calculated field. Click the arrow in the Click to Add field, then choose Calculated field from the dropdown menu, as shown below.
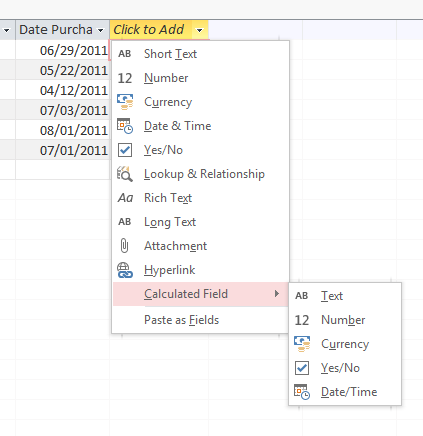
Now you can choose what type of calculated field you want to add. It can be text, number, currency, Yes/No, or Date/Time. Since your table contains a lot of text and not many numbers, we've chosen text.
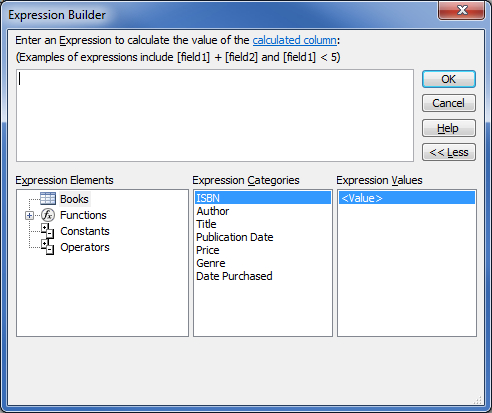
The Expression Builder then opens up. You can use the Expression Builder to create calculated fields or expressions for records.
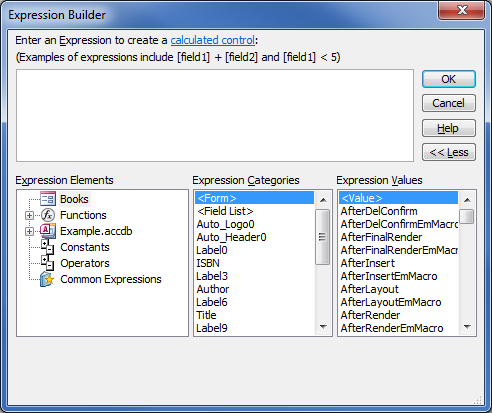
The Expression Builder
Below you'll see a snapshot of the Expression Builder that we opened in the last section of this article. Let's learn how to use it in creating a calculated field, although you can use the Expression Builder for any expression you want to create anywhere in table, query, or other area.
Let's learn how to use it.
The upper section of the Expression Builder is called the Expression box. This is where you put together your expression. The three columns below the Expression box are where you can go to construct the expression. If you want, you can type some or all of your expression directly into the Expression Box.
If you go to the first of the three columns below, you can choose an expression element. If you'd like to see the month value for the publication date, you'd first expand the Functions group. Select a category, then select the value. We've selected Month.
Double-click on the function to add it into the expression box.

Now you can fill in values.
Now you can click on <<date>> to highlight it, and type in the value. Type in [Publication Date]. Access may suggest the field for you as you're typing.
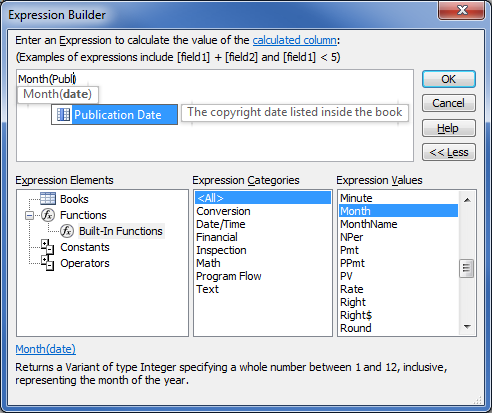
Press Enter to add the selected field.
Click OK and it will be inserted into your database. The field will be added, as shown below.
![]()
Enter a name for the field, and the table will be updated.

Functions
As we stated earlier, a function is a procedure that's used to determine a value. The concept is simple, but learning all the functions can be overwhelming and almost impossible. Unless you're a programmer or familiar with programming language, using the Expression Box is the quickest and simplest way to do functions in Access2013.
In addition, MS Access 2013 explains what each function is at the bottom of the Expression Builder window. To see all functions for MS Access 2013 and what they do, as well as use them in your expressions, click on Functions in the first bottom column, then Built In Functions.
Insert Expressions into Queries, Reports, and Forms
To use a calculated expression in a Query, open the query.
Switch to Design view, then go to the Design tab and click Builder in the Query Setup Group.
![]()
To create an expression in forms or reports, go to Design view.
Select the field where you want to enter a calculated expression and select Properties. You'll see this window on the right hand side:
Look for the three dots beside the Control Source item, which is on the Data tab. This represents the Expression Builder. We've pointed out in the snapshot below.

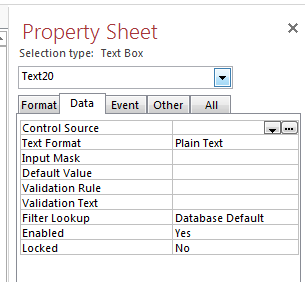
Click on those three dots to open the Expression Builder and enter your expression.