When you look at an image in Elements, you see the subject of the image, the noticeable colors, and the background. What you don't notice are the little aspects that come together to form the image, as well as to determine the quality of it.
An image you view in Elements is comprised of pixels arranged on a grid. Pixels are tiny squares. They form the image you see, but they also determine the resolution of the image you see.
An image you view in Elements also contains a color mode. The color mode of an image determines how many colors the image contains. The color mode is important when using tools in the Tools panel or Panel Bin, as well as when printing or sharing.
The file format in which you choose to save your image will also help determine the quality of the image. Some file formats are better for printing. Others are better when viewing on a screen. In this article, we will learn about selecting a file format. We'll also learn more about color modes and resolution.
About Resolution
The number of pixels in an image determine the image's resolution. The resolution is measured by the number of pixels that exist across a one inch horizontal line in your image. That said, if you have 72 pixels across one horizontal inch, the resolution for that image is 72 ppi – or pixels per inch.
Higher resolutions are better for printing. The optimal resolution for an image that you will print is 300 ppi. If you're not going to print the image, but just use it online or for display on a screen, a lower resolution is better. This is so the resolution of the image matches screen resolutions – or display resolutions. The optimal resolution for an onscreen image is 72 ppi.
Image Size and Resolution
The size of an image is measured by the image's height and width. For example, an image's size may be 3 X 5 inches. You can change the image size of an image. You can also change the resolution – or you can change both. However, if you change only the size of an image, it will still affect the resolution. If you increase the size of an image, the resolution will decrease. If you decrease the size of an image, the resolution will increase.
Changing Image Size and Resolution
To change the size of an image, go to Image>Resize>Image Size on the Menu Bar.
You will then see the Image Size dialogue box.
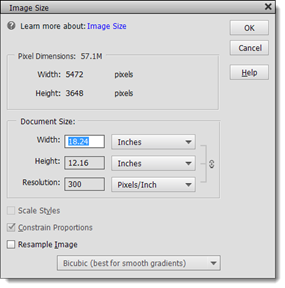
In the Document Size section of the dialogue box, enter the new dimensions for the image. By default, dimensions are shown in inches. You can click the downward arrow to the right of Inches to change the measurement to percent, centimeters, millimeters, points, picas, or columns.
Next, you can change the resolution by entering a new value in the box.
If you want to resample the image, put a checkmark beside "Resample Image", then select a resampling method from the dropdown menu. When you resample an image, you can change the dimensions and the pixels at the same time. The benefit of resampling is getting the best quality image for the image size selected -- without an output file size that's too large.
The resampling methods are:
-
Bicubic. Default resampling method. Produces an image of medium quality. Best resampling method to use unless you get noticeably better results with another.
-
Bicubic Smoother. Products a better quality than bicubic, but edges may be softened.
-
Bicubic Sharper. Produces good quality. Sharpens images.
-
Nearest Neighbor. Fastest resampling method. Produces smaller file size. Best for images that have large areas of the same color.
-
Bilinear. Produces an image of medium quality. Best used with grayscale and line art.
Click OK when you are finished.
Changing the Canvas Size
In addition to resizing images, you can add blank space to any side of an image to enlarge the canvas. Keep in mind that this does not enlarge the image. It just adds space on the sides of your canvas.
Canvas that you add appears as the background color in background layers. It is transparent in all other layers.
To change the canvas size:
Go to Image>Resize> Canvas Size.
You will then see the Canvas Size dialogue box.
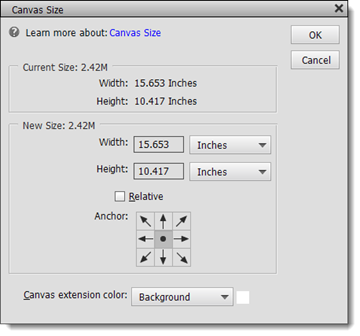
You can now do one of the following:
-
In the height and width box, enter the new height and width. You can enter it in inches, picas, centimeters, percent, pixels, column, or millimeters by clicking the dropdown box beside either the height or width box.
-
You can also use the anchor. Click where to position the image on the new canvas.
Click the OK button when you're finished.
Understanding Color
There are two color models in Elements that allow you to set color for your images. The first model is based on the way that the human eye sees color. Using this model, you can adjust the colors for hue, saturation, and brightness or HSB.
The other model that Elements gives you to adjust color is based on the way computer monitors display color: in red, green, and blue or RGB.
Elements also gives you four image modes to allow you to determine the number of colors used in an image. These are grayscale, indexed color, RGB, and bitmap.
We'll learn more about these modes in the next section of this article.
Image Modes
As we just discussed, an image mode allows you to determine the number of colors used in an image as well as the file size.
Elements has four image modes. Let's discuss each one of them and what they mean.
Bitmap mode means all pixels in the image or displayed in black and white. These images or 1-bit images because they have a bit depth of 1. To convert an image to bitmap, go to Image>Mode>Bitmap. If your image is currently in RGB mode, Elements will first convert it to Grayscale to remove hue and saturation from the pixels, and then to bitmap.
Grayscale mode uses up to 256 shades of gray in the image. This is an 8-bit image. Each pixel has a brightness value that ranges from 0 (black) to 255(white). To convert to grayscale, go to Image>Mode>Grayscale.
Indexed Color mode uses up to 256 colors. When converting to the indexed color mode, Elements makes a list of all the colors used in the image. If a listed color is not one of the 256 colors that the indexed color mode offers, Elements then converts that color to its closest match. The match will be one of the 256 colors. This helps to reduce file size. However, editing features are limited in indexed color mode. It's recommended that you temporarily convert to RGB to make any changes. To convert into indexed color mode, go to Image>Mode>Indexed Color.
RGB mode. In RGB mode, the red, green, and blue components in your image are assigned an intensity number that ranges from 0 to 255. Zero is black, and 255 is white. This allows for a wide range of colors and results in a larger file size. However, it also provides crisp, colorful images. To convert to RGB mode, go to Image>Mode>RGB.

Color Management
Each device that you use for an image will have a different range of colors, called a gamut. Your digital camera, scanner, monitor, and printer will have a slightly different gamut. When you move images from one device to the other, the colors shift and are reproduced slightly differently.
Color management translates the colors in your digital camera and other devices so that the colors you see on your monitor before you print are the colors you see after you print the image. The colors may not match exactly because your printer may not have the same range of colors as your monitor, but color management means they will be as close as possible.
In order for color management to work, you must profile all your devices or use the ICC profile given by the device manufacturer. Embedding profiles with your images makes the colors portable so other devices and Elements can read and translate the color.
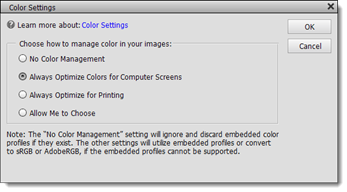
To set color management in Elements, go to Edit>Color Settings. You will then see the Color Settings dialog box. Select a color management option, then click OK.
When you save a file, select ICC profile in the Save As dialogue box.
Working with File Formats
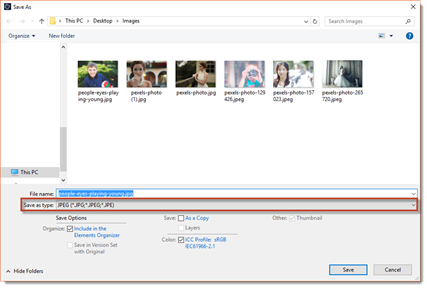
Whenever you save a file in Elements, you will need to select a file format. These file formats are listed in a dropdown menu in both the Save and Save As dialogue boxes, as shown below.
Let's look at the different file formats to help you decide the best format to choose for your images.
-
BMP (.bmp, .rle, .dib). The bitmap format is best used for images that you'll use as system resources, such as wallpaper for your desktop. It can also be used when you cannot import images into documents using other file formats.
-
CompuServe GIF (.gif). GIF stands for Graphics Interchange Format. It's a common format of files saved for use on the web. If you're going to save an image as a GIF, go to File>Save for Web.
-
JPEG (.jpg, .jpeg, .jpe). JPEG stands for Joint Photographic Experts Group. It's arguably the most common format. The JPEG format can be used for onscreen or printed documents. However, files are compressed to reduce file size, so there is data loss. If you select the JPEG format, you'll see the JPEG Options dialogue box after you click Save. The dialogue box allows you to specify the amount of compression as a value. Zero is the lowest quality and the highest compression. Twelve is the highest quality and lowest compression.
-
Photo Project Format (. pse). This format is an Elements format. Use it when you want to save a file as a project.
-
Photoshop (.psd, .pdd). This is the Photoshop file format. Saving in these formats prevents layers from being merged, so that you can work within the layers the next time you open the file.
-
Photoshop PDF (.pdf, .pdp). PDF files can be viewed in Adobe Reader for free. If you're printing slide shows, calendars, etc. you can export to PDF. If you save in PDF, layers and text can be preserved, making it the perfect format if you need to share files with people who don't have access to Elements or Photoshop.
-
Pixar (.pxr). This format is for exchanging files with Pixar workstations.
-
PNG (.png). PNG stands for Portable Network Graphics. It's the format used mostly with web pages.
-
TIFF (.tif, .tiff). TIFF stands for Tagged Image File Format. It's the format used most by graphic designers for importing images into layout programs.
As an Elements user, you are probably not a professional graphic designer or image editor. Your main concerns will be the best formats for printing your images, as well as displaying them onscreen.
For printing, TIFF, PDF, and perhaps even JPEG. For onscreen display, JPEG, GIF, and PNG will be your best choices.
About Foreground and Background Colors
In Photoshop, the foreground color is the beginning color of a gradient. The background color is the color you apply with the Eraser tool and is the last color of a gradient. If you're painting with a brush tool, you will paint using the foreground color.
To see or change the foreground or background colors, go to the Color section of the Tools panel. You'll see two boxes. One is black and the other is white. The top color (the black) is the foreground color. The white is the background color.

You can change either of these colors using the Eyedropper, Color Swatches Panel, or the Color Picker.
Remember:
1. Whenever you use the Brush, Paint, or Bucket tools, you use the foreground color.
2. When you use the Eraser tool, you use the background color.
3. The foreground and background colors are used together in the Gradient tool.
Using the Color Picker
You can use the Color Picker to change the foreground or background color. To access the Color Picker, simply click on either the Foreground or Background color.
We've clicked on the foreground color, or the top color.
You will then see the Color Picker.

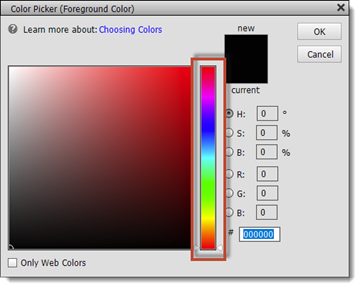
You can select your color by clicking in the panel on the left -- or using the Color Spectrum, as outlined in red below.

After you choose a color in the Color Spectrum, click a color in the panel.
You can also select colors using the HSB or RGB models, or assign a hexadecimal color.
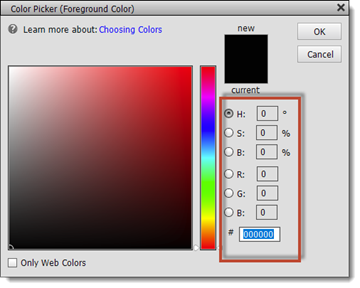
You can also check the box at the bottom left of the Color Picker to assign only web-safe colors.
The Color Swatches Panel
The Color Swatches panel makes it easy to store and use colors that you use often in your images. By clicking on a color in the color swatches, you can change the Foreground or Background color. You can even add or delete colors to the swatch to create custom colors, then you can save them for use in future images.
To open the Color Swatches panel, go to Window>Color Swatches.
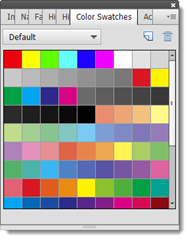
To choose a background color, click Ctrl + the color in the panel.
Add a Color
Now let's learn how to add a color to the Color Swatches.
To add a color to the Color Swatches, click on the foreground color in the Tools panel. You will then see the Color Picker.
Use the Color Spectrum, then click in the panel to create a new color.
Click OK.
This is the foreground color we created:

Next, click the new swatch button on the Color Swatches panel:  .
.
Enter a name for the new color swatch.
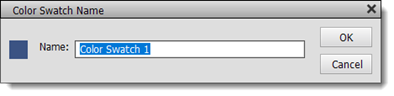
Click OK.
The new foreground color is now added to the end of your color swatches.
To delete a Color, drag the color you want to delete to the trashcan at the top right of the Color Swatches panel.
Selecting Colors Using the Eyedropper Tool
With the Eyedropper tool, you can copy a color in your image without having to go through the steps to select a swatch. If you want to save the color, however, make sure you add it to the Color Swatches panel.
To use the Eyedropper tool, click on the Eyedropper tool in the Tools panel. It looks like this:  .
.
Go to your image. Click on the color in the image that you want to use as the foreground color.
In this example, we're going to change our foreground color to the color of the light purple flower in this image:
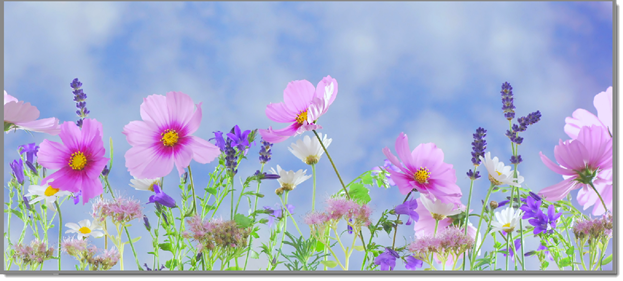
With the Eyedropper tool active, we simply click on the light purple color in the image.
The foreground color changes to the color of the flower, as seen below.

To change the background color, simply hold down the Alt key on your keyboard while clicking the Eyedropper tool on the color in the image.
|
IMPORTANT NOTE From this point forward we will work in the Expert editing mode in the Photo Editor. If you are following along in Photoshop Elements 15, switch to the Expert editing mode at this time. |