Unless you like the old methods of correction tape and liquid, MS Word 2003 makes editing a lot less of a headache. In this article, we're going to cover both basic editing features and later advanced editing techniques.
Find
Let's say you want to find all occurrences of a certain word or phrase within your document. Rather than scanning through your document to find all the words, you can do it all quickly and easily within a matter of minutes.
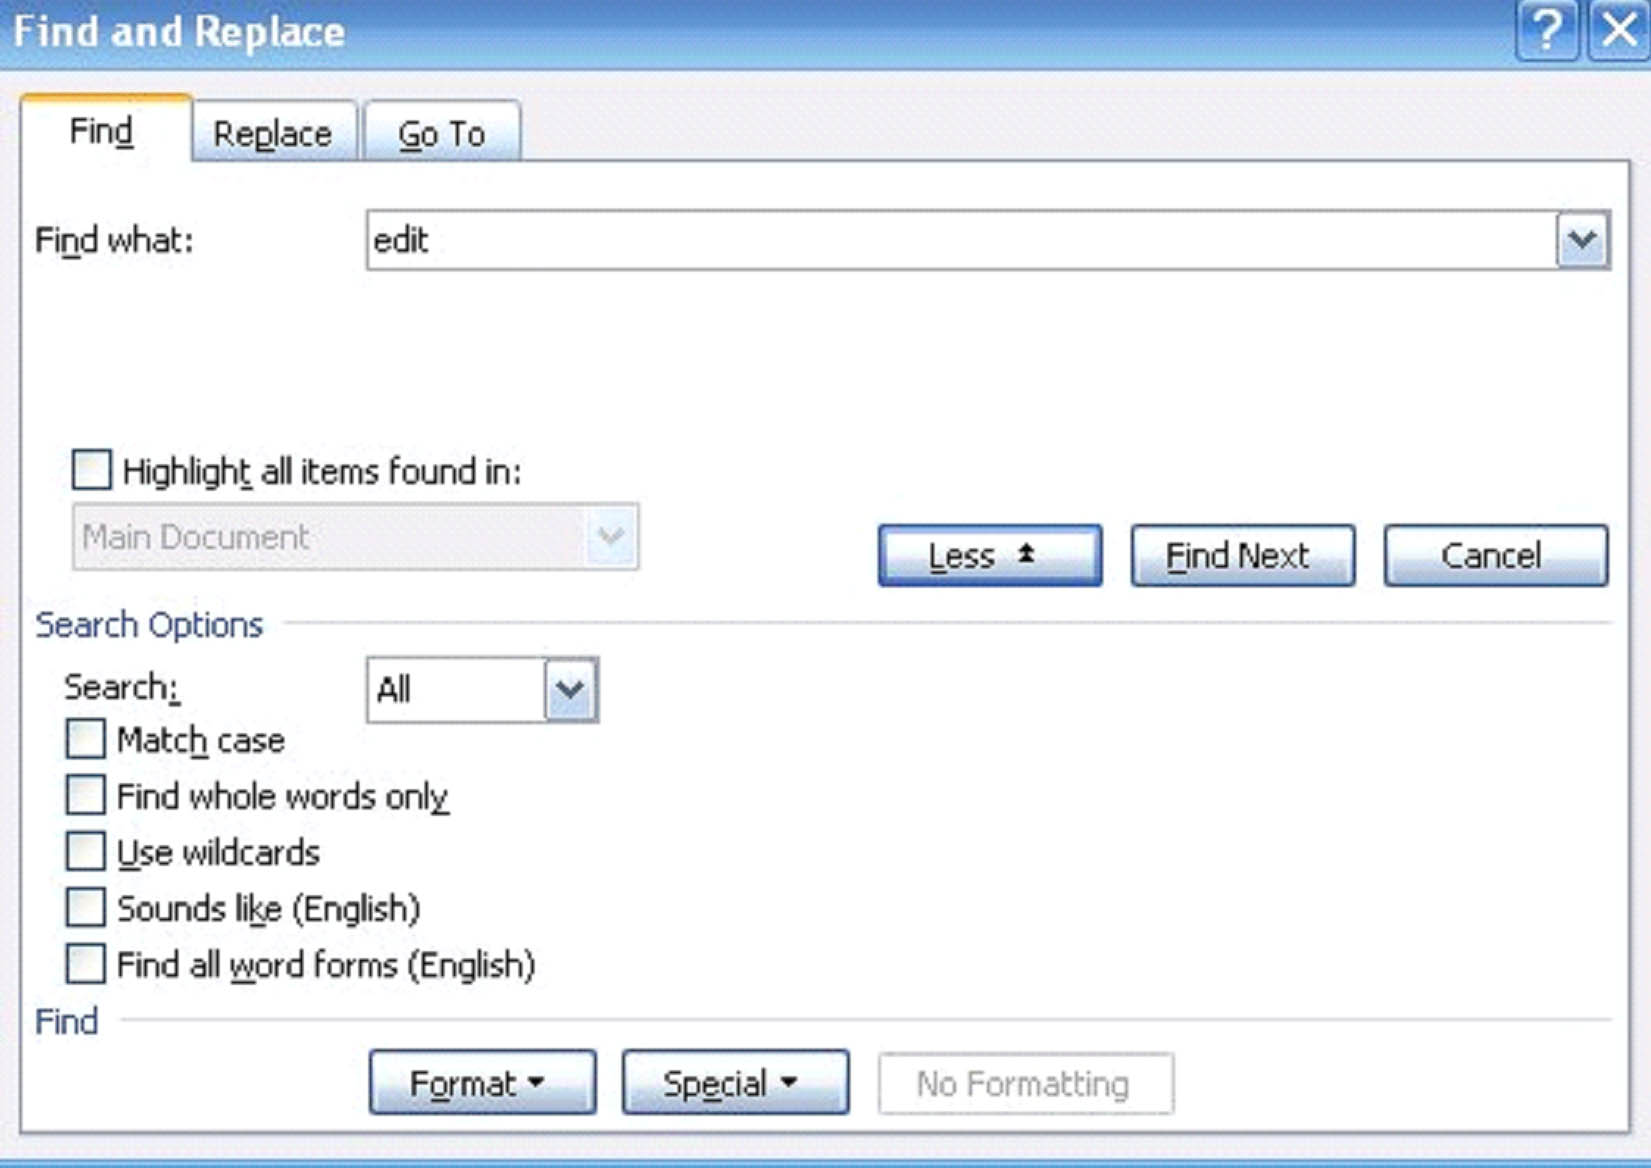
First, go to �Edit' on the menu bar. Scroll down to �Find' and click it. �Find' has a pair of binoculars beside it. The window you'll then see will look like this:
![]()
Type the word or phrase you want to find. When you type a word or phrase in, the �Find Next' button will become active. Click on it.
Keep clicking find next to find all occurrences.
Here's another neat feature that can be used with �Find' (and even �Replace,' which we'll talk about next).
- Click on the �More' button in the �Find and Replace' window as shown below.
- You can specify �Find' to locate only those words that match by case, whole word, sounds like, and all word forms. You can click �Special' and instruct MS Word 2003 to find paragraph marks, tab marks, em dashes, etc.
Note: You can also click the icon on the �Standard' toolbar.
Replace
Replace is a lot like find. The big difference is instead of just finding a word or phrase, MS Word will find that word or phrase and replace it with something different.
Click on the �Replace' tab in the �Find and Replace' window.
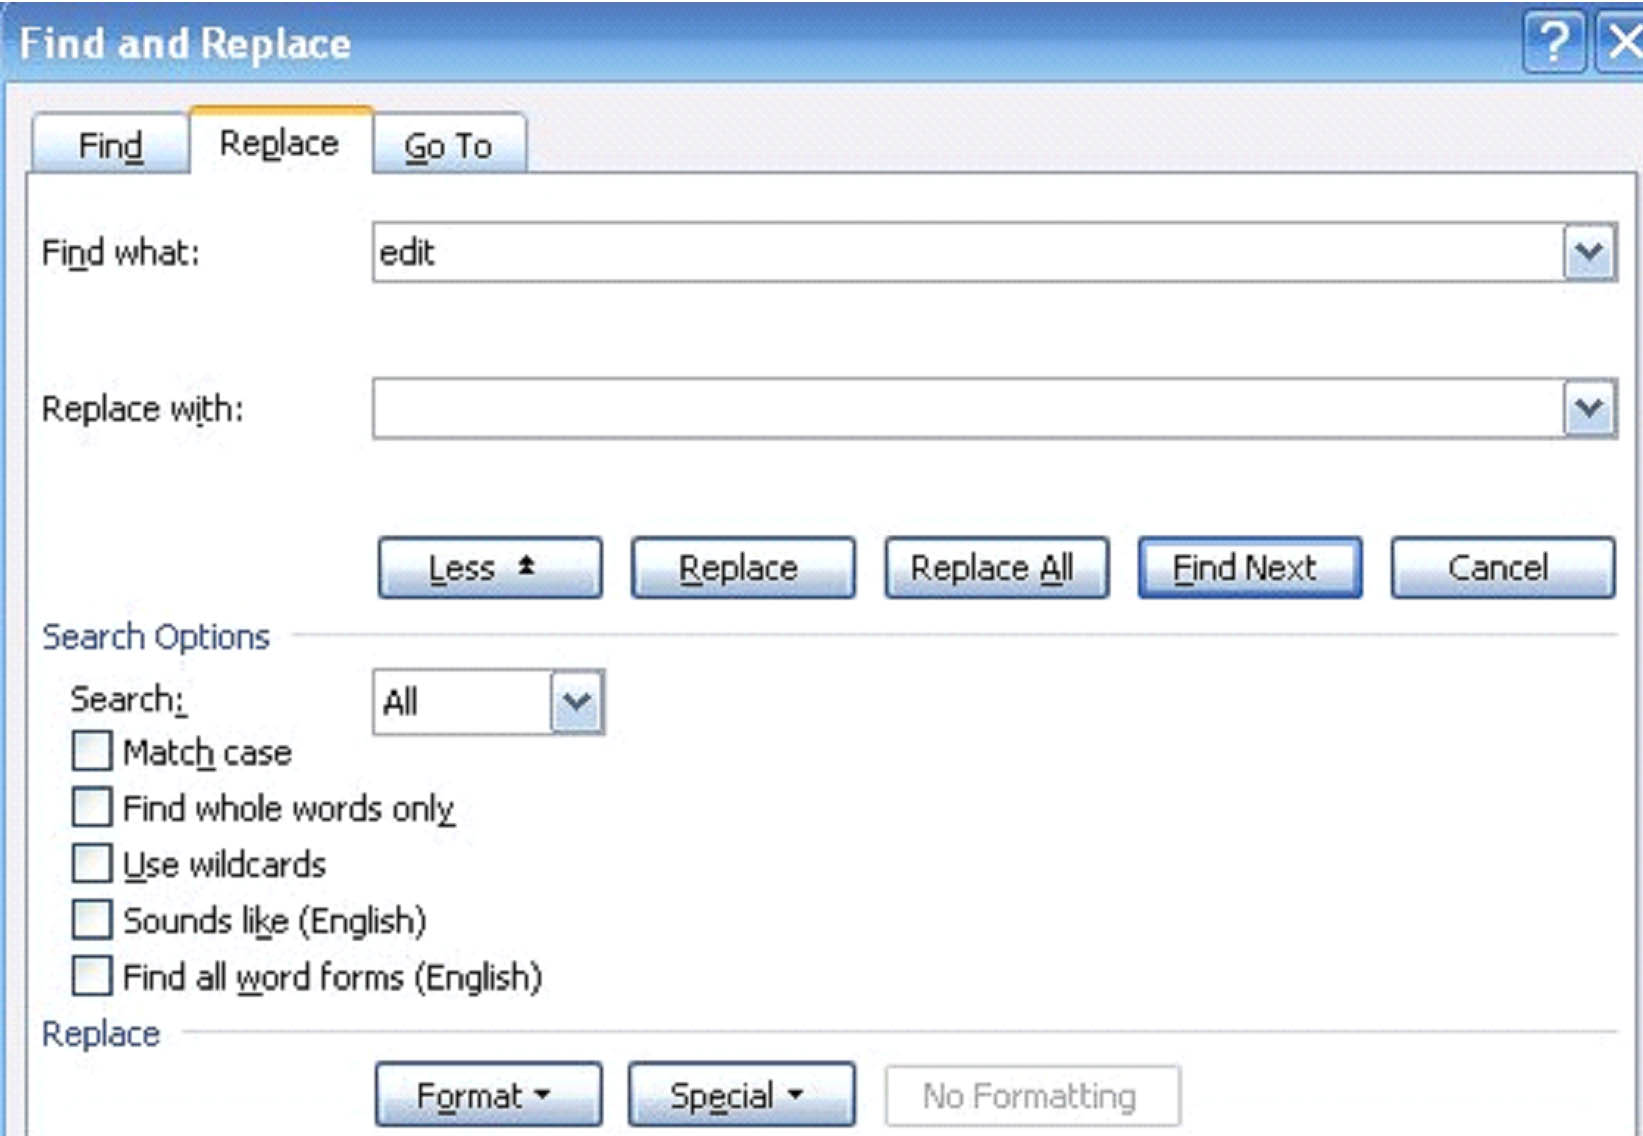
Type in the word or phrase you want MS Word to find in the �Find what' box.
Next, type in the new word or phrase that will replace the old one in the �Replace with' box.
Now, you have several options.
- You can click replace, and MS Word 2003 will find the next instance and make the replacements for you. Just keep in mind you have to click on �Replace' to make the next change. MS Word will not ask you permission before making the change.
- You can click on �Replace All' and MS Word 2003 will automatically replace all occurrences. It will not ask permission before making the changes.
- Or, you can click �Find Next.' �Find Next' allows you to find each occurrence of the word or phrase before you replace it. Once you find an instance, if you want to replace it, all you have to do is click �Replace.'
Go To
The �Go To' feature is also located in the �Find and Replace' window. Just click on the �Go To' tab.
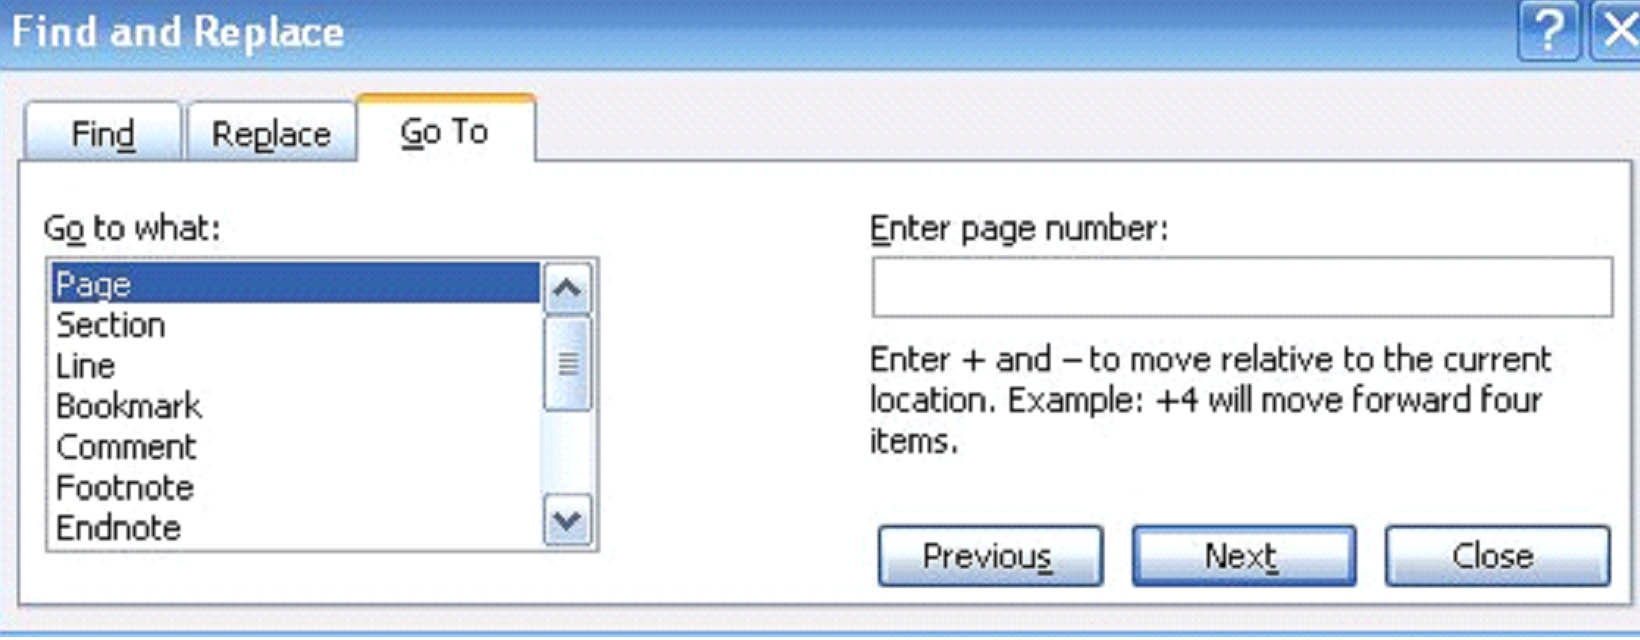
�Go To' allows you to easily go to a certain place within your document. You can choose to go to a certain page, section, line, etc. You can see in the picture above how easy it is to go to a certain page.
Undo and Redo
The undo and redo feature is one of the most convenient features that MS Word offers if you're someone that makes errors. Let's face it, everyone makes errors!
For example, let's say you format your document. You change the font size, the font type, and even change the color of the font. But once you get it all done, guess what? You decide you dislike the changes and want to go back to the original version. The good news is that you don't have to go back through and make all the changes again. Instead, you can simply undo the changes.
To undo any changes you've made, click �Edit' on the menu bar, then �Undo.' Clicking that will undo the very last thing you did. You can keep clicking �Undo' to undo previous changes you've made as well.
Note: You can also click the  icon on the �Standard' toolbar.
By the same token, if you undo the changes and decide you really did like them, you can always redo them. Click �Edit' on the menu bar and click �Redo.' This will redo anything you've undone.
Word Count
Sometimes it's helpful to know how many words that you have in a document. You may have a word limit that you have to go by, or you may just want to make sure it's a certain number of words.
There's no need to count words by hand with MS Word 2003. Go to �Tools' on the menu bar and click on �Word Count.'
This window will appear:

As you can see, it shows you the number of:
- Pages
- Words
- Characters without spaces
- Characters with spaces
- Paragraphs
- Lines
You can also click �Show Toolbar' or go to �View' and select the Word Count toolbar.
You can use this toolbar to easily reference how many words you have as you work on the document. All you have to do to update the word count is click �Recount.' The number of words will appear in the box to the left.
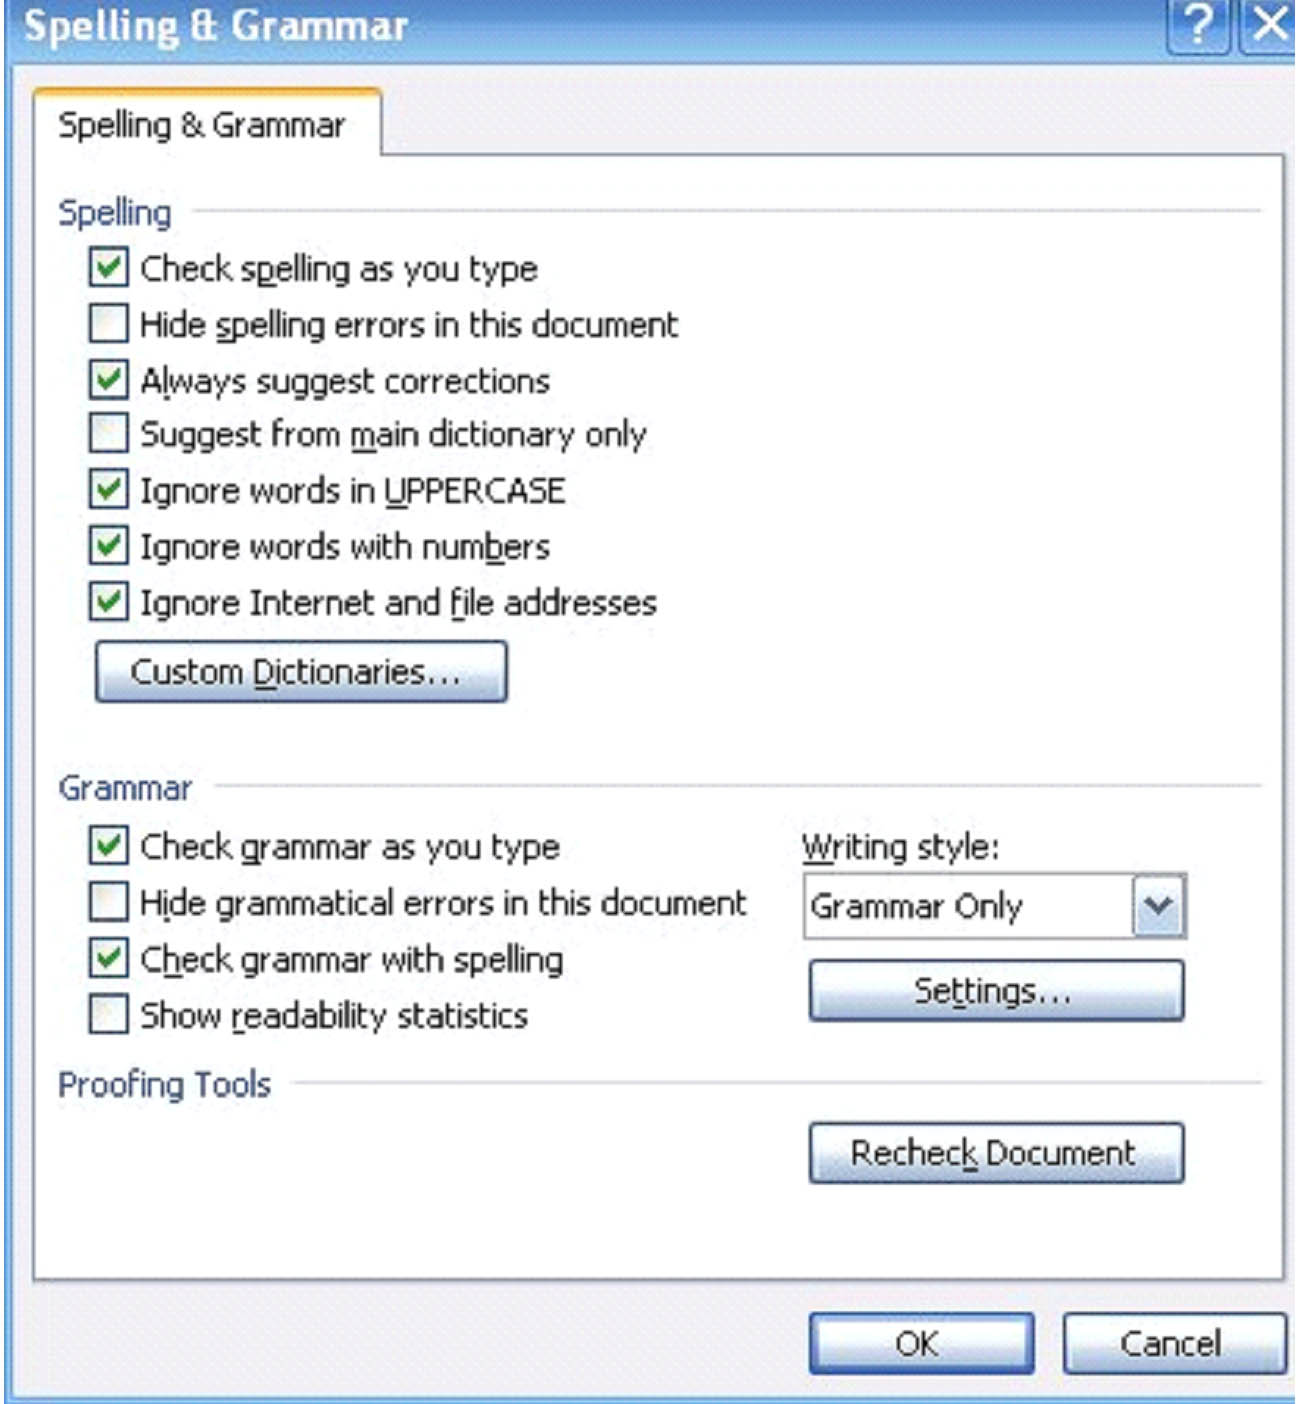
Spell Check
If you've ever used MS Word 2003 before and noticed little red squiggly lines appear under certain words that you type, that is part of the Spell Check feature in action. Spell Check makes note of commonly misspelled words and typos as you type. It also allows you to go through a document and find errors, then correct them.
To use Spell Check, go to �Tools' on the menu bar and select �Spelling and Grammar.'
If there aren't any errors, a window will appear that informs you that the spelling check is complete.
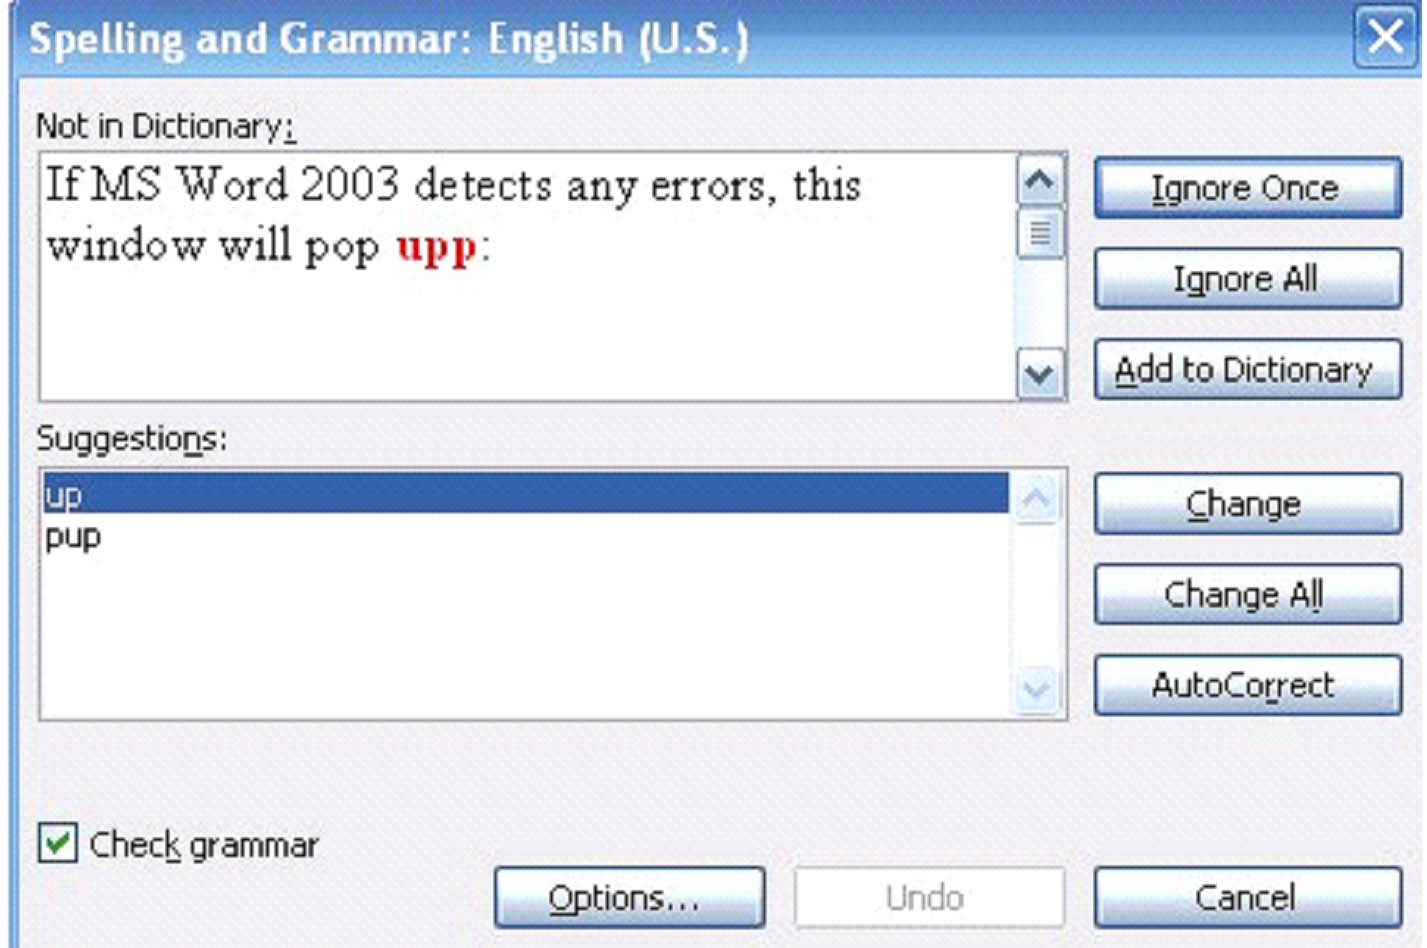
If MS Word 2003 detects any errors, this window will pop up:

As you can see, we've purposefully misspelled �up' so that Spell Check would appear.
All spelling errors in Spell Check appear in red. Errors such as punctuation, grammar, etc, appear in green.
Once MS Word 2003 detects an error, it will appear in the upper window. From the column on the right, you can decide whether to ignore that instance of the error or all instances of the error (Ignore All). You can also �Add to Dictionary,' accept MS Word's suggestion for just that instance, for all instances, or select �AutoCorrect' so that it's automatically corrected from that point forward.
Add to Dictionary
MS Word 2003 uses its own dictionary to determine errors. If you use certain words that MS Word doesn't recognize, you can add those to the dictionary so they won't be marked as errors again. If you click on �Add Dictionary' in the Spell Check window, you can edit the dictionary to recognize words and terminologies that you use often.
Options
If you click on the �options' button in the Spell Check window, this new window will appear:
Here you can set your preferences for Spell Check, including editing the MS Word dictionary or adding one of your own by clicking on the �Custom Dictionaries' button.
If you click on �Settings' under the Grammar heading, you can choose what errors you want Spell Check to find. See the window snapshot below.
Spell Check should never be the only method you use to check your document for errors because there are some it will not catch no matter what. An example is �your' instead of �you're.' MS Word will never catch that error. However, you can customize Spell Check and use it to make your editing work a lot quicker and easier.
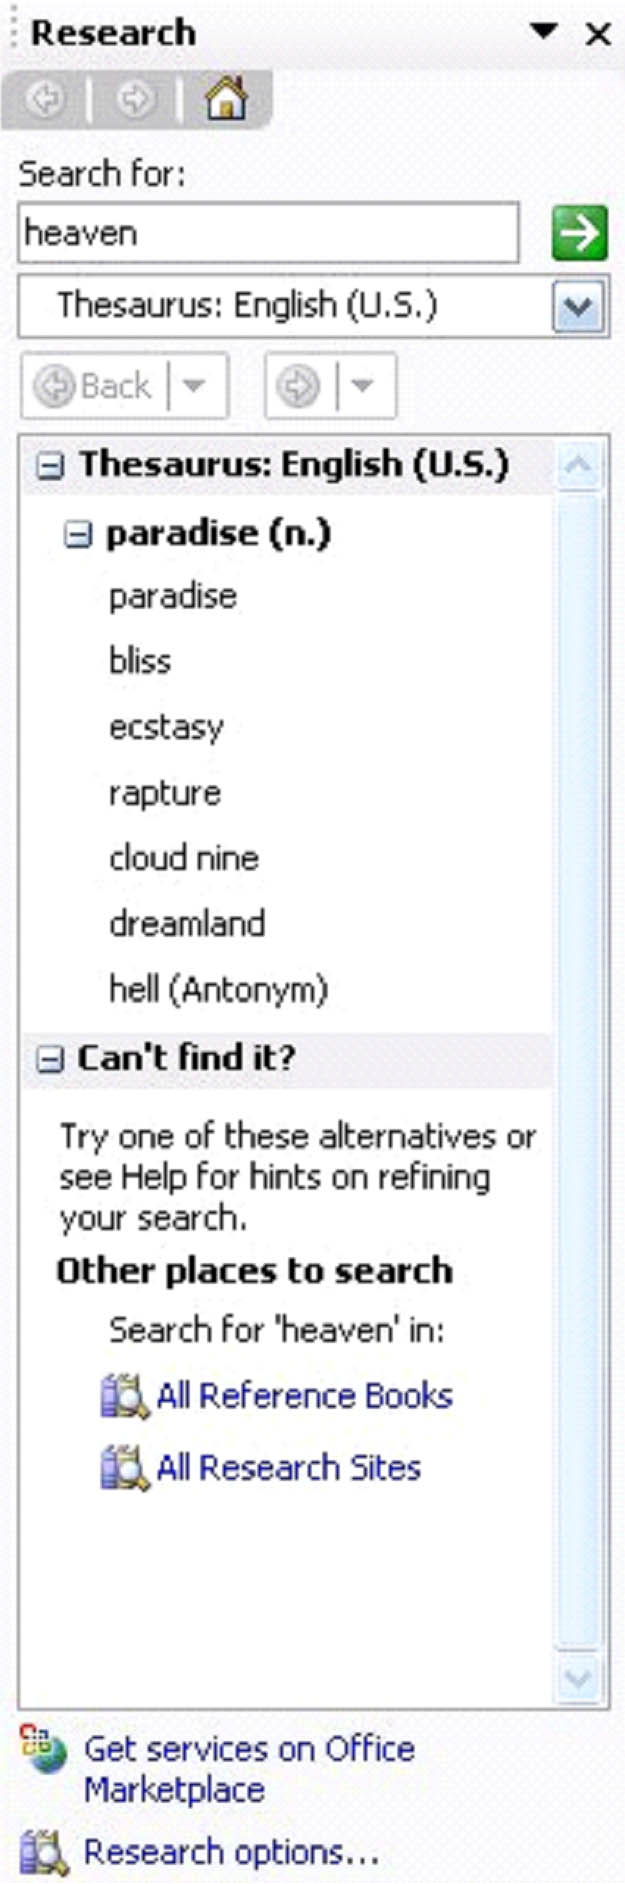
Thesaurus
A thesaurus allows you to find different words that mean the same thing (synonyms). MS Windows 2003 has a thesaurus built in.
To use the thesaurus:
Go to the �Tools' menu on the menu bar
Select �Research'
Type the word you want to find synonyms for into the �search for' box.
Select your reference book.
We used the word �heaven' and the English thesaurus for this example. The window appears to the right of the text area.
Note: You can also use the thesaurus by clicking the  on the �Standard' toolbar.
Advanced Editing Techniques
Track Changes
The Track Changes feature lets you see changes made in your document from the time it was created to the final draft. But to use it, you must first turn it on. To do so, click �Tools' and �Track Changes', or Control + Shift + E. You can also select the  icon on the �Reviewing' toolbar.
The Track Changes feature makes it easy to compare your first draft to the final product, but it also allows you to review the changes made when you send the document to someone else for revisions. This way you can reject the changes you don't like. You can also leave and review comments, which we'll talk about more a little later.
The Track Changes Toolbar
When you activate Track Changes, the �Reviewing' toolbar will appear, if you don't already have it displayed, and the �Track Changes' icon will be highlighted, as below.

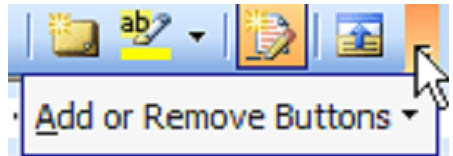
The �Reviewing' toolbar contains all the functions you'll normally need when using the Track Changes Function. To undock the toolbar, click the dotted line at its far right and drag it into your document. You can also add or remove buttons on the toolbar, by clicking the toolbar options arrow on the left.
This window in the toolbar:
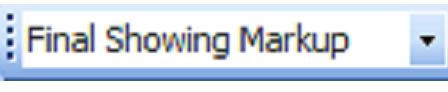
determines what version of the document that you will see. Click on this box to see your options.

The example below is Final Showing Markup. It shows you to view all of the changes made as well as who made them. �Final' would show you what the document would look like if all changes were accepted, and �Original' shows you what the document looked like originally. You can easily compare to the two versions.
By default, when changes are made to a document, they are indicated by a color coding, and the type of change is shown in a balloon in the right margin. In this case, the words "sped up" were deleted, and the words "slowed down" were inserted. A thin black line also appears in the left margin to let you know that a change was made to that particular sentence.

The Track Changes feature will also let you know of any changes in character formatting. In the example above, the words "departures, arrivals, and landings" have been highlighted.
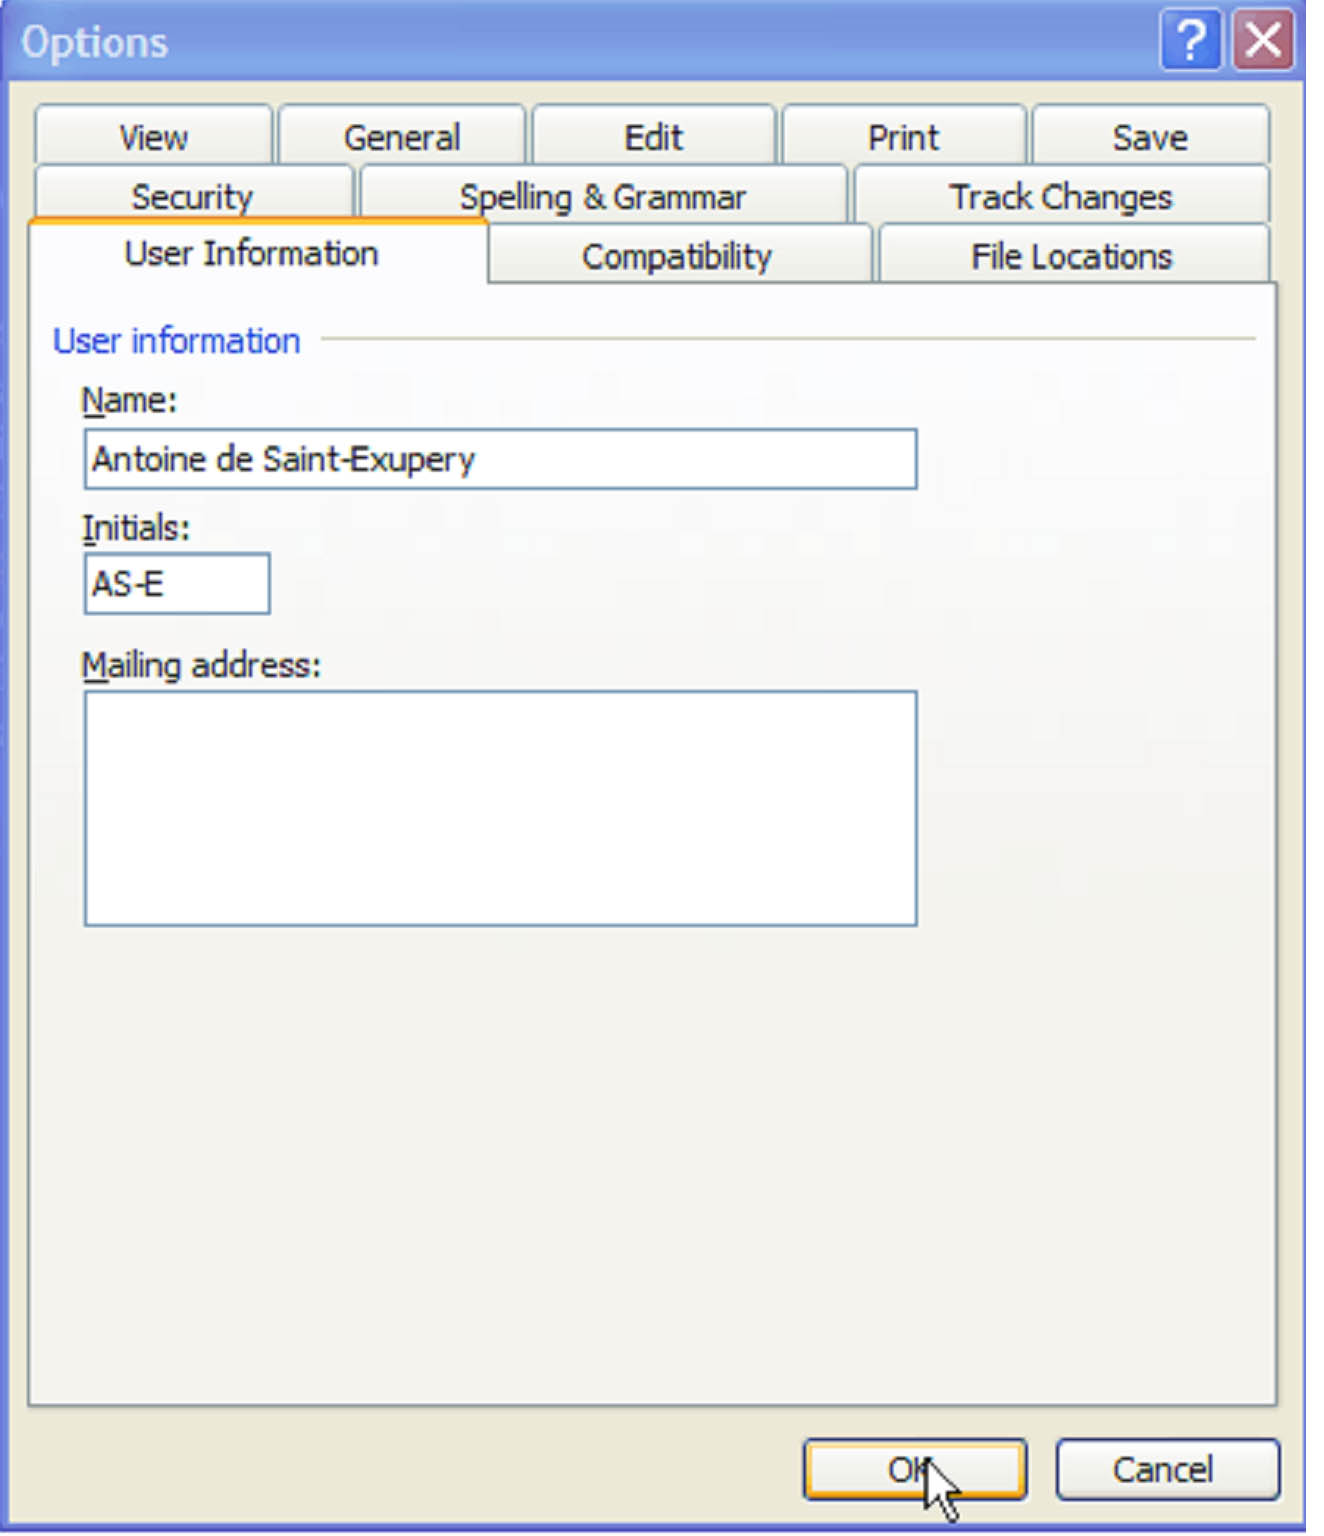
A different color is given to every individual who edits the document. This makes it easy to remember who made what changes. Two different people edited the example above. One is shown in blue, the other in red. Word 2003 applies these colors randomly, so you cannot choose a color to represent you. You can, however, change the name of the person editing the document by clicking Tools > Options > User Information and entering your name and initials in the appropriate fields.
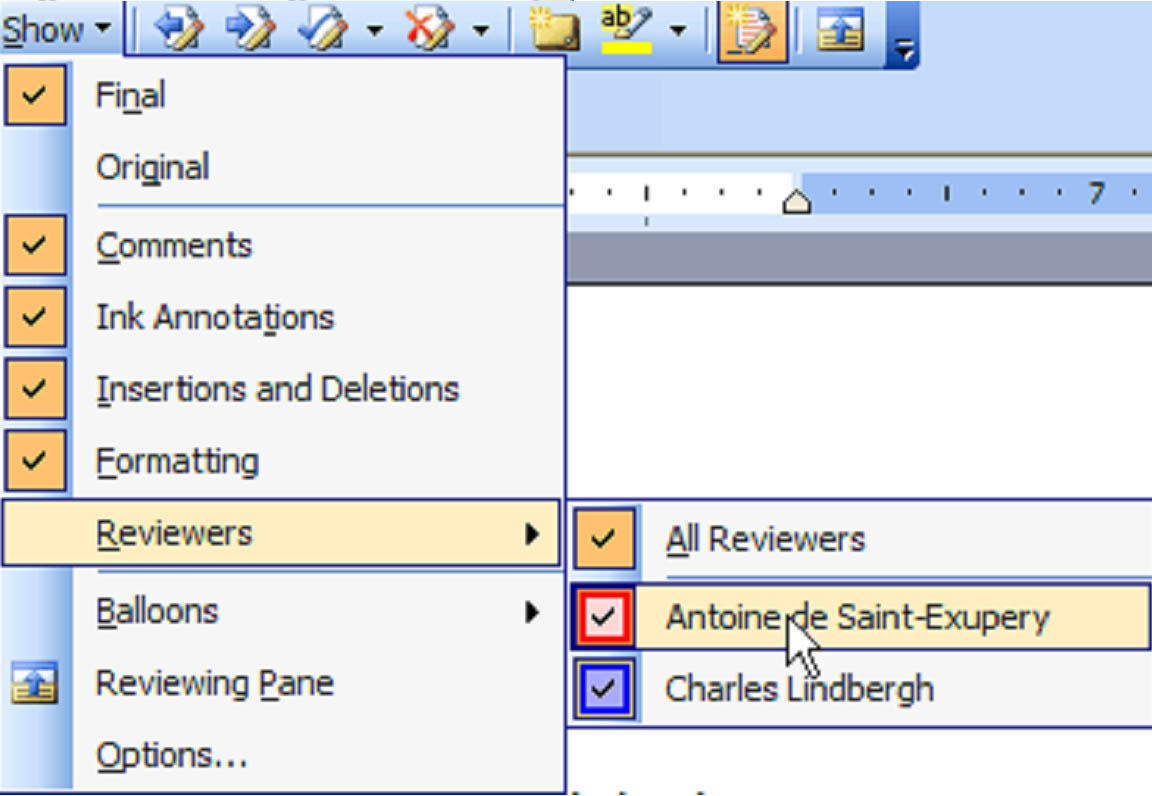
However, it's important to remember that documents quickly get cluttered by additions, deletions and other changes. When you're also dealing with multiple editors, trying to make heads or tails of it all can be quite frustrating. Don't worry though. Those folks at Microsoft came up with a solution. They've given you the option of seeing all changes, or only certain kinds of changes. These include comments, insertions and deletions, changes made to formatting, etc.
Let's say we only wanted to see changes made by a particular person. To do that we'd, click the Show button  in the Track Changes toolbar. Roll our mouse over Reviewers, and select the reviewer(s) we'd like to hide or reveal. A check mark next to a name means that person's changes will be visible.
You can also select which balloons you want to see in the right margin or not to see them at all.
Adding a Comment
In addition to seeing changes to a document, Word 2003 allows you to leave comments to other reviewers. Comments also appear in the right margin, are coded with the specific editor's color, and have the editor's initials in it. Comments are further identified by shading.

You can attach a comment to a particular word, to a particular place in the text, or to an entire paragraph. The text specified will be highlighted.
To place a comment, select the text you want to associate the comment with and click the Insert Comment button  in the Track Changes toolbar. The comment balloon will be active and the cursor will be blinking inside it. If the balloon is not active, just click inside of it. Type your comment, then click anywhere outside of it to deactivate it.
Accepting or Deleting Changes
You can quickly navigate through changes by using the navigation buttons in the �Reviewing' toolbar. These are Previous  , Next
  . You can also just scroll through the documents and click on a change or comment to select it. When a change is selected, it is highlighted.
You can then choose to Accept it or Reject it
  .
.
When you accept a change, its marker in the text and the balloon in the margin will disappear and the change will be made in the document. You will no longer see any difference between the Original and the Final versions.
Another way to accept a change is to select it, then click the right mouse button. Click Accept Deletion (or Insertion, or Formatting, as the case may be.)
You can accept all changes by clicking the arrow to the right of the Accept Changes button and selecting Accept All Changes in Document:

To Reject a change or delete a comment, select it, then click the Reject Change/Delete Comment button. Alternatively, you can right click on the comment or change and select Reject Change (or Delete Comment as the case may be.)
Compare and Merge Documents
There are two ways to compare documents in Word 2003. You can compare documents side by side or use the compare and merge command.
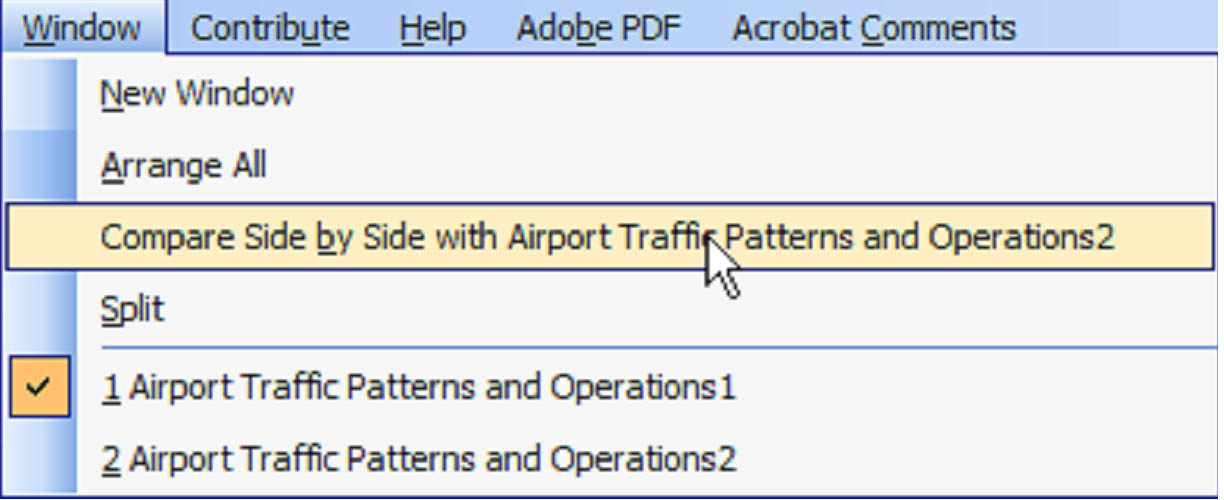
The compare documents side by side command allows you to view documents in separate windows, but scroll through them simultaneously. To use it, click Window > Compare Side By Side With�
The Compare and Merge command uses tracked changes to show you the differences between two documents.
Use the Compare and Merge function by clicking Tools > Compare and Merge. From the Compare and Merge Documents dialogue box, select the document you want to compare the current document to.
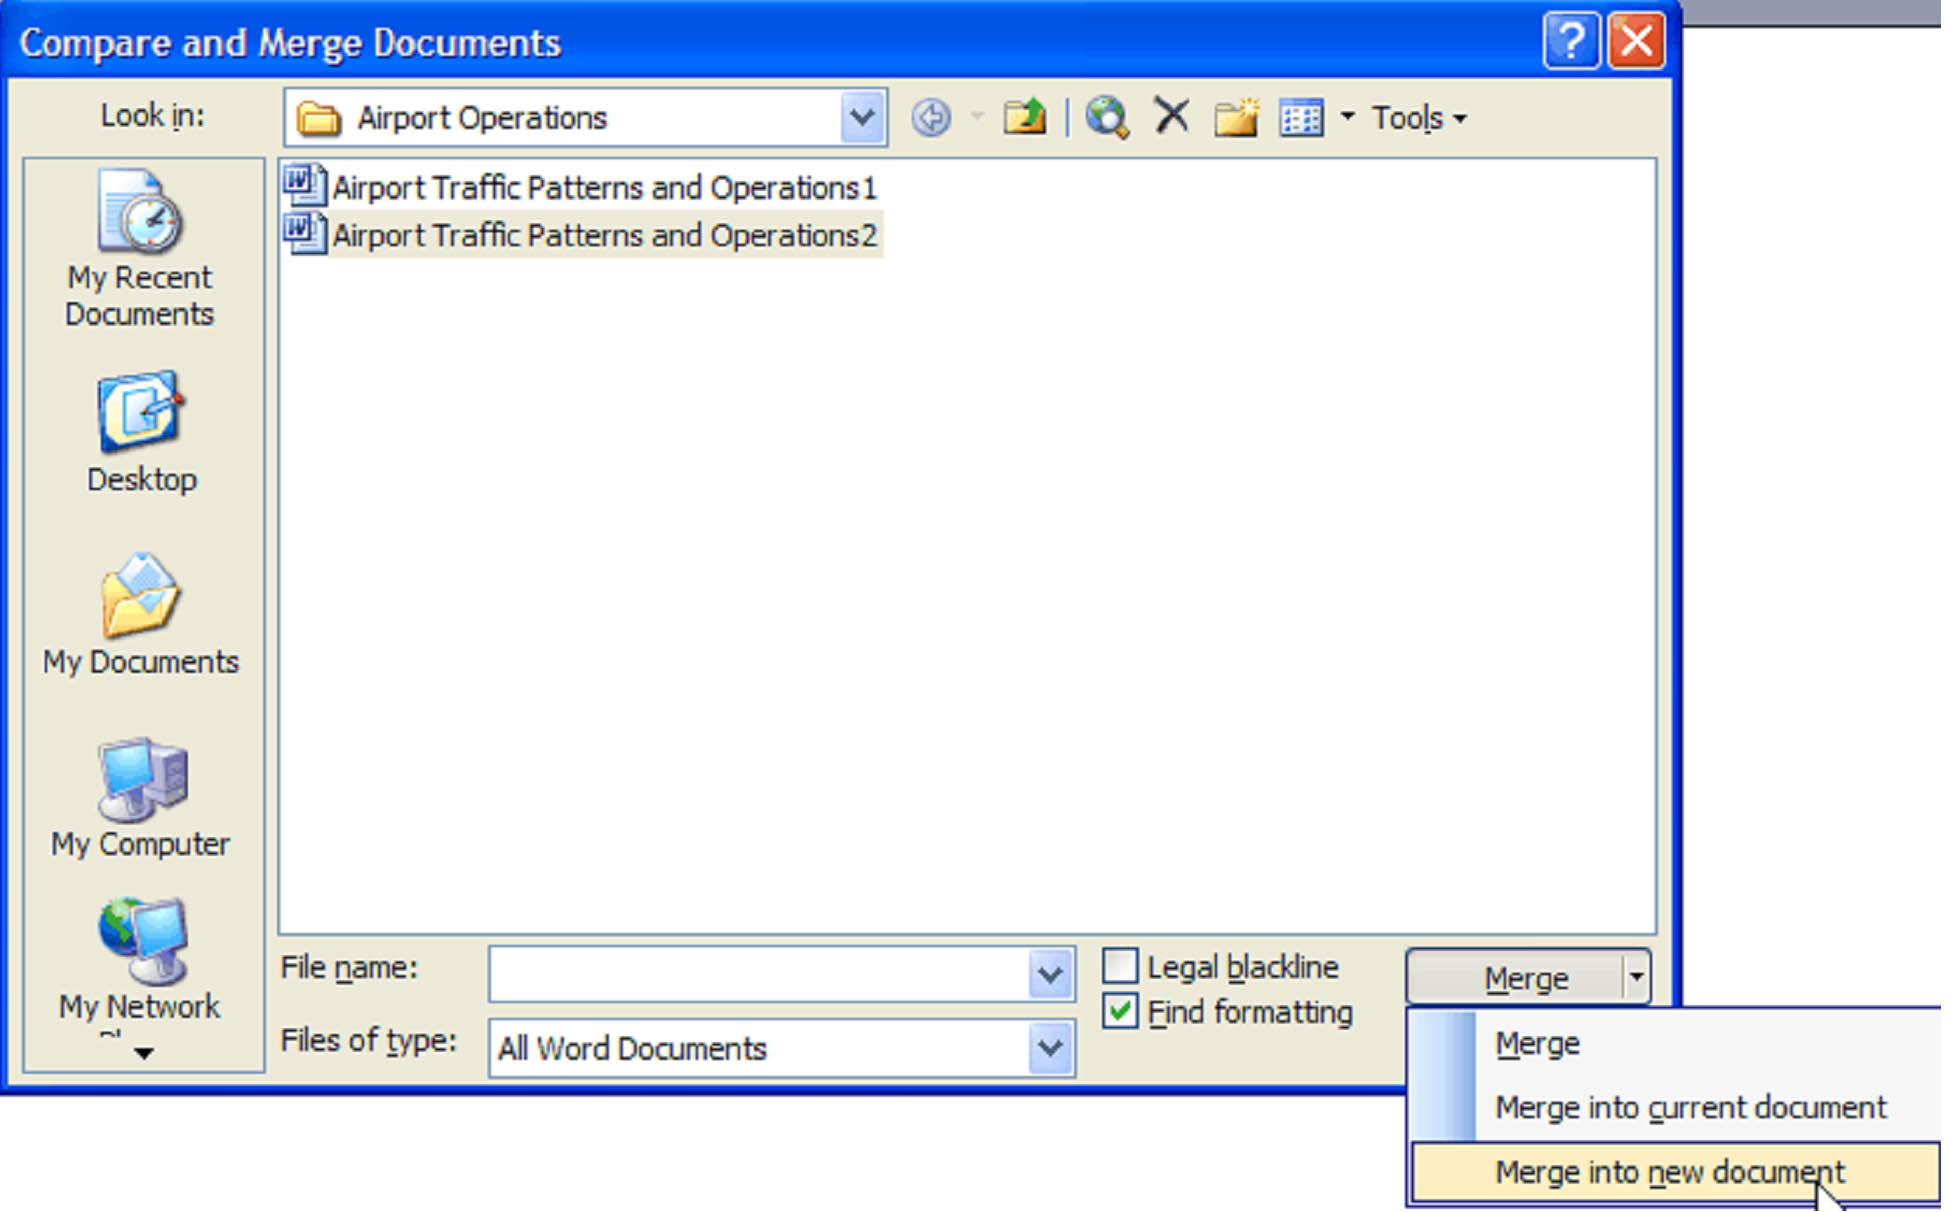
From the merge menu, located in the lower right hand corner of the dialogue, you can elect to merge the documents into the current document or into a new one. If you choose to merge them into a new document, Word 2003 will open a new document.
If you check the Legal blackline box, all changes in the base document will be accepted and only the differences between the two documents will be shown.
Speech Recognition
Another way to enter and edit text in Word 2003 is by talking. Yes, Word 2003 even takes dictation. Not only that, but you can select menu and toolbar items in this manner.
Before you can begin to use speech recognition, you must train the computer to recognize how you speak. Talk about your role reversals, I know. You do this by reading prepared text into the microphone. It takes about 10 minutes, but it will increase the computer's accuracy.
To install speech recognition and train the computer, click Tools > Speech, and when you are asked if you want to install it, click Yes. When installation is done, click next to train the computer.
When you're finished, you will see the language bar, which will look something like this:

After you click dictation, begin talking and your words will appear in your document as soon as the computer finishes processing the words. The message box in the language bar will tell you how you're doing. For instance, if you're talking too softly for the computer to understand you, it will say: "Too Soft."
To use your voice to perform tasks you can either click the Voice Command button on the language bar, or say simply: "Voice Command." The message box in this case will print the name of the command you are using. For instance, if you wanted to make text bold, you would select the text and say "Bold." The word "Bold" will appear in the message box. In the above example, we've select "Word Count."
You can use both your voice and keyboard commands at the same time.