There are several ways to share data and information located in your MS Excel 2003 workbooks with other colleagues, associates, or friends. The way you share depends on how you want to transmit the information in the spreadsheet. For example, if the person you are sending it to has MS Excel, it may be easiest to just send a fixed version of a finished workbook by email. In this article, we're going to cover the ways that you can share your MS Excel 2003 workbooks.
Protecting a Workbook
Before you even think of sharing a workbook, you have to ask yourself if you want the information contained in that workbook to be edited by other viewers. Sometimes, information contained in a workbook is sensitive. You may not want it edited or changed in any way, or you may want to restrict who can make changes before that person sends it to someone else.
MS Excel 2003 offers a feature called Protect Document. This simply allows you to decide who has editing privileges and what parts of the workbook those privileges extend to. For example, you may want to allow Mary to edit a worksheet that deals with Accounts Receivable, but not the worksheet that deals with Accounts Payable. MS Excel 2003 allows you to specify this.
To protect a workbook, go to Tools>Protection. A slide out menu will appear that gives you several more choices. We'll cover each one of these choices in this article, but for now let's discuss protecting a workbook. Go to Tools>Protection>Protect Workbook. You'll see this window:
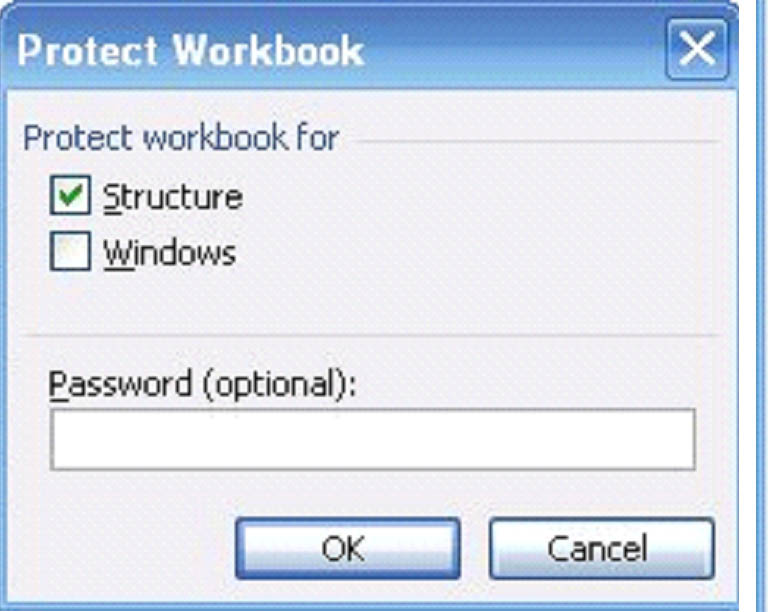
In the Protect workbook for section, select if you want to protect the structure and/or windows.
- Structure prevents users from changing the order of worksheets within a workbook. It also prevents them from adding or deleting worksheets.
- Windows prevents users from resizing or moving the windows.
- Password. The password is needed to remove protection. If you don't want anyone else removing the protection, it's important that you add a password.
When you've made your selections, click OK to protect the workbook.
Protecting Worksheets
There's really not much to do to protect a workbook, as you've learned above. That's because the data and references in Excel are all kept in worksheets. Most of the protection you can give a workbook, such as restricting editing, etc, will be done by protecting the individual worksheets within a workbook.
If you go to Tools>Protection>Protect Sheet, you'll see this window:
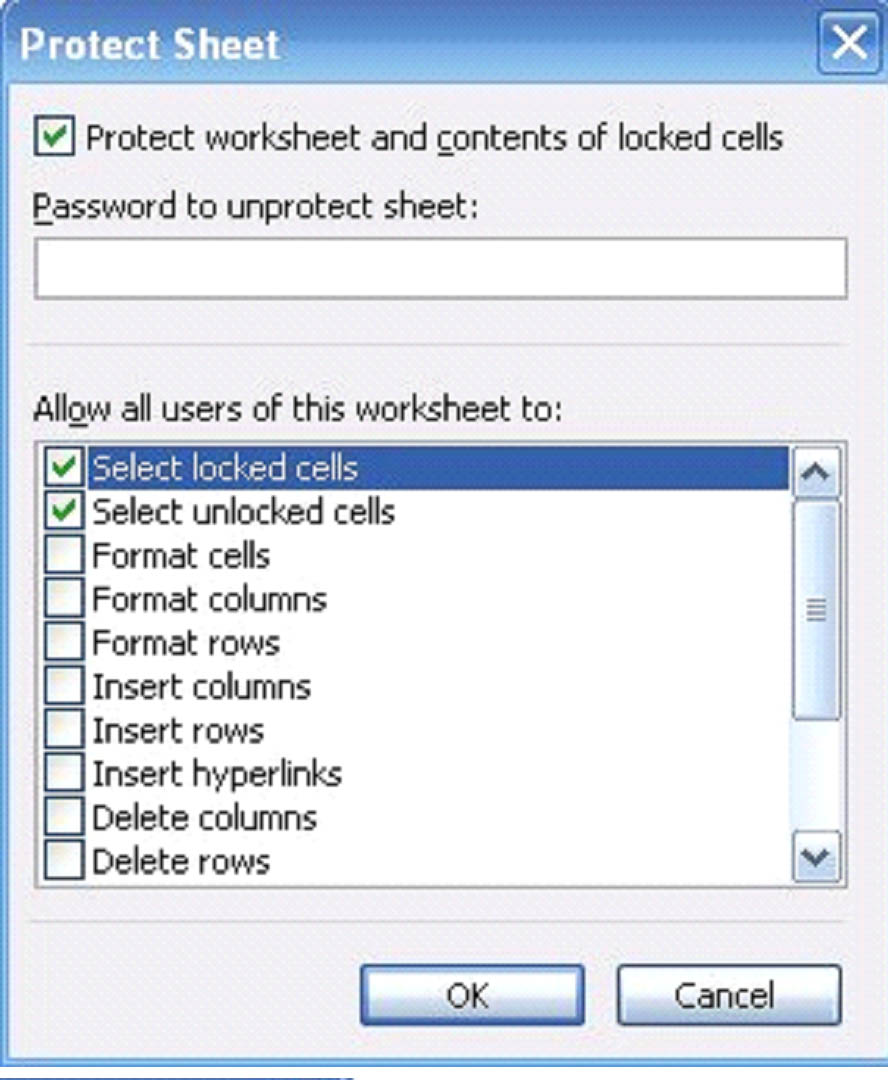
This dialogue box allows you to protect objects and scenarios. In earlier versions of MS Excel, however, you could not protect the cell contents with this box. MS Excel 2003 automatically protects the contents of the cell when you protect the worksheet.
Keep in mind, cell contents can be locked or unlocked using a password. You can go to Format Cells and lock or unlock it. However, a cell that is locked when you add worksheet protection stays locked unless the protection from the worksheet is removed. Even if a user has permission to edit the worksheet, they will not be able to override the locked cell formatting. For example, even if the Format Cells box is checked in the dialogue box shown above, users can still not edit the cells because the locked cell formatting cannot be overridden.
Let's discuss all the checkboxes that appear in the Protect Sheet dialogue box and what they're used to do.
- MS Excel 2003 checks the Select Locked Cells by default. This box allows users to select cells using the Lock check box in the Format Cells dialogue box. Whenever the Select Locked Cells is selected, the Select Unlocked Cells is selected also.
- The Select Unlocked Cells check box allows users to select cells to unlock with the Lock checkbox in the Format Cells dialogue box. If there aren't any unlocked cells on a protected sheet and this checkbox is not checked, users cannot select any cells on the worksheet.
- Format Cells. This enables conditional formatting. It also enables all controls in the Format Cells dialogue box for every cell, including locked cells, with the following exceptions: on a protected sheet, the Protection tab is hidden, and on the Alignment tab, the Merge Cells box is unavailable.
Remember: You cannot permit formatting of unlocked cells only.
- Format Columns. This enables every item in Format>Column.
- Format Rows. Enables every item in Format>Rows.
- Insert Columns. Allows users to insert columns anywhere on the worksheet.
- Delete Columns. If the Delete Columns is not checked, the user can only delete columns by using the undo method.
- Insert Rows. Allows users to insert rows.
- Delete rows. If this is not checked, the user can only delete rows using the undo method.
- Insert Hyperlink. This makes the Insert>Hyperlink command active as long as the cells are unlocked.
- Delete columns. This allows the user to delete any columns in the worksheet as long as they don't contain locked cells. If someone tries to delete a column that contains locked cells, a message will appear stating that the column cannot be deleted because the worksheet is protected.
- Delete Rows. If this is checked, the user can delete any rows in the worksheet as long as those rows do not contained locked cells.
- Sort. Enables Data>Sort as long as the range to be sorted does not contain locked cells.
- Use AutoFilter. Checking this box gives users permission to change the filter criteria on an existing AutoFilter. The AutoFilter must exist before the worksheet is protected.
- Use Pivot Table Reports. This allows users to make changes to an existing Pivot Table Report.
- Edit Objects. This removes protection from any objects when checked, except for any protection properties set for the object.
- Edit Scenarios removes protection from scenarios.
Allow Users to Edit Ranges
MS Excel 2003 allows you to permit certain users to edit only certain ranges of cells. For example, let's say you want Mary to only be able to edit cells that pertain to your company's budget, but you want Joe to be able to edit cells that have to do with your company's expenses.
To do this, you'll need to go to Tools>Protection>Allow Users to Edit Ranges.

Click on New to add ranges.
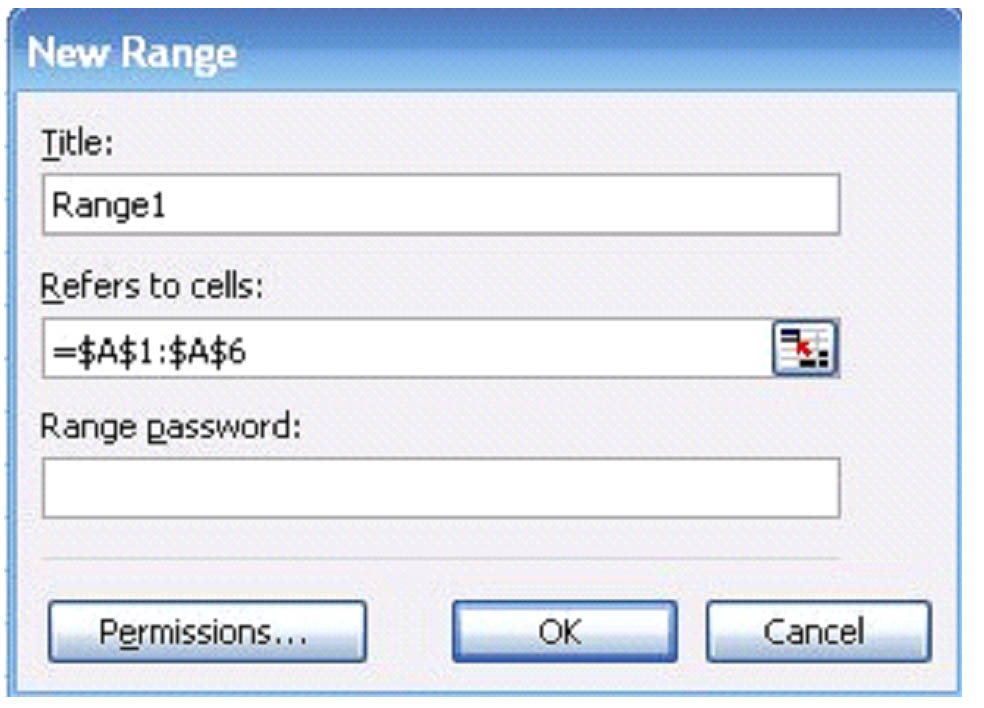
As you see in the dialogue box above, you will first name the range in the Title box. Next, you will list the cells � or range of cells � that you will allow to be edited. Notice the equal sign before the range and the dollar sign that comes before each row or column. The $ signifies a row or column to MS Excel 2003. If you want to enter a password to edit the range, type it into the Range password box.
Click Permissions.

Add the groups of users or individual user names who can edit the selected range. Also select if they need a password to edit the range.
Click OK when finished.
Restrict Users and MS Excel 2003 Security
MS Excel 2003 gives you added levels of security to not only keep unauthorized people from editing your workbooks, but also from viewing them at all. It's as simple as adding a password to the workbook, but bear in mind that you may want to save an unprotected version of the workbook in case you ever forget the password.
To add a password to a workbook to restrict who may open it, you first need to open the workbook.
- Go to Tools>Options. You'll see this dialogue box:
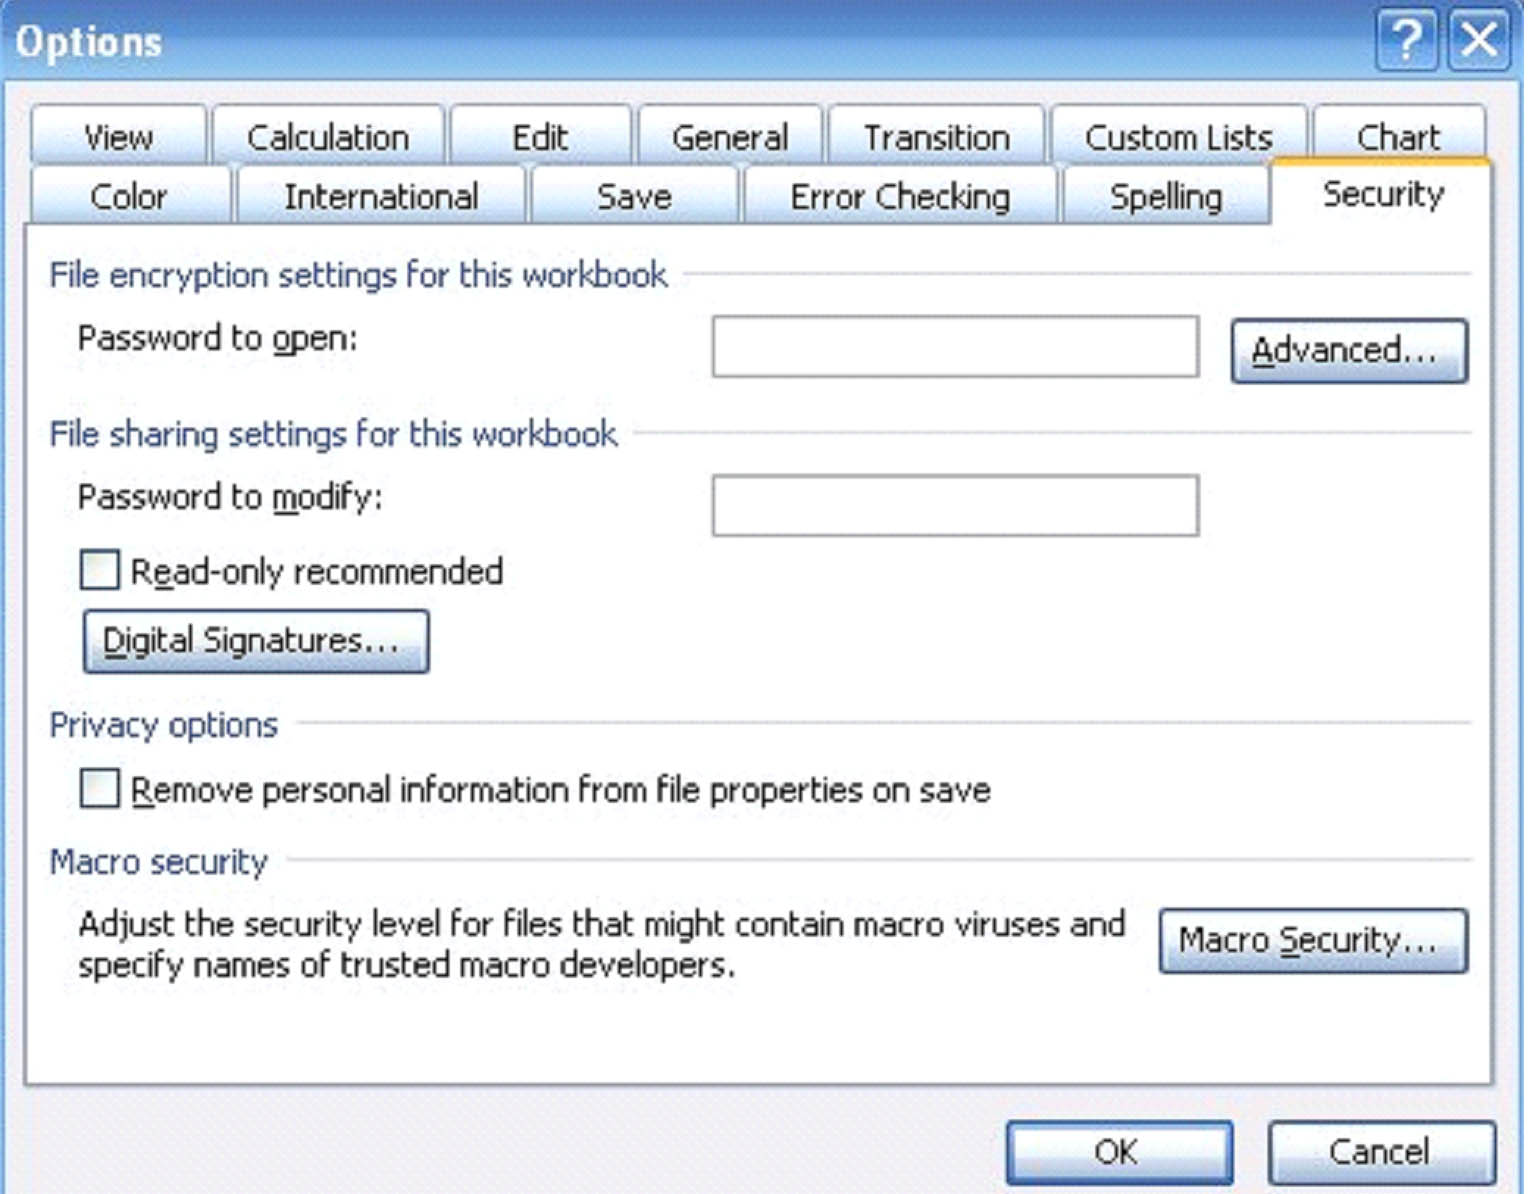
- Select the Security tab as in the screenshot above.
- Enter a password in the Password to open box. This restricts who may view the workbook.
- Next, enter a password in the Password to modify box. If you do not enter a password here, anyone who is able to view the workbook will also be able to modify it. If someone wants to modify the workbook, they must enter both passwords: to read, then to modify.
- Click Advanced if you want to change the encryption type.
- Check the Read-Only recommended box to open the workbook in Read Only format.
- Click OK when finished. Your workbook is now protected.
Sharing Worksheets and Workbooks
There are several ways to share data and information located in your MS Excel 2003 workbooks with other colleagues, associates, or friends. The way you share depends on how you want transmit the information, if the person you are sending it to has MS Excel, or if you just want to send a fixed version of a finished workbook by email. We're going to cover the ways that you can share your MS Excel 2003 workbooks.
Online Collaboration
In MS Excel 2003, workbooks that can be shared online through a server are called workspaces. Workspaces are uploaded to document management servers or other websites for collaboration. To save a workbook as a workspace, go to File>Save Workspace. This will save your file as an .xlw instead of an .xls. Normally, you create a workspace whenever you want to email or share a file. You become the administrator of that workspace and you control who can and cannot access and make changes to that workspace while it's online or as an attachment.
You can share your MS Excel 2003 workbooks online by uploading them to a document management server such as SharePoint Services 3.0. A program such as this allows you to save workbooks to the shared server and even update your local file with the changes to the workbook.
Another way to easily create a workspace is go to Tools>Shared Workspace. A dialogue box will appear on the right that looks like this:
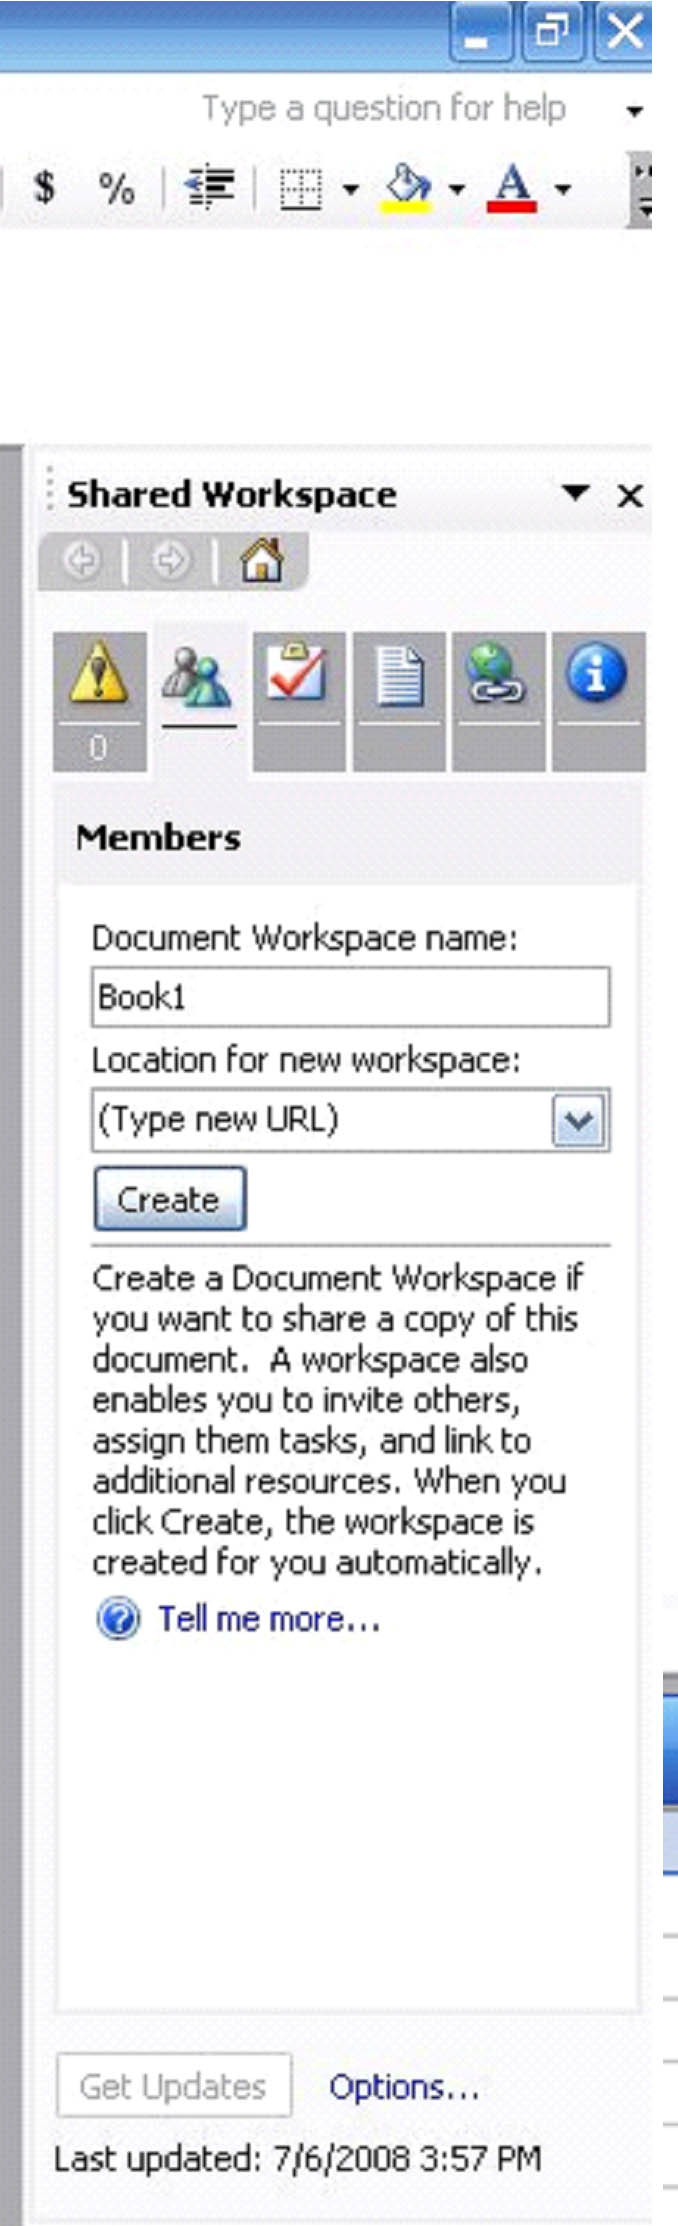
You type the workspace name in the Document Workspace name box, then the location for the workspace.
When you create a workspace this way, you can name the workspace or site anything you want. When you create a workspace to send out as an attachment, the attachment bears the same name as the workbook.
Set Up a Shared Version of a Workbook
You can use MS Excel 2003 to create a workbook that several users can work in simultaneously. All these users would create the workbook together, meaning this is very different than allowing users to edit a workbook.
To create a workbook that can be shared, go to Tools>Share Workbook.
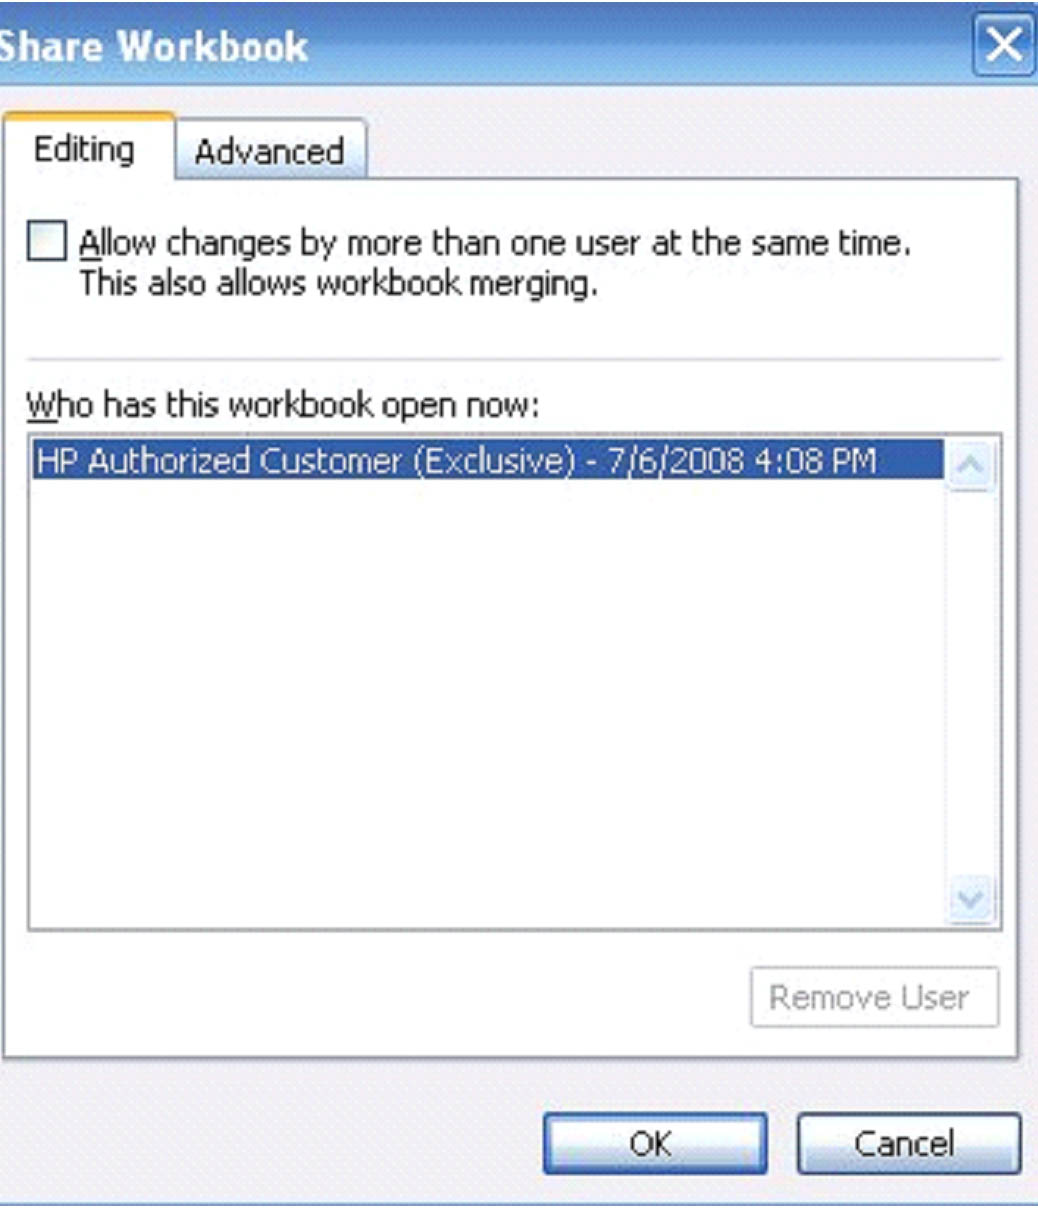
This dialogue box shows you all users who have the workbook open at that time. If you want other users to be able to make changes at the same time, check the box at the top, under the editing tab. You should check this box for workbook sharing, then click OK.
Save the workbook. Go to File>Save As and save the file on a network location where other users can access and collaborate on it.
Note: If, after the workbook is finished, you'll want to merge all the copies together, click the Advanced tab and make sure track changes is enabled.
Merging Versions of the Same Workbook
Of course, when you have several users creating the same workbook, you're going to want to see the different versions that are created. Each user should save the workbook as a unique file name, then send the versions to you. You can them compare and merge the different versions with your own (the master version.)
Open the workbook that you want to use to compare against other versions.
Go to Tools>Compare and Merge Workbooks. Select the workbook that you want to compare and merge with your version.
Click OK to merge the files.
Note: You cannot share workbooks or merge data with anyone using MS Excel 95.
Adding, Editing, and Deleting Comments
Comments added to a MS Excel 2003 worksheet provides additional information to users and viewers. It gives special insight to others who may be sharing or editing the workbook with you.
In MS Excel 2003, you can add comments to individual cells.
To add a comment to a cell, click on the cell. Go to Insert>Comment. This box will appear on your spreadsheet:

Type your comment in the box, then click anywhere else on the spreadsheet to save the comment.
If you have several users accessing and making changes to the workbook, every user's comments will appear in different colors. Bill's may be blue. Mary's may be red. If you're anything like most people and in a rush to get things done, you can simply scan for a certain color to see comments and changes that one particular person made. A red triangle will be made in the upper right hand corner of any cell that contains a comment. Just click on the cell to read the comment.
Editing a Comment
If you want to edit a comment that is in a MS Excel worksheet, click on the cell where the comment is located, then right click. The following dropdown menu will appear:
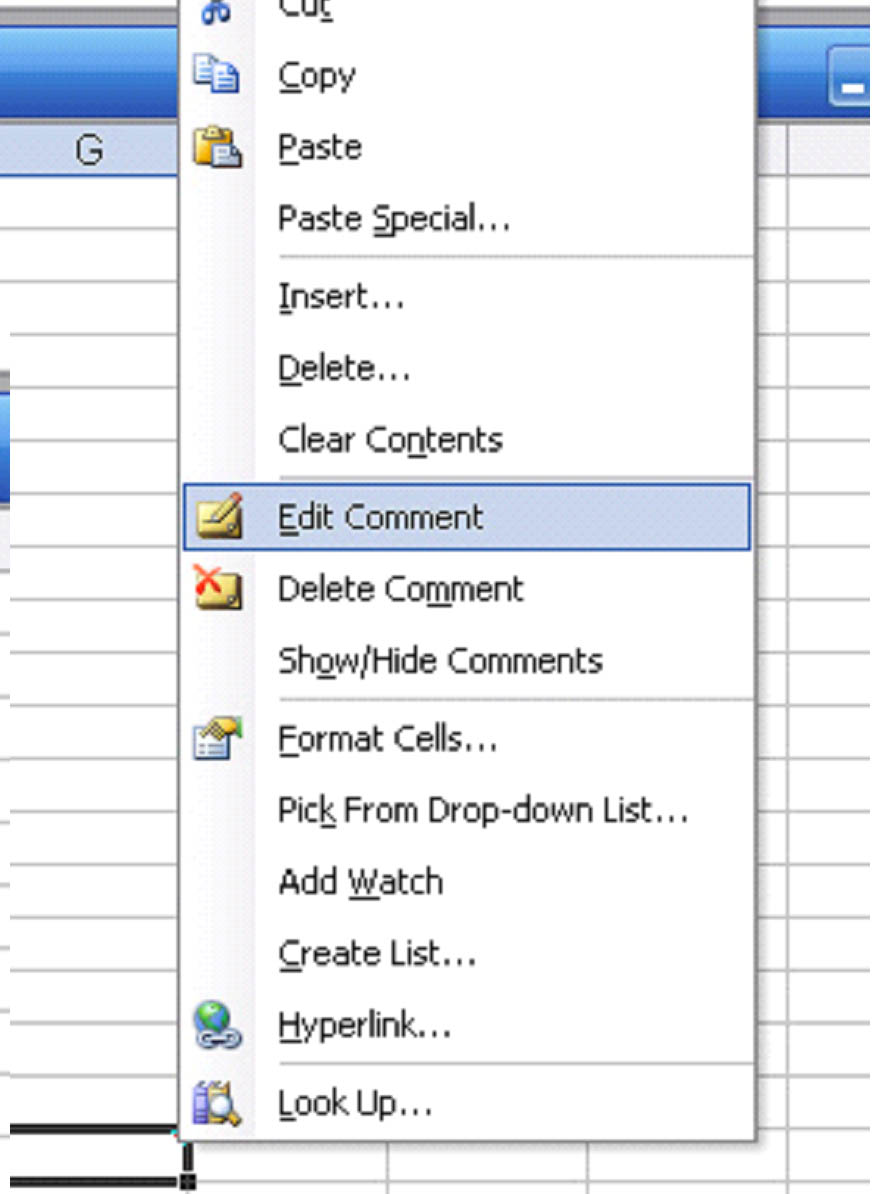
Select Edit Comment. You will then see the cursor appear inside the comment box. Make the changes to the comment, then click outside of the comment box to save those changes.
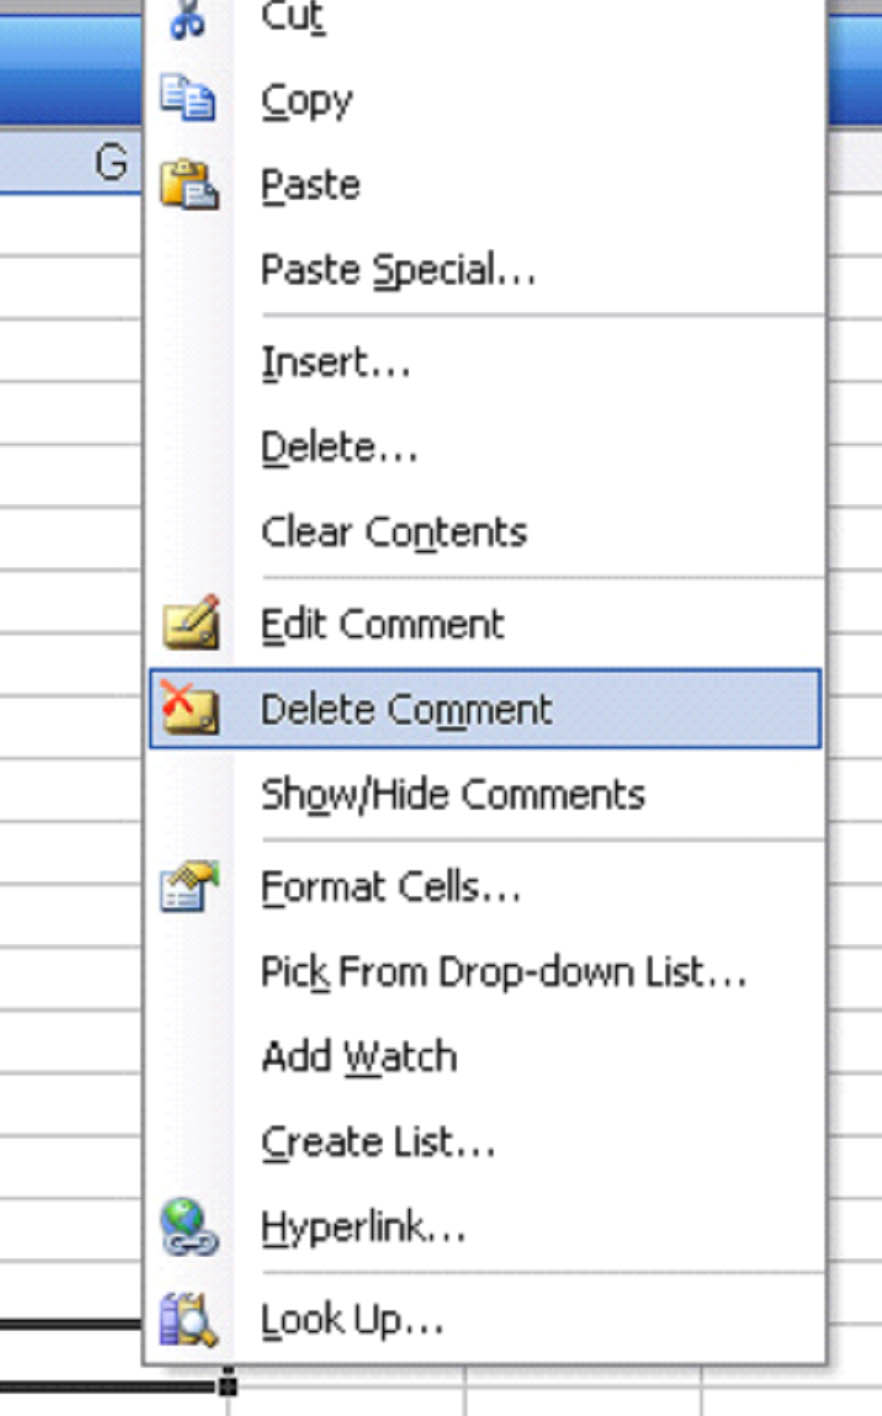
Delete a Comment
To delete a comment, follow the same steps as you take when editing a comment, except select Delete Comment from the dropdown menu.
Creating and Sharing Templates
A template is a worksheet or workbook that already had your preferred formatting such as font, font size, colors, etc. You can create your own templates in MS Excel 2003 easily and rather quickly.
Creating a Template
Whenever you start a new workbook in MS Excel 2003, it uses the default template, which is simply a blank workbook with no formatting. The name of this default template is Book.xlt.
If you use various formatted worksheets regularly, you can also create worksheet templates. The default worksheet template that MS Excel 2003 provides is named Sheet.xlt.
To create a template:
- Create a worksheet or workbook with the formatting that you want to be in the template.
- To save a formatted workbook as a template, go to File>Save As and scroll down the Save as type until you see Template. Click save and it will be stored as a template. If you want to replace the default template, then save it as Book.xlt.
- To save a formatted worksheet as a template, create a template with just one worksheet. Format the worksheet as you want it for the template, then go to File>Save as, then select Template in the Save as type box.
- Select the folder that you want the template to be stored in.