Nobody likes to think about taxes. They can be very confusing because they are different based on locations. Although taxes may seem like a daunting task, with QuickBooks Online, setting up sales tax can be fairly straightforward.
In this article, we will first look at what sales taxes are and discuss some important terms that relate to them. Then, we'll look at how we set up sales tax in QuickBooks Online and get our customers and items using sales tax. We'll also look into filing sales taxes and getting reports about sales taxes.
What Is a Sales Tax?
Let's start by defining what a sales tax is. A sales tax is a tax which is imposed by a government on the sale of goods and services. These taxes are paid when the sale is made. The tax is collected by the seller and then paid to the government.
These taxes are charged to the customers who receive the final product. Because there are supply chains in the modern economy, not every sale of product requires a sales tax. For example, if you have to buy wool to make blankets which you sell, then you shouldn't have to pay a sales tax on the wool. In this sort of situation, you need to obtain a certificate from the government that says that the purchase is not the end product so you can avoid paying sales tax.
To make sales taxes more confusing, they change based on the local laws of your area. These laws can overlap, so you may have to worry about not only your state's sales taxes, but also your city and county. You also have to consider where a product is going to be used. For example, if you buy a car in one state but plan to use it in another, then you have to pay sales tax for the stat it is being used.
There are three other concepts that should be understood with sales taxes: nexus, excise tax, and value-added tax.
- Nexus - A nexus refers to a physical presence in a jurisdiction the means that you should pay sales taxes there. This becomes important in online sales, which can have customers based anywhere.
- Excise Taxes - While some goods may not have sales tax because they are food or clothes, other goods have special taxes because they are considered vices. This is the case for taxes on cigarettes and alcohol.
- Value-added Tax - This is a tax placed on products in a supply chain whenever value is added to them. This type of tax is common in the European Union, but is not used in the United States.
Setting up Sales Tax
Now that you have a little background information on sales taxes, let's see how you can set it up. To start setting up sales tax, QuickBooks Online has wizards that help you with the process. It will ask several questions such as about your address and state. Then you will need to set up sales taxes for your items in the inventory.
To start setting up sales tax, you need to be sure that you set your accounting basis to the accrual method. Let's quickly see what the differences are between an accrual basis and cash basis for accounting.
Accrual Basis and Cash Basis
Two concepts that you should be aware of are accrual basis accounting and cash basis accounting. Although these methods differ in the timing in which transactions are recorded, they return a result that is approximately the same over a period of time.
- Accrual Basis - In this type of accounting, transactions and revenue are recorded when they are earned and expenses are recorded when they are consumed.
- Cash Basis - In this type of accounting, the transaction and revenue are recorded when cash is received from the customer and expenses are recorded with cash is paid.
Of these two methods, the easiest to implement is cash basis. That's because it doesn't require complex accounting transactions like accrual or deferrals. In the United States, though, cash basis can only be used by companies with less that 5 million in sales per year. Because the timing of receiving and spending cash can vary, there may appear to be times of high and low profits.
Companies with sales that exceed 5 million USD use the accrual basis method. With this method, it is easier to see revenues and expenses within a time period because they are not waiting for cash to come in or go out.
If your accounting is set to accrual, then QuickBooks Online can track and report your sales tax automatically. It also calculates sales taxes on items automatically.
If you are operating on a cash basis, then you should switch to accrual before setting up sales taxes, and afterwards you can switch back.
Setting the Accounting Basis
Make sure that your accounting method is set to an accrual basis. You can do this by clicking on the gear-shaped Settings icon in the header and then clicking on Account and Settings under the Your Company. Under the Advanced tab, you will see the Accounting section at the top.
Click on the pencil icon to start editing the settings. Make sure that Accounting Method is set to Accrual and then click the Save button.
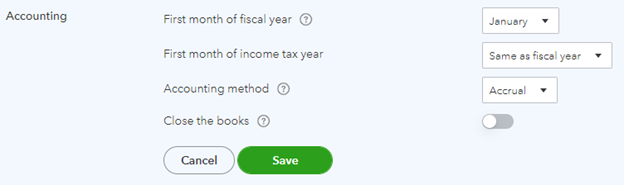
[Figure: Setting the accounting method to Accrual]
After making sure that your accounting method is accrual, you can set up your sales tax. Start setting up your taxes by clicking on the Taxes link in the left-side Navigation Pane. You will then be taken to the Sales Tax Center where there is a wizard that says it will setup your taxes in two steps. Start the wizard by clicking the Get Started button.
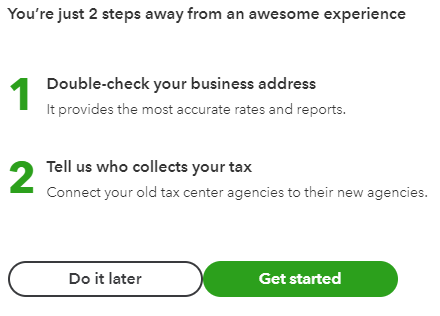
[Figure: Starting the Sales Tax Center wizard]
You will be shown your address and can change it by clicking on the pencil-shaped icon. When everything is entered correctly, click the Next button.

[Figure: Confirming your address]
You will then be asked who collects your sales taxes. You will need to know if you have to charge sales tax outside of your home state. You should match the tax rate name with the official agency name from each dropdown. You can ask your accountant if you need help filling out this information for your business.

[Figure: Selecting who you pay taxes to]
After clicking the Next button, you will have one more chance to review your information and then you are done with the wizard. Click the Continue button to exit the wizard.

[Figure: Ending the wizard]
When you return to the Sales Tax Center, it will then ask you how often you file your sales tax. Based on your address, it will give you suggestions depending on your your average monthly liabilities.
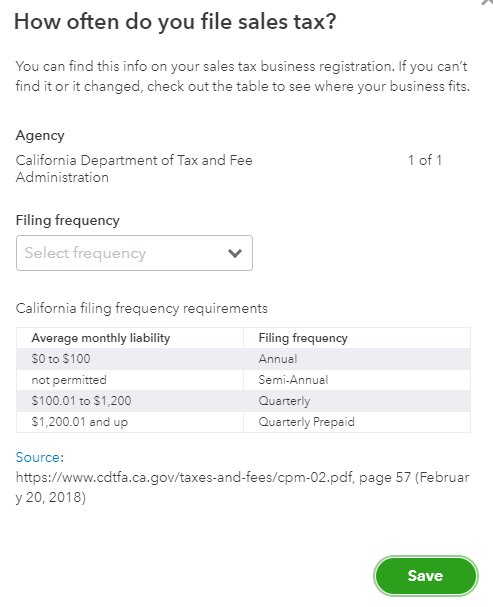
[Figure: Setting the tax filing frequency]
When you finish the setup, it will set all of your customers up as tax-paying entities. Not all of your customers might need to pay taxes, though. If they are a charity, school, or government agency, then they may be exempt. In that case, you can edit their profile to reflect that. Go to Sales in the left-side Navigation Pane and then click the Customers tab.
Find the customer that you are looking for in the list and click on their name to get to their details page. At the details page, click on the Edit button to edit their profile. In their profile, find the Tax Info section and check the box where it says This Customer Is Tax Exempt.
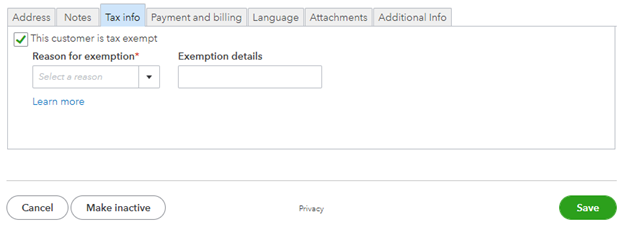
[Figure: Making a customer exempt from sales tax]
Enter details about the reason that they are tax exempt and their exemption certificate ID. You can attach a copy of their certificate in the Attachments tab.
Creating and Editing Agencies and Rates
You can add new rates and make changes in the sales tax settings. To do so, click the Sales Tax Settings link at the top-right. You will be taken to a page where you can make many changes to tax settings.
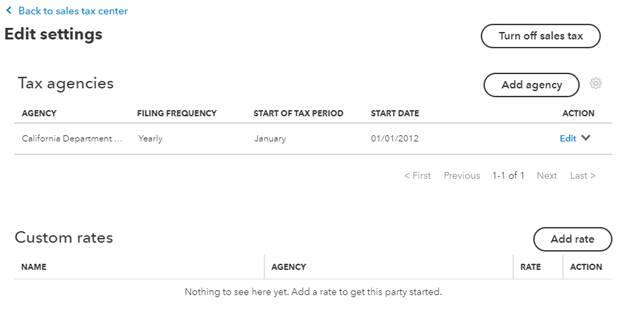
[Figure: Editing sales tax settings]
You can add a tax agency from the Add Agency button. It will pop open a panel on the right side where you can enter the agency, its filing frequency, and a start date. Click the Save button to finishing adding the agency.
You can also add a custom rate by clicking the Add Rate button. When adding a rate, you can choose between adding a single rate or a combined rate.
If you only pay tax to one agency, then you can select single rate. If you are tracking sales tax for more than one agency, then you may want to set up a combined tax rate. With a combined rate, your customers only see one tax rate on their sales forms. The Sales Tax Center, however, still keeps track of this and splits the amount into appropriate rates for each agency.

[Figure: Adding a combined rate]
When you choose a combined tax rate, then make a name for it and enter the different sales tax requirements. Click the Add Another Rate link to add more than two rates. When finished, click the Save button at the bottom of the pane.
You can also edit agencies and rates. Click on the Edit link in the Action column for the agency or rate.

[Figure: Editing an agency]
An edit screen will pop up on the right side for each editable item. Click the Save button to finish making your edits.
You can also make an agency or rate inactive by clicking Inactive from the Action column. In order to see inactive items again, click on the gear-shaped icon above the table and check the box next to Include Inactive.
Adding Sales Tax to Sales Transactions
You can apply sales tax to invoices, sales receipts, estimates, and credit memos. Let's see how it works on a new invoice. Click on the New button in the left-side Navigation Pane and click on Invoice under the Customers heading.
Add a taxable product into the invoice. Check the box in the Tax columns to make sure that the product is taxed.

[Figure: Adding tax for a product in an invoice]
At the bottom-right of the invoice, select the appropriate sales tax. You can click on the Add Rate option at the bottom of the dropdown to add a custom rate.

[Figure: Selecting the tax rate in an invoice]
When you've finished adding the tax rate, click the Save button.
Changing the Sales Tax in Sales and Credits
You can also go back and add sales tax to sales and credits. Start by clicking Sales in the left-side Navigation Pane. Then go to All Sales.
Find a charge or credit memo in the list. Open it by clicking on it. In the Tax column, check the checkbox to add sales tax or deselect to remove the sales tax.
[Figure: Adding sales tax in a credit memo]
Click on the Save and Close button when you're finished.
Changing the Taxable Status of Unbilled Expenses
You can also change the tax status of unbilled expenses. Go to the Sales link in the left-side Navigation Pane. From there, go to All Sales. Find a billable expense charge and open it.
Click on the Bill link at the top to open up the bill.
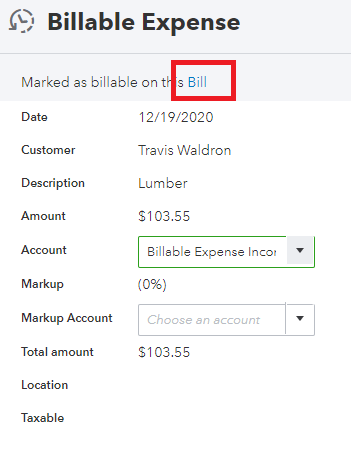
[Figure: Opening up a bill from a billable expense]
Under the Tax column in the bill, mark the checkbox to make the product taxable. Or, uncheck the box to make it untaxable.
Reporting and Paying Sales Tax
You can have an accountant manage your sales tax or you can do it on your own. Click Taxes in the left-side Navigation Pane and then Sales Tax. You will now be in the Sales Tax Center.
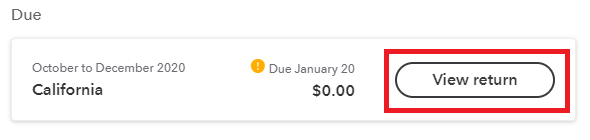
You can then see all the sales tax returns that are due. You'll also see the ones that are overdue.
In order to file and pay a return, click the View Return button on the right side of the page next to the return you want to file.
[Figure: Starting to file a return]
You will then be at a screen to review your sales tax.
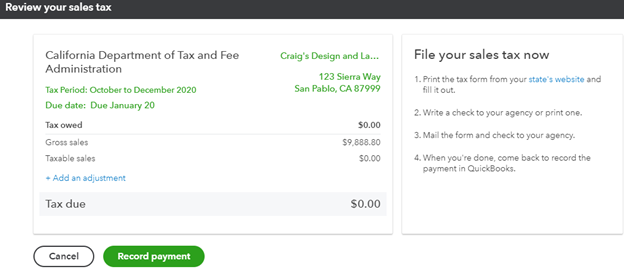
[Figure: Reviewing Your Sales Tax]
At this point, you can add a sales tax adjustment. If you click on the Add an Adjustment link, a panel will appear on the right.
You will first need to add a reason for the adjustment. The dropdown menu includes credit, prior payments, and pre-payments as reason for an adjustment. You can also choose Other, which could be for penalties, interest, or rounding errors.
If you select the reason to be because of a credit or prior payment, then select an income account. It the reason is because of a fine, penalty, or interest due, then select an expense account. If it's because of a rounding error, then choose an income account for negative errors or an expense account for positive ones.
Then, enter the amount of the adjustment. Click the Add button to finalize the adjustment.
Back at the Review Your Sales Taxes page, click Record Payment to continue.
QuickBooks Online then calculates and shows you the amount that is due to the tax agency. You will be able to confirm or change it here. You can also view details by clicking the Report link and then Download Your Full Report. That breaks down your taxes in the Sales Tax Liability.
Lastly, enter a Payment Date and a bank account that will be paying from. Click the Record Payment button to end the process.
Sales Tax Reports
You can use QuickBooks Online to get various reports about sales tax. Get to the Reports page by clicking on Reports in the left-side Navigation Pane.
At the reports page, start typing 'sales' in the search bar. You will see the Sales Tax Liability Report. Click on that title to open up the report. This report shows how much sales tax you've collected and how much you owe to tax agencies.
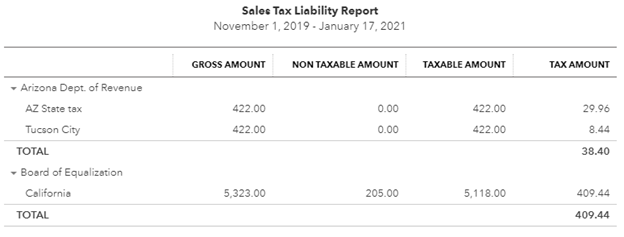
[Figure: Sales Tax Liability Report]
You can change the settings up by the top of the page. Set the Report Period to All Dates and the Tax agency to All, and then click the Run Report button to update the report.
Click on the amount to open the Transaction Report. You can see the transaction type in the report. Clicking on the invoice there will open up the invoice where you can see the taxable amount, tax rate, and tax amount.
Another useful report is the Taxable Sales Detail. This can also be reached at the Reports page by typing it into the search window. This report shows the sales of taxable products and services. It includes the date, transaction type, customer, quantity, rate, amount, and balance.
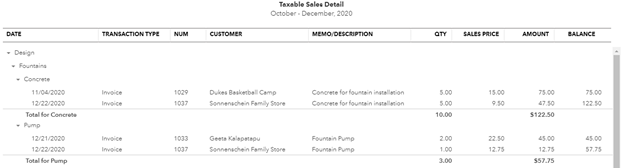
[Figure: Taxable Sales Detail report]
Assigning Sales Tax Categories
Whether or not something is taxable can vary from state to state. For that reason, you may want to categorize the products you sell for tax purposes. Some products like this include clothing, sales tax holidays, food for home consumption, meals tax, medical products, items with fees, and computer products & services.
Once you have checked your local tax regulations, you can assign sales tax categories. Go to Sales in the left-side Navigation Pane and then click on Products and Services. Click the New button or else click Edit in the Action column of an existing item.
Find the Sales Tax Category dropdown and click on Choose a special category.
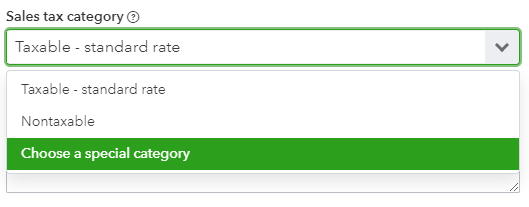
[Figure: Selecting a sales tax category]
Clicking on Choose a Special Category will open a popup with all sorts of pre-generated categories that you can choose from for the item. When you are finished, click the Save and Close button to return to the Products and Services list.
Integrating with TurboTax
Intuit offers separate software that is geared towards taxes. Currently, you cannot export QuickBooks Online to Intuit's tax program, TurboTax. It also doesn't support tax line mapping in the Chart of Accounts. Instead, you can use detail accounts that you can use to make tax line assignments.
Accountants can, however, use QuickBooks Online Account which has the Book to Tax feature. That allows it to integrate with Intuit Tax Online.
Importing Sales Tax from QuickBooks Desktop to QuickBooks Online
Sales tax is one thing that doesn't convert over perfectly from QuickBooks Desktop to QuickBooks Online. You will notice that some taxes convert as journal entries or import only the list and balances.
There will also be sales tax payable accounts at the Chart of Accounts page. There will be one for each Sales Tax Payable account in QuickBooks Desktop and one for each Sales Tax Agency Payable account in QuickBooks Online.
Conclusion
In this article we learned about dealing with sales tax using QuickBooks Online. We saw that there are different accounting methods that you can use. We also saw how sales taxes are different in different locations.
We used the Sales Tax Center to set tax agencies and rates. We also made sure that customers who didn't have to pay sales tax were configured not to do so. Furthermore, we saw how to pay sales tax and view reports about sales tax.