QuickBooks Online also has many other types of lists which are very useful. In this article, we will look at several of the remaining lists available.
Accessing Lists
You can access lists by clicking on the gear icon for Settings in the Heading. One of the categories that pops up is Lists. In the Lists category, click All Lists.
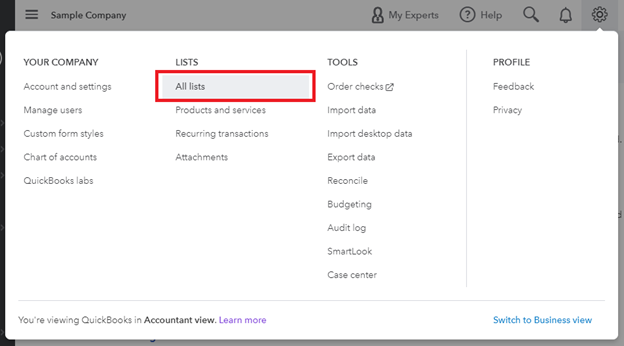
[Figure: Accessing all the lists ]
You will then see a page of lists. In addition to the Chart of Accounts and Products and Services, there are lists for Recurring Transactions, Product Categories, Custom Form Styles, Payment Methods, Terms, and Attachments.
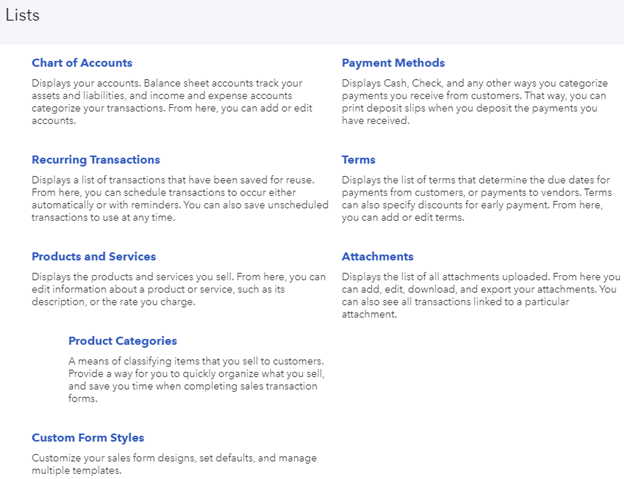
[Figure: All lists]
Clicking any list will take you into a full table view, and you can easily return to the list view by clicking All Lists in the breadcrumb navigation under the heading. We'll start this lesson by looking at the Recurring Transactions list.
Recurring Transactions
In Recurring Transactions, you can see the transactions that are set up to happen over and over again at intervals. This functionality is useful for paying regular bills such as rent or loan repayments.
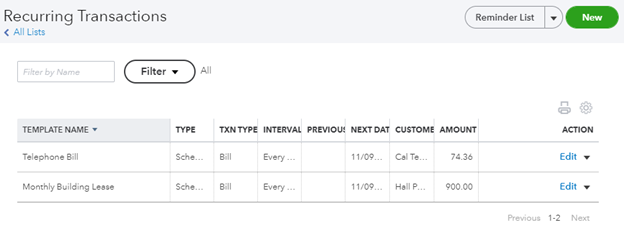
[Image: The Recurring Transactions list]
At the top of the Recurring Transactions list, you can see buttons for going to the Reminder List and for making a new recurring transaction. The Reminders List button also has a drop-down for generating a report based on the recurring transactions list.
Below those buttons, there is a search field where you can find specific transactions. You are able to filter your search by template types and transaction types.
To the right of the search bar are icons for printing and changing the settings of the list. The only setting available is changing the number of rows viewable per page.
The list itself is composed of nine columns: Template Name, Type, Transaction Type, Interval, Previous Date, Next Date, Customer, Amount, and Action. The list can be sorted in ascending or descending order by any column except the Action column. The Action column allows for editing, using, duplicating, or deleting the row.
Editing a recurring transaction will allow you to change all properties of a recurring transaction. The edit page is very similar to the page to add a new recurring transaction, which we will look at now.
Adding a New Recurring Transaction
You can add a new recurring transaction by clicking the New button above the Recurring Transactions list.
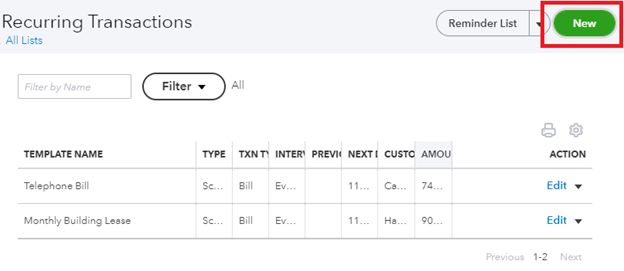
[Figure: Adding a new recurring transaction]
You will then need to choose the transaction type. For this example, we will make a recurring bill. After selecting Bill, click the OK button.
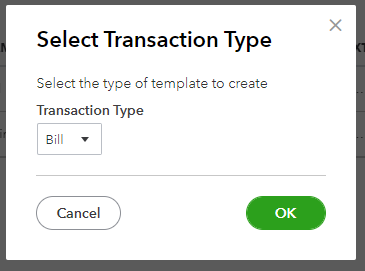
[Figure: Selecting the transaction type]
You will now be taken to the form where you can enter the details for the recurring transaction. You will need to come up with a Template Name, such as 'internet bill' or 'water bill'.
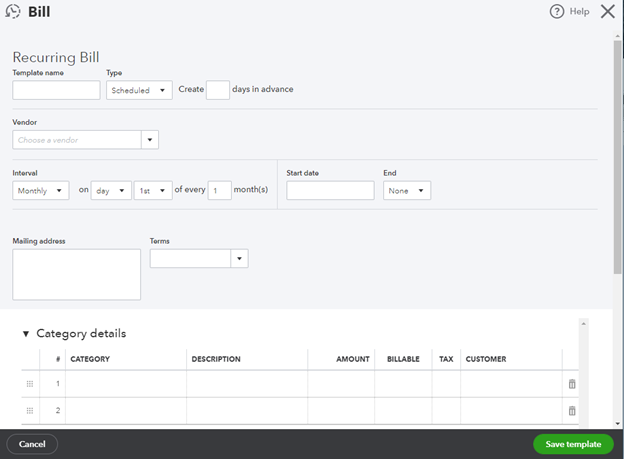
[Figure: Recurring bill template]
You will then need to select a Type. There are three types to choose from: Scheduled, Reminder, and Unscheduled.
- Scheduled: This is useful for transactions with a fixed schedule and amount such as rent or loan payments. They are sent automatically and you can decide if you want a notification sent when they occur.
- Reminder: This is useful for transactions that have a fixed schedule but could change in amount, such as the electricity bill. They must be reviewed before being sent out and can be edited beforehand. They can be viewed by clicking the View Reminders link above the Recurring Transations list.
- Unscheduled: This is useful for complicated transactions that you want to keep a template of so you don't have to reenter the information each time. They won't be sent out unless you manually send one out yourself by using the Use link in the Action column.
If you choose scheduled, then you will need to specify how many days in advance to create the bill. If you set it to reminder, then you need to specify how man days before to send a reminder. Unscheduled bills do not need any timing information entered.
You can continue to fill out the form with the relevant information for the vendor, interval, start date, end date, category details, and item details. When the bill is ready, click the Save Template button at the bottom.
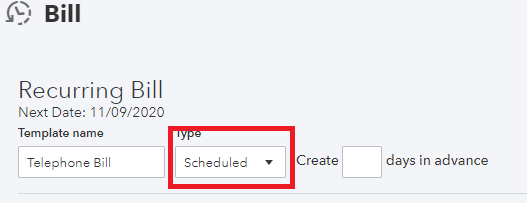
Once created, you can edit a recurring transaction by clicking Edit in the Action column. You can change a scheduled bill to unscheduled by changing the Type while editing. When you finish editing the template, click the Save Template button at the bottom of the screen.
[Figure: Changing the type of recurring transaction]
You can set up all types of different transactions by clicking the New button at the top of the Recurring Transactions list. Some other common types of transactions to make recurring include: deposits, invoices, and transfers. The process for adding other types is very similar to adding a bill.
We can now take a look at another list type that QuickBooks Online offers by clicking the All Lists breadcrumb link at the top of the page. The next list we'll look at is Product Categories.
Product Categories
From the All Lists page, we can see that Product Categories is another list. It shows up as a sub-list of Products and Services. Clicking the link will take you to the list.
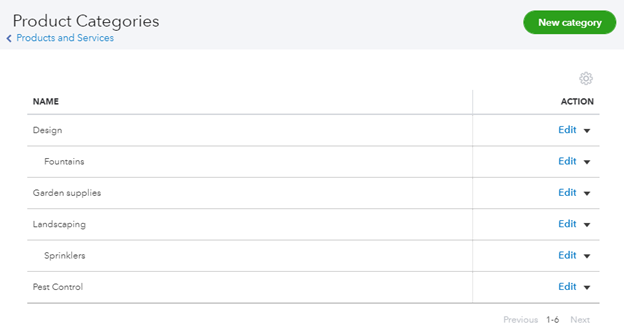
[Figure: Product Categories list]
This is a straightforward list of the categories you have created to better organize your products and services. From the Action column you can either edit or delete the category.
You can create a new category by clicking the New Category button at the top of the page. You have the option of putting your category into a sub-category for better organization.
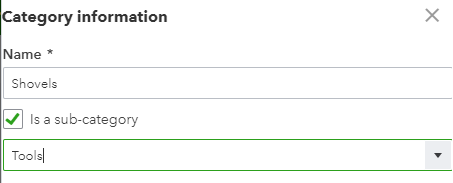
[Figure: Adding a sub-category]
You can return to the All Lists page by first clicking the breadcrumb link to Products and Services and then clicking the link to All Lists.
Custom Form Styles
The next type of list available is for custom form styles. Creating custom form styles allows you to personalize your form styles to give your business forms more character. You can change colors, add logos, and more.
In a later lesson, we will go over form styles in more detail. So for now, we will briefly see what we can do here.
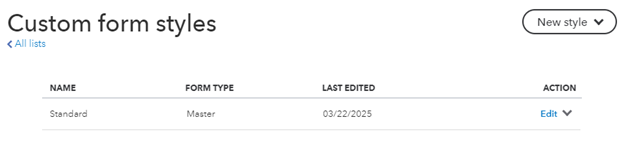
[Figure: Making custom form styles]
The New Style button at the top of the list will allow you to customize invoices, estimates, and receipts. The list itself only has four columns: Name, Form Type, Last Edited, and Action. You can sort in ascending or descending order based on any of the columns except Action. The Action column allows you to edit, preview, rename, and delete a style.
Create a new invoice style by clicking the New Style button and choosing between Invoice, Estimate, and Sales Receipt. In this example, we will choose Invoice. You will be taken to a screen where you can change and preview your new style.
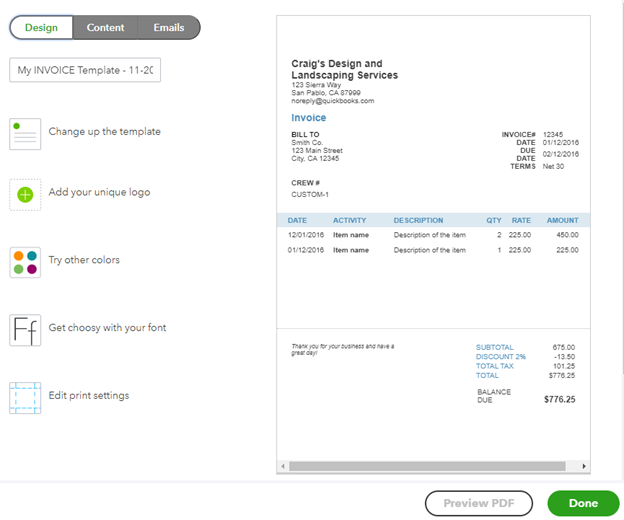
[Figure: The screen for adding a new invoice style]
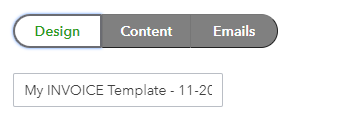
At the top-left corner there are three view options. They are for design, content, and emails. Directly below is a field for the name of your template. Enter a unique name into the field.
[Figure: Template view and name field]
The default view is Design. Here, you have the options to Change up the template, Make logo edits, Try other colors, Get choosy with your font, and Edit print settings. You can get experimental with this section until you have found a design that fits your company's style.
After editing the design, click the Content button to change the text and fields that show up. Click the pencil icon in each section of the invoice to customize what you would like to show up there.
Lastly, click the Emails button to customize how your invoice will show up in emails. You can choose from multiple options here, as well. You can also make separate emails for standard emails and reminder emails.
Once you have finished your custom invoice form, click the Done button at the bottom of the screen. Your new invoice form will show up in the list and you can preview it from the Action drop-down menu. Creating custom estimates and sales receipts are similar to making invoices, as well.
You can also choose to edit the Standard form style, too. The Standard form has the Form Type of Master. Changes made to this form affect the other forms, so you don't have to set them all up individually.
After creating your custom form types, you can click back on All Forms in the breadcrumb link to explore more lists.
Payment Methods
The next list type available is Payment Methods. Payment methods are assigned to each customer payment, so it is essential that each payment is recognized and accepted. Clicking on the Payment Methods link will take you to the list. Many payment methods are added by default, such as credit cards, cash, and checks.
Adding a Payment Method
You may want to add payment methods, however, such as ACH or a new credit card. In order to add a method, click the New button at the top of the Payment Methods list.
The screen that pops up will ask you to make a name for the method and choose if it's a credit card or not. Write the name of your method and, for this example, check credit card. When credit card is checked, a customer's credit card information can be entered.
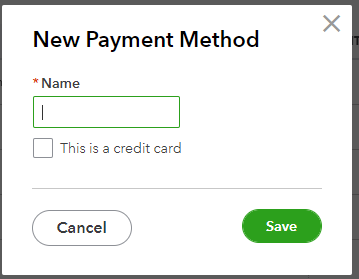
[Figure: Adding a Payment Method]
Clicking the Save button will take you back to the list with your newly added payment method appearing. In the Action column, you can run a report, edit the payment method, or make it inactive. Editing the payment method allows you to change the name and whether or not it is a credit card.
Terms
Returning to the All Lists page, you can see that another list exists for Terms. This displays the list of terms that determine the due dates for payments from customers or payments to vendors. Terms can also specify discounts for early payment.
Clicking on the Terms link will take you to the list. From here, you can add or edit terms.
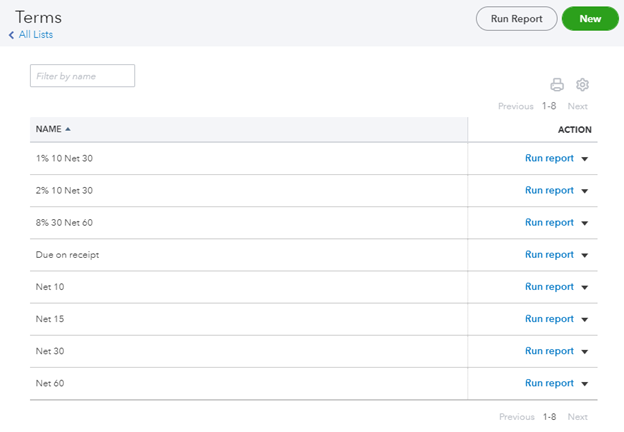
[Figure: Terms list]
The table only shows the term name and the Action column. In the Action column, you can run a report, edit the terms, and make the term active or inactive.
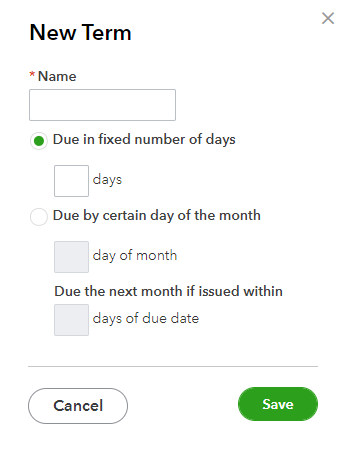
Adding a Term
To add a term, click on the New button at the top. A window will open that asks for the Name and the properties of the term.
[Figure: New Term window]
Make a name for your term, such as 'Due in two weeks,' and then set the fixed number of days to 14. Clicking Save will take you back to your list with your newly added term.
Attachments
One more list that is available from the All Lists page is for Attachment. Following this link will take you to a list of all attachments that have been uploaded.
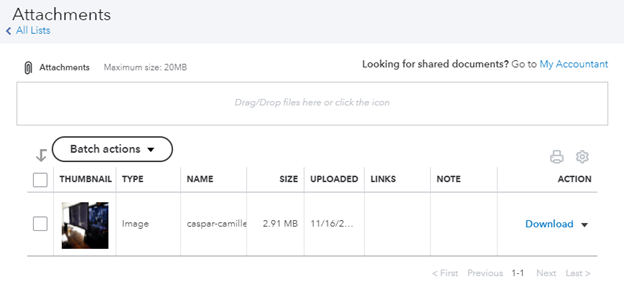
[Figure: Attachments list ]
The table shows you a Thumbnail, File type, Name, Size, Upload date, Links, Notes, and Actions. From here you can add, edit, download, and export your attachments. The file size maximum is 20MB. The links column shows which transactions are linked to the attachment. In the Action column, you can download the file, edit the file name or notes about it, delete it, or create an invoice or expensive form that includes it automatically.
Adding an Attachment
Above the attachments table, you can drag and drop files or click the paper clip icon to add a file. Dragging and dropping will automatically add the attachment, while clicking the paper clip icon will open a system dialogue box.
Although there are only a handful of different lists on the All Lists page, there are actually many lists that can be viewed in QuickBooks Online. We'll take a look at a few more before finishing this lesson.
Tags
Another list type is Tags. This is a relatively new feature added to QuickBooks which is intended to be customizable labels that let you track your money however you want.
Things like invoices, expenses, and bills can be tagged. These tags have no actual effect on your books.
There are both tags and tag groups. It's important to put your tags into groups in order to run reports on them.
To get to the tags list, click on the Banking menu item in the left-side Navigation Pane, and then click on Tags. You can also get there by clicking the Settings icon and clicking Tags under the Lists heading.
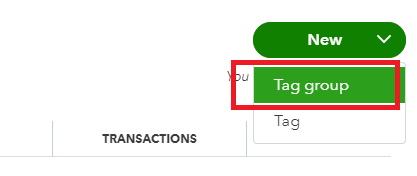
Create a New Tag Group
You can create a new tag group from the New button above the tag list.
[Figure: Creating a new tag group]
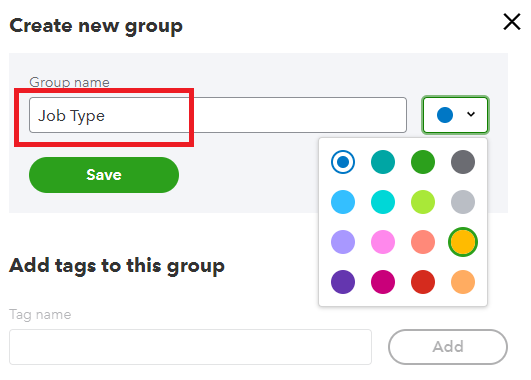
You will then be able to add a new tag group as well as add tags to it. In this example, we will make a tag group called Job Type. You can also assign it a color to make it stand out. Click the Save button to start adding individual tags.
[Figure: Adding a tag group]
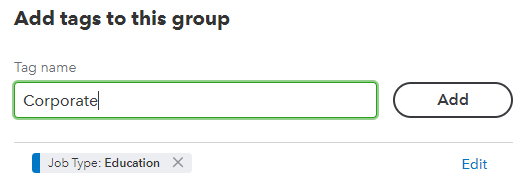
Once you have a tag group, decide on some tags within it and enter them into the text input field for tag names. For example, you can enter 'Education' and 'Corporate' to describe different job types. When you are finished, click the Done button at the bottom of the screen.
[Figure: Entering tags]
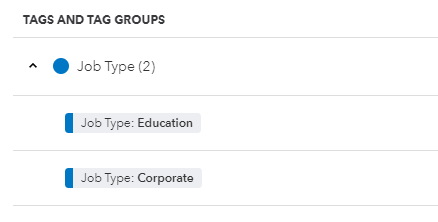
Now when you look at the tags list, you will see your new tag group. Click the drop-down arrow to see the tags within it. You can also start tagging any transactions with your new tags.
[Figure: Tags and tag groups in the tags lists]
While tags might be optional, there are other lists that are much more vital to your company. One example is the customers list, which we'll look at now.
Customers
The customers list is full of information about our customers. We can get there by clicking on Sales in the left-side Navigation Pane and then clicking Customers.
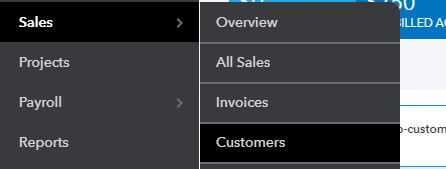
[Figure: Navigating to the customers list]
In the customer list, each customer is listed in alphabetical order. By default, you can view their phone number and balance in the list. Clicking the settings icon will allow you to also view their address, email, customer types, and attachments in the list.
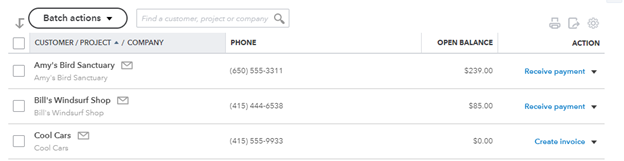
[Figure: Customer in the customer list]
You can also export your customer list to Excel or print by using the icons next to the settings.
There are numerous actions available from the Action column, such as to receive payment, create an invoice, send a reminder, create a sales receipt, create a statement, or make inactive. Each of these actions will be discussed in more detailed in upcoming lessons.
Creating a New Customer
You can create a new customer by clicking the New Customer button above the list. If you already have a list of customers, you can also import them by selecting Import Customers from the drop-down menu next to the New Customer button.
Clicking the New Customer button will open a form where you can enter detailed information about your customer.
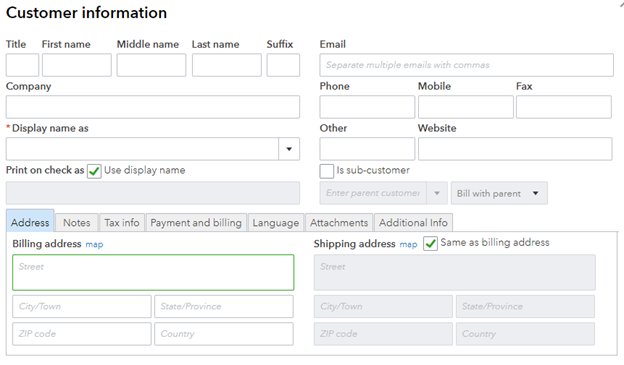
[Figure: Adding a new customer]
Although there are numerous fields available, the only required one is the Display name as field. Fill out as much information as necessary and click the Save button at the bottom to add your customer.
Customers can also be organized into Customer Types. Clicking Customer Types at the top of the customers list will allow you to define these customer types.

[Figure: Viewing the Customer Types list]
From the Customer Types list, you can add or remove types to organize your customers.
Conclusion
In this article we took a closer look at lists in QuickBooks Online. We have seen that there are lists for all different kinds of things. The lists allow us to easily find and edit what we are looking for.
We've also seen that QuickBooks Online has given us a very standard way to add items to our lists. They usually put buttons in the same place and each list has an Action column where we can perform common functions.