Keeping track of the items that your company buys and sells is an essential task for a company. Monitoring your inventory lets you plan for the future and also stay on a budget. Therefore, the better you are able to monitor and control the items in your inventory, the more your company will benefit.
In the desktop version of QuickBooks, objects in the inventory are called items. In QuickBooks Online, however, items are referred to as Products and Services. Items are things that you sell to a customer or purchase. In this article, we'll take a look at everything you need to know about setting up and working with your products and services.
Getting to Products and Services
You can get to Products and Services easily in two ways. The first way is through the left-side Navigation Pane. Click on Sales and then Products and Services. The second way is to click the gear icon for Settings in the Heading. You can find Products and Services under the Lists category. Once there, you will see a list of all the products and services that you have set up.
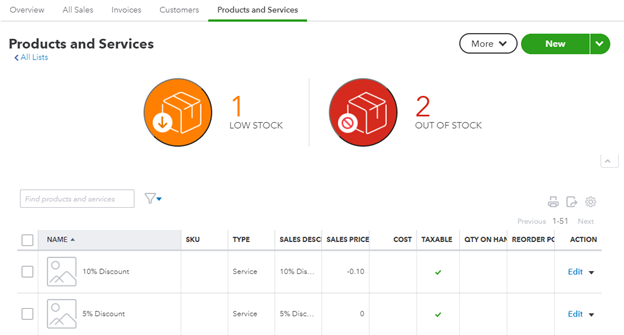
[Figure: The Products and Services screen]
Underneath the Products and Services heading, you will see a breadcrumb navigation that goes to All Lists. Clicking that will take you to a page of lists where you can also see the chart of accounts that was discussed in the previous unit.
If you're running low on an item or are out of stock, you will see alerts above the table that tell you so. Clicking on either alert will filter out the product and services table so that only those items are viewable.
You can also search for specific products and services by using the search bar. The blue triangle next to the search bar will allow you to set options for your search, such as the status, type, and stock level.
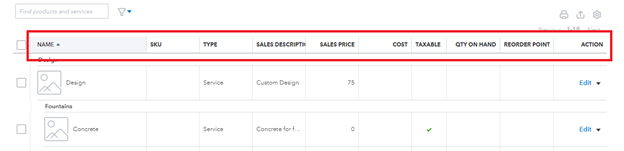
The icons on the right of top-right will allow you to print, export to Excel, and change settings for the table. There are several other columns that can be added that are not shown by default. Those are for income account, expense account, inventory account, purchase description, and quantity on purchase order.
In the table, there are ten columns which are viewable by default. Most of the column headings can be clicked on to order the items by that column in either ascending or descending order.
[Figure: columns in the products and services table]
The first column is for the name and a picture. You can edit the name and picture by clicking the Edit link in the Action column.
The second column is for SKU numbers. These are unique codes used to track inventory. Using SKU numbers is optional.
The third column is for Type. Item types include inventory, non-inventory, and service. Inventory is for items that you buy and/or sell and that you want to keep count of. Non-inventory is for items that you buy and/or sell but you don't need to keep track of. Service is for services that you provide which, therefore, don't have a quantifiable element.
The fourth column by default is Sales Description. This is for descriptive text of the item or service. The text that is entered here will appear on various forms, such as invoices and receipts.
The next column is Sales Price. If you have entered a sales price that you charge each time, it shows here. If the price differs every time, then you should leave this field blank.
The following columns are Cost, Taxable, Quantity on Hand, and Reorder Point. We'll discuss those at a later time. Cost represents what you pay for the item to add it to your inventory. Taxable simply refers to whether a sales tax will be added to the item in an invoice. Quantity on Hand is how many of an item you have, while Reorder Point is the number of an item at which you will receive a notification that more should be ordered.
The last column is the Action column. You can edit a row or do other functions, such as run reports and duplicate the item, by clicking the drop-down arrow.
You can also do Batch actions if you select more than one item by checking them in the left-most column. Batch actions include reordering, making products inactive, adjusting quantities, and switching between inventory and non-inventory.
We have now taken a look at the products and services table. Next, we will start looking into adding different types of products and services.
Adding a New Product with Inventory Tracking
Adding your products to QuickBooks Online will simplify your inventory-keeping process. Right now, let's start adding a product with an inventory that we will monitor.
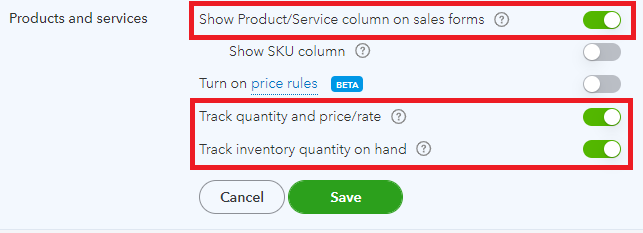
The first step is to make sure that inventory tracking is turned on. To turn on inventory tracking, click on the gear icon in the Heading and the select Accounts and Settings under the Your Company category.
Then go to the Sales tab and find the Products and Services section. Click the pencil icon to edit the section. Now you can turn on the three fields that we need. Turn on Show Product/Service column on sales forms, Track quantity and price/rate, and track inventory quantity on hand. Click the Save button in the section and then the Done button at the bottom of the screen.
[ Figure: turning on inventory tracking]
Now that inventory tracking is enable, go back to the Products and Services screen by either clicking the gear icon or Sales in the Navigation Pane.
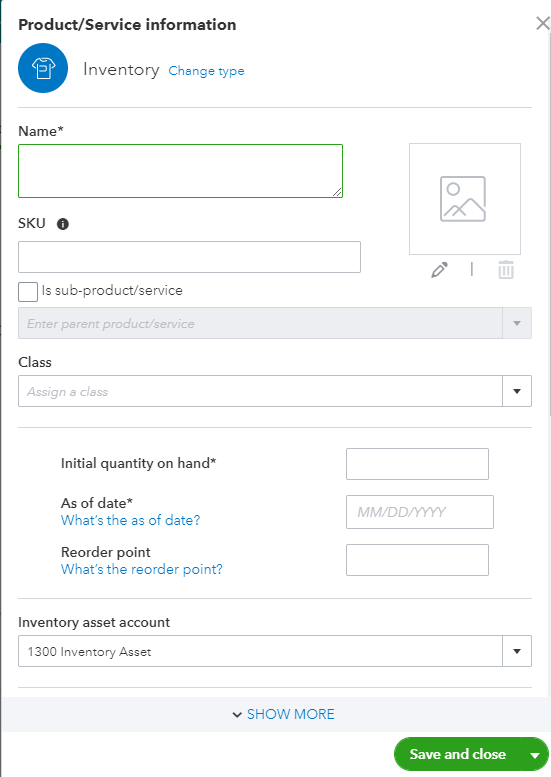
Next, click the New button and then Inventory in the window that pops up.
[Figure: Adding an inventory item]
Now you can add a Name, SKU, and Category for your new item. You can also add an image and determine if this is sub-product of another item. You may also set the Class of product is it to keep your items better organized.
Since this is an item that we will be tracking, we will want to add the product's quantity, reorder point, and inventory asset count.
For the Initial Quantity on Hand, enter the number from the date that you want to start tracking from. If it's an item that you will be purchasing from vendors, enter 0 and then later you can track how many you have received from vendors.
Next, select the Reorder Point. When an inventory item falls to this point, you will receive a notification that it is time to reorder more.
For the inventory Asset Account, click on the drop-down triangle and select Inventory Asset. Selecting this account ensure that this item is including in QuickBooks calculations for the cost of all the products you have in inventory.
You will need to make sure that you see all the options by clicking the Show More button that will appear near the bottom of the screen. Depending on your screen size, the button may show up in different places.
Expanding the screen, the next thing you can then enter is the description. The text here will show up on forms like sales receipts and invoices which your customers will see.
Enter the sales price if this product will have a constant price.
Next you will choose the Income account that will track sales of this item. QuickBooks Online already has an income account, however you may make a new one by clicking Add New in the dropdown menu.
Next select the Sales Tax Category. You can select Nontaxable or Taxable at the Standard Rate based on where the product is being sold.
Now, add the product's cost. This amount can be changed when purchasing supplies.
For the Expense Account, you can select Cost of Goods Sold from the drop-down menu. This account keeps track of the total cost of all the products you sell.
You can then decide on a preferred vendor. This will be the default vendor that pops up when you need to reorder the item.
Once you are done, click Save and Close. You will be taken back to the Products and Service list and will be able to see your new product in the table.
Adding a New Product without Inventory Tracking
Not all products that you sell need to have their inventory tracked. Setting up a non-inventory item is similar to setting up an inventory item, but there are a few differences.
Starting from the Products and Services list page, click New and then choose Non-inventory. You will then be on the page to add a Non-inventory item.
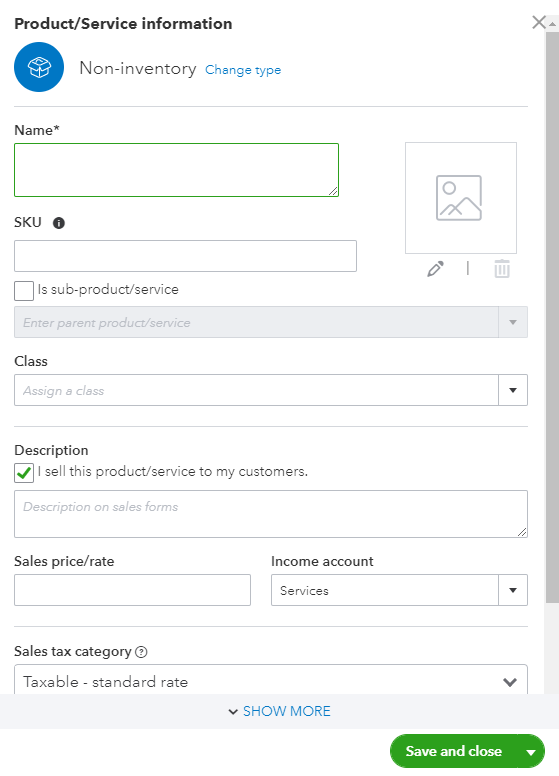
[Figure: Adding a non-inventory item]
Just as with an inventory, item, add a Name, SKU, and Category for your new item. You can also add an image and determine if this is sub-product of another item. You may also set the Class of product it is in order to keep your items better organized.
If this is an item that you will sell, then check the box next to I sell this product/service to my customers.
Next, enter the text for the item's description. The text here will show up on forms like sales receipts and invoices which your customers will see.
Enter the sales price if this product will have a constant price. If not, you can set the price when you fill out an invoice or sales receipt.
Next you will choose the Income account that will track sales of this item. QuickBooks Online already has an income account, however you may make a new one by clicking Add New in the dropdown menu.
Next select the Sales Tax Category. You can select Taxable - Standard Rate if there is a sales tax or Nontaxable if there isn't. There is also an option to choose a Special Category. This will give you many options based on the industry the item is in.
If you purchase the product from a vendor, then check the box in Purchasing Information that says I purchase this product/service from a vendor. That will show the options that are listed below.
You can enter the products Description. This shows up on forms like bills and purchase orders that you send to vendors.
You can also add the product's cost. This amount may be different when purchasing supplies.
For the Expense Account, you can select the account that keeps track of the products that you sell.
You can then decide on a preferred vendor. This will be the default vendor that pops up when you need to reorder the item.
Once you are done, click Save and Close. You will be taken back to the Products and Service list and will be able to see your new product in the table.
Changing a Non-inventory Product to an Inventory Product or Service.
You can easily change a non-inventory product into an inventory product. Find the product in the Products and Services list and click Edit in the Action column. You can then click the Change Type link to make it into either an inventory product or service.
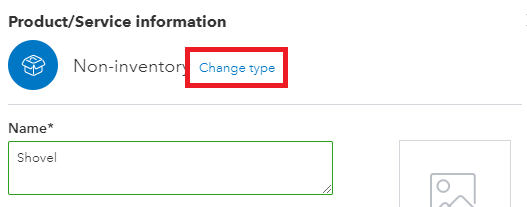
[ Figure: Changing the product type]
Once you change the type, the relevant fields will show up in the edit window. Therefore, you can add the Initial quantity on hand, As of date, Reorder point, and Inventory asset account.
After making the desired changes, click the Save and Close button to return to the Products and Services list.
Adding a New Service
Adding a new service is nearly identical to adding a non-inventory product. Click the New button at the top of the Products and Services list. Then choose Service.
You can follow the previous instructions for non-inventory products when adding a service. When adding the Income Account, though, make sure you add to the correct account where you want to keep track of the sale. Click the Save and Close button when you're finished.
Adding a Bundle
You can also add a bundle to the Products and Services list if you sell groups of products and/or services. To make a new bundle, click the New button and select Bundle.
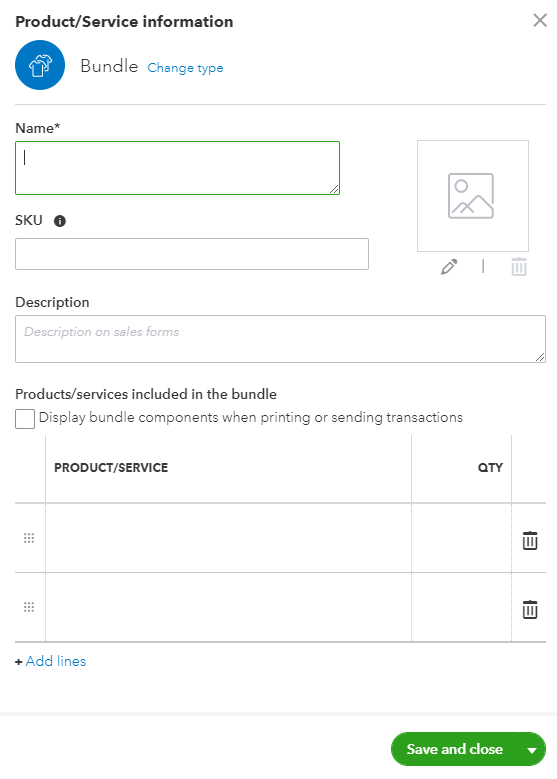
[Figure: Adding a bundle]
First you will need to come up with a name to describe your bundle. Additionally, you can add an SKU and description for the bundle. If the description is blank, the individual descriptions of each item will still be shown on invoices and sales receipts.
Decide if you want to display the bundle components when printing or sending transactions and click the checkbox next to that if so.
You will then choose the products and/or services that you want to include in the bundle. Clicking on an empty line will bring up a window where you can search or browse for the item. You'll also want to set a quantity and can move the items around by clicking the grid icon in the left-most column.
Clicking the trash can icon will remove a line and more lines can be added by clicking Add lines below the list. When you are done, click the Save and Close button to return to the Products and Services list.
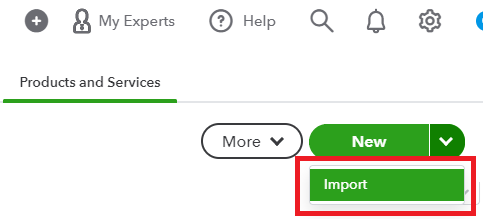
Importing Products or Services
You can also import products and services from an Excel file. To do this, click on the drop-down arrow next to the New button on the Products and Services page. From the drop-down, select Import.
[Figure: Importing products and services from a file ]
This will pop open a window where you can select either a CSV or Excel file to upload. Click the Browse button to find your products and services file.
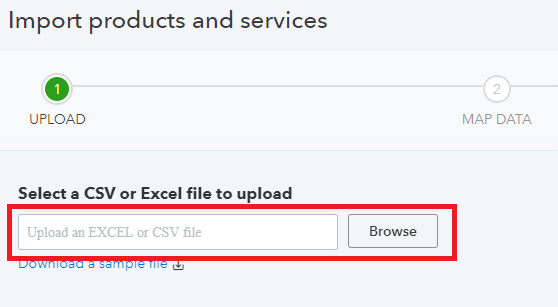
[Figure: Browse for an Excel or CSV file ]
Navigate to your file and click Open in the system menu. You should note that you can only import up to 1,000 rows at a time. Longer lists should be split up into smaller files. In addition, the Product/Service Name filed can only be up to 100 characters and cannot include special characters. Also, the Quantity as-of Date should be in the format of MM/DD/YYYY or DD/MM/YYYY and the Income and Expense account cannot use sub-accounts.
If you are importing products or services that have sub-categories and sub-items, then they should use a specific format. For just categories, use this format in the Product/Service Name: [Name of category]:[Name of product/service]. For example, Small:Hat.
If there is both a category and a sub-category, then use: [Name of category]:[Name of sub-category]:[Name of product/service]. For example, Medium:Blue:Dress.
With items and sub-items, you should use a row for each variation. For example, use the format: [Item]:[Size]:[Color]. In the Product/service Name, put:
|
Product/Service Name |
|
Towel |
|
Towel:Small:White |
|
Towel:Medium |
When everything is formatted well, click Next at the bottom of the screen to have your preview a map of your data. As long as your file is configured correctly, you will see your data mapped out from its original field to the QuickBooks Online field.
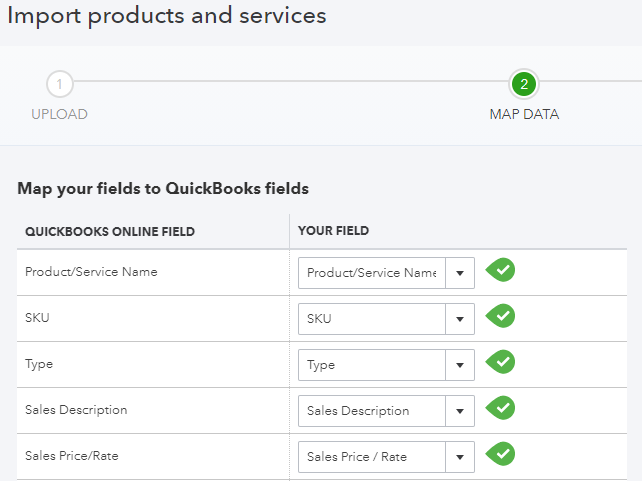
[Figure: Data map for import to QuickBooks Online]
Use the drop-down menu to select the right field for each QuickBooks Online Field, if it isn't already set up correctly. When all the fields are matching, click the Next button at the bottom of the page.
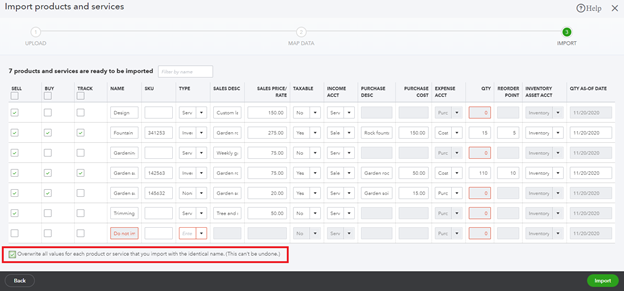
On the next page, make sure that all the data is correct. When you are certain, check the field at the bottom that says Overwrite all values for each product or service that you import with the identical name. This cannot be undone.
[Figure: Confirming the data to import]
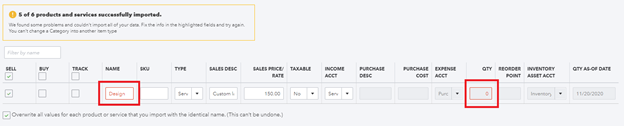
Some rows may not have been imported due to errors. You will get a follow-up screen that shows the errors highlighted in red. Fix the errors and try again.
[Figure: Errors in importing]
Once you have finished importing, return to the Products and Services lists to see your new items added to the list.
Conclusion
In this article you learned all about using the Products and Services list. This is the list that is referred to as Items in other versions of QuickBooks.
You've learned how to read the rows of products and services in the list. You've also seen how to add products and services, including inventory and non-inventory items. Lastly, you have also learned how to import items from an Excel file.