
Buy Microsoft Excel
You can purchase Microsoft Excel as a standalone program by going to the Microsoft website. At the time this writing, the price was $109.99 for Excel 2016.
Buy Microsoft Office
You can also buy Microsoft Office, which includes other Microsoft Office programs, such as Excel. The price to buy the software vary depending on what version you which to purchase. There are three versions: Home and Student, Home and Business, and Professional. As with other versions of Office, it's a one-time charge and the software is yours to use as long as you wish. You can buy Office directly from Microsoft or an approved retailer.
Subscribe to Office 365
With Office 365, you'll be able to download the Office program to your computer just as if you had purchased them. The only difference is you will pay either a monthly or yearly subscription price in order to keep the program active and functional. The price of your subscription will be determined by the version that you want. In the snapshot below, you can see the subscription prices for the Home and Students versions of Office 365. You can also see what it includes.
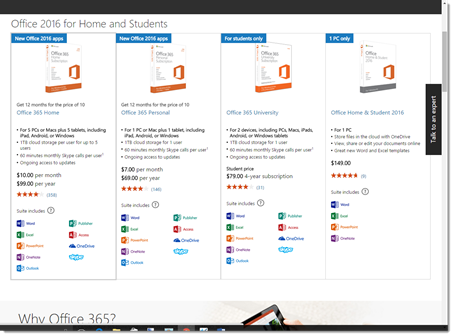
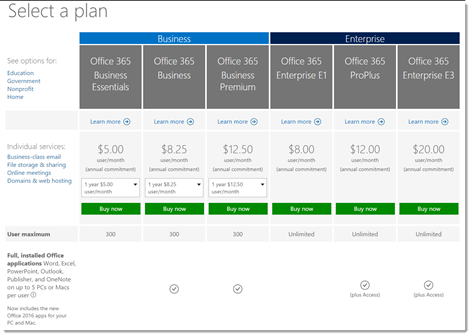
As part of Office 365, you'll also be given multiple licenses which will give you the ability to install the software on other computers as well. For the Home version, you get up to five licenses (five devices). The Small Business version comes with licenses for up to 25 users. The Midsize Business provides for up to 300 users. There's also an Enterprise version for larger companies that offers unlimited users.
Once you subscribe to Office 365, you'll never have to worry about purchasing a new version of Office ever again. When a new version comes out, you will be able to update your software by signing into your Microsoft account. To subscribe to Office 365, go to office.products.com.
Upgrade Your Office 365 Subscription from Office 2013 to Office 2016
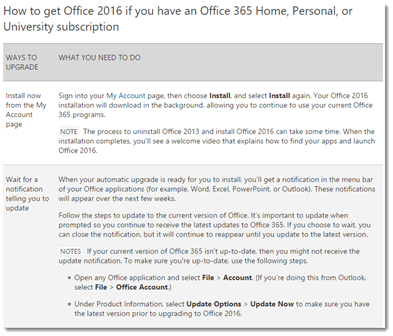
Once you subscribe to Office 365, you'll never have to worry about purchasing a new version of Office ever again. When a new version comes out, your software will be updated for you. If you don't have your software set to update automatically or you don't see the update, you can go to your Microsoft account to download the update. Simply follow the instructions in the screenshot below from the Microsoft.com website.
What's New in Excel 2016
With each new version of Excel, we see new tools and features that make creating, editing, and working with spreadsheets even easier. Excel 2016 is no exception.
Listed below are some of the improvements and changes you can look forward to seeing in Excel 2016:
-
3D Maps. Previously known as Power Map, 3D Maps is now built in to Excel and is found under the Insert tab.
-
Even more enhancements to help create better and more effective PivotTables.
-
Create and share data reports and visualizations through Power BI.
- Shape Formatting. Now you can choose from preset fills and theme colors to make inserting shapes from the Shapes gallery easier and faster.
- Smart Lookup allows you to fact check parts of your spreadsheet. All you have to do is highlight the term you want to check. You will see the search results in Excel.
- Tell Me. Tell Me is a feature that allows you to tell Excel what you want to do. This feature will guide you through the steps you need to take to complete the task.
- Ink Equations. Inserting math equations in your document is even easier in Excel 2016. You can simply go to Insert>Equation>Ink Equation whenever you want to put an equation into your spreadsheet. With a touchscreen device, you can write the equations by hand. Excel converts it to text for you. You can also write with your mouse.
- Automatic image rotation automatically rotates an inserted image to match the camera's orientation.
- View previous versions of a document. You can now view historical versions of your spreadsheets.
- Share spreadsheets with others easier than ever before. You can now share a spreadsheet by clicking on the Share button in the Ribbon.
- Work with others simultaneously by using the new co-authoring feature.
- Real-Time Typing. The co-authoring feature goes hand in hand with real-time typing. As you work within a spreadsheet, you can see what others are doing in the spreadsheet, as well as view the changes they make.
- New chart types. Treemap, Waterfall, Pareto, Histogram, Box and Whisker, and Sunburst are some of the new chart types in Excel 2016.
Differences Between Word 2016 for Mac and Word 2013 for Windows
Not long before the windows version of Excel 2016 was released, the 2016 version of Excel for Mac was released as well. In the past, the Excel for Windows and Excel for Mac looked like very different beasts.
Excel 2011 for Mac, for example, still had the feel of the old Excel for Windows before the invention of the Ribbon. However, they look more alike in the 2016 versions.
Below is a picture of the Home tab of Excel 2016 for Mac.

Now look at the Home tab of Excel 2016 for windows.

Some of the new features found above the Ribbon in Excel 2016 for Windows aren't yet available for Mac, such as the Share button and the Tell Me box. Excel 2016 for Mac also doesn't have the File tab in the Ribbon. In order to access the Backstage area of Excel, you must go to the Menu Bar at the top of your Mac screen, then click File. Aside from that, the two versions of Excel 2016 are very similar in terms of the user interface and design.
Most of the major differences between the two versions are related to features. Listed below are some features found in Excel 2016 for Windows that you will not find in Excel 2016 for Mac.
-
Flash Fill
-
The ability to insert online pictures of screen clippings from within Excel
-
Watch Window
-
Evaluate formula
-
Table Slicers
-
PivotCharts
-
PageBreak Preview View
However, even with the slight difference in features, if you use both Excel 2016 for Windows and Excel 2016 for Mac, it should be easier than ever to switch between the two because they have close to the same look and feel.
Getting Started In Microsoft Excel 2016
You open Microsoft Excel by double clicking on the icon on your desktop or in the taskbar. The icon for Microsoft Excel 2016 looks like this:

Excel 2016 opens to a Start screen that offers you several different ways to get started using the program. The Start screen is pictured below.
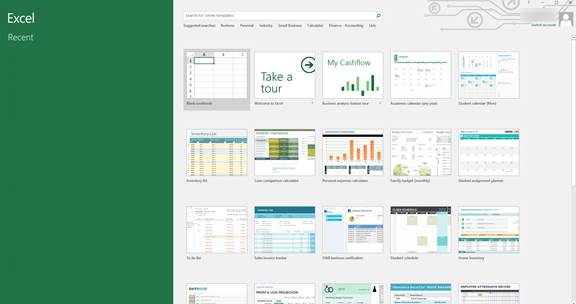
On the left, you'll see the dark green column that contains your recently opened files. You can click on any file in the list to open it. On the right side of the screen, you'll see templates that you can use to create a new Excel workbook. This includes a blank workbook that contains blank spreadsheets
Let's open a blank workbook.
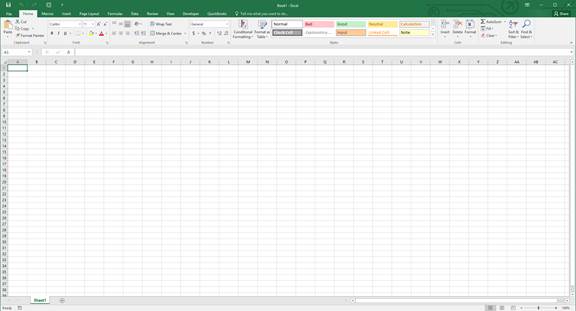
This is a new workbook for which the default name is Book1. You can see the name in the Title bar.

For each additional new workbook that you open, the name increases by one digit: Book2, Book3, etc. If you start MS Excel by clicking on an already existing workbook on your computer, it will open automatically and your workbook will be displayed in the MS Excel window.
Touring the Excel 2016 Interface
Let's take a look at the blank workbook again. This time, however, we've labeled the different parts of the interface that you'll use in Excel 2016.
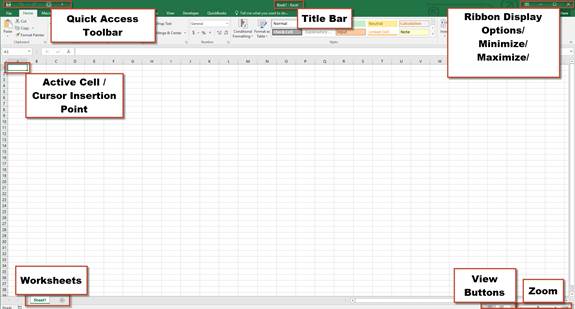
Take a few minutes to look at the features that we've labeled for you. It's not important that you know how to use these things right now. For now, just take a second to familiarize yourself with where everything is located. The items labeled above help to make using Excel 2016 easier, but they're not the bread and butter.
If you look below the Quick Access Toolbar, you'll see the Ribbon. The Ribbon was first introduced in Office 2007.

The ribbon is divided up into tabs. These tabs are also menus. The tabs are File, Home, Insert, Page Layout, Formulas, Data, Review, View, and Developer.
Below each tab are commands and tools you'll use in Excel. The commands and tools located beneath each tab relate to the tab. For example, under the Page Layout tab, you would find tools to design a page layout.
The tools under each are broken down into groups. This is to make it easier to find what you need. The tools in each group relate to each other just as the tools under each tab. In the snapshot above, we're looking at Home. You can see the group labels beneath the tools.

The groups within the Home tab are Clipboard, Font, Alignment, Number, Styles, Cells, and Editing. Below is a snapshot of the Alignment group.
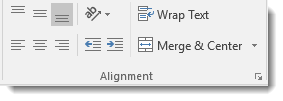
In the Alignment group are all the tools that are related to alignment.
If you look to the right of the word �Alignment,' you'll see an arrow in the lower right hand corner. If you click this, it will take you to the Alignment options dialogue box. You can click this arrow in any group to open the options for that group.
Working with Excel 2016 on a Tablet
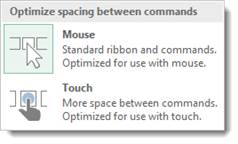
If you're using Excel on a tablet, you can adjust the spacing between buttons on the ribbon to make it easier to use. You do this by activating Touch mode.
To do this, click or touch the Quick Access Toolbar button: 
Select Touch/Mouse Mode.
You can now see the button in the Quick Access Toolbar, as shown below:

Now, touch or click the button and choose Touch.
There is now more space between commands on the Ribbon.


