Creating and Defining Projects in MS Project 2013
Before you can begin using Project 2013 to manage your project, you have to take the time to develop the scope of the project. Project 2013 can only manage the information about the project that you give it, so it is important to have everything organized and planned before you even start to use the program.
Planning and Understanding Your Project
By definition, a project charger is a document that authorizes or recognizes a project. It is usually created by the project manager with the help of the project sponsor, and it functions as an agreement that states the purpose and objectives of the project. You will want to develop a project charter before you start to use Project 2013 so all of your objectives are laid out in front of you, and you know what needs to be done (and how). This is information you will need to successfully manage the project with Project 2013.
Your project charter should contain:
-
The purpose of the project, as well as a description
-
Objectives
-
Requirements
-
Milestones
-
Budget
-
The name of the project manager
You can find project charter templates for free online. Simply do a Google search and find one that will work best for your project.
Planning for Tasks
A project is made up of tasks. Your project may have ten tasks, or it may have five hundred. Tasks are steps that must be completed. Each task moves you one step forward to completing the project. We can use the analogy of a staircase to better explain the relationship between tasks and projects.
You want to build a stairwell, and you know it must contain twenty steps. However, you have to build one step at a time in order to reach the top and complete the stairwell. Think of tasks as the steps to get you where you want to go with the project. That said, your tasks must be planned out in order for your project to be successfully completed.
If you want, you can open up Project 2013, create a new project, and immediately start entering tasks. You can plan and create your entire project within Project. However, for larger projects, this typically is not a successful way of doing things because you may overlook a task that needs to be done. You are more focused on entering data into the program and populating it with tasks instead of planning tasks to manage with the program so the project is successfully completed.
The fact is that tasks need to be planned out just as projects do. What tasks must be completed before other tasks begin? This question as well as others will be ones you want to answer before you start inputting information into Project 2013. You have to plan before you can manage, and you have to realize that Project 2013 is a project management program. You still have to plan.
To plan your tasks, it helps to create a Work Breakdown Structure, or WBS. This will be a visual representation of the hierarchy of the tasks associated with your project.
You create a WBS by looking at the project as a whole, breaking it down into large parts, breaking those large parts into smaller parts, and breaking down those smaller parts until you have exact deliverables � or tasks. In other words, what do you have to do to accomplish a large part of the project? What do you have to accomplish in order to accomplish these things, etc.? You can use an organizational chart or an outline to create a WBS.
Starting a New Project
When you want to start a new project in Project 2013, you have two choices. You can either open a blank project in the backstage view or use a project template.
When you open a new project, the project will open in Gantt Chart view by default. The project is blank. All you have to do to get started is start entering tasks for the new project.
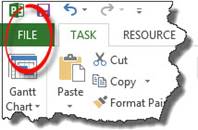
If you want to start a new project while you are working on an existing one, simply go to the backstage area by clicking the File tab.
Click New in the green column on the left side of the window.
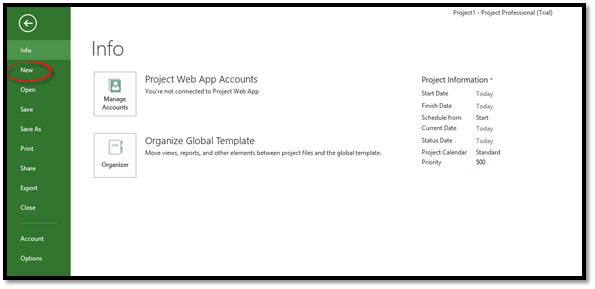
Now you can choose to either start a blank project or start from a template.
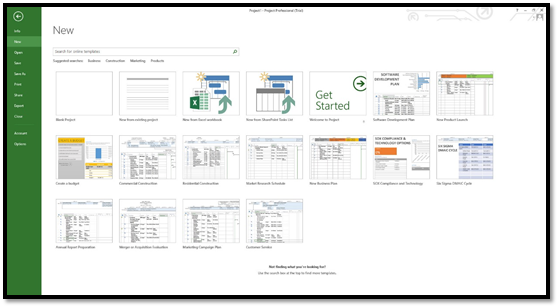
The new project opens in the Project 2013 window.
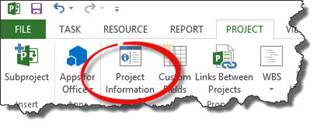
Adding Project Information
Once you create a project, you can start entering information about the project. This information can include the start or end date of the project, as well as other details.
To enter information about the project, click on the Project tab, then click Project Information on the ribbon (Project>Project Information).
You will then see this dialogue box:
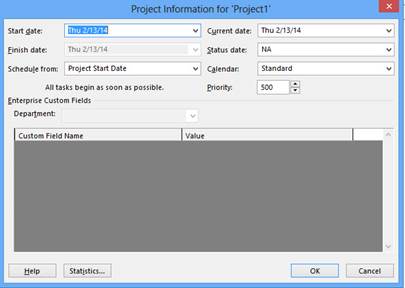
Enter the information about your project.
-
Start Date, Finish Date. If your project is scheduled forward from the date it starts, only enter the start date. If you are scheduling back from the finish date (for example: scheduling to meet a deadline), enter a finish date.
-
Schedule From. Tasks can be scheduled backward or forward. Typically, it is forward form the start date.
-
Current date. This will match the settings on your computer. You can change that if you need to list a different date.
-
Status Date. It is a good idea to set the current date in order to track progress. You will want to progress on the project in real time.
-
Calendar. Click the drop-down box and select a calendar.
-
Priority. You will want to set this if you have many projects and want to link them together. It can also be helpful if you use the resource leveling tool.
Click the OK button when you are finished.
Saving a Project
To save a new project that you've never saved before, go to File> Save As and enter a name for your project. It is a good idea to create a folder for your project in the location where you will save it � before you save it for the first time. That way you can save your MS Project 2013 file and any supporting documents together. It helps to keep the project organized.
The main part of your project is going to be the tasks. The tasks are what will track your project progress from start to finish. There are a few ways that you can create an enter tasks.
-
You can enter task names in Gantt chart view.
-
Enter task names in the Task Information dialogue box.
-
Import tasks from Excel or Outlook
Let's start with the simplest.
To enter a task, you can simply start typing in the Gantt Chart view. The Gantt Chart view is displayed by default when you open a project.
In Gantt Chart view, we are going to enter "Create Outline" as our first task. To enter a task name, just click on a blank cell.
Now, we can enter other information about this task such as the duration, start and finish, predecessors, and resource names. For now, we've just entered "Create Outline" as shown below.

Once you've finished entering the task name, use the arrow to move down to the next Task Name cell or just click on another cell. Repeat these steps until you've entered all task names, as we did in the following snapshot.

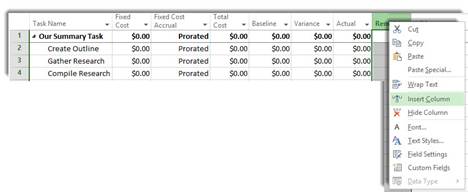
If you need to display more columns to add more information, simply go to Add New Column (on the far right of the snapshot above). Then select the column name to display from the Field Name list.
If you do not see a column called Add New Column, right click in any of the column headings and select Insert Column.
Entering Tasks Using the Task Information Dialogue Box
To create tasks using the Task Information dialogue box, simply double click a blank cell in the Task Name column.
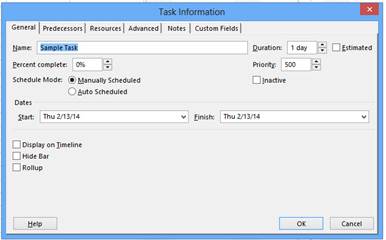
Enter a name in the Name Field.
Click OK. The task now appears in the empty box that you double clicked on. Use the arrows to navigate to the next cell and repeat these steps to add more tasks using this method.
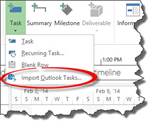
You can also import tasks from Outlook. This is a handy feature. Sometimes you have so many tasks in Outlook that they can turn into a project of their own. You can import them into Project and have all the benefits of project management software instantly at your fingertips.
To import tasks from Outlook:
Either open the project plan that you want to insert tasks into (using Project) or create a new project.
Next, select Format>Task>Import Outlook Tasks.
You will then see the Import Outlook Tasks dialogue box.
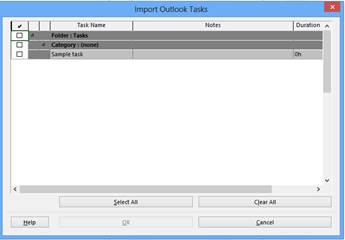
Select the options for the task that you are going to import. You can also click Select All to import all tasks.
Click OK.
An effort-driven task means that it is a task where effort drives it to completion. If you adjust resources (or people or things used to accomplish a task), the duration of your task might change, but the hours of effort (or work) will stay the same. Whenever you add or delete a resource on an effort driven task, the work is divided equally among those resources.
The definition we gave you above will suffice for the time being to help you understand effort driven tasks.
That said, this is how an effort driven task works:
Let's say you have a task set up that will take two days. Two days is its duration. You have one resource assigned to this task working four hours a day. It will take eight hours to complete the work � or two 4 hour days. If you add another resource to this effort driven task, it will only take half the time because the work will be split between them. Effort driven can simply mean that effort drives the task to completion. The more resources that put in effort, the less time the task will take.
As we said, all tasks are effort driven by default. You can change a task so it is not effort driven (or make it effort driven again), by double clicking a task to open the Task Information dialogue box. Click on the Advanced tab.
Either check or uncheck the Effort Driven box, then click OK.
Sometimes a task will start, and you will find that you need to put it on hold while you take care of another issue or complete another task. Or maybe you realize they'll be a delay in the task when you create it and want to structure it so that it takes a break and resumes later. You can easily remedy either of those scenarios in Project by simply splitting a task. When you split a task, you create a break in it with no activity occurring for the task during the break. You can create as many splits in a task as you want.
To split a task:
Click the Split Task button. It is located under the Task tab in the Schedule group and looks like this:  .
.
A box appears (as shown below) that guides you as you split a task.
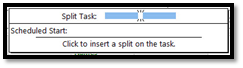
Now, click the date where you want to split the task. Drag until the box shows the date where you want to begin again.
When you release the mouse, your task is split.
With every task that you create, you can also add notes about the task. You can use the note area to write about changes in timing, to list changes in vendor information, or any other information or changes relevant to the task.
To enter task notes:
Double click on a task.
Select the Notes tab in the Task Information dialogue box as shown in the next snapshot.
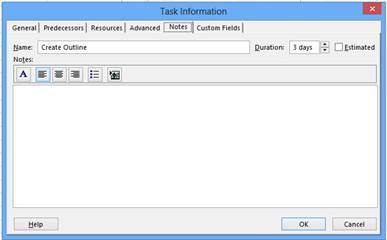
The task name will appear in the Name field.
You can write your notes in the text field. Project also gives you the ability to format your notes. You can left align, center align, or right align. Also, you can format text as a bulleted list or insert an object.
When you are finished, click OK to save your note.
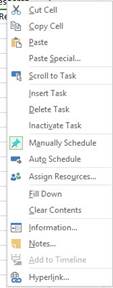
You can either choose Auto Schedule or Manually when scheduline tasks.
If you choose Auto Schedule, Project 2013 will figure out the task schedule for you based on the start and finish date for the task, dependencies, calendars, and resource scheduling.
If you choose Manually, you won't have to enter the task duration and end dates. You can enter these later. When you do enter the duration and dates, Project will fix the schedule for the task. It won't move the task unless you do it manually.
To set the scheduling for a task, right click on the task, then choose Manually Schedule or Auto Schedule.