If you've never worked with Access or even a database before, it can seem overwhelming at first to try to digest everything we're telling you. So first, don't worry. We're going to make understanding databases and Access as easy as tying a shoe with Velcro instead of laces. That's easy enough, isn't it?
A database, as defined by Merriam Webster dictionary is "a usually large collection of data organized especially for rapid search and retrieval (as by a computer)." That said, picture a used car dealership in your head. If you were the owner of the dealership, you'd want to store the cars you had on your lot, the prices for each car, the make and model, etc. You'd want information about your entire inventory.
But you'd also want customer information. You'd want to know which customer bought which car, the customers' information, etc. You'd also want to be able to sort that information on a whim. Maybe you want to pull up how many Toyotas you've sold in the past year versus Ford. Perhaps you'd want to pull up a list of customers who bought warranties that your dealership offered. When all the information you have is stored in a database, you can easily access that information.
Tables
Databases are made up of a series of tables. A table is the name of the object that stores data. It's kind of like a spreadsheet, if you've worked with those.
Tables have columns (also known as fields), and rows (also known as records), that store the data that you need. A database can be small and only have one table, or it can be a large database with hundreds of tables.
A record, or row, contains data for one particular entry in a table. Using the user car dealership, a record in the table called Makes and Models may represent one combination of a make and model of a car. A field, or column, defines what information needs to be stored, such as Make, Model, or Construction Year.
The advantage of using a database, instead of a spreadsheet, is being able to keep the data clean and organized. This is so that data is where it needs to be, is correct, and isn't missing when you need it.
Relational Databases
Relational databases specify that data is stored tables and they have some relationship among them. You can think of relational databases as a group of tables, each table containing data that relates to the data in other tables. It helps to picture it as a web of tables that all relate to each other with the data they contain. Look at the illustration below to help picture what we're talking about.
Each square above represents a table in a database. Because each table contains data that's related to the data in other tables (all data relates to the car dealership), this would be a relational database.
Now with that explained, let's delve a little deeper. In the example above, we have five tables. Each table has fields (columns) and records (rows). If you've never used Access before, think of how an Excel spreadsheet looks to get the proper visualization.
A record, or row, contains data for one particular entry in a table. Using the user car dealership, a record in the table called Makes and Models may represent one combination of a make and model of a car. A field, or column, defines what information needs to be stored, such as Make, Model, or Construction Year.
Relating Tables
Different tables can have the same columns (fields) in common. This is used to specify a relation between two tables. Using our example again, perhaps all tables would have a column for "Make/Model." The sales table would have one to refer to what sold, the customer table would have one to show which customer bought which make/model, and so on and so forth.
Columns or fields contain three basic data types:
- Number (the column only contains numbers)
- Text (the column can store numbers, letters, and punctuation)
- Date (the column can only store date and time data)
As we said, all of our tables may have a column/field for Make/Model. They all share this column/field. This relationship allows us to specify that we have a certain Make/Model, we've sold Make/Model, and the names of customers who bought Make/Model. This is also known as Master/Detail.
In this type of relationship, a single master record such as Ford Taurus can have many detail records (how many were sold, which customers bought that make/model, etc. It's possible for a Master record to exist without details; however, it is not possible for detail records to exist without a Master record.
Each table also has a special column called the Key. This Key is used to identify rows or records. The values entered under a key column can't be duplicated. It's a unique identification. For a car dealership, it may be the VIN number or a customer account number. As you fill in rows or records in the table, that Key cannot be duplicated in any of the other rows or records.
The primary key of a relational table gives a unique identification to each record in the table. It is a normal attribute that is known to be unique, such as a social security number or account number. You will not be allowed to enter duplicate primary keys within a database table.
A foreign key is a field in a relational table that is a match for a primary key of another table. It can be used to cross reference tables. For example, perhaps the customer's account number is used at the primary key in Table 1. Perhaps their phone number is used as the primary key in Table 2, but their account number is also used in that table. It is a foreign key.
As you create tables within a database in Access, each table must have a primary key. Foreign keys are only used when linking to other tables.
Joins
Remember, during normalization, different but related types of data are stored in tables called relations. Whenever a query combines data from different tables into a result table, it's called a join. If you have multiple joins in a query, it can reduce the performance. When you denormalize and add back some redundancies, it cuts down on the number of joins.
Database Design Guidelines
As you're soon going to see, creating a database in Access is very easy to do. However, creating a good relational database that performs well isn't so easy.
Here are some tips to help you:
- Distribute information in multiple tables. This way, as your database grows, your efficiency isn't reduced. If you want to make a database of books, for example, don't list all books in one table. Instead, create a few: author, genre, etc.
- Select a good primary key. Remember, the primary key should be unique. Each table has its own primary key, and these tables must reference each other by a foreign key.
- Index all fields that are used as search criteria.
The process of designing a good database to meet guidelines is called normalization. We will discuss this later in the course, as we don't need to know the details on this topic at the moment.
Creating Simple Forms
Creating Simple Forms
A form is an Access database object that's used to create an interface for a database application. We know how difficult that sounds, but it's really not. A "bound" form is directly connected to your data, such as a table or query. It's used to enter, edit, or display the information from the data. You can also create an "unbound" form that doesn't link to a data source (such as a table or query) but still contains buttons, labels, or other controls that you need to operate the application.
Creating a Single Item Form
A single item form displays information about one record. Once you create the form, you can modify it in Layout or Design view.
Let's learn how to create it so you can see exactly what a report does and how easy it is to create one.
Go to the Navigation Pane in Access (you should have the database you created open). Click the table or query that you want to use to create the form. For this example, let's click the Books table.
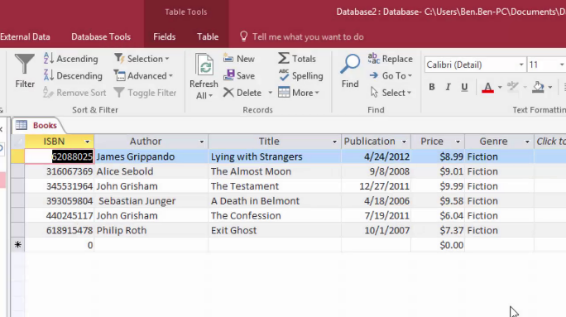
Now, go to the Create tab. Go to the Forms group and click Form.
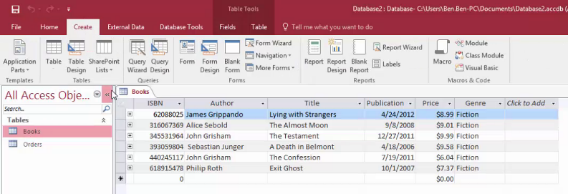
Access creates the form for you.
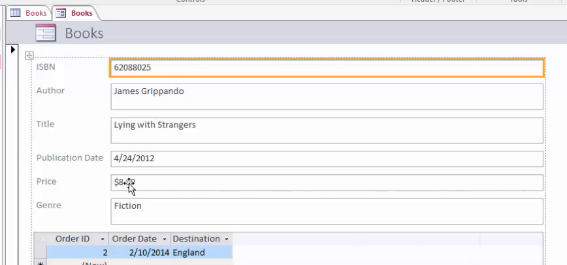
If you go to Layout view, you can edit the design while the form is still showing data. You can do things like adjust the size of text boxes.
Now, to use the form, go to Form view. To do this, go to the Home tab. In the Views group, click View, then Form View.
If you want, you can now change the data in your table by editing the form. Let's change the price to $25.00 for the first book ("Lying with Strangers") in the form. Click in the field labelled "Price" and type in the new value of 25.
Once you do that, you'll see a little pencil on the left hand side, as shown below.

To change the price in your data, click that little pencil. It will now turn into an arrow.

The price has now been changed in the table. Double-click on the Books table to open the table and see.

Navigating Forms
So far, we have seen forms that only show a single record at a time. However, if your table has more than one record, you are able to see them in the form.
At the bottom of the form, there is a toolbar that displays record information:

This section shows:
� The number of the current record, and the total number of records (for example, 1 of 6)
� Buttons for moving to the next and previous record
� Buttons for moving to the first and last record
� A button for creating a new record
� Filtering and search functions
To navigate between records, you have a few choices.
Click on the Next Record button, which is highlighted here:

The next record will be displayed, and the toolbar at the bottom will show the next record number.
To search for a record, type a value to search for in the Search box. In this example, we're going to search for "Belmont", which is part of a book title that we have.
Type the word "Belmont" into the search box at the bottom. It doesn't matter if it is upper or lower case.
As you type, you'll notice that the next available record starts to appear and the word is highlighted. The record for the book "A Death in Belmont" is now displayed.
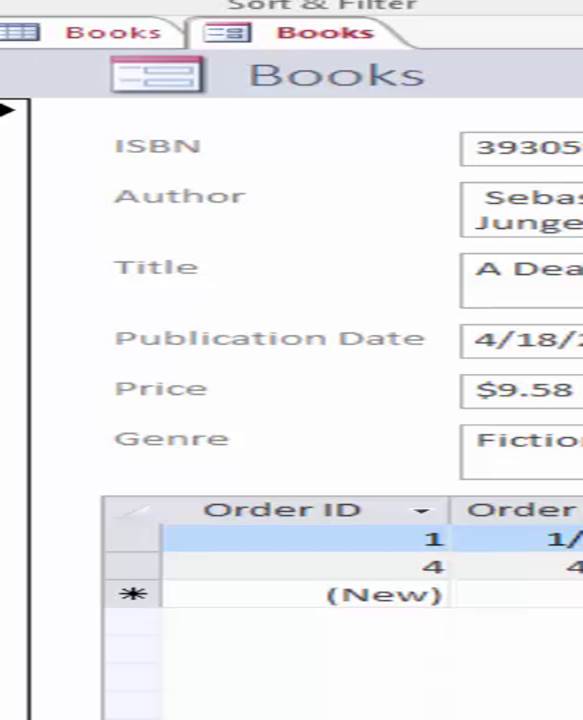
Automatic Subdatasheet Creation
An automatic Subdatasheet sounds complicated, but it's really not. If Access finds a table that has a one-to-many relationship with the table or even the query that you used to create the form (remember, a query comes from a table), then it will add a Subdatasheet based on the table or query.
A one-to-many-relationship occurs when each record in one table may have many linked records in another table, but each record in the second table may have only one corresponding record in the first table. We have one of these already � our Orders and Books table.
Here's an example. If you create a form based on our Books table, as we did above, and a one-to-many relationship exists between the Books table and the Orders table, the Subdatasheet will display all the records that exist in the Orders table that relate to the current Orders record you're using to create the form. You can go to Layout view, if you want, and delete the Subdatasheet. However, if there's more than one table that has a one-to-many relationship, Access will not add anything to the form.
An easier way to understand what this is if you did a report for a single customer using the Customer table. Let's say the customer had placed more than one order that appeared in the Orders table. All the orders for the customer (which are linked records linked by primary keys and foreign keys) will be displayed in a Subdatasheet.
Creating Multiple Item Forms
A multiple item form is also known as a continuous form. It displays information from more than one record at a time. The data is arranged just as it is in a datasheet with rows and columns with multiple records being displayed. But because it's a form and not actually a datasheet, you can customize it more and add features like graphics, buttons, etc.
To create a multiple item form, go to the Navigation Pane and select a table or query. (We're selecting a table again.)
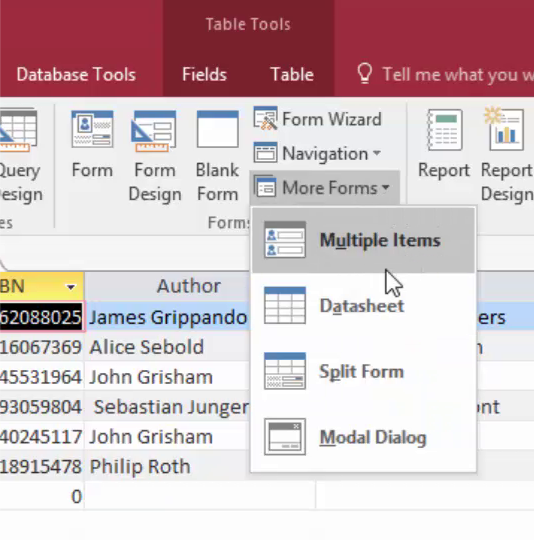
Go to the Create tab. Go to the Forms group and click Multiple Items. If you don't see that, click More Forms, then go to Multiple Items.
Here's our form:
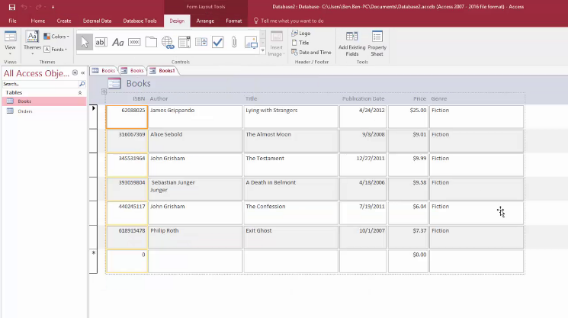
Once again, go to the Home tab and switch to Form view to use the form.
To close a form, click on the "X" in the top right of the form window. If Access asks you to save the file, choose either Yes or No, depending on if you want to save the file.
Creating a Split Form
With a split form, you see two views of your data: the form view and the datasheet view. The views are connected to the same data source and are synchronized. If you select a field in one part of the form, the matching field in the other part of the form is selected too. Data can be added, deleted, or edited in either part as long as the record is updateable.
To create a new split form:
Go to the Navigation Pane and select a table or query. We're using a table, of course. Make sure it's open in the Datasheet view by double-clicking the table name to open it.
Go to the Create tab, select More Forms, and then choose Split Form.
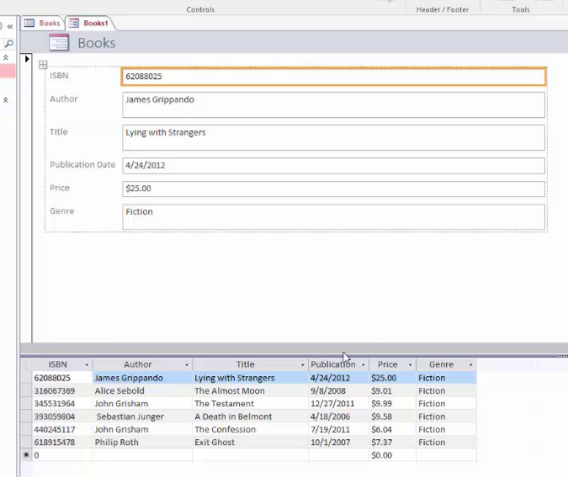
The Split Form is now created. You can make updates in either pane and they will be updated in the other pane accordingly.
To create a split form from an existing form, open the form you want to use in Layout View. To do this, right click on the form in the Navigation Pane, then click Layout View.
View the Property Sheet by clicking on Design, then Property Sheet, or press F4.
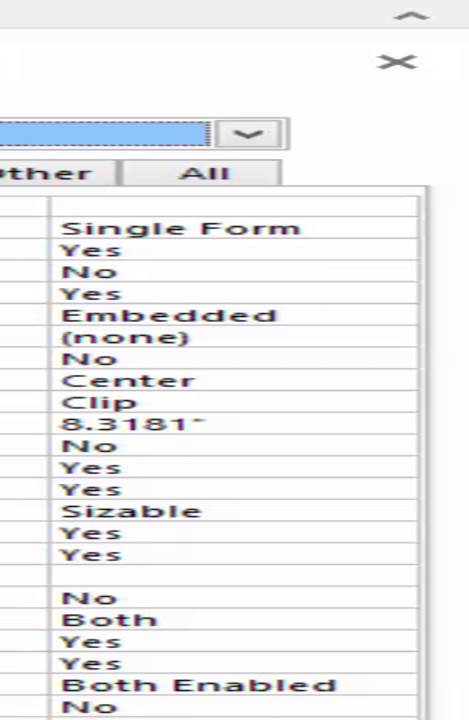
Choose Form from the dropdown list that's at the top of the Property sheet.
Go to the Format tab on the Property sheet. Go to the Default View dropdown and select Split Form.
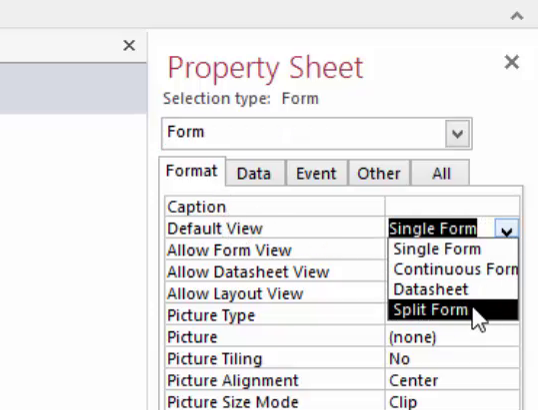
This message will appear.

Click OK, and then make sure you save the form if you haven't already.
Close the form, either by clicking on the X on the top right of the form window, or right clicking on the form title bar and selecting Close.
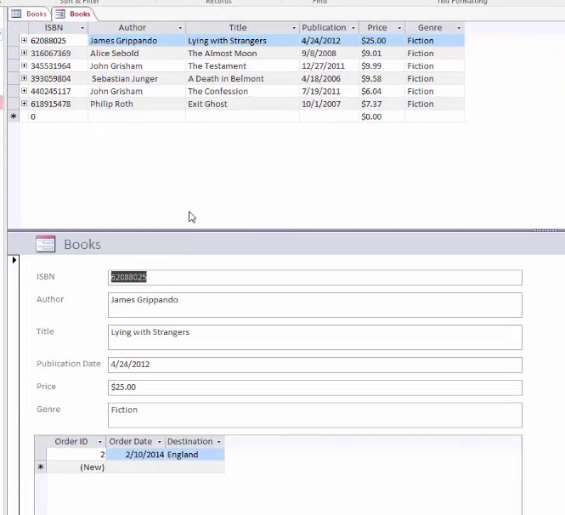
When you open the form again, you'll see it is now in Split View.
Creating a Navigation Form
A navigation form is just as it sounds. It creates a Navigation Control. If you're going to publish your database to the web, you'll need this type of form because the Navigation Pane won't show.
To create a navigation form:
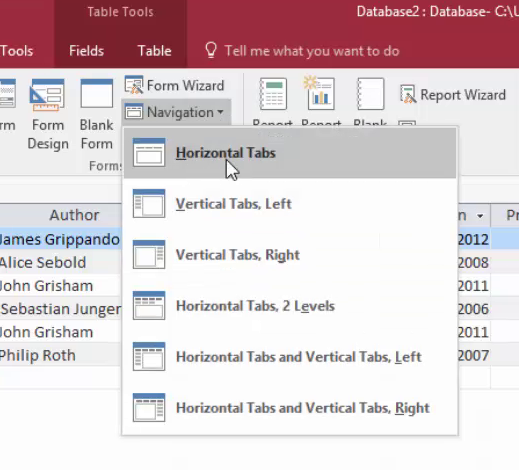
Go to the Create tab. Go to the Forms group and click Navigation. Choose the type of form you want. We chose the Horizontal Tabs.
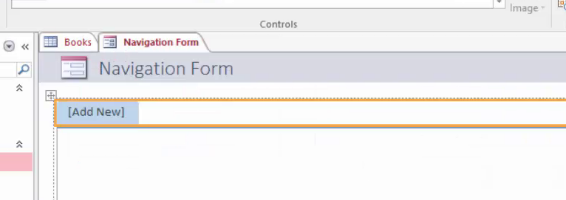
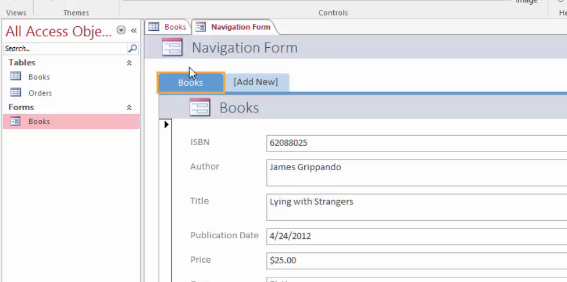
Drag the form or report that you want to add from the Navigation Pane to the tab that says Add New.
Below you'll see the navigation form that you created:
