It's important to take care of your QuickBooks Online files and environment in order to maintain the integrity of your books. Although QuickBooks Online is a cloud-based service and you don't deal with your files as directly as you would if you were only using the desktop version, there are still several considerations that you will need to take into account.
In this article, we will see how can make regular backups of your company file both manually and by using tools from QuickBooks Online. We'll see how you can also restore from those files.
We're also going to consider security, as it is one of the most important aspects of taking care of your QuickBooks Online account. We'll see how you need to protect against internal and external threats while protecting your backup files and your systems that you use to connect to QuickBooks Online.
Lastly, we'll take a look at the audit log, where you can regularly check up on all activity that's happening in your QuickBooks Online account. By mastering these topics, you will be well on your way to taking care of your QuickBooks Online environment.
Backing Up a QuickBooks Online Company
Let's start by looking at how you can back up your QuickBooks Online financial data. To back up company data in QuickBooks Online, you currently need to be subscribed in QuickBooks Online Advanced. This is the highest-tiered plan for QuickBooks Online.
If you are subscribed to that plan, then you can do online backups of your accounting data. This includes all of the data that is in your Chart of Accounts.
The data that gets backed up includes:
- Transaction data: invoices, estimates, sales receipts, payments, deposits, bills and bill payments, credit memos, vendor credits, journal entries, purchases and purchase orders, refund receipts, time activities, and transfers
- List data: accounts, budgets, classes, currencies, customers, departments, employees (excluding Social Security Numbers), items, journal codes (for France only), payment methods, tax agencies, tax codes and tax rates, terms, and vendors (excluding Tax ID)
- Other data: attachments, company information, entitlements, exchange rates, preferences, Intuit Payroll information, Inventory shrinkage and adjustments
Not all data is backed up, however. Data that doesn't affect your accounts is not backed up, which includes:
- Account-based billable expenses with markup
- Audit log entries
- Bank feeds and their links to transactions and bank rules
- Custom form templates
- Custom reports
- Customer types and price rules
- Delayed credits and charts (associated invoices are backed up, though)
- Item-based billable expenses with markup
- Recurring transactions
- QuickBooks Online Payments Information
Data backups can be scheduled at regular intervals or they can be done as one-time events. They can also be saved to other services such as DropBox or Google Drive.
Let's now take a look at setting up automatic backups.
Setting Up Automatic Backups
The first thing you will need to do is make sure that you are logged into your QuickBooks Online Advanced as an admin.
If you're not logged in as an admin, you can change your account to an admin by having the current admin log in and change roles. Changing roles is done from the Manage Users page. You can get there by clicking on the gear-shaped Settings icon in the Header.
Locate the user that you want to be an admin in click Edit to change the value in the Role column. You will receive a verification code to the phone number or email address of the master admin to confirm that the new user becomes an admin.
You can also create a new user and add them as an administrator from the start. Select the Ad User from the Manage Users page to start this process.
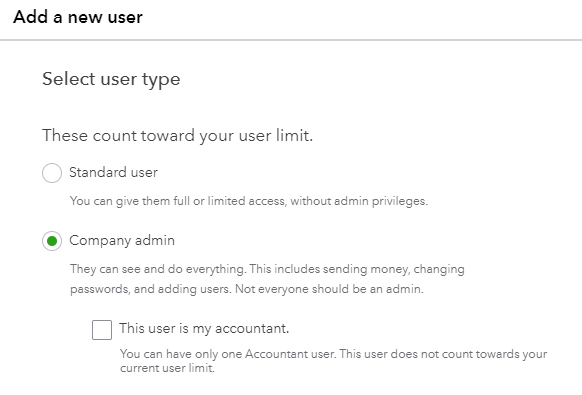
[Figure: Creating an administrator account]
Once you have confirmed that you are an admin, click on the gear-shaped Settings icon in the header and go to Back Up Company.
You will then need to choose Add a Company. You'll then want to select the company that you are connecting.

[Figure: Adding a company that you want to back up]
You will then be shown directions to follow in order to connect the app. When company is connected, select Enable Backup.

[Figure: Enabling the backup]
That's all you have to do. At this point, your backups are all set up. They will automatically occur every 5 to 10 minutes after you make changes, in addition to running a daily backup.
Turning Off Automatic Backups
Now that you've seen how to set up automatic backups, let's take a look at how you can turn off backups.
To turn off backups, you will have to logged in as an admin, just as when you set up the backups.
Once you're logged in as an admin, click on the gear-shaped Settings icon in the Header and then go to Back Up Company. Find the company that you want to stop backing up, and in the Action column, select Disable Backup.
Doing Manual Backups
You can do one-time manual backups at any time. This can be useful if you are about to make a lot of changes and want to be able to revert to a backup in case things don't go right.
As with the other types of backups, you will need to be logged in as an admin. Once logged in as an admin, click on the gear-shaped Settings icon in the Header and go to Back Up Company.
From the menu on the left side of the backup screen, select Backup.
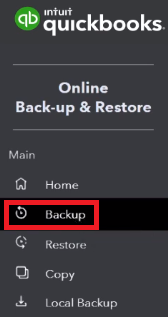
[Figure: Selecting the Backup button for manual backups]
You can then see a screen which shows when the backups were made. From here, choose New Manual Backup. You will then choose the company that you want to back up, and then choose the backup type from the Backup Type dropdown.

[Figure: Staring a New Manual Backup]
The options for backup type are incremental, full, and complete. An incremental backup only backs up changes that have occurred since your last full backup. A full backup saves all of your financial data. A complete backup saves all your financial data in addition to company data.
After you make your choice of backup type, choose Request Backup.
Saving and Scheduling Backups to Google Drive or DropBox
It's possible that you can store your backups to either Google Drive or DropBox. These are public cloud servers that allow you a certain amount of free space that you can use to store your files.
To start saving your company files to these services, you will also need to make sure that you are logged in as an admin, as with the other backup processes.
Next, click on the gear-shaped Settings icon in the Header and go to Back Up Company. From there, select Local Backup. Choose Link a Service and select either Google Drive or DropBox. You will then have steps to follow depending upon the service that you chose.
Once you're set up with either service, you can start a backup by selecting Local Backup from the menu. Then, choose New Local Backup Schedule. Select the company that you want to back up in the Company field.
You can choose from four options in the Frequency field: once, monthly, weekly, and daily. For the Service section, choose between Google Drive or DropBox.
Once you're done, click the Create Local Backup Schedule button.
Restoring from a Backup
Now that you've learned how to back up your data, let's take a look at how it can be restored.
When you restore a company, there are a few things that QuickBooks Online won't restore. That includes your inventory history and inventory adjustments, budgets, and tax rates using expense accounts.
When you're ready to start restoring, you will first need to be logged in as an admin, just like when making backups.
To start the restore process, click on the gear-shaped Settings icon and then choose Back Up Company. Choose Restore from the menu that appears and then click New Restore.
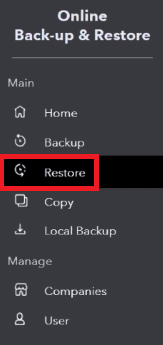
[Figure: Starting a restore]
From the Company dropdown menu, choose the company that you want to restore the data to. It will overwrite the data that is currently there.
In the Restore To dropdown menu, choose the time and date that you want to restore to.
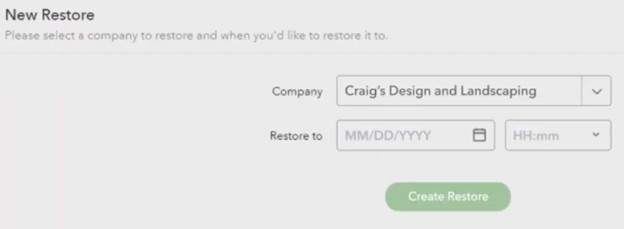
[Figure: Choose the date to restore to]
After everything is ready, click the Create Restore button and select Restore to confirm. It can take up an hour to restore your data, depending on the amount of data.
Securing Your Backup Data
Your data in QuickBooks Online contains very sensitive information about your company and great care should be taken to secure it. There are numerous threats out there that could wreak havoc if they can get access to your accounts.
When considering threats, it may be a good idea to break them up into internal vs external threats. Internal threats come from within your own company. They include employees, visitors, or anyone who is close enough to connect your company's Wi-Fi connection. External threats are all the bad actors beyond your walls, including competitors, hackers, and automated bots.
Insider Threats
Insiders within your company can have various reasons to want to see QuickBooks Online files. They may be disgruntled or curious about payroll or, more nefariously, may want to edit their wage information. If you have many contractors on your premises, they may have motivation to share your information with competitors. Even regular employees may be bribed to find and share your information.
For the above reasons, it's important to realize that you will need to take extra steps to secure your data. One thing that you will need to do is make sure that the computer you use to interact with QuickBooks Online is as secure as possible.
Securing the system that you use to connect to QuickBooks Online involves several steps. These can include:
- Running anti-virus software and be constantly up-to-date on system patches
- Being sure that the computer is password-protected
- Having a screen lock that actives quickly when the user becomes inactive
- Keeping the system in a secure location where the screen cannot be seen by others
- Consider encrypting the filesystem using your operating system's native encryption tools in case the system or its hard disks are stolen
- Safeguard backups of financial information by encrypting the files and storing them in locked, fireproof cabinets
- Keep an extra backup of encrypted financial information at a separate location in case of a fire or other disaster occurring at the first place
With insider threats, you will also need to be sure that you change your QuickBooks Online passwords regularly, such as every month. If you have an employee leave, always reset the password if they had access to it. Each user will have their own password, so you will need to remember to remove their account if their employment is terminated.
Outsider Threats
While there are many insider threats to be worried about, there are even more threats on the outside that you need to be aware to best take care of your QuickBooks Online information. You need to be alert to hackers and understand the risks incurred when using cloud-based services.
Malware like worms or ransomware can quickly spread throughout your network, even if you have antivirus software on all your systems. That's because there are viruses called zero-days that are propagated before researchers can discover them on the dark web. For that reason, you always need a backup plan to restore every system from scratch as quickly as possible. Otherwise, you may have to pay hackers a ransom in order to regain control of your systems.
Another threat is social engineering. This is when an imposter makes contact with your business pretending to be someone that they aren't so they can gather sensitive information. They could, for instance, pretend to be the CEO and quickly demand usernames and passwords. They can also craft fake emails that look legitimate to fool users. To prevent against this, your employees need to be regularly trained to notice attempts at social engineering and verify suspicious communications.
Cloud-based Computing Threats
In addition to insider and outsider threats, there are also aspects of cloud-based computing that should be considered. While QuickBooks Online encrypts data that travels between your computer and their servers using SSL, there is no guarantee that once your data arrives on their servers that it remains encrypted.
With cloud-based services, your data is stored on shared systems using a process called virtualization. It is possible that a user can break out of its virtualized process and thus gain access to other files on the shard system. That could possibly result in your financial information being leaked on the internet.
If you are also using Google Drive of DropBox to store backup files, then you also share the same risks from using cloud-based servers. To increase your security, it is better to not keep sensitive files like backups on either of those services.
Despite the risks of keeping your financial data on a cloud-based service like QuickBooks Online, there are also some positive things about their security. First of all, QuickBooks servers and staff are available 24/7 in case you need them immediately. They also have physical security over their servers with video surveillance and alarms. Additionally, they have redundant power supplies and backup generators, as well as smoke, flood, and fire suppression.
The Audit Log
Along with having backups and securing your date, one more way that you can keep your QuickBooks Online account secure is with the audit log. This is an always-on feature that cannot be turned off by any user, even the administrator. It records all important actions, including every time someone logs on to the system and each time there is a change to a financial transaction.
Using the Audit Log
To start using the audit log, click on the gear-shaped Settings icon and then click on Audit Log. At the Audit Log, you can find the information that you need by using the Filter tool. With the filter, you can narrow your results by user, date, or events. The audit log can grow to be very long, so using the filter tool becomes necessary. You can also control the number of results per page from the gear-shaped icon directly above the table.
The types of events that are recording include sign in/sign out, budgets, recurring templates, settings, reconciliations, transactions, lists, time events, statements, sales customizations, and data exchanges. With these events, you can filter out some or all of them by checking the boxes next to each.

[Figure: Events to filter by in the audit log]
The audit log not only records all financial transactions in your Chart of Accounts, it also tracks user sign-ins, changes to settings, and edits to customers, vendors, and employees. Although it records sign-ins, it doesn't record signing out unless the user actually uses the Sign Out link. So, it won't record a sign-out if the user closes the browser window, visits another website, or is logged out because of inactivity.
The audit log records the date of the change, the name of the user that made the change, the type of change, the name of the customer or vender related to the change, and the original transaction date and amount. The last column in the table lets you view the history of the transaction. It will show the transaction and any others that are directly related to it.
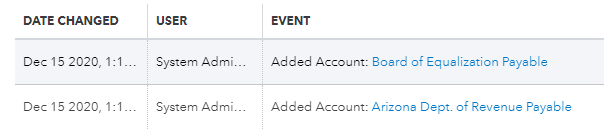
In the audit log, you may notice some unknown users. That is because QuickBooks Online creates users for some processes. These users include Online Banking Administration, Support Representative, Import Administration, and System Administration.
[Figure: Special user accounts in the audit log]
Online Banking Administration is for changes that are made that are done automatically to set up bank accounts. Support Representative are changes that have been made by a QuickBooks Online support person. Import Administration shows changes that happened during the import of data into QuickBooks Online. System Administration is for changes that were made automatically by QuickBooks Online for other reasons, including:
- When changing one record affects changes in another one which you aren't directly changing
- When acting on behalf of a third-party app, whenever the app makes changes it will appear as being done by System Administration
- For recurring transactions, each time the transaction is done automatically by QuickBooks Online
- Other scheduled events, such as updating bank feeds nightly.
By keeping track of your audit log, you can know exactly what is going on with your financial information. This is a very important step in taking care of your QuickBooks Online information and you should take time regularly to peruse the log for any out-of-the-ordinary activity.
Conclusion
In this article, we learned all about the things you need to do to take care of your QuickBooks Online files. We saw that while QuickBooks Online lives in the cloud, you can still download your company file for backup and restore a company from a file. We also saw that this can be done automatically using QuickBooks Online's services.
We also took a look how to keep your files safe by consider internal and external threats. We saw that there are numerous threats that can occur from various sources such as employees and hackers and that there are ways to mitigate against these attacks. Additionally, we also considered the inherent threat of keeping your financial information on cloud-based servers.
Lastly, we saw that you can take care of your QuickBooks Online files by keeping a close eye on your audit log. We saw that browsing the log every once in a while is a good way to make sure that there isn't any unusual activity going on.