Some essential duties of running a business include estimating how much a job will cost and then tracking that job in detail to determine how profitable it was. With QuickBooks Online, we can easily make estimates for our customers. We can also set it up to organize our projects which will allow us to keep track of income and expenses, such as the time our workers spent on it.
In this article, we will first take a look at estimating. You will see how you can easily turn an estimate into a purchase order or invoice.
We'll also take a look at time tracking, in particular with using projects. Lastly, we'll look at job costing, which in QuickBooks Online is accomplished through its Projects feature.
Estimates
We'll start by looking at estimates. We use estimates to make bids, or sometimes called quotes, to present to a potential client. With an estimate, you don't make any changes to your accounts.
QuickBooks Online can keep track of all your proposals for you even though they don't adjust the books. Just like delayed charges and delayed credits, estimates are considered non-posting transactions.
If a client is satisfied with your estimate, then it is easy to convert it to a purchase order or invoice. Converting an estimate to an invoice changes the status of the estimate from Pending to Closed, although converting it to a purchase order does not change the status. A delayed charge is similar to an estimate, and it can also be turned into an invoice.
Starting an Estimate
You can start an estimate by clicking on the New button in the left-side Navigation Pane, then going to Estimate under the Customers heading. Another way to start a new estimate is from the Sales link in the left-side Navigation Pane. From there you can go to All Sales and click on the New Transaction button and select Estimate.
You will then see the estimate form pop up. Select a customer from the dropdown at the top-left corner of the form to start.
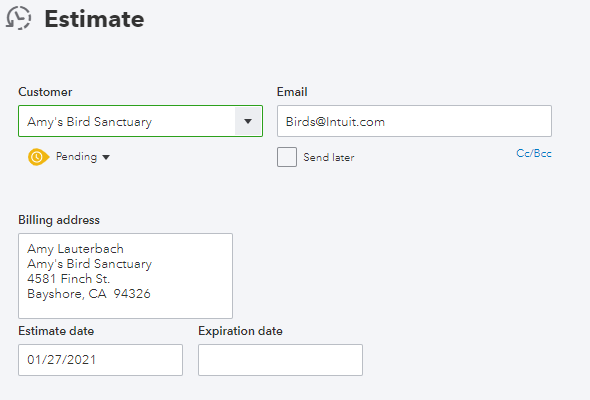
[Figure: Starting an estimate]
Selecting a customer will auto-fill several of the other fields. The estimate date will be filled with the day's date, but you will also need to set a date for the invoice to expire. You can also check the Send Later box to delay sending the estimate.
You may also notice that the status is listed directly below the customer. The default status is set to Pending. Other possible values in the Status drop-down are Accepted, Closed, and Rejected.
You can then fill out the products or services that you are offering in your estimate. QuickBooks Online will fill in the details from your products and services list, but you can edit each field directly here.
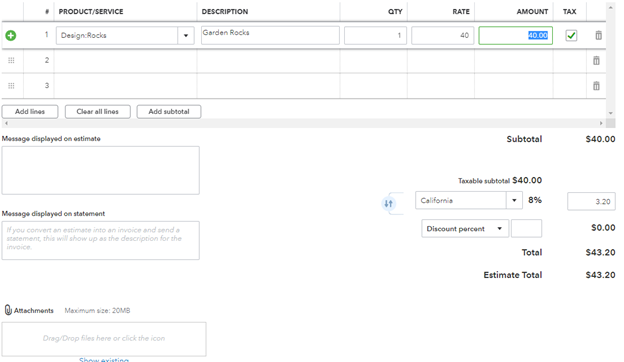
[Figure: Adding products and services to the estimate]
Just as with an invoice, you can enter details for the tax rate and also decide on a discount and if it is applied before or after tax. Additionally, you can enter a message to display on the estimate or statement along the left side of the estimate. Attachments may also be added to the estimate.
At the bottom of the form are some additional buttons. You can cancel the estimate to clear everything and start over. You can click the Print or Preview button to see a PDF version. You can click the Make Recurring button to have additional scheduling options appear that let you email the estimate at intervals. A Customize button lets you change the style of the form that you send out. The Save button will save the estimate in QuickBooks Online and assign it a number. Lastly, you can click on Save and Send to save it and enter the message body of the email to send.
Turning an Estimate into a Purchase Order
If your customer approves of your estimate, then you can save time by turning the estimate directly into a purchase order, rather than making a new one from scratch. You will need to be subscribed to QuickBooks Online Plus to take an estimate that is Pending or Accepted and copy it to a purchase order.
To start turning it into a purchase order, open up the estimate. You can find your estimates by clicking in the Sales link in the left-side Navigation Pane and then going to the All Sales tab. You can quickly filter out all the transactions other than estimates by clicking the estimate part in the graph at the top.
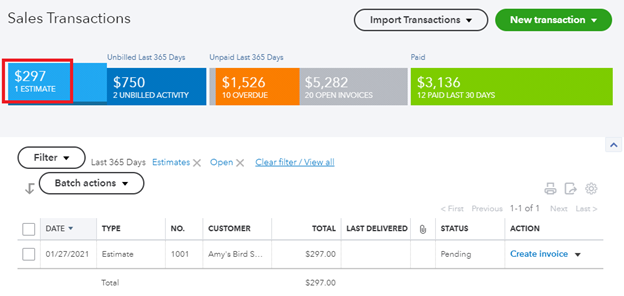
[Figure: Filtering out transactions other than estimates on the All Sales page]
Click on the estimate in the list to open up the Estimate window. At the top you will see a Create Invoice button next to the Amount. Click on the dropdown for that button and choose Copy to Purchase Order.

[Figure: Copying the estimate to a purchase order]
You will now have a purchase order based off of the information that you submitted. The estimate's status will remain pending.
If you see a message saying that some items didn't carry over to the purchase order, it could be that the product or service was set up without the I Purchase This Product/Service from a Vendor option chosen. In that case, you can edit the product or service to select that option and then make sure that you add it to this purchase order.
At the Purchase Order window, add any information needed, such as the vendor, and the click Save and Close to finish making the purchase order.
Turning an Estimate into an Invoice
In addition to making a purchase order from an estimate, you can also make an invoice directly from an estimate. There are several ways to go about doing this. One way is to go back to the All Sales list from the Sales tab in the left-side Navigation Pane. Then filter out transactions other than estimates by clicking on Estimates in the chart at the top. In the estimate row, click on Create Invoice in the Action column.
Another way is to open up the estimate by itself and click the Create Invoice at the top. This will take you to a new Invoice form with all the relevant information filled in.
You can also open a new Invoice from the New button in the left-side Navigation Pane. When you select the customer with an open estimate, it will show up in a pane on the right side. Click the Add button to add it to the invoice.
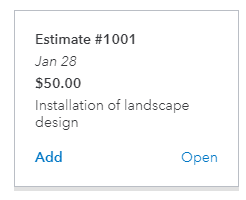
[Figure: Adding an estimate automatically from a new Invoice form]
Once the invoice has been made, it will change the estimate's status to Closed. All the products or services will be considered closed even if you make changes to the invoice to remove some items. Therefore, if the customer wants to get those items at a later date, then you should make a new estimate.
Copying an Estimate
You can also make a copy of an estimate. This will save you time if you are making an estimate that is similar to one that you've made before.
To make a copy, open up the estimate from the All Sales tab in the Sales section. At the bottom of the window is a More button. Clicking that button will give you the option to make a copy.
The new copy will have all the information from the previous estimate. Make any changes to the invoice you need and click the Save button.
Time Tracking
Time tracking can be a very important tool in order to keep your projects within their budgets. You can track time natively with QuickBooks Online. In a previous lesson, you have already seen how to invoice customers with your time. So, in this lesson, we will look more into keeping track of time in order to track projects.
To start, go to the Time link in the left-side Navigation Pane. QuickBooks Online will ask you some questions to determine how it will help you. In this case, select Track Projects when it asks you why you need to track hours worked.
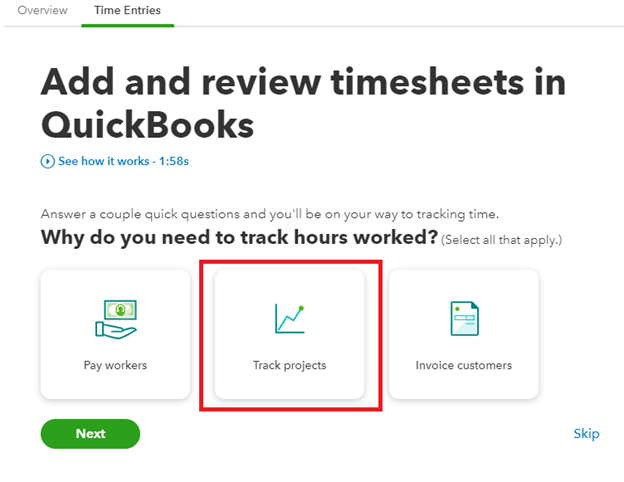
[Figure: Tracking hours worked to track projects]
Next, QuickBooks Online will ask about what special features you want in your time tracking. You can decide if you want to run simple reports, invite teams to enter their time, calculate overtime, track time off, schedule shifts, or view worker locations. For now, we'll just click the link at the bottom that says None of the Above, Just Hours Worked.
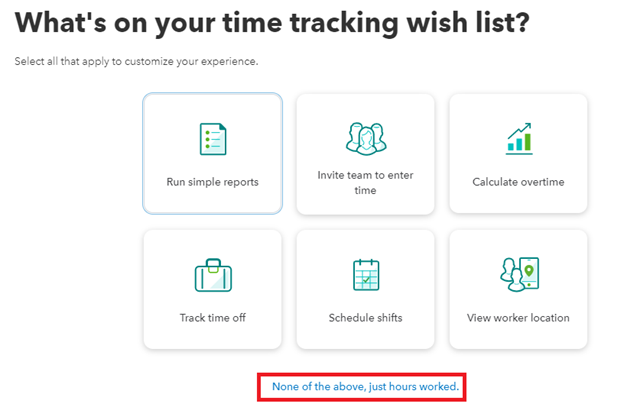
[Figure: Setting your time tracking wish list]
In the final step, QuickBooks Online will recommend the final settings for you.
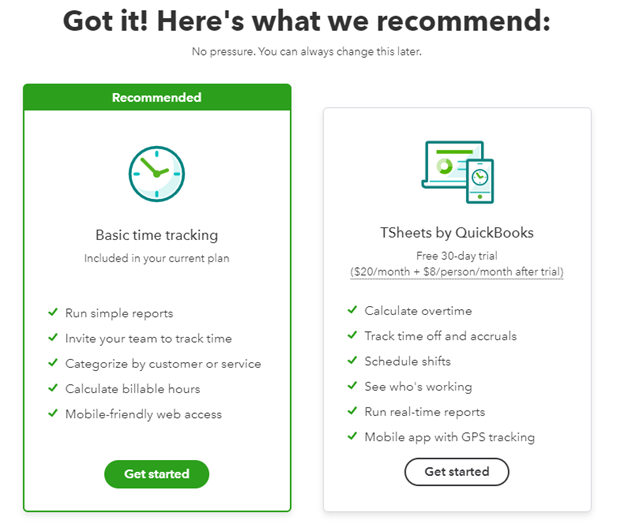
[Figure: QuickBooks Online's time tracking recommendation]
For more advanced features, you could try TSheets by QuickBooks, but we won't use that now. Click on the Get Started button in the Basic Time Tracking panel.
Now, you can add time activities to your projects. If you don't have a project set up, follow the directions in the next section. If you already have a project, then go to the Time Activity tab on the project's page.
Click on the Track Time button and a Time Activity form will pop up. Fill these out as you did before and click Save and Close at the bottom.
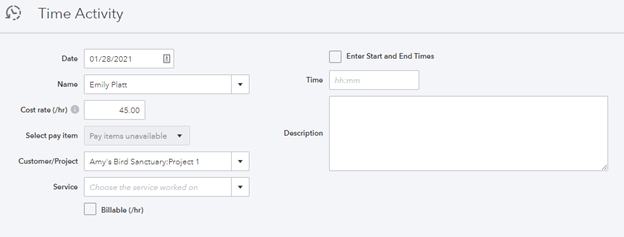
[Figure: Adding a time activity to a project]
You will now see the time activity added to the list.
Job Costing
Job costing is the process of tracking costs and revenue by a certain job. It allows us to see how profitable a project is. In QuickBooks Online, we can do job costing by using projects.
QuickBooks Online organizes the transactions, time, and reports into projects. To start using projects, you need to enable the Projects feature. To turn it on, click on the gear-shaped Settings icon at the top-right and then go to Account and Settings.
In Account and Settings, click on the Advanced tab and find the Projects section. Click on the pencil-shaped icon to change the settings. Make sure that Organize All Job-related Activity in One Place is enabled. Click the Save button when done.

[Figure: Enabling projects from the settings menu]
In addition to enabling projects in Account and Settings, you need to make sure that the customers list is also set up to be able to use projects. You can do this by going to Sales in the left-side Navigation Pane and then clicking on the Customers tab. Click on the gear-shaped settings icon directly above the list and check the box next to Include Projects.
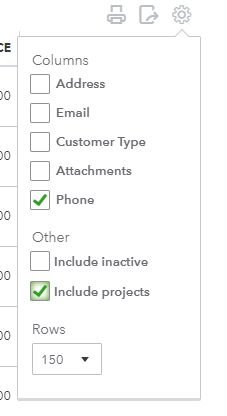
[Figure: Viewing projects in the customers list]
Enabling that in the Customers list will allow you to see projects on the Customers page, in list boxes in transactions, and on the Projects Center page.
Setting Up a Project
Once projects are enabled, you can begin setting them up. To begin, click on the Projects link in the left-side Navigation Pane. The first time you do so, you will be greeted with a page giving you an overview of the benefits of projects.
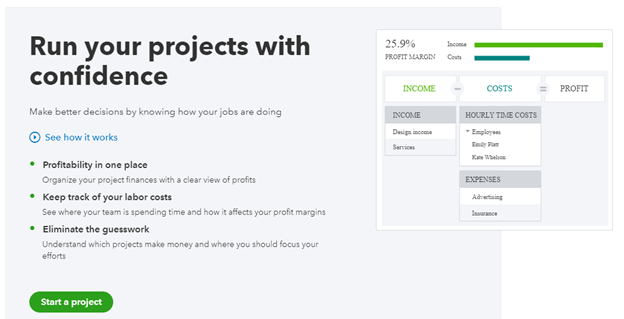
[Figure: Starting a project for the first time]
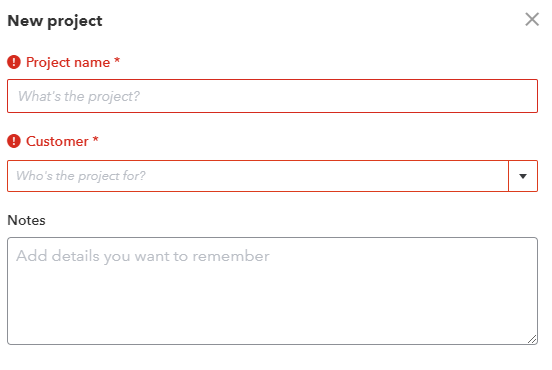
Click the Start a Project button at the bottom of the screen to start a new project. A panel will open on the right side that asks for a project name, customer, and notes about the project.
[Figure: New project form]
Once you have added a new project, you will be taken to the project's page.
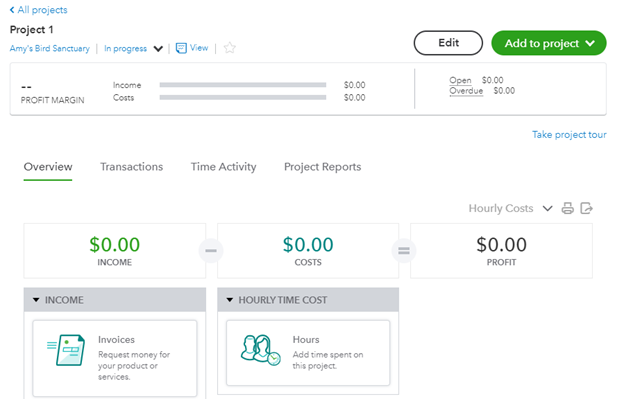
[Figure: A project page]
At the top of the page, under the project name, you can see the customer's name. Clicking on the customer's name will take you to the customer's details page.
Next you can see the status of the project, which can be In Progress, Completed, or Canceled.
You can also see any notes that you have about the project by clicking on the View link.
A star icon allows you to pin the project, which keeps it at the top of the list.
The Edit button at the top allows you to change the project name and the Notes field that you have about it.
Clicking the Add to Project dropdown will allow you to add transactions to the project, including Invoice, Receive Payment, Expense, Estimate, Time, Bill, and Purchase Order.
Beneath the buttons, you can see a summary of your profit margins, including income, costs, open invoices, and overdue invoices.
Below the summary is an area where there are four tabs that you can click on to dive deeper into your project. These tabs are for Overview, Transactions, Time Activity, and Project Reports.
- Overview - Shows your project at a glance, where you can see income and costs. You can also switch between hourly labor costs and payroll expenses.
- Transactions - You can see a list of transactions related to the project. See details about income and costs to make sure that the project is operating at a profit.
- Time Activity - You can keep track of everyone's time to see how much work they are putting in and how much labor costs. The Track Time button at the button allows you to track how your employees spend their time.
- Project Reports - In this tab, you can see multiple reports about the project. These reports include Project Profitability, Time Cost by Employee or Vendor, and Unbilled Time and Expenses.
Adding Transactions to a Project
QuickBooks Online doesn't pull in any previous transactions from the client when initially setting up the project. So, you will need to create the transactions for the project after it has been created.
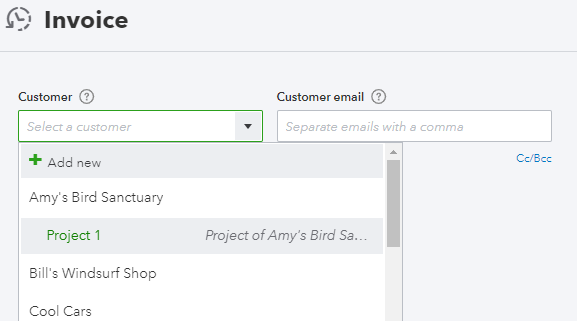
There are two main ways to add transactions to a project. The first is to add it while making any other transaction from the New button in the left-side Navigation Pane. In this case, you will find the project name underneath the customer in the Customer drop-down.
[Figure: Making an invoice from the New button that will go into the project for the customer]
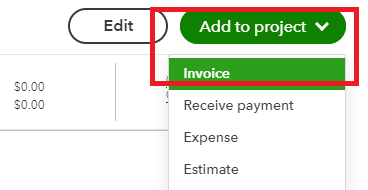
The other way is to use the Add to Project button in the project's page. Click the drop-down in the Add to Project button and choose the type of transaction.
[Figure: Adding an invoice from the project's page]
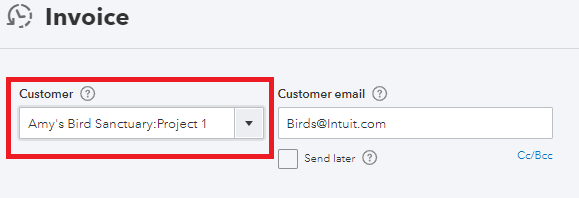
Using both methods, in the Customer field, you will see the customer's name separated from the project's name by a colon.
[Figure: The customer's name and project name together]
Once you start adding transactions to the project, your transactions list in the Transactions tab will start filling up and you will be able to run meaningful reports. The relevant reports are located in the Project Reports tab. These reports can be customized just like other reports, which was discussed in a previous lesson.
The Project Profitability report shows how much you are making or losing with the project.
The Time Cost by Employee or Vendor report lets you see how much employee or vendor time is costing for the project.
The Unbilled Time and Expenses report shows any unbilled time or expenses for the invoice.
The Projects Page
You can exit your specific project and return to the Projects page by clicking on the link at the top that says All Projects.
At the top of this page, you can see how hourly cost rates affect your profit margin. Clicking on the Hourly Cost Rate button will open a panel where you can select the rates for each worker.
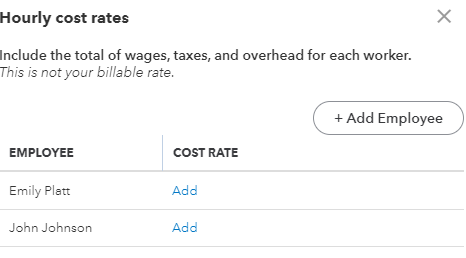
[Figure: Adding hourly cost rates]
Clicking the Add text will open up a calculator where you can determine the rate based on the employee's wage, taxes, workers compensation, and overhead.
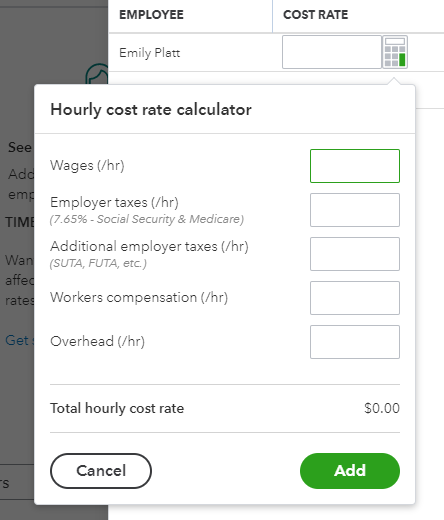
[Figure: Calculating an hourly cost rate]
Click on the Add button when you are finished, then click on the Save link for each employee that you add a cost rate to.
You can also add employees to this list from the Add Employee button. This will pop open a panel where you can select the employee by name or by adding them through a connected Gmail account.

[Figure: Adding an employee to projects]
When you are done, check that you have clicked the Save link next to each employee and that their cost rates are entered correctly. If there are any errors, click on the pencil-shaped icon next to the rate to edit the values. You can then click the Done button at the bottom when you are finished with hourly cost rates.
You can expand or contract the profit margin chart with the drop-down arrow below the Hourly Cost Rate button. Below that, you can see the New Project button, which will allow you to create another project.
The New Project button has a dropdown that says Convert from Sub-customer. Because users sometimes use sub-customers to keep track of projects, this function allows a sub-customer to be transformed into a project. With this function, all transactions that are linked with the sub-customer will be moved over as well. Follow the instructions on-screen if you have any sub-customers that you want to convert.
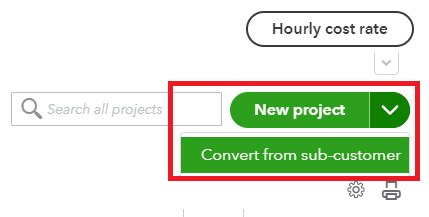
[Figure: Converting a sub-customer to a project]
There are also filter options to limit the projects that you want to view in the Projects list.
In the projects list, you can see an overview of each project, including the income, costs, profit margin, and time spent. There's also an Actions column where you can edit the project, mark it as completed or canceled, or delete it.
Conclusion
In this article, we learned about making estimates and turning them into purchases orders and invoices. We also saw how we can track time in time activities and how we can organize our work into projects for job costing.