Unlike character level formatting, most of the paragraph formatting options can only be found on the Home tab in the Paragraph group.

Creating Bulleted and Numbered Lists
The types of lists you can create are really simple and easy to remember. Bulleted lists have bullet points and numbered lists have numbers. We're going to learn how to create both.
If you want to create a list within existing text, select the text within a text box that you want to use to make a list.
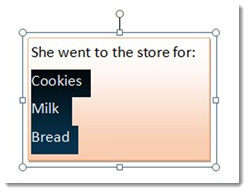
In the example below, we've selected the text that we want to turn into a list.
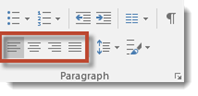
Next, click on the Home tab and go to the �Paragraph' group. Select either the bulleted or numbered list button, whichever you need, as pictured below.
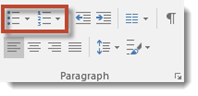
(You'll notice that the first button is for a bulleted list, the second for a numbered list.)
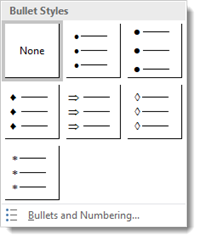
We chose bullets.
Choose a bullet style from the dropdown menu.
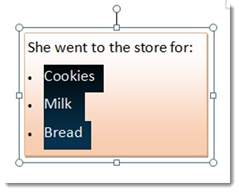
The bullets are added to your list.
When creating a new list:
- Put the cursor in the publication where you want to create the list.
- Click either the bulleted or numbered list button.
- Start to type.
Note: Above is an example of a numbered list.
Paragraph Alignment
As with all word processing programs, you can either left, right, center or justify your text and paragraphs. You can either do one of these things to a portion of text or to the entire publication.

The following text, selected from this article, is justified so that it is aligned between the left and right margins, adding space between letters if necessary. It gives the publication a clean look.

The buttons or commands for aligning text are located under the Home tab in the Paragraph group, as shown below.
From left to right, there is Left Align, Center Align, Right Align, and Justify.
To use these, simply select a method of formatting as we described in the last section, and click on the appropriate button.
Setting Line Spacing
When you change the line spacing, you change the space that appears between every line of text in a paragraph. Publisher adds the space below each line.
To set line spacing, go to the Home tab, then to the Paragraph group. Click the  button.
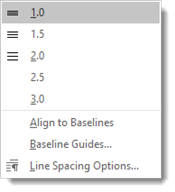
You'll then see line spacing values. 2.0 represents double space. 1.0 represents single space. If you don't see the spacing you want, click Line Spacing Options.
Go to the Line Spacing section, and specify the space you want to put between lines in the Between Lines field.
Paragraph Spacing
If you want to start a new paragraph within a text box, you just press the Enter key on your keyboard. But what if you want to add more space between paragraphs? Of course, you can push the Enter key more than once. Yet why bother when you can also set spacing between paragraphs.
To add space after a paragraph, click the  button in the Paragraph group. Select your spacing from the dropdown menu.

If you want to customize the spacing, click Paragraph Spacing Options.

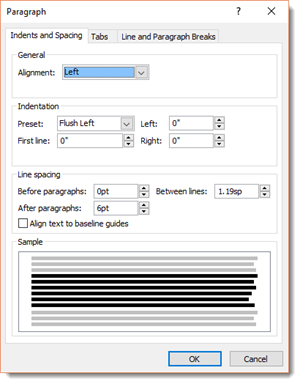
Go to the Line Spacing section, and set the amount of space you want in the Before Paragraphs and After Paragraphs fields.
Indenting Paragraphs
You can indent paragraphs inside text boxes using these two buttons in the Paragraph group under the Home tab:
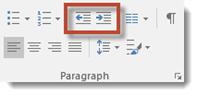
The button on the left decreases in the indention of the paragraph.
The button on the right indents the paragraph.
Setting Tab Stops
Tabs are not quite the same as indents. You probably remember setting the tab stops on your typewriter, and then using the tab key to do everything from indenting the first sentence of a paragraph to creating bullet points or numbered lists. Those days are long gone. The truth is, you could use a word processor for years without ever using the tab key. You don't really need it anymore. The word processor automatically indents the first sentence, and the bullet list and numbered list buttons allow you to easily indent those.
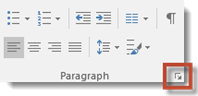
If you do need to set tabs, go to the Home tab, then click the arrow in the lower right hand corner of the Paragraph group to launch the Paragraph settings window.
You will then see this dialogue box:

Click the Tabs tab.
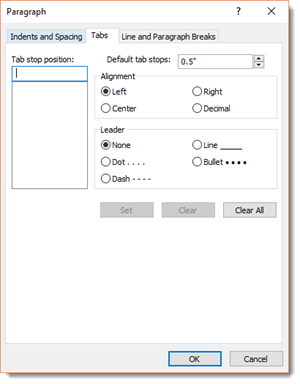
Type a value into the Default tab stops field, then click OK.
Using Styles
Styles are simply character and paragraph attributes you can apply easily to your text. We encourage anyone working with electronic text to use styles. They usually work across the different platforms, and make it easy to create things like tables of contents.
What's more, you can change the attributes of a style, and every block of text that style was applied to will automatically adjust to reflect those changes.
Styles can be created for headlines, subheadlines, body text, sample text, accent text, and more.
To apply a style to any text, go to the Home tab and locate the Styles button. It looks like this:

Click it to see the available styles or to create your own.
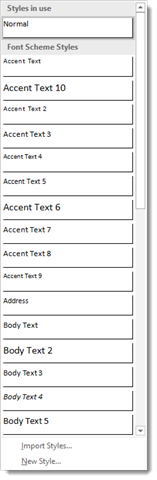
As you can see in the example above, Publisher comes with a bunch of predefined style sets. If your are not satisfied with those styles, you can import them from another program, such as MS Word, or you can create a new one. When you click New Style, you will see a window like this:
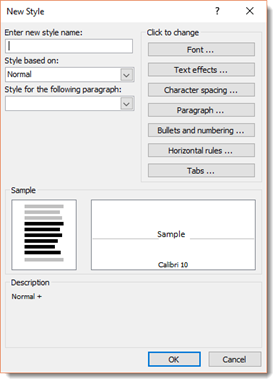
Here you can enter a name for the style, select the font, character spacing, paragraph format, and more. Click OK when finished.
Correcting Text and Design Errors
Publisher gives you a number of tools to catch and correct the errors in your publication. These can be design errors or spelling errors. In this article , we're going to show you exactly how you can use these tools to keep your publications clean and consistent, and to avoid unseen issues that might derail your attempts to have them reproduced correctly by a commercial printer.
Check your Spelling
Most of our modern devices check our spelling for us--from iPods, to iPads, to personal computers to smart phones. Publisher is no different. It's not as full-featured or as sophisticated as that of a dedicated word processor such as MS Word, but it's more than capable. After all, the focus of Publisher is designing publications. You're probably not going to write that novel on it.
Just like in Word, you can find the spell checking function on the Review tab. Let's look at it.
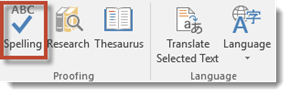
To check the spelling in a story, select the story then click the Spelling button. This will activate a dialogue box. Remember, when we refer to a "story" in Publisher, we mean all the text in a single text box, or all the text threaded between several text boxes.
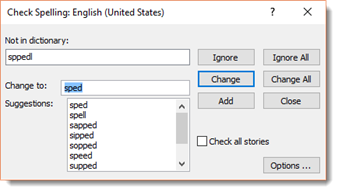
The process begins wherever the cursor is located. If the cursor is in the middle of a paragraph in the middle of a story, it will work its way to end of the story, then jump back to the beginning and eventually work its way back to where the cursor was originally located.
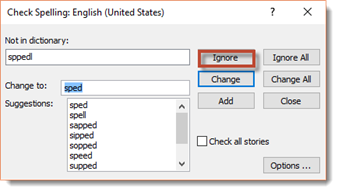
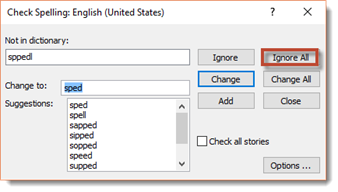
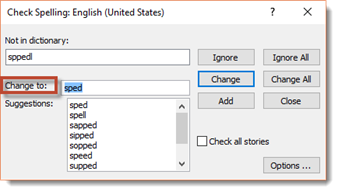
As the spell checker works its way through the publication, it will pause on misspelled words. In the example above, the dictionary didn't recognize the word "sppedl" and stopped on it.
If this is the correct spelling of the word, and you want it to remain spelled as such, you can click the Ignore button so that Spell Checker will ignore this instance of the word; therefore, not altering the spelling.
You can use the Ignore All button to ignore every instance of the word in the story.
As you can see, Publisher tries to guess what you were getting at and automatically inserts what it thinks you were trying to say in the Change To box.
If this is the wrong word, you can select a word from the list of suggestions by clicking on one of the suggestions.
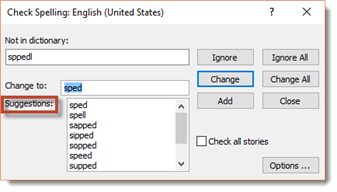
In addition, you can manually type the actual word in the Change To box. To make the change, click the Change button.
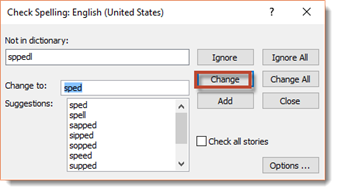
Use the Change All button to change every instance of the word in your publication to the new word.
Click the Check all stories box to have Spell Checker go through every story in your publication.

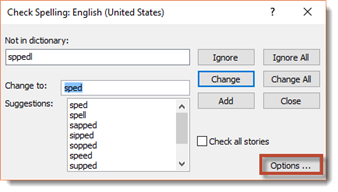
Spell Check Options
To change options in Spell Checker, click Options in the Check Spelling.
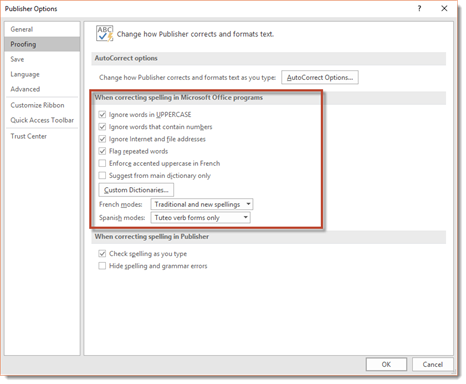
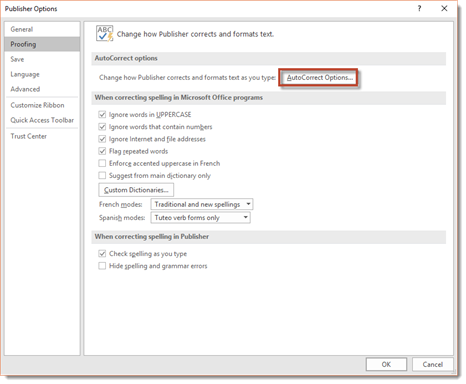
You can also go to the File tab. Click Options on the left. In the Publisher Options dialogue box, select Proofing from the column on the left.

Here you can choose to ignore words in uppercase, or words that contain numbers, internet addresses, etc.
Choosing the "Check Spelling As You Type" option will underline misspelled words in red as you type.

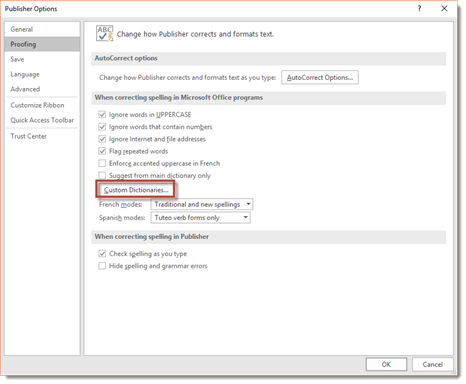
You can also add words to your custom dictionary so that words you type often won't be marked as misspelled. To do this, click the Custom Dictionaries button.
You will then see the Custom Dictionaries dialogue box.
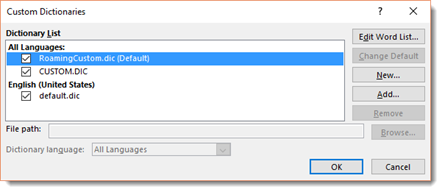
Choose a language in the Dictionary language drop down menu. Here you can create a new custom dictionary, or remove one.
To see or edit the words in any dictionary, including custom made ones, select the dictionary, then click the Edit Word List button. A new window will open that looks like this:
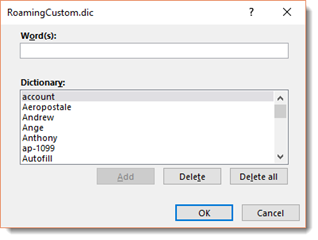
You can search through words using the Word(s) field, or scroll through them by clicking the Dictionary field and using your mouse wheel.
Add a new word that doesn't appear in the dictionary by typing it into the Word(s) field, then clicking the Add button.
Click OK when finished.
Use AutoCorrect
AutoCorrect works in tandem with spell checker, except that instead of just alerting you to typos and other common errors, it automatically fixes them. For instance, you might forget to capitalize the first letter of a sentence. Instead of having to go back and fix it (and interrupting your flow of thoughts), Publisher capitalizes it automatically.
Let's take a closer look at some of our options. To view them, go to the File tab and click Options. Click Proofing from the column on the left, then click AutoCorrect Options.
You will then see this dialogue box:
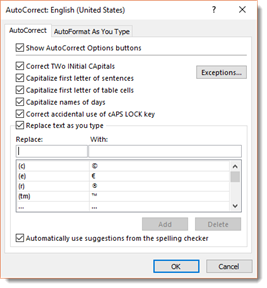
As you can see in the above illustration, Publisher will correct two initial capitals. This is actually a common error, especially for very fast touch-typists. They hold that shift key for a fraction of a second longer than they should. Publisher can also capitalize the first letter of sentences, as we said earlier, the first letter of table cells, names of days, etc.
Now look at the window near the bottom. Here is a list of keystrokes that Publisher will replace and what it will replace them with. For instance, (c) will be replaced with the copyright symbol �. This is also where you can create custom replacements.
Sometimes Publisher will automatically correct something you don't want it to. To correct this, click the Exceptions button.
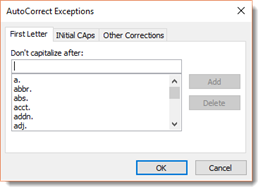
Here you can see stock exceptions and add your own.
Click OK when finished.
Use Design Checker
You might be tempted to dismiss Design Checker as something that is a waste of time, because your publication looks exactly as you want it. In a word: don't.
Publisher's Design Checker does not look at your publication from an aesthetic standpoint. It won't say something like, "You have an image over here, and it should be over there to create a sense of balance;" or "Your headlines are in blue, they should be in black."
Instead, Design Checker points out potential errors that could mean your publication won't print correctly.
To find the Design Checker button, go to the File tab and click Info on the left. This is what it looks like:

When you click this button, Publisher returns you to your publication, where a pane opens on the right.
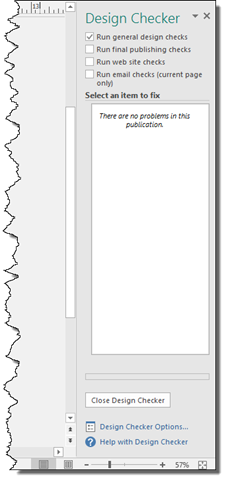
If there were any potential issues in our publication, Publisher would show it here. These are not necessarily bad things, or things that should be changed. You may, in fact, have had your reasons to do things the way you did. You do not haveto act on any of the potential errors--Publisher is just pointing them out to you.
Click on any item listed in the design checker pane to jump to the error's location in your publication.
At the top of the Design Checker pane are boxes you can check to change the parameters. You can have Publisher make general design checks, commercial printing checks, website checks, or email checks.
To change Design Checker options, click the Design Check Options link at the bottom of the pane. A new window will open.
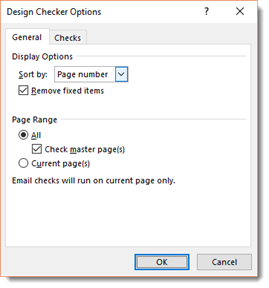
From within this window, you can sort the design issues by description, page number, or status (either fixed or unfixed). If you'd like to see only the uncorrected issued, check the Remove Fixed Items box. You can also choose to include or exclude master pages.
Clicking the Checks tab takes you to a new set of options.
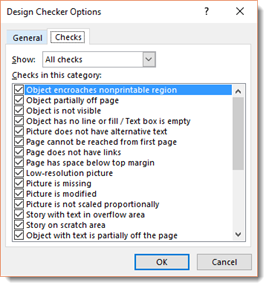
Here you choose which potential errors Publisher should look for. All items are checked by default, but you can exclude items by clicking on an item to uncheck it.