 With QuickBooks Online, you can directly link your accounts at financial institutions to your accounts in QuickBooks Online. This is advantageous because it allows you to immediately verify transactions at financial institutions without having to wait for statements from your bank.
In this article, we will take a look at how you can link a QuickBooks Online account to an account at a financial institution. You will also see how you have to categorize those transactions and how that can be helped by creating your own rules.
Creating a Bank Account
We have already discussed creating bank accounts in a previous lesson, although we did not discuss linking them to a bank online. In order to connect to a financial institution, you will first need to have the account created in your QuickBooks Online account. You cannot just connect to your bank account without having it linked to one of your local accounts.
Let us review how to make an account and also see how to link it to a bank online.
To start, click on Accounts in the left-side Navigation Pane and then, on the Chart of Accounts page, click on the New button. You will see a window to create a new account.
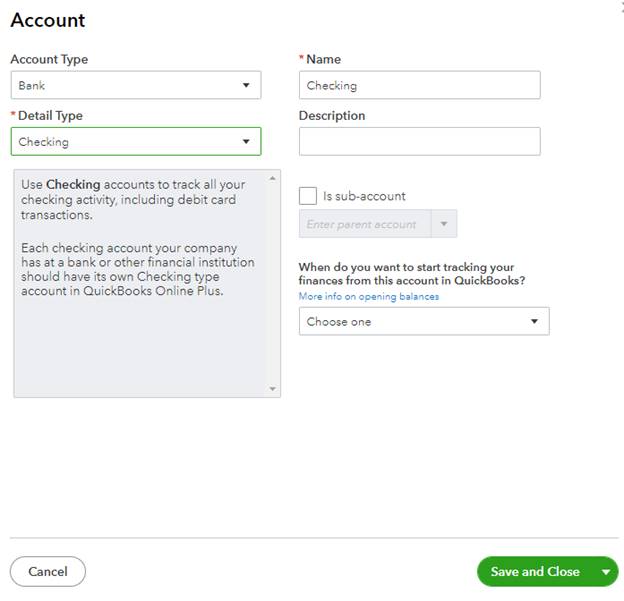
[Figure: Creating a bank account]
Create a bank account as you have done in the previous unit. In this case, we will make a checking account. Click the Save and Close button when you are finished. Your new account will show up in the Chart of Accounts.
Connecting a Bank or Credit Card Account
Now, let us take a look at directly connecting a bank or credit card account to a financial institution.
You can see the accounts that are connected to a financial institution by clicking on the Banking tab in the left-side navigation pane. This page will not have much information if you have not linked an account yet.
You can start linking an account by clicking the Link Account button at the top right. This will bring up a page where you can select your financial institution.
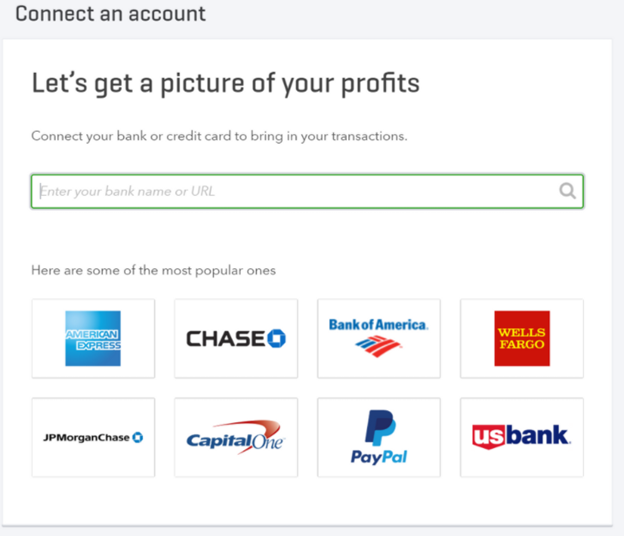
[Figure: Selecting the financial institution]
As long as your financial institution supports connecting to QuickBooks Online, then you will see it in the list. If it is not in the list of the most popular banks on the first page, you can search by name or internet address in the search box.
Next, you will log in to your account at the financial institution. You will provide the same credentials that you ordinarily use to visit your bank online. You may also be asked to go to the bank's website and log in first, as well as having to answer Captcha questions to prove that you are not a robot trying to connect.
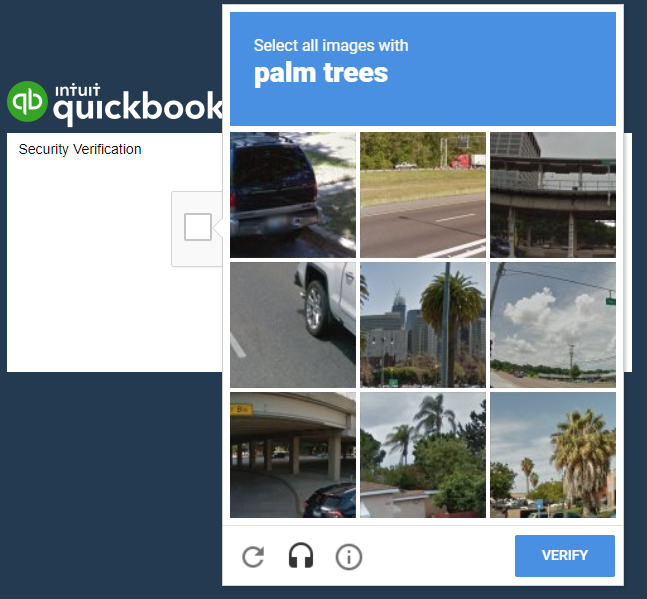
[Figure: Answering Captcha questions]
Once the connection is established, you will need to select the account(s) that you want connected. You can see the accounts that you have at the institution and the accounts that you have on QuickBooks Online that they can be linked to. QuickBooks Online will pull the last 90 days of transactions for the accounts that you are linking to aid in reconciliation.
Finally, click the Give Access button to finish setting up the account.
You will now see the connected bank account and its information from the bank. This information from the bank is updated nightly, although sometimes it may take longer.
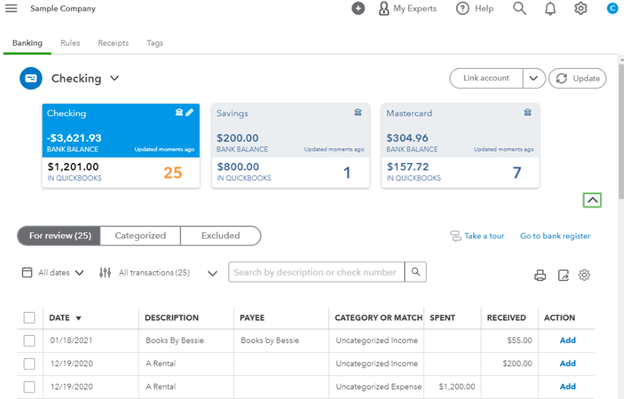
[Figure: The Banking page with connected accounts]
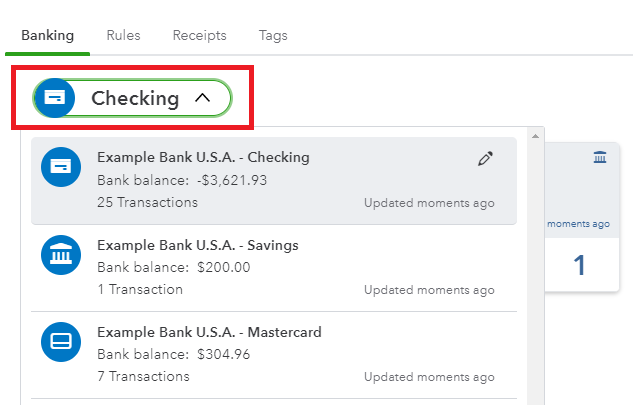
Selecting the Account
At the top of the banking table, you can switch between accounts by clicking on the down arrow next to the account's name. In the dropdown menu, you can see not only the names of your other accounts, but also a summary showing the bank balance, number of transactions, and when it was last updated.
[Figure: Choosing the account to show]
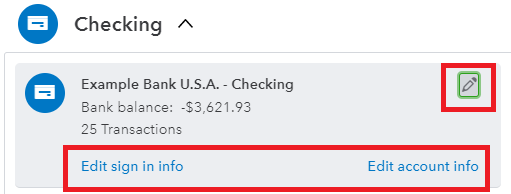
You can also quickly edit account information by clicking on the pencil icon. That will take you to the panels to change either account or sign in information, based on your choice.
[Figure: Editing account information]
To the right of the account name, you can see the Link Account and Update buttons. The Link Account button has a drop-down menu where you have two options: Upload from File and Order Checks.

[Figure: Options other than linking account]
Since we have seen how you can link your accounts automatically, let us go ahead and see how you can manually upload your banking information by using the Upload from File option.
Manually Updating an Account from a File
By clicking the Upload from File link in the Link Account button, you are able to bring your banking information into QuickBooks Online even if you don't directly connect to your bank.
With this option, you will first need to download the transaction data from your bank. QuickBooks Online supports files in CSV, QFX, QBO, OFX, and TXT formats. Select the dates that you want and export the file from your bank.
Once you download the file from your bank, you can browse to it from the Upload from File panel.

[Figure: Uploading a file from your bank]
After clicking the Next button at the bottom of the screen, you can select the QuickBooks Online account that the file should be applied to. Once applied, make sure to delete your file, as it is unencrypted, so you risk having someone else view it.
Now that we have seen the first option under the Link Account dropdown menu, let us take a quick look at the second option, which is to order checks.
Ordering Checks
You can order checks as well as other supplies from QuickBooks Online. Click on the Link Account button dropdown and choose Order Checks. When choosing checks, there are three options to choose from: Basic, Secure Plus, and Secure Premier.
- Basic checks. These are basic checks that you can print from QuickBooks Online. They only have minimal security features.
- Secure Plus checks. These checks have 23 security features, including a heat-sensitive icon that prevents photocopying, watermarks that prevent against counterfeiting, and a security coating that prevents tampering with check information.
- Secure Premier checks. These checks include 29 security features. In addition to those in the Secure Plus, they also include a security hologram.
Viewing Account Information
Directly below the account name and the Link Account and Update buttons is a carousel where you can also see a summary of each of your accounts. Clicking the right arrow button will scroll through your accounts.
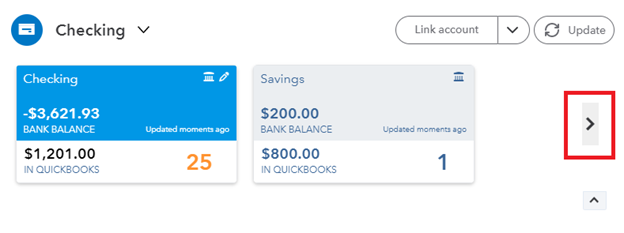
[Figure: Browsing accounts in the carousel]
Clicking on one of the accounts in the carousel will select it and change its background color to blue. When an account is selected, it will filter out all other accounts in the table below.
You can also edit the account information by clicking on the pencil icon. Both sign-in information and account information are editable here.
The Banking Table
You can see all your downloaded transactions in the main table. Each line in the list shows when you spent or deposited money into the bank account. You will want to evaluate each transaction and update QuickBooks Online appropriately. At the top, you can toggle between transactions that are For Review, Categorized, or Excluded.
The table has several columns and the ability to add more with the settings icon. There are columns for batch processing, Date, Description, Payee, Category or Match, Spent, Received, and Action.
The first column allows you to do batch processes, so if you check one of the boxes, you can choose to accept, update, or exclude the transaction.
The Date column allows you to order the table by date. The most recent transactions are at the top by default.
The Description and Payee columns give information to help recognize the transaction.
In the Category or Match column, you can see if transactions have been recognized by QuickBooks Online.
The Spend and Received columns show the monetary amount entering or leaving.
Lastly, the Action column lets you add, view, or match the entry. If QuickBooks doesn't recognize the transaction, this column will have the Add action. If it finds a match, this column will have the Match action. And if there are multiple matches and QuickBooks Online can't decide, then it will have the View action.

[Figure: Categories for the banking table]
- In the For Review tab, you will see transactions that have been downloaded but have not been categorized yet.
- The Categorized tab shows transactions that have been added to QuickBooks Online.
- The Excluded tab is for transactions that have been downloaded but have not been added to QuickBooks Online for some reason.
Transactions are first put into the For Review category. While they are here, they do not count towards any account balances and do not show up in reports or financial statements. You will need to enter some more information about them to add them so that they start affecting your books.
Adding a Transaction
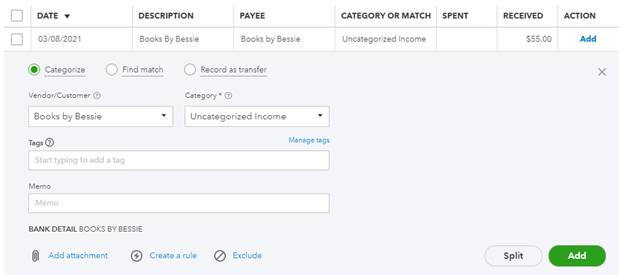
Clicking on one of the transactions will let you see details about it.
[Figure: Viewing details of a transaction]
The details will show up below the row. In the above example, you can see that the transaction involved receiving $55.
Using the radio buttons at top, you can choose to add the transaction by categorizing it, trying to find a match, or transfer the transactions information to another account.
In the Vendor/Customer field, QuickBooks Online will select the appropriate one if it is recognized. If the payee is not recognized, type the name into the field and click the Add button at the bottom of the dropdown. Fill in additional information about the payee in the window that pops up and select the Save button.
Next, choose the most appropriate category to put the transaction into the correct account. If you do not have an appropriate account, you can also create a new one by typing it into the field and clicking the Add button to pop open a New Account window.
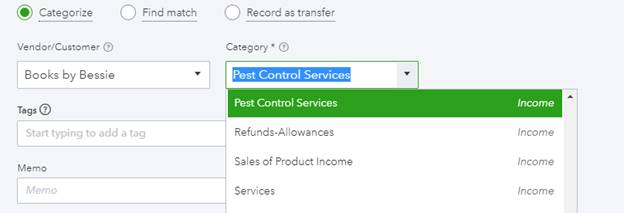
[Figure: Putting the transaction into the right account]
You can optionally add tags or a memo in the next two sections. Below that, there is an additional section for bank details that may be sent by your financial institution.
You can also choose to exclude the transaction if you do not want to include it in QuickBooks Online. The Exclude link is at the bottom, next to the link to add a rule, which will be discussed a little later.
Lastly, if it is a new transaction, click Add. The transaction will then be added to your accounts and put into the Categorized tab. In the Categorized tab, you can undo it by clicking on Undo in the Action column.
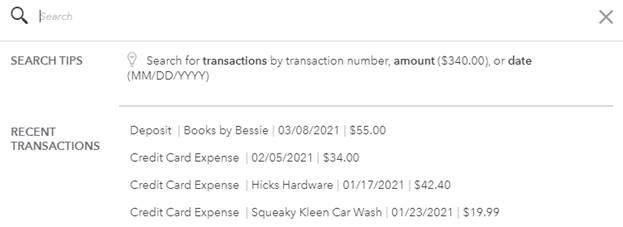
You can also view it just like any other transaction. For example, if you click on the search icon in the header, you will see it located at the top with recent transactions.
[Figure: The newly added transaction]
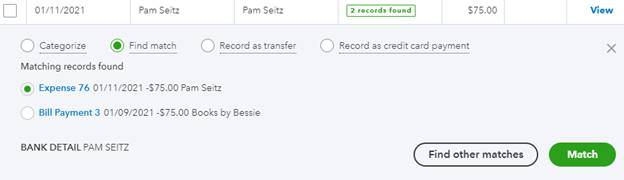
Matching a Transaction
If QuickBooks Online finds a match for the transaction, then when you click on the transaction and the details pop open below the row, you will not have to enter the category information.
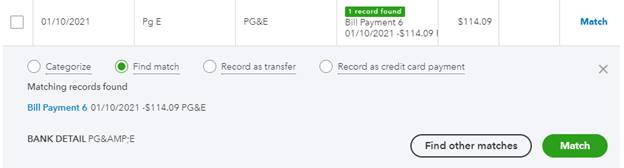
[Figure: Matching a transaction]
You can view the matching record found to confirm that the category is correct. Click on any of the matching records to open up their transaction window. Once you have checked that the category is correct, you can cancel that window to return to the previous screen.
You can click on the Find Other Matches button if none of the records match. If no matches are found, you can click on the Categorize radio button and then enter the information the same way that you did in the previous section.
You can use the Record as Transfer radio button to select a new account for the transaction. This will change the Match button at the bottom to become a Transfer button.
If the match is correct, then you can just click the Match button at the bottom. It will be added to the Categorized tab as in the previous section.
Viewing Transactions with Multiple Matches
If QuickBooks Online finds multiple matches and cannot suggest one, then instead of saying Add or Match in the Action column, it will say View.
Clicking on this type of transaction will present you with the possible matches.
[Figure: Multiple matches for a transaction]
In this case, check both transaction windows and select the one that matches. Or, click on the Categorize window and enter the information manually as you did the first time.
Continue adding and matching until all the transactions in the For Review tab have been cleared.
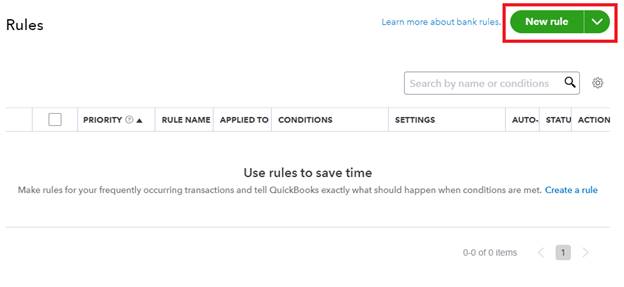
Rules
The second tab on the Banking page is for rules. Rules are intended to help QuickBooks Online automate the process of reviewing transactions.
Setting up rules involves telling QuickBooks Online which accounts go with which transactions. You can specify different requirements that have to be met for each rule to take effect.
Once you have rules, they can work in two different ways. They can be used to suggest what to do with downloaded transactions and then wait for you to confirm them, or they can automatically be applied by QuickBooks Online.
Making rules the first way, you will see a rule icon in the Category or Match column in the For Review tab whenever QuickBooks Online finds a transaction that meets the rule. If you do it the second way in which QuickBooks Online automatically makes the rules, you can still go back and change the transactions.
Creating a Rule
You can create a rule by clicking on the New Rule button at the top right of the Rules page.
[Figure: Adding a new rule]
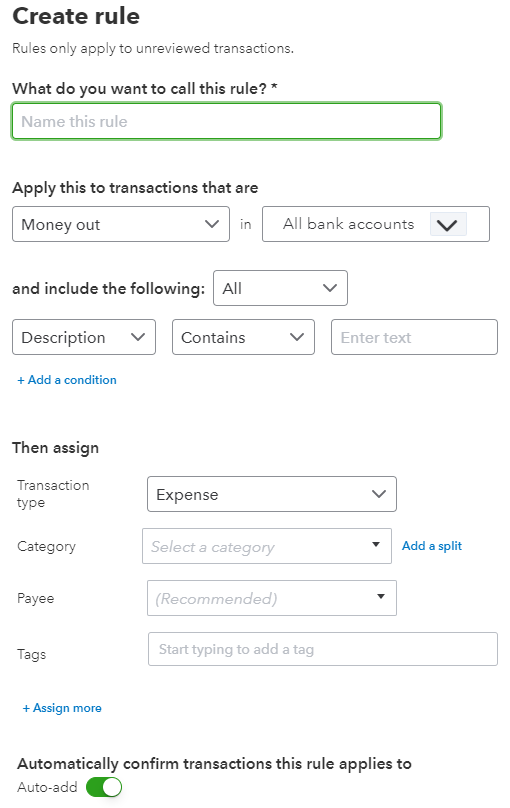
This will pop open a new pane on the right where you can begin adding your rule.
[Figure: Adding a new rule]
First, you will need to come up with a name for your rule. Make a name that lets you remember what the rule does.
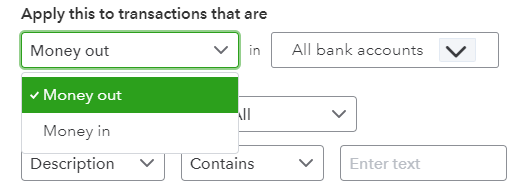
Next, you will decide if the rule applies to transactions that involve money in or money out, and to which bank accounts. You can only choose one money direction, but can select multiple accounts.
[Figure: Setting the direction of money and accounts for the rule]
Next, you will start setting the conditions that the transaction must meet. You first decide if the rule needs all the conditions that you will set, or just any one of them. Select All to make it more specific.
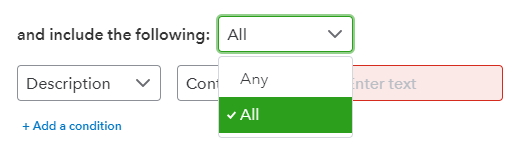
[Figure: Specifying that all conditions should be met]
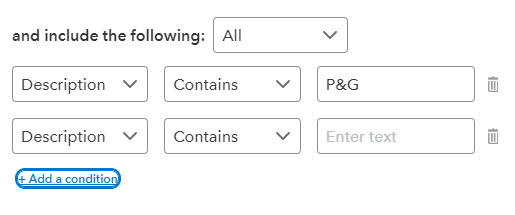
Next, you will choose with part of the transaction the rule applies to. This can be the Description, Bank Text, or Amount. The Description is the same as what is in the Description column on the Banking page. The Bank Text is the same as the Bank Details when you click on the transaction on the Banking page.
After that, the next dropdown lets you specify if the text Contains, Doesn't Contain, or Is Exactly the same as your specified text. Choose Is Exactly to make it the most precise.
Lastly, you will write the text that you are looking for in the text field for the condition.
To add another condition, click on the Add a Condition link below each condition. You can later remove a condition by clicking on the trash can icon.
[Figure: Adding extra conditions]
Once you have finished adding all the conditions, you then tell QuickBooks Online what you want to happen to transactions that have met the rule.
In the first dropdown, choose the type of transaction that should be assigned, such as Expense, Transfer, Check, or Deposit/Credit Card Credit.
Then, select the category that you will put the transaction into. You can divide into multiple categories by clicking the Add a Split link and then specify the percentage or amount to put into each category. If the account does not already exist, then start typing a new category and click the Add New link in the dropdown.
Next, select the Payee that should be assigned to the transaction. If it is a new payee, then start typing and click the Add New link in the dropdown.
You can also add tags if you like and, if you click on the Assign More link, add a memo.
Finally, decide if the rule is Auto-add or if you will manually confirm transactions by clicking on the toggle button at the bottom.
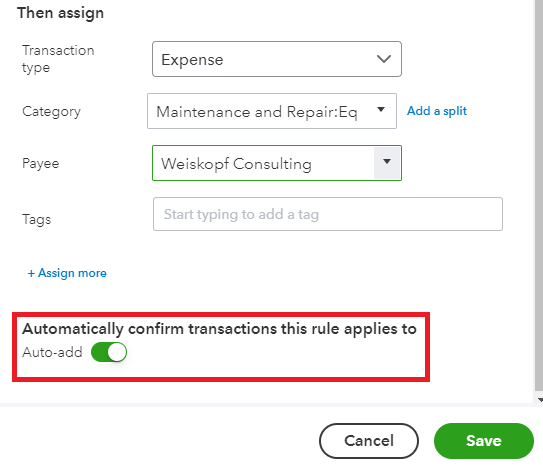
[Figure: Setting the rule to Auto-add or not]
When your rule is finished, click on the Save button to finish adding your rule. Your new rule will not show up in the Rules list.
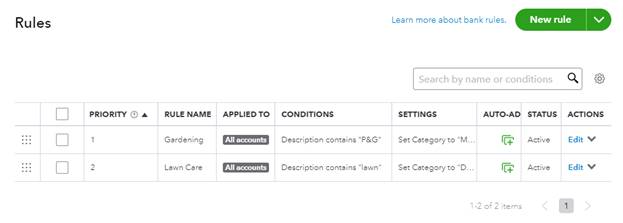
[Figure: Rules added to the rules page]
In the Rules list, you will notice that the second column is Priority. With rules, the order in which they are executed is important. If a transaction meets the first rule, then the other rules will not be considered. This could potentially cause issues, so if you notice that transactions are not going where you want them to, you might want to check the logical order of their execution here. You can change priorities by dragging and dropping the icons on the far left.
Importing and Exporting Rules
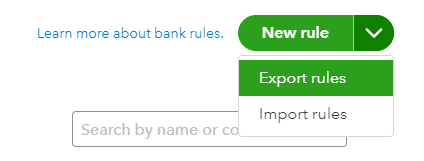
Since creating rules can be tedious, QuickBooks Online also has an import and export feature. To use this, first export your rules from the other company.
In QuickBooks Online, you can export your rules as an Excel document by clicking on the New Rule dropdown and choosing Export Rules.
[Figure: Exporting rules]
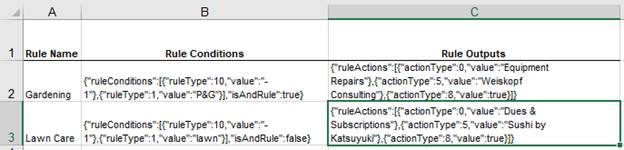
Your rules will be exported as an Excel file into the directory you specify. The Excel file will have the rule names, rule conditions, and rule outputs in three separate columns.
[Figure: Exported rule file]
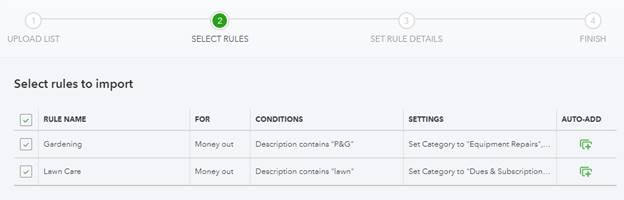
To import rules, choose Import Rules from the same dropdown. You will first be asked to select the Excel file with the rules.
You can then select the individual rules you want to import.
[Figure: Selecting the rules to import]
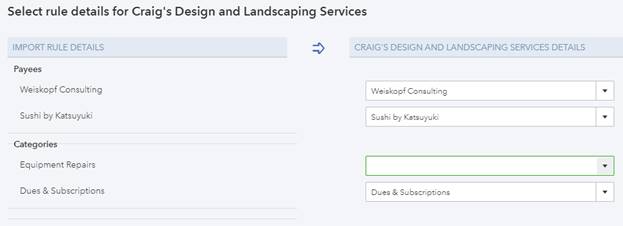
In the next screen, you can make further adjustments to the rules, such as switching the payee and category for each one.
[Figure: Adjusting the imported rules]
Lastly, click on the Finish button to complete the import.
Summary
In this article, you learned about linking your accounts from financial institutions to your QuickBooks Online accounts.
You saw that downloaded transactions have to be added, matched, or excluded when putting them into QuickBooks Online. You also saw how to create rules to automatically categorize transactions.