
All messages that you receive go into your inbox. That goes without saying. Once they are in your inbox, you read them. Then, you decide if you want to keep each individual message or get rid of it.
If you want to get rid of a message permanently, you can delete it - as we'll show in this article.
However, if you want to remove a message from your inbox, but want to keep it around in case you need it in the future, you can archive it. Archiving messages is a great way to keep your inbox clutter-free.
Using the Archive Button
Let's open an email in our inbox.

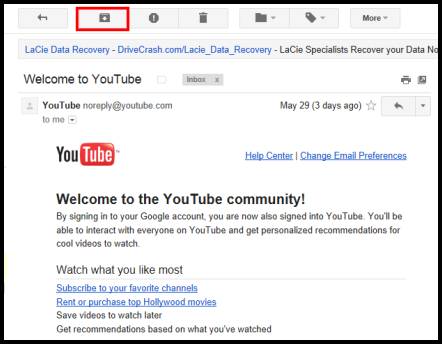
This is our email message from YouTube. This may be considered junk mail by some people, and they would just delete it. However, since it relates to our YouTube account, we decide that we want to save it in case we need it later. For that reason, we're going to archive it.
To archive the email message, we click the Archive button, which we've highlighted below with a red square.
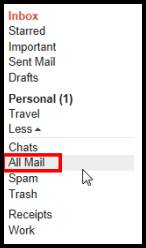
When we click on the button, the email message is moved from our inbox to "All Mail," as shown below.
Finding Archived Messages
To find an archived message, simply click "All Mail" and use the search box at the top of the screen to search for it. You can search by sender, subject line, etc.

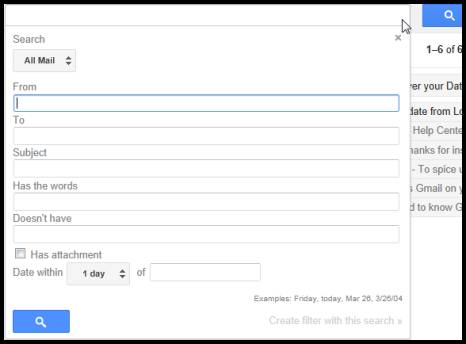
Or you can do more of an advanced search.
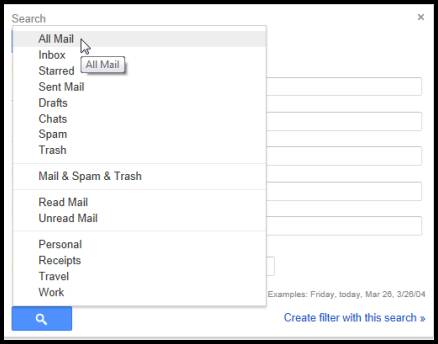
If you click on the downward arrow in the search box, you can fill in search criteria.
Deleting Messages
This is a screenshot of our inbox:

If you'll notice, to the left of each email message there is a checkbox. Click on the checkbox to put a checkmark in the box and select the message(s).
As you can see below, when you do this, a whole new set of options open up to you regarding the message(s). You can archive a message without opening it. There are lots of things you can do right from your inbox. One of those things is delete email messages.

To delete a message or multiple messages from your inbox, first put checkmarks next to the messages you want to delete.
Then, click the garbage can button. 
Gmail will then let you know that you have deleted a message by displaying this dialogue box:

If you deleted it by mistake, you can click Undo.
Searching for Messages
In some email programs such as Outlook, you can search for and sort messages. Gmail, however, is different. It is set up to let you search for messages, but it's not set up to let you sort them. That said, though, you can trick the search operators and filters to allow you to sort messages by keyword, sender, etc. and find the messages you want. In this article, we're going to learn how to search for messages.
Searching for Messages by Keyword, Subject, or Sender
Gmail organizes emails by date. This does not help you to organize emails at all. You cannot sort by name, subject, sender, or size like you can with other email programs. However, that does not mean you cannotsearch for Gmail emails by this criteria to be able to locate messages you need.
Look at the search bar at the top of your Gmail window. Click the downward arrow in the search bar.

Click that arrow, and a dropdown box will emerge.
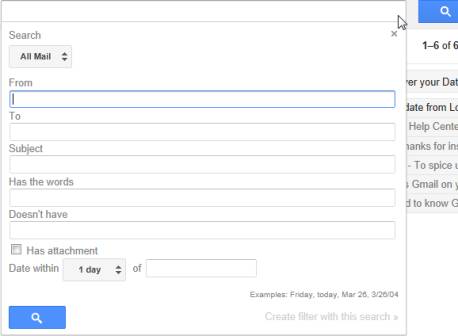
First, select where you want to search by clicking the Search button. Right now, ours is set to All Mail. We're going to switch ours to Inbox.
Then, decide how you want to search for messages.
Search by Sender
To search by sender, type the sender's name in the From box. You can search by sender name or email address.
Click the blue magnifying glass button.
Your search results will appear on the screen:

Notice the search parameters are in the search box.
Search by Recipient
You can also search by recipient by entering the recipient's name in the To box.
Search by Subject
To search by subject, enter as many words from the subject of the email as you can remember. You don't have to have the exact subject of the email, just enter words or phrases that you remember. For example, we know we have a lot of emails about security. Let's say we want to review those. We're just going to type "Security" in the Subject box.

Now click the magnifying glass.

As you can see, only emails that had security in the subject line were displayed.
Search by Keywords
You can also search by keywords. We're going to use the keyword "account" because we are looking for account information.

This pulled up several emails about security as well as other accounts we have online. Since we want to find those other account emails, now we're going to fill in the box "Does not Have" with "Lookout" since those emails all relate to security (which we're not interested in finding).

Click the magnifying glass.
This filtered out the emails that we didn't want to see in our search results.

Search by Attachment
You can also search for emails that have attachments by checking the Has Attachment box.
Remember, you can enter as much search criteria as you want in the boxes - or as little as you want. You can search for emails with attachments from certain senders with certain keywords in the emails. Or you can search for all emails in your inbox with attachments. It's up to you how much criteria you want to provide for your search.
Search by Date
To search by date, go to "Date within" at the bottom of the search box. Determine what date or range of dates that you want to search for.
For example, let's say you want to search for emails received around May 18th to find an email that you know you have in your inbox. You know you received the email around May 18th, but it might have been a few days earlier - or a few days later.
Click the button that says "1 Day" by default.
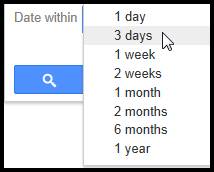
Select the range that you want to search. We're going to select 3 days. Enter the date that you want to use for the search. Ours is May 18th.

As you can see, Gmail shows you the required format to the right.
Now click the magnifying glass.
Gmail shows results for three days before the date specified, as well as three days after.

Advanced Search Operators
You can run simple searches for Gmail messages, or you can run more advanced searches using operators that you type into the search bar.
Remember, you type these operators into the search box.
Here are a list of the most used operators for advanced search.
|
Operator |
Purpose |
Example |
|
OR |
Searches for messages that matches term A or term B. OR must be in all caps. |
from:amy OR from:david means messages from Amy or David. |
|
- (Hyphen) |
Use this to exclude message from your search. |
security -lookout means we want messages that contain the word "security" but do not contain the word "lookout." |
|
list: |
Searches for messages from a mailing list. |
list:info@list.com. This pulls up all messages to/from the mailing list "list.com." |
|
filename: |
This allows you to search for an attachment by file name or file type. |
filename:course.doc allows you to search for an attachment called "course.doc." filename:pdf lets you search for all attachments that are PDFs. |
|
" " (quotes) |
Use quotes to search for an exact phrase. |
"the meeting is at four" will pull up messages that have that exact wording in them. Capitalization does not matter or affect results. |
|
( ) |
Groups words. Used to specify terms that shouldn't be excluded. |
From:amy(dinner OR movie) means results will show message that are from Amy AND contain dinner or movie. |
|
in:anywhere |
Searches for messages anywhere in Gmail except Spam and Trash |
in:anywhere movie searches all Gmail for the word movie (except Spam and Trash) |
|
in:inbox |
Will search for messages in your inbox, trash, or spam |
in:trash from:amy. Gmail looks in your trash for an email from Amy |
|
is:chat |
Search for chat message |
is:chat movie. This will search for any chats that contained the word movie. |
Labels
If you've ever used Outlook or Windows Live Mail, then you probably know that these programs allow you to sort messages into folders. Gmail does not allow you to create folders like these programs; however, Gmail does allow you to create labels. Labels organize your email messages into categories. The great part is that you can assign more than one label to one email message. For example, you may have a label called "jokes." You can also apply a "Aunt Marge" label to that message if you also want to organize your emails by sender.
Let's learn how to create and apply labels to get a better feel for how (and why) they work.
Create a Label
On the left side of your Gmail screen, click Create New Label. You'll have to click the More button to be able to see this option. "Create New Label" will be in blue at the bottom of the list.

You'll then be prompted to create your new label.
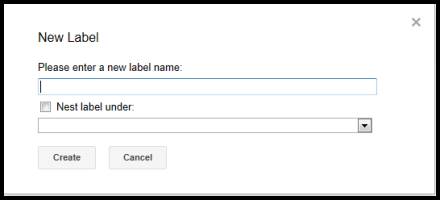
Enter a name for the label. If you want it nested under another label, choose the label you wanted it nested under. For example, you might have a label called "Office files" already created. Now you are creating a new file called "Maggie" because this label will be for all office files sent by Maggie. Since "Maggie" is still office files; however, you are going to nest "Maggie" under "Office Files" so they are connected.
Once you've entered a name for your new label, click Create.
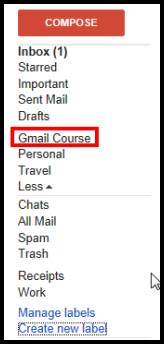
As you can see above, the label "Gmail Course" now appears in your list.
Add a Label to a Message
There are a few ways that you can add a label to a message.
If you are in your inbox, put a checkbox next to the messages for which you want to add a label (as shown below).

Next, click the Labels button, and select the label you want.
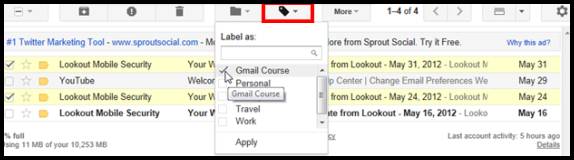
Click Apply.
If you are viewing a message, click the Labels button to add a label to the message. Also, you can click and drag a label from the left side of your screen and drop it on your message to apply the label.
If you are composing a new message, use the Labels button (pictured below) to apply the label before sending the message.
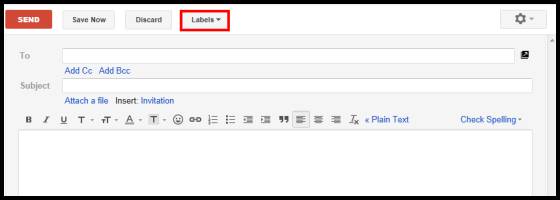
Remember, you can apply more than one label to a single message if you want.
Edit or Delete a Label
If you want to edit or delete a label, that is also easy to do. Just find the label on the left side of the Gmail page, then click the downward arrow that appears next to the label that you want to edit or delete (as shown below).

When you click the downward arrow, this is what you'll see:
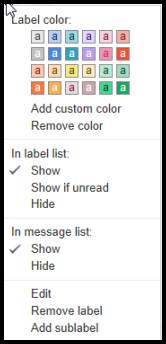
You can edit the label and add a color to it. Let's say we add the color red.
You'll now see a little red box to the right of your label:

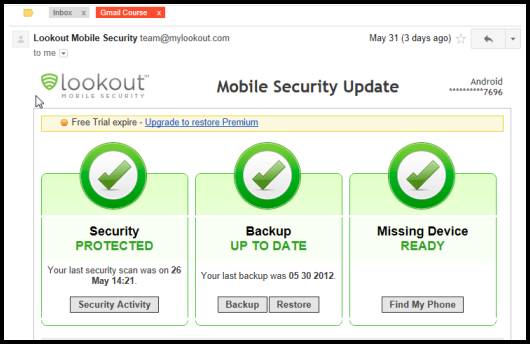
Also, all messages with that label will be marked in your inbox:

They will also be marked when you open the message:
Let's go back to our label options that appeared when we clicked the downward arrow:

You can also determine if you want:
- The label to show in the label list on the left hand side of the screen
- To show only if there are unread messages under that label
- If you want to hide it in the label list
You can also decide if you want the label to show or be hidden in the message list. Remember, we showed you how the label looks on the messages that appear in your message list when we added the color red to the label.
If you want to edit the name of the label, click "Edit."
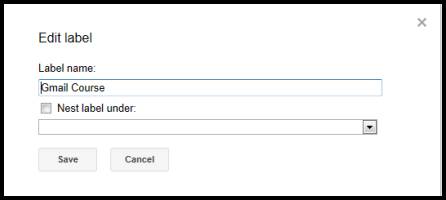
Edit the label name and click "Save."
If you want to delete a label, click on Remove Label from the list.

Gmail will ask you to confirm that you want to delete the label. Push "Delete" to confirm.
When you were taught to create a new label, we told you that you could nest the new label under an existing label. You can also turn a label into a sub label that will be nested under another label. Click "Add Sub label."

Enter the information, then click "Create."
Managing Labels
To organize your labels, click the gear icon. Click on Settings, then click on the Labels tab.

You'll see all your labels, starting with the System labels, or the ones that are essential to the Gmail system.
Below that, you'll see the other labels, including the ones you create:

From here, you can:
Decide which labels will appear on the left side of the Gmail screen in the Label List. Go to the "Show in label list" column, then click either show, hide, or show if unread. If you click show if unread, the label will only show in the list if there are unread messages in it.
You can also choose which labels appear in messages. Go to the "show in message list" column. Click "hide" if you don't want the label to appear in your message list. Again, we showed you how labels appear in your message list when we changed a label to red.
You can delete labels. Go to the "Remove Label" column, and confirm you want to remove the label by clicking delete.
You can also create sub labels just as we did from the dropdown menu.
Note: If you delete a label, you will NOT delete the messages associated with that label. Also, if you have more than 500 labels, it may make Gmail go slower.
Organizing Labels
It can become tedious if you have to go through every message that you receive and assign a label to it. For that reason, you can create a filter so that incoming messages are automatically assigned a label and removed from your inbox for you.


