You can create a filter so that when an email message matches a specific search, Gmail automatically performs an action. In Outlook and other email programs, this is called mail rules or message rules.
Creating Filters
The first thing you must do to create a filter is enter search criteria. Enter the search criteria that will apply to your filter. For example, if you want to filter messages from your boss Joe, then enter "Joe" in the "From" box in Search.
To do this, click the dropdown arrow in the search box again. Enter some search criteria. We're just going to enter "account" in the "Has the words" box.
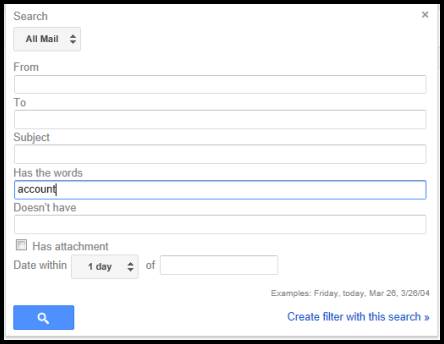
Now, click Create Filter with this Search. This is located at the bottom right hand side of the dropdown box, as shown above. This is what you'll see:

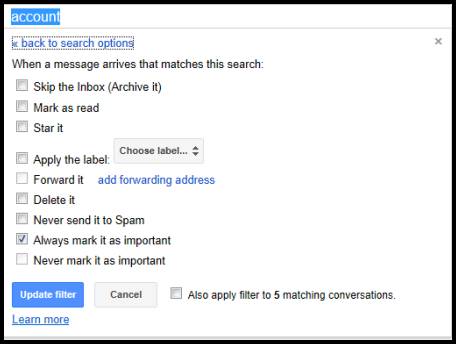
Now, we can set filters. These filters will make it so that Gmail automatically takes action whenever an email comes into our inbox that matches the search criteria we just entered.
When a message arrives that matches the search, we can:
- Archive it. Remember, Gmail will automatically archive it.
- Mark it as read. Unread messages show up in boldface. Read messages are in regular font.
- Put a star beside it. This is a way of highlighting messages like the flag in Outlook.
- You can also apply a label.
- Forward it to a recipient. If you want to forward the email, click "Add forwarding address" to input the recipient's email address.
- Delete it. This moves it to the trash.
- Never send it to spam. Some messages will be sent to the spam folder. You can create a filter to make sure certain messages never go to spam.
- Always mark it as important. Messages that you mark as important have this little yellow tag beside them:

You can also click that tag to make them important without setting a filter.
- Never mark it as important.
Click "Create Filter" when you are finished.
Edit or Delete Filters
There may be a time when you want to edit or completely delete a filter. This is easy to do in Gmail.
Start by clicking the gear icon. Select Settings.

Next, click the Filters tab, as shown below.
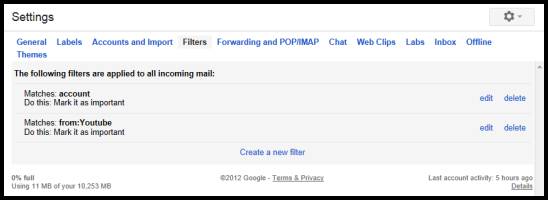
Now you can see all filters that you've created. To edit a filter, click "Edit" to the right of the filter, as shown above.
We're going to edit our first filter.
When you click "Edit," you can change the search criteria:
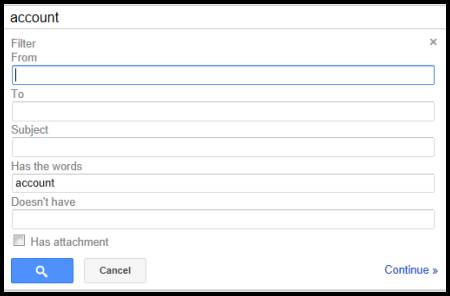
Once you are done changing criteria (if that's what you want to do), click Continue.
Now you can change the action that Gmail automatically applies to messages that meet the search criteria.
If you want to delete a filter, click "Delete" to the right of the filter.
You can change the Gmail settings to match your personal preferences by clicking the gear icon in the upper right corner of the screen, then selecting Settings. This is what you'll see:
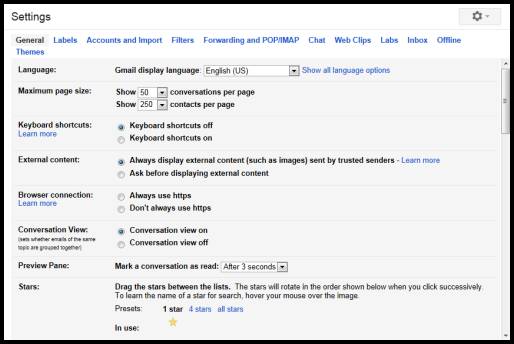
The General tab is displayed by default. Here you can change the display language, the number of conversations and contacts shown per page, and if you want keyboard shortcuts turned on or off. You can also decide if you want external content (such as images in emails) displayed or if you want Gmail to ask first.
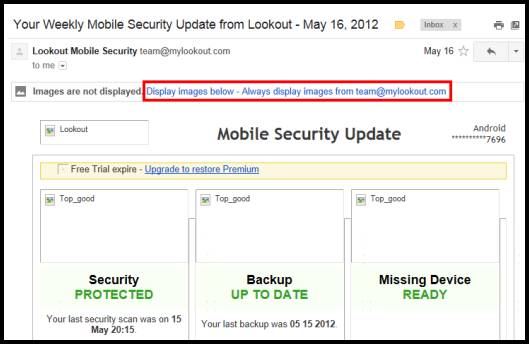
This is how a message looks if Gmail asks to display images:
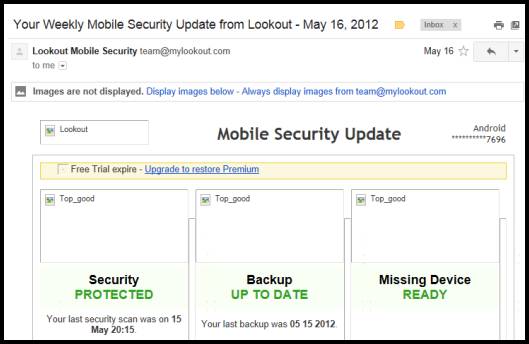
You have to tell Gmail to display the images or to always display images from that particular sender.
Also under the General tab in Settings, you can decide if you want to use https (a more secure browser connection) or not. You can also turn the conversation feature on or off, and determine when Gmail marks a conversation as read (unread conversations are boldfaced). For now, let's talk about what other preferences you can set or change in Gmail Settings.
Creating an Email Signature
You can also create an email signature, or a message that will appear at the bottom of all your emails, under the General tab in settings. Just scroll down the page until you see "Signature." Remember, this is under the General tab in Settings.

The "No Signature" box is checked by default. Click the other box to enable a signature. Then, click in the white area to enter the text for your signature. You can also format your new signature just like you can format email messages. This means you can also add a picture to your signature.
Create an Autoresponder Message
An autoresponder message, by definition is an email that is sent out automatically in response to emails you receive. If you go on vacation, for example, and won't be able to respond to emails, you can create an autoresponder to let people know you are away and when they can expect your return.
You can create an autoresponder message by going to the General tab in Settings and scrolling down until you see this:
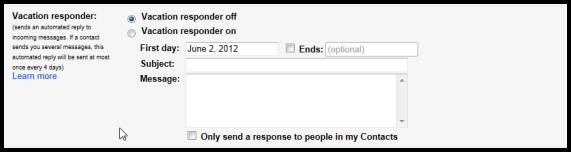
Put a check in the "Vacation responder on" box.
Next, you must decide how long you want Gmail to send these messages on your behalf. Enter the first day that you want Gmail to send the autoresponder message, as well as the last day.
Then, enter a subject line just like you would a regular email. You might want the subject line to be something like "Out of town" or "Out of the office."
Write your message in the white space provided.
If you only want to send this message to your contacts (and not to mailing lists, etc.), put a checkmark in the box that says "Only send a response to people in my Contacts."
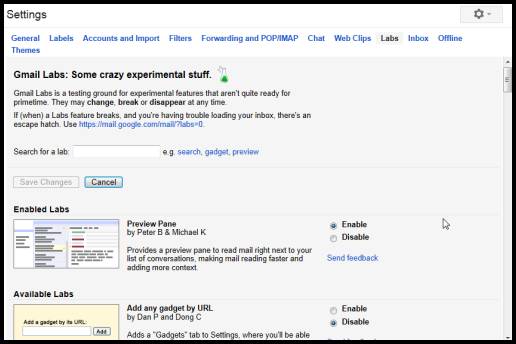
Enabling Gmail Labs
Gmail Labs isn't as complicated as it may sound. It may put you in the mind of beakers and chemistry s, but it's not that complicated. Gmail Labs is simply the breeding ground for new Gmail features. Whenever a new feature for Gmail is created, but the quirks haven't been worked out or Google isn't sure how popular the feature will be, it's put into Google Labs. The Preview Pane, if you remember, was a Gmail Labs feature. Gmail does not guarantee features found in Gmail Labs will work correctly - or at all-and they also don't promise they'll be around forever.
To enable Gmail Labs, click the gear icon, then select Settings. Click on the Lab tab.
Managing Your Contacts
Contacts are the people that you regularly keep in touch with via email. They may be friends, family members, co-workers, and the like. These are people who you keep in what's traditionally called an address book because you always want their address handy.
In Gmail, your contacts are found by clicking the downward arrow beside the red Gmail, then clicking Contacts.

You'll then see all your contacts. We've blurred our contacts for privacy reasons.
This page is called the Contact Manager. You can add, edit, and delete contacts using the tools given to you here.
Navigating the Contact Manager
Let's take a broader look at the Contact Manager page.

To the left, you'll see Contacts written in red. If you click the downward arrow beside it, you can navigate back to Gmail.
Below the word Contacts, you'll see the button to create a New Contact.
Below this, you see labels.
"My Contacts" is where all of your contacts are listed.
If you have a contact starred in Android, those will be listed under the label "Starred in Android."
Then, you have "Most Contacted" and "Other Contacts."
If you want to create groups from your contacts (for example, friends, family), you'll click New Group. If you want to import contacts from another source, you'll click Import Contacts. We'll talk more about that later.
Above your actual contacts, you'll see buttons (as shown below).

In this article, we'll learn to use these buttons to create, edit, delete, and manage your contacts.
Creating a Contact
To create a new contact, click the New Contact button in the Contact Manager. Remember, it's the red button on the left.
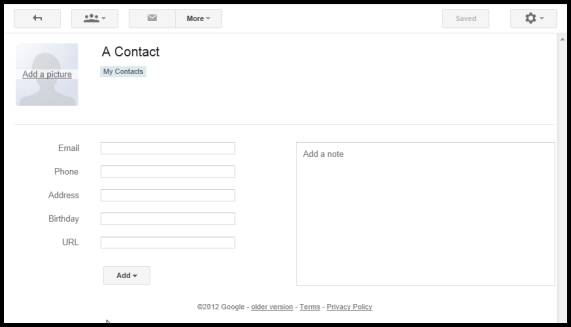
You'll then see this in your browser window:

Add the contacts name where it says "Add name." You can also add their picture by clicking "Add a picture." Then, fill in as many of the fields as you want. Just remember to add their email address. You can even add notes about the contact in the "Add a note" section. This can be information you want to remember about the contact - or anything else you want.
If you click downward arrow beside the Add button, you can also add other fields:
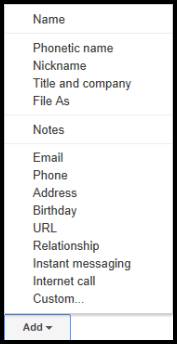
Just choose the field you want to add.
When you're finished, click the Save Now button at the top right of the window.

Gmail automatically saves contact information too, if you've taken a while to enter it. If that's the case, the button will say "Saved."
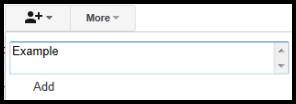
You can also add a contact by going to the Contact Manager and clicking the button with the little person and the plus sign. Enter a contact's name in the field, then click Add.
The contact will be added to your address book, but you'll have to edit the contact to enter more information.
Edit a Contact
Let's go back to the Contact Manager and learn how to edit a contact.

Simply click on the name of the contact you want to edit. The information will then appear in the browser window in the same format as when you added a contact.
Modify or edit any information that you want, then click Save Now.
Delete a Contact
To delete a contact means that you will no longer have their contact information in Gmail. Make sure you want to do this before you even begin.
However, if you want to delete a contact, go to the Contact Manager and put a checkmark beside the name of the contact that you want to delete, as shown below.

Then, click the downward arrow beside "More."
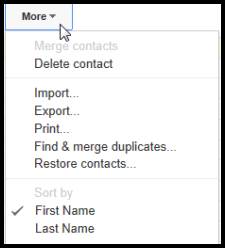
Select Delete Contact.
The contact is deleted.
However, Gmail gives you one last chance to change your mind in case you've made a mistake. This dialogue box will appear on the Contact Manager page.

If you didn't mean to delete the contact, simply click Undo.
Creating a Contact Group
You can organize your contacts into contact groups, as we mentioned earlier. Contact groups are simply groups of contacts. Creating groups makes it easier to email sets of people. For example, if you frequently send the same email to your entire family, you can create contact group named 'family' and, instead of typing a dozen addresses into an email, you can simply send the email to the entire group. Plus, you'll never forget anyone.
To create a contact group, put a checkmark next to all your contacts that you want to add to the group. We've selected two below.
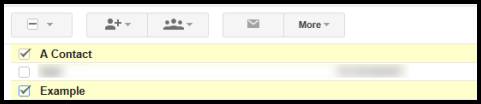
Then click the Groups button in the Contact Manager. It looks like this: 
Select Create New from the dropdown menu.
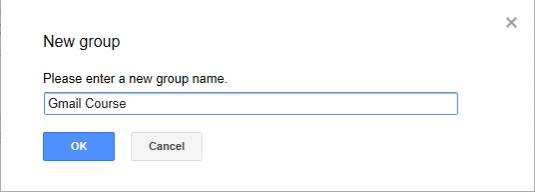
Enter a name for the contact group, then click OK.
As you can see, the contact group now shows up in the labels on the left side of the screen.

When you compose an email, all you have to do is type the name of the group into the To, Cc, or Bcc line, as shown below:

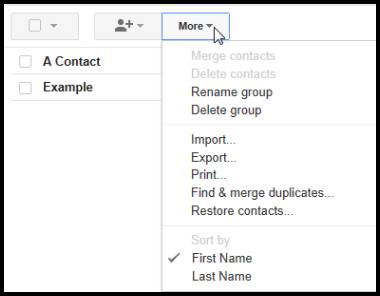
Delete a Contact Group
To delete a contact group, click on the contact group in the label list (on the left). Then click the More button and select Delete Group, as shown below.
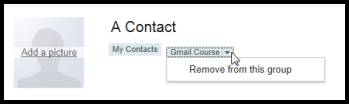
Remove a Contact from the Group
To remove a contact from a group, go to the Contact Manager. Click on the name of the contact that you want to remove.
As you can see in the snapshot below, this contact is listed in our contacts and is also in the Gmail Course group.

Click the downward arrow beside Gmail Course.
Select "Remove from this Group."
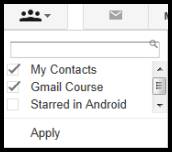
Add a Contact to an Existing Group
To add a contact to an existing contact group, go to the Contact Manager. Put a checkmark next to the name of the contact you want to add to a contact group.
Now, click the Groups button. Put a checkmark next to the group you want to add them to, then click Apply.
Import Contacts
You can import contacts from other email programs and address books such as Yahoo, Hotmail, Outlook, and others. It's not difficult to do.
The first thing you'll need to do is format your contacts (from other email programs) into a CSV file. This is a spreadsheet file. Most email programs do this for you. You may have to go into the other email program and export your contacts as a CSV file that you save to your computer. Go through your other email program's help files if you need help doing this.
Once you have a CSV file that contains all your contacts' information, you can import the file to Gmail. You can import 3,000 contacts at one time. For more than 3,000 contacts, you'll have to use multiple CSV files.
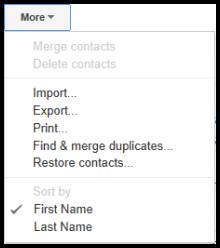
To import your contacts, go to the Contact Manager and click the More button. Select Import from the dropdown menu.
Find the CSV file on your computer.
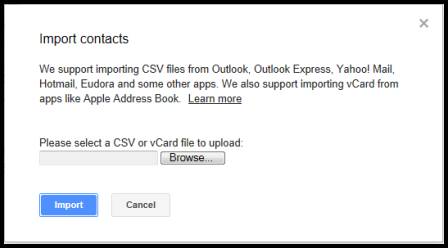
Click Import.
You can also import vCard files, as you can see above. You can do this with programs like Outlook and Apple Address book. You'll have to "Export vCard" in those programs, then import them to Gmail following the same steps that we just showed you.
Export Contacts
You can also export your Gmail contacts to other email programs by easily creating a CSV file. You'll then upload the CSV file of your Gmail contacts to your other email program by using the other email program's import feature.
To export your Gmail contacts into a CSV file:
Go to the Contact Manager and click the More Button.

Choose Export from the dropdown menu.
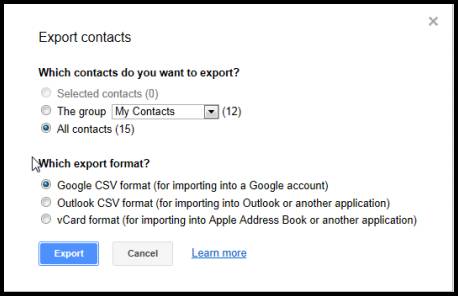
Select which contacts you want to support.
Then, select the export format. By default, Google CSV is chosen. However, if you're going to import your contacts into another email program, choose Outlook CSV or vCard format, depending on which you want.
Click the Export button.