Once a customer has purchased your product or service and they have sent a form a payment from them, the next thing you need to do is record the sale and take their payment. There are many ways that you can do this automatically, such as through integrating your QuickBooks Online with QuickBooks Payments, which is Intuit's online merchant service. That way, you can have ACH or credit card payments get recorded directly into your QuickBooks Online account.
In this article, however, we will be looking at how to record payments using QuickBooks Online's native tools. We'll start by learning how to find our open invoices and then move on to recording payments for invoices. We'll then look at recording sales receipts and, lastly, look into why all these payments end up in the Undeposited Funds Account.
Payments
Regardless of whether a customer pays you by check, credit card, or some other way, there is a common way to record it in QuickBooks Online. That involves filling out a Receive Payment form. There are many ways that you can get to the form, however. Let's start by first seeing how we can find out who we should be receiving payments from.
You can see who owes you money by going to Reports in the left-side Navigation Pane. From there, find the Who Owes You category and click on Open Invoices.

[Figure: Finding the Open Invoices report]
This will run a report that shows every invoice that hasn't been paid yet. For example, we can see at the top that there is an invoice for $239.00 that hasn't been paid by Amy's Bird Sanctuary.
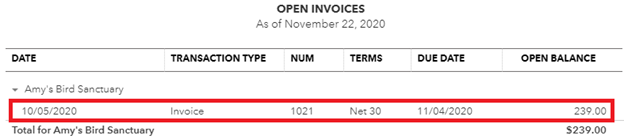
[Figure: Open invoices report]
From this report, you can click on any of the fields shown in the expanded view to be taken to the details page for that particular invoice. After receiving payment, when we return to this report, we should not see this entry anymore if the balance is paid in full. If it's only partially paid or overpaid, however, it will remain.
Now that we've seen one way to check if a payment has been recorded, let's take a look at how to actually record the payment.
Recording a Payment
There are many ways to navigate to the screen to record payments. One way is to go to the New button in the left-side Navigation Pane. Under the Customers category, click on Receive Payment.
This time, we'll try another way, which is to go to Sales in the Navigation Pane and then click on Customers. You can see here that our customer has an open balance and that there is a link to receive payment.

[Figure: Receiving payment in the customers list]
When we click to receive payment, the Receive Payment form is opened with our customer's information already filled out for us.
We have the option to find the pertinent invoice by invoice number. However, this customer's invoices are already listed at the bottom of the page in the Outstanding Transactions list.
For the Payment Date, select the date that the customer sent in the payment.
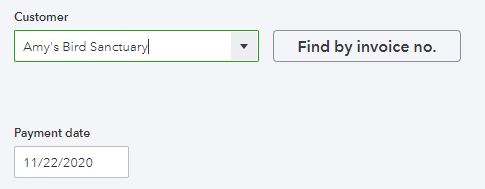
[Figure: Customer, Find by Invoice Number, and Payment Date for Receiving Payment]
Next, we need to select the Payment Method. There are many ways the customer could have paid you, such as by credit card, cash, check, or PayPal.
You can add new payment methods just by clicking the Add New link in the drop-down menu. For example, you can type in Bitcoin and it instantly appear as an option.
You may enter a reference number for the payment.
For the Deposit to account, select Undeposited Funds. You can also directly deposit into another account, such as checking or savings. If you expect to have more deposits, however, it can be better to keep the payment in Undeposited Funds first.
Then, enter the amount that the customer paid. By default, QuickBooks Online will enter the total amount. However, a customer may not have actually sent all that in.
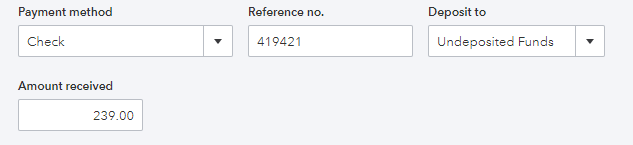
[Figure: Payment Method, Reference Number, Deposit to, and Amount Received in the Receive Payment form]
Now we need to check the customer's invoices in the Outstanding Transactions list. This list has five columns: Description, Due Date, Original Amount, Open Balance, and Payment.
If the customer only has one invoice due and they send the amount to cover its payment, then it is simple to apply the payment to that invoice.
Sometimes, however, a customer will have more than one open invoice and they will send in an amount of money that doesn't cover all the invoices. By default, QuickBooks will apply the payment to the oldest invoice first.
If you need to pay the invoices in a different order, then you can specify the specific amounts in the Payment column.
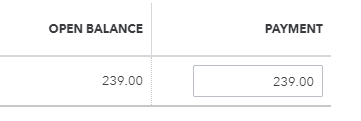
[Figure: Paying the open balance]
Below the table you can see the total amount that will be applied. If there are credit memos available, then they could also be applied here.
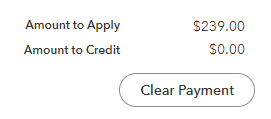
[Figure: Amount to Apply and Amount to Credit]
Additionally, you can add a memo and attachment to the Receive Payment form.
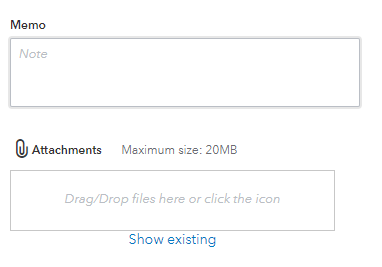
[Figure: Memo and Attachments on the Receive Payment form]
Once the form is complete, you can save it and move on. At the bottom of the page, you have the options of Save and New, Save and Close, and Save and Send.
Save and New will save the payment and open up a new, empty Receive Payment form. Save and Close will save the payment and return you to your previous screen. Save and Send will save the payment and give you the option to mail it to someone as a PDF. Once you save the file, the payment will be processed and you can then check to confirm.
Viewing the Payment
There are a few different places where you can see the payment. First of all, you can go to your Chart of Accounts. Access the Chart of Accounts by clicking on Accounting in the left Navigation Pane and then click the Chart of Accounts link.
Scroll down the Chart of Accounts until you get the Undeposited Funds account, which is where we specified the payment to go to. If you specified a different account in the Receive Payment form, then check that other account.

[Figure: Undeposited Funds account in the Chart of Accounts]
Clicking the View Register link in the Action column of the Undeposited Funds account will take you to a detailed view of the account's register.
Here we can see that the payment we just received has been recorded.

[Figure: Seeing the payment recorded in the Undeposited Funds register]
We can also view the payment in the customer's list. Click on Sales in the left-side Navigation Pane and then Customers.
Find the customer in the list and then click on them to see
You will see that their open balance is zero and that their invoices have been paid.
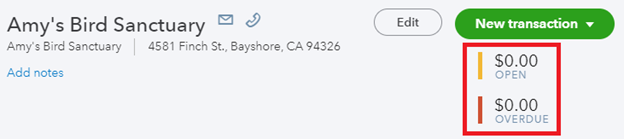
[Figure: Balance paid off]
Furthermore, if you return to the Open Invoices report that we ran earlier, you will see that the customer is no longer mentioned when the report is run.
Now that we've seen how to record a payment to an invoice, let's take a look at dealing with a sales receipt.
Sales Receipts
Unlike an invoice, in which the customer pays later for a product or service, a sales receipt is given when a customer pays for something right away. The process for entering a sales receipt is not much different from receiving a payment for an invoice.
Entering a Sales Receipt
There are several different ways that you can enter a sales receipt. One way is to go to the New button in the left-side Navigation Pane and then click on Sales Receipt in the Customers category.
This time, we'll go to Sales in the Navigation Window and then click on Customers. In the Customers list, find your customer and click the drop-down menu icon in the Action column. There you will see an option for creating a sales receipt.
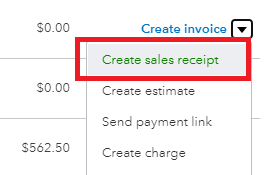
[Figure: Creating a sales receipt]
Once you click to create a sales receipt, you will be taken to the Sales Receipt form. Since you created the sales receipt from the customers list, the customer's name, email, and business address information will already be filled in.
You can add additional email recipients by separating them with a comma. Carbon copy and blank carbon copy email recipients can also be included by clicking the Cc/Bcc link. Checking the Send Later checkbox will let you hold off on emailing the receipt in case you want to send batch emails later.
You can change the information in the billing address if it is not up-to-date. Doing so will make QuickBooks prompt you to confirm the changes after saving.
Enter the day's date for Sales Receipt Date and you may also enter a Crew Number, which can be an internal number in your company related to the sales team. You can also just leave the Crew Number field blank.
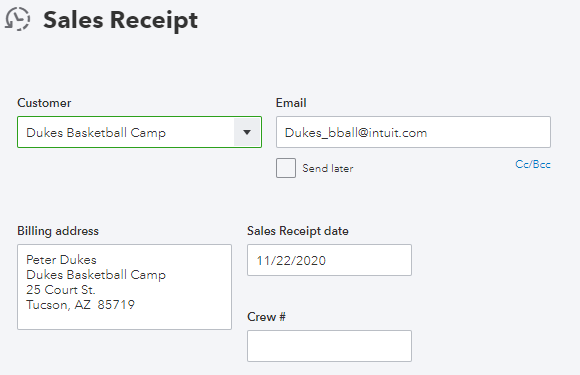
[Figure: Customer, Email, Billing Address, Sales Receipt Date, and Crew Number information in the Sales Receipt form]
The next thing you will need to fill out is the Payment Method. You can choose from your accepted methods of payment in the drop-down list.
You can also easily add newly accepted payment methods by clicking the Add New button in the drop-down menu. As soon as you add the new method, it will show up in the list.
Next you can add your own Reference Number.
For the Deposit To account, just deposit the payment to Undeposited Funds. This can be changed to other accounts, such as checking or savings. Leaving it at Undeposited Funds will be better if you are expecting more payments to come in soon, however.

[Figure: Adding the Payment Method, Reference Number, and Account to Deposit To]
Now you are ready to enter the products or services that were paid for by the customer. The table has six columns: Product/Service, Description, Quantity, Rate, Amount, and Tax.
Choose your product or service from the drop-down menu when you click within the field. Selecting your item will auto-fill the rest of the row. You can then make adjustments to the fields as necessary, such as changing the quantity and choosing if it is subject to sales tax.
You can continue to add products and services to the list by clicking the Add Lines button below
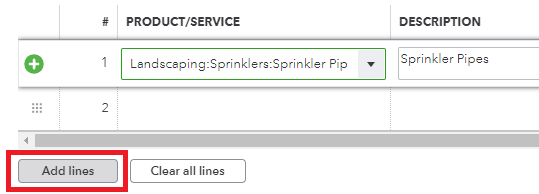
[Figure: Adding more products or services to the receipt]
If you need to remove a line, click the trash can icon in the right-most column. To reorder lines, drag the icon in the left-most column.
Below the list are some fields where you can enter custom messages to be displayed on both the receipt and statement, as well as add attachments.
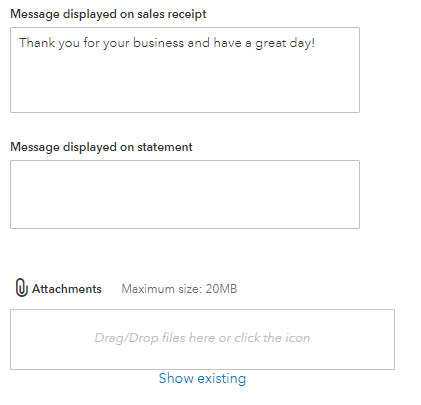
[Figure: Adding custom messages to the sales receipt and statement, as well as attachments ]
Now you finish adding the tax and deciding if there should be a discount. At the bottom you will see the subtotal for all goods and services as well as the amount that is taxable.
Choose your tax rate from the drop-down menu based on your region.
You can also give a discount based on percent or value. Clicking on the up/down arrow button will determine if the discount is added before or after the tax.
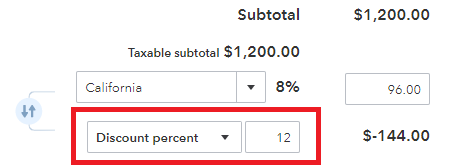
[Figure: Adding a discount to the purchase]
Below the discount is the Total, Amount Received, and Balance Due. Because a sales receipt assumes that the total is paid right there, the Amount Received should be the same as the Total. Consequently, the Balance Due will be 0.

[Figure: The Total, Amount Received, and Balance Due for a sales receipt]
At the very bottom of the screen, there are a few more options for your sales receipt. You can print or preview it, make it recurring, or customize it.

[Figure: Invoice options]
Print or Preview allows you to see what the sales receipt will look like on paper as well as immediately make a hard copy.
Make Recurring lets you set up a schedule so that this sales receipt is automatically sent out when you want it to.
Customize lets you add custom fields into your sales receipt. Based on your business, there may be more things you want to include.
Lastly, you have buttons at the bottom for Save, Save and Send, Save and New, and Save and Close.
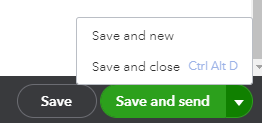
[Figure: Save options]
Clicking the Save button will save the sales receipt without closing it. The Save and Send option will save the sales receipt and email it out. The Save and New option will save the sales receipt and open up a blank new sales receipt to work on. The Save and Close button will save the sales receipt and then take you back to your previous page. Let's click the Save and Close button. Your sales receipt is now done and you can now confirm that it was completed.
Viewing the Sales Receipt
There are several ways to view the sales receipt that we just created. Let's click Sales in the left Navigation Pane and then All Sales.
At the top of the list we should see our latest transaction. The status will say Paid because it was a sales receipt, not an invoice.

[Figure: The paid sales receipt]
In the Action menu, you can view the details of the receipt again.
You can also confirm that the funds have moved into your Undeposited Funds by checking the Chart of Accounts. Go to the Chart of Accounts by clicking Accounts in the left-side Navigation Pane and then clicking Chart of Accounts.
Scroll down the list of accounts until you see the account for Undeposited Funds. That account should have an amount more than zero because we just added to it, and there were likely other undeposited funds in there before we made our new sales receipt.

[Figure: The Undeposited Funds account in the Chart of Accounts]
In the Undeposited Funds row, click on View Register in the Action column. At the top, you will see the transaction that we just completed for the sales receipt.
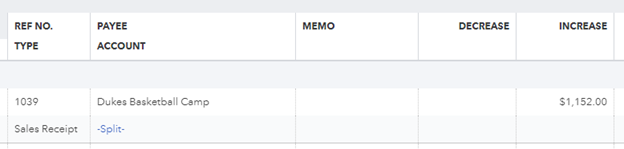
[Figure: The latest sales receipt transaction in the Undeposited Funds account]
Now that you've seen how completed payments have ended up in the undeposited funds account, let's take a minute and discuss why we use the undeposited funds account instead of just directly depositing each payment.
The Undeposited Funds Account
When you deposit the checks that you've received as payments from customers into the bank, the bank will combine the checks and enter them as a single deposit to your account. Likewise, when you later receive your statements from the bank, you will only see those deposits, not the individual checks.
That makes it important for you to follow this convention in your own bookkeeping as well. That way, when you reconcile your books with the bank, you won't have to try and add up each individual check to make sense of where they were deposited.
That's why QuickBooks uses the Undeposited Funds account. Because if you deposited each check on its own to the bank, and the bank later presented you with cumulative deposit receipts, then it would be very difficult for you to reconcile all your deposits with the bank's records. By storing undeposited funds in this account and depositing them all together, you make it much easier to keep track of your books.
Handling Overpayments
One more situation to discuss in this lesson is what to do if a customer overpays you. In this case, you can either credit the customer or else keep the money as if it were a tip for good service.
You need to make sure that you have set up QuickBooks to automatically apply credit. You can do this by clicking the Settings buttons and then choosing Account and Settings. Then go the Advanced section and under the Automation heading, make sure that Automatically apply credits is turned on. If it isn't click the pencil icon to edit the settings and turn it on.

[Figure: Setting to automatically apply credits]
Turning this setting on makes QuickBooks Online automatically create credits upon overpayments, even though you can choose what to do with the credits.
Now you can safely apply the payment to the invoice it was sent in to, and subsequently decide if you want to use the overpaid portion for applying to another invoice, applying to a future invoice, or adding it to your tip income account. We will look at credits more in a future lesson.
Conclusion
You have now seen how to record payments from invoices as well as add sales receipts. You've also seen how payments can be confirmed. In addition, you've seen why we use the Undeposited Funds account and learned what we can do when people overpay.