There are many new ways to print and export reports in Access 2016. In this article, we'll introduce you to them, and show you how to do them.
Previewing a Report
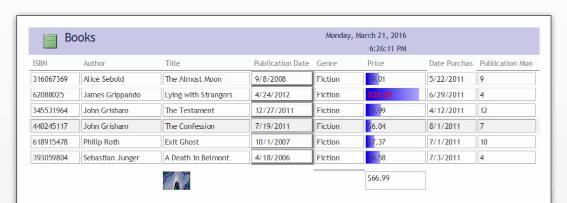
If you're used to printing in Microsoft Word, you may at first feel a bit frustrated when trying to print a report correctly in Access 2016. It isn't because it can't be done, it's because there are a few extra steps you need to take in order to assure that the report prints correctly, and in a pleasing manner. To illustrate the possible issues, we're going to show you a report we've run on the table we've created called "Books."
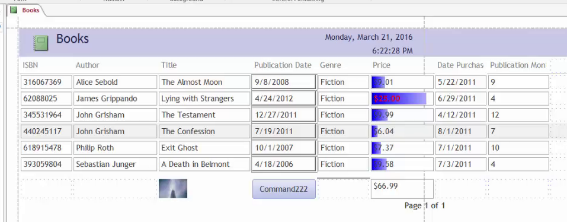
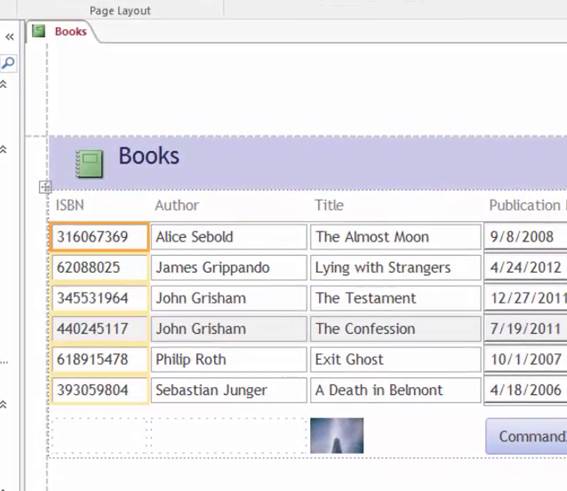
In the example above, we've selected Layout View. To get here, we went to the Design tab of the Report Layout Tools and clicked the View button.
In this view, we are able to change the way the report looks. In Print Preview, we can only see an exact replica of the way it will print, not alter it.
If you look closely, you will see some dotted lines. We've marked the intersections of these lines with red arrows. Those dotted lines represent the edge of the printable area. They are like margins in Microsoft Word.
Now look at the next example. This is in Print Preview. It shows us exactly what the report would look like when printed.

Notice on the right side of the page, how the column was cut off in the exact place the dotted lines (or margins) appeared in Design View? The portion of the report that fell to the right of the margin is going to print too, of course, but only a separate page.
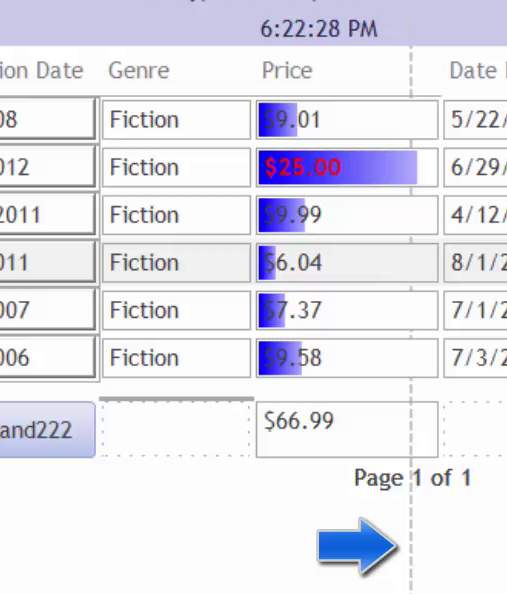
This obviously is not an acceptable way to print this report.
There is an easy way to fix it, though, if page orientation is not an issue.
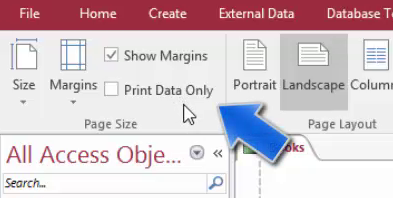
Go to the Page Setup tab. Below is an example of the options available.
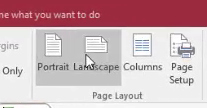
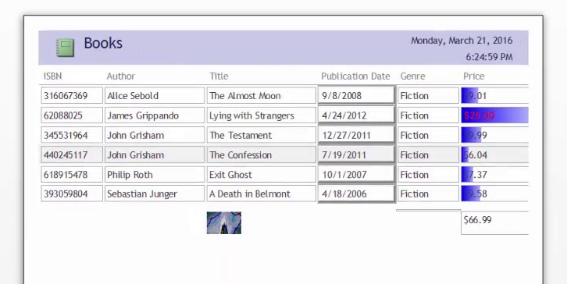
Right now, the page is set to print in Portrait mode. We can tell because Access has highlighted the portrait button. To change the layout, simply select Landscape.
This is now what our page will look like when printed.
If page orientation is important, however, you may have to adjust the columns until they all fit on the page, or even choose to remove some of them. Every option involves compromise, of course, so it's really just a matter of finding a solution that you are satisfied with.
Page Setup
Earlier in this article, I introduced you to the dotted lines in Layout view and likened them to margins in Microsoft Word. That is exactly what they are. Now I'm going to tell you how you can change them.
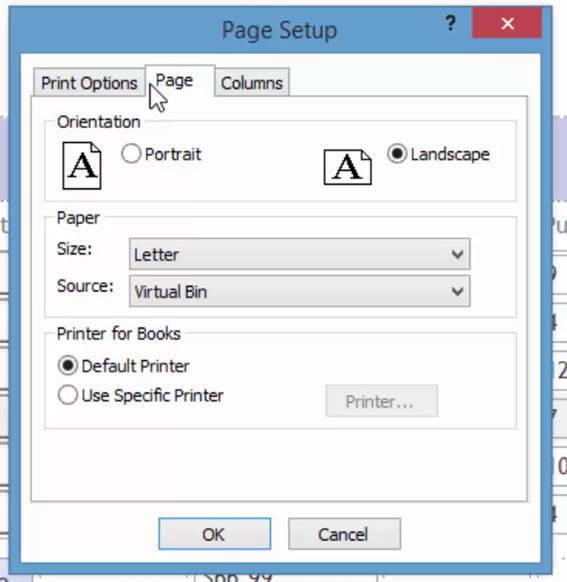
Navigate to the Page Setup tab and click the Page Setup button. This launches a dialogue window.
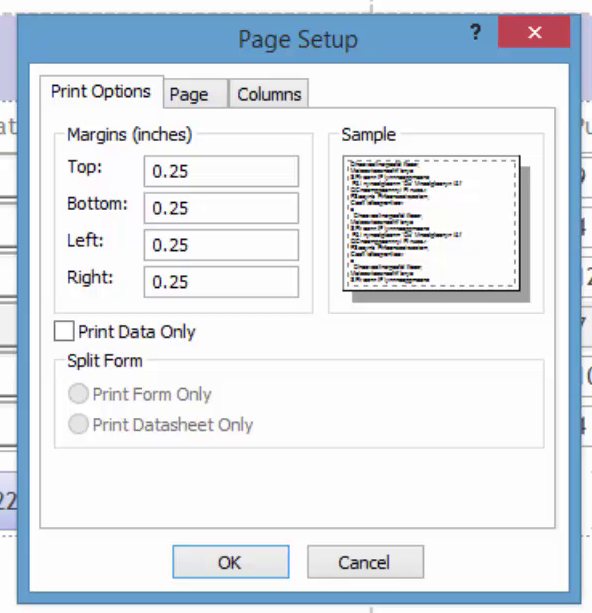
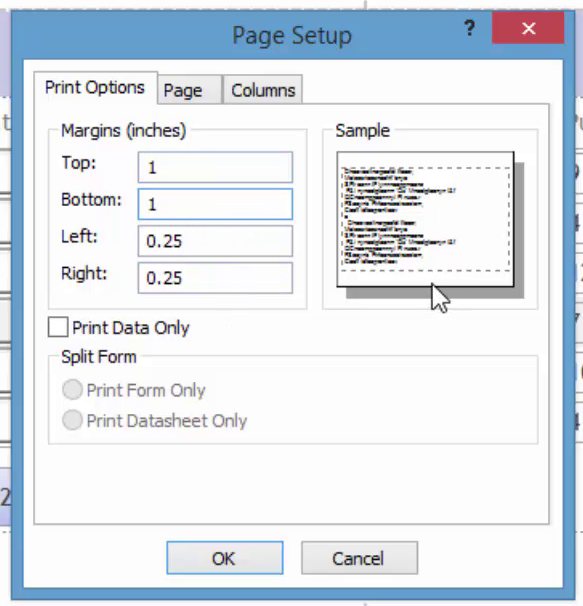
Margins are defined in inches or millimeters, depending on your system settings. By default, Access 2016 applies a one-quarter inch margin (6.35mm as shown above) on all four sides, but you can use any margin that appeals to you. To do so, just click into a field and enter a new number. As you do so, the sample box on the right gives you a rough idea of what to expect. In the next illustration, I've selected a 1-inch margin (25mm) on all sides.
Click OK when finished. Layout view for this arrange will reflect our changes.
The Print Data Only checkbox allows to easily remove the borders and print only the information inside each cell.
Now, switching to the Page tab of the Page Setup dialogue allows us to select a paper source, the size of the paper, and even choose a printer. From here, we can also change the orientation of the page.
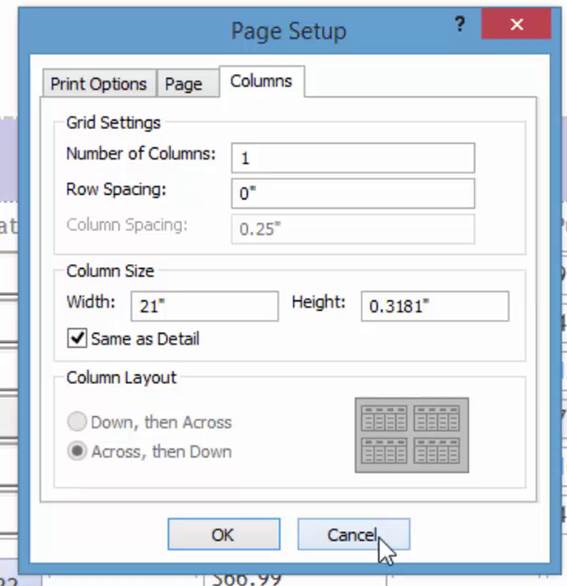
The Columns tab allows you to specify how many columns you'd like, the size of each column, and the amount of space between columns and rows.
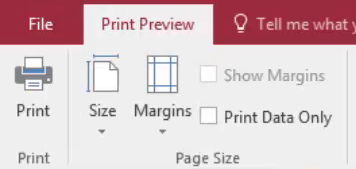
Each of these options is also available on the ribbon in Print Preview.
Printing a Report
When you've finished previewing your report, and are satisfied with the results, it's time print it. You can do so by clicking the Print button on the left side of the ribbon in Print Preview.
This will launch the Print dialogue.
![]()
From here, you can select an available printer, specify a print range, and the number of copies. Click OK to send the report to the printer.
You can also access the print tools in Backstage View.
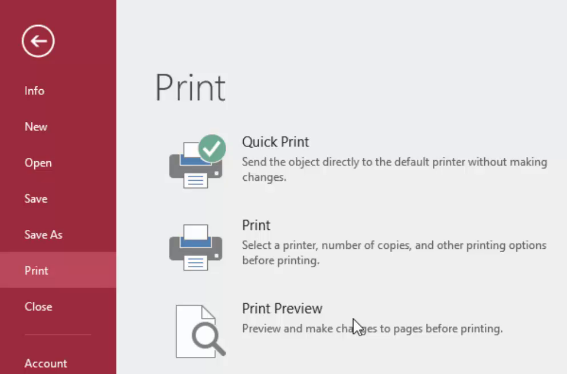
- Quick Print sends the file directly to the printer without allowing you to select any options or make any alterations to your report for easy reading.
- Print launches the Print dialogue window.
- Print Preview launches the Print Preview screen.
Exporting a Report
I don't know about you, but when I hear the words "exporting a report" I think of a complicated conversion process involving many steps. Nothing could be farther from the truth. Exporting is just another way of saying "saving as" a new file type. Access 2016 does all the work for you, all you have to do is know where to find the tools. For the most part, Access 2016 even makes that process easier by putting them right in the ribbon.
In the remainder of this article, we're going to show you where to find the tools and how to make sure the information you export is complete.
The first thing we're going to do is run our report. If you aren't already in Report view, click the View button and select it. Navigate to the External data tab. This is where most of the importing and exporting tools are located.
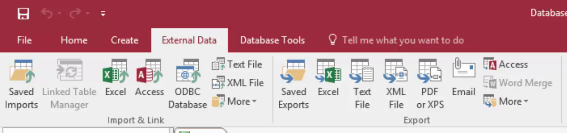
The Saved Exports button will be covered later in the article. For now, let's learn how to export into different formats.
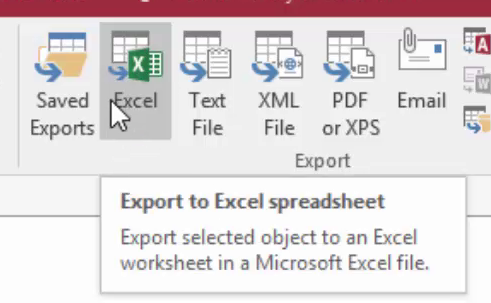
Export to Excel
Use the Excel button to export your data to Microsoft Excel 95, 97, or 2003.
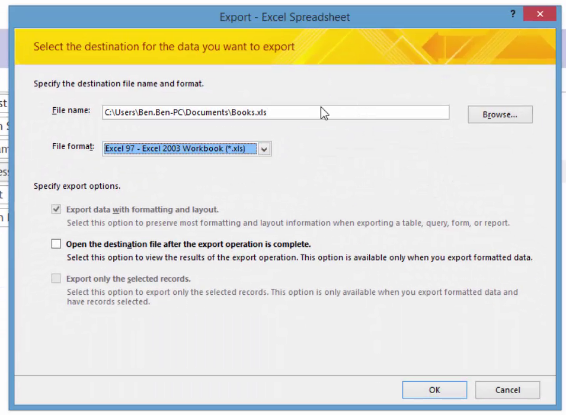
Use the File name box to manually enter a location on your computer in which to store the exported file. You may also use the Browse button to search for a location.
Use the File format drop-down menu to select a file type. You can save it as an Excel 5.0/95 workbook, or an Excel 97 � 2003 Workbook.
When you click OK, Access exports the file to the specified location, then asks you if you want to save the export.
Saved exports appear in Saved Exports manager.
Click Save export steps. You'll then be asked to enter in a name and description.
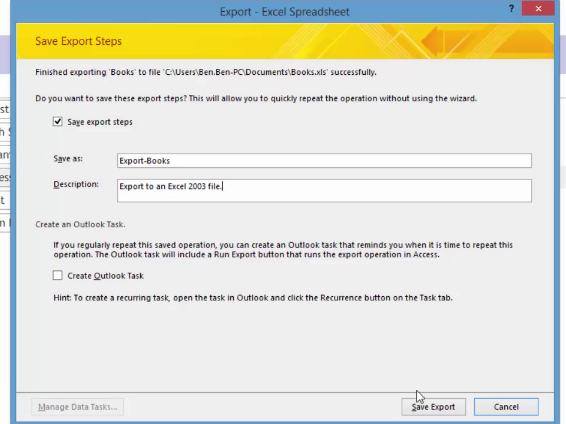
Press Save Export to save it.
Export a Report as a Text File
Use the Text File button to export your report as a text file. The Export screen opens, where you can enter a location for the file, and choose whether you want to preserve the formatting options. When you click OK, you will see a small window like this:
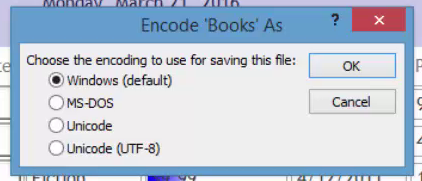
Here you will select an encoding option. If you are not sure, leave the default setting as Windows. Click OK when finished. You will then have the option of saving this export.
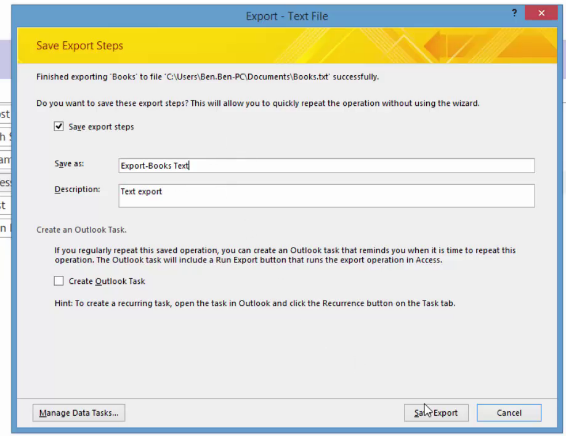
Click Save Export.
Exporting to XML
XML stands for Extensible Markup Language. It is a format for storing information. Many people confuse it with HTML, which is a format for displaying information.
To export your report in XML, use the XML file button.
You will be asked to enter a location in which to save the file. Click OK.

You may now select an option as to which information to export. You can choose to export only the data in each field, the data along with table and field formatting (XSD) or a presentation of your data, which is similar to an HTML file.
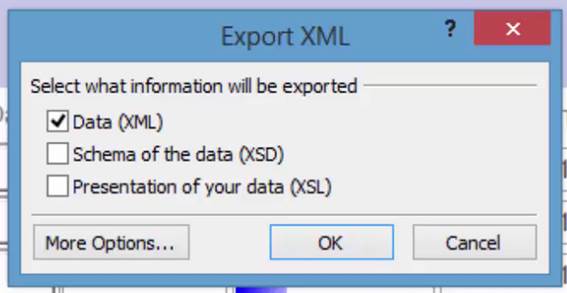
When you click OK, you will be asked if you'd like to save this export to the Saved Exports manager.
Export to PDF or XPS
Exporting to PDF is like printing your document, except that instead of a paper copy, you're getting a digital copy. XPS is a format similar to PDF, but created by Microsoft.
Select a report, then click the PDF or XPS button to get started. You will be asked to select a file location for the PDF.
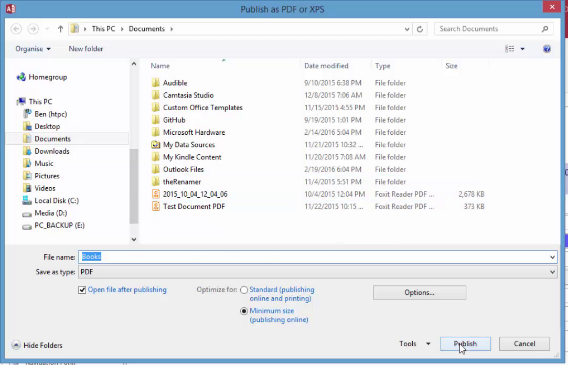
When you click OK, Access asks you if you'd like to save the export to the Saved Export Manager.
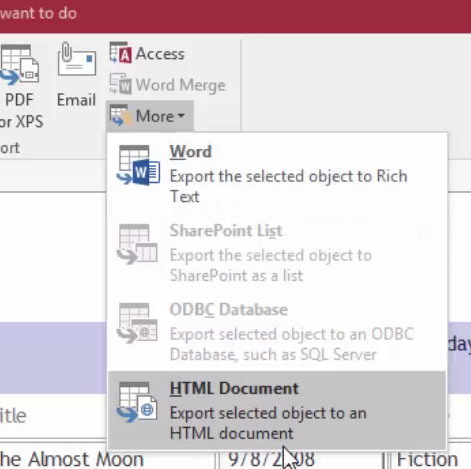
More Options
By clicking the More button in the Export group on the ribbon, you access options to save the report as a Microsoft Word file, an HTML file, and others. Since the process to export to each of these files is nearly identical, we won't repeat it here.
Saved Exports
If you use the same export settings frequently, you may want to save those settings. The Saved Exports button is basically the saved export manager. As we discussed the export options, we saved some of the export settings. Right now, we're going to examine the Saved Export window.
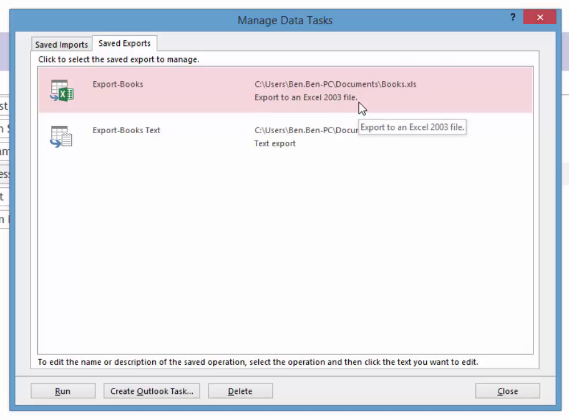
Here we have the saved settings. One export is called "Export-Books". It has a short description--"Export data to Excel file" - and a location. We can edit any of this information by clicking on it and typing in something new.
To run a saved report, select it from the list and click Run.
Importing and Exporting Data
You can use the data you have saved in other programs with MS Access 2016. In fact, you can use Access to:
X Combine data that was created in other programs
X Transfer data from one program to another
X Store data and have the ability to export it to Excel for analysis
In this article, we're going to learn the multiple ways that you can import and export data to/from Access. This will be very important to you as you start your database and need to transport data. We realize that some of this was covered in the last article; however, this article covers importing and exporting all data, not just data from reports.
External Data Operations
In other Microsoft Office programs, you use Save As if you want to save a document in a different format. An example is saving a Microsoft Word program (.doc) as a rich text file (.rtf), or saving an Excel .csv file as a text file. However, Access is different, and you do not use the Save As feature in the same way.
In Access, you can save objects as other objects. You can also save databases as earlier database versions, but you cannot save Access as a spreadsheet file or any other type of file. By the same token, you can't save a spreadsheet file as an Access database file. You can't do any of this using the Save As feature. Instead, you must go to the External Data tab. This is how you'll import and export data between other file formats.
You'll see the External Data tab and the ribbon below.

Data Types
Let's look at the snapshot of the External Data ribbon above. These are all the data formats that Access can import and export.
- The Import & Link group shows data formats that Access can import from or even link to.
- The Export group shows all data formats that Access can export to.
- If you click More in either group, you can see additional formats.
In the table below, we show you which formats can be imported, exported, or linked to.
|
Program/ Format |
Allows Import? |
Allows Linking? |
Allows Exporting? |
|
MS Excel |
X |
X |
X |
|
MS Access |
X |
X |
X |
|
ODBC Databases (SQL Server) |
X |
X |
X |
|
Text files. Delimited or Fixed Width |
X |
X |
X |
|
XML Files |
X |
X |
|
|
PDF/ XPS Files |
X |
||
|
Email attachments |
X |
||
|
MS Word |
No, but you can save as a text file, then import. |
No, but you can save as a text file, then link to. |
X (Word Merge or Rich Text) |
|
SharePoint List |
X |
X |
X |
|
Data Services |
X Microsoft.NET 3.5 or higher required |
||
|
HTML Documents |
X |
X |
X |
|
Outlook Folders |
X |
X |
No, but you can save as a text file then export. |
|
dBase Files |
X |
X |
X |
Importing or Linking to Data
To import or link to data in another format, you follow the steps listed below.
First, open the database that you want to use.
Go to the External Data tab. Click the type of data that you either want to import or link to. For this example, we're going to say Text.
![]()
You'll then see this window:
1
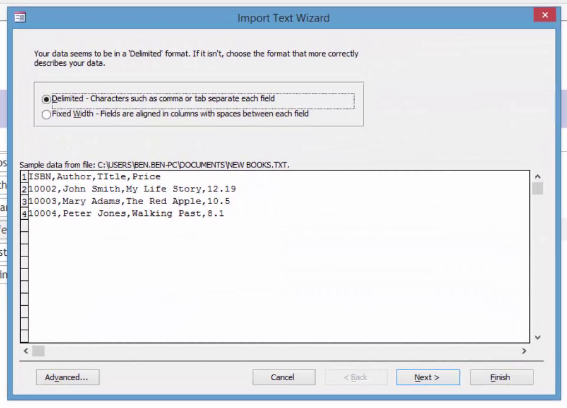
Find the data file on your computer by clicking the Browse button.
Next, tell Access how and where you want to store the data in your database. We're going to Import the source data into a new table.
You'll now see this window:
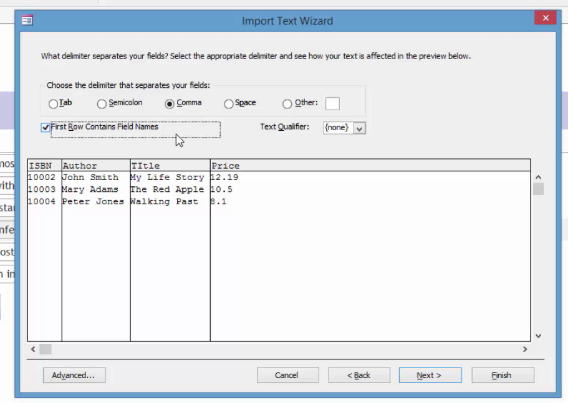
Now tell Access if you want it to use the first row as field headings, and click Next.
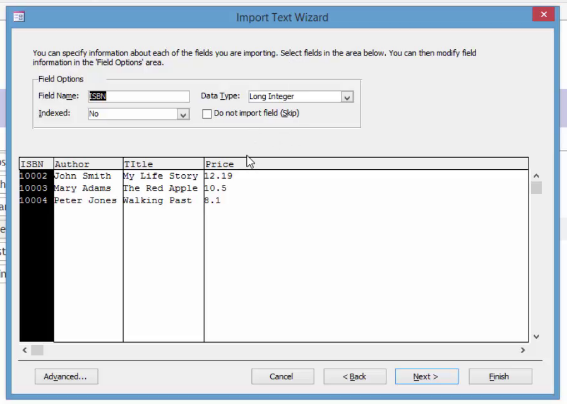
You can change field options on this screen, such as data types to be stored, and which fields can be skipped. If you don't want to change anything, click Next.
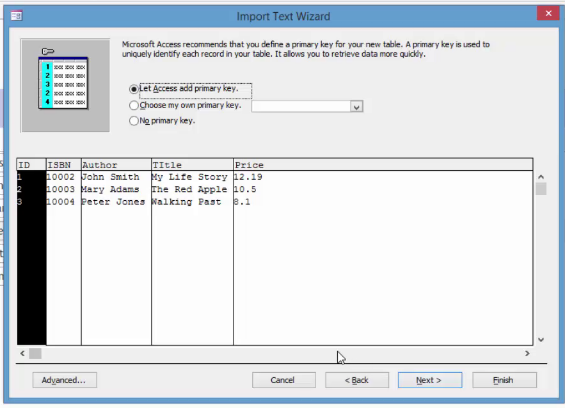
In the window above, you get to specify whether Access adds a primary key, if you do, or if you don't want to add a primary key. In this example, I've selected to choose my own primary key, which is ISBN.
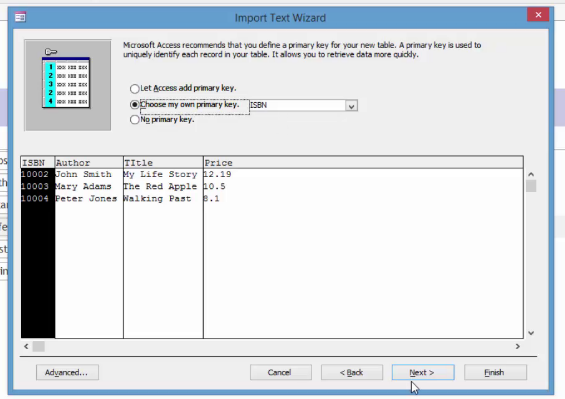
Click Next.
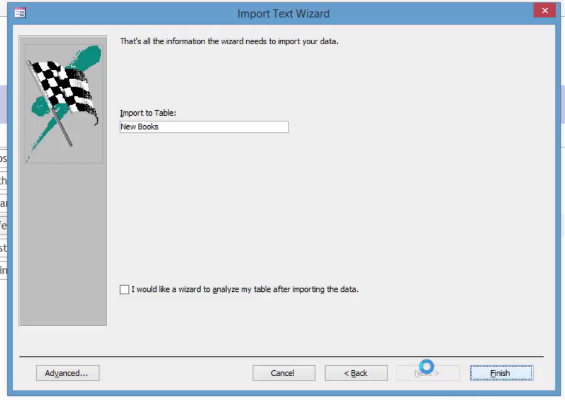
Now you can specify a name for the table, then click Finish.
This window will appear. You can save the import steps or just click Close.
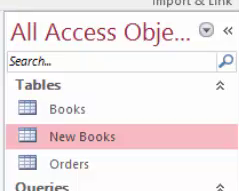
New Books now appears in the Tables section of the Navigation Pane, with your new data.
Export Data
When you want to export data, first open the database that you want to use. Next, go to the Navigation Pane and select the object that you wish to export. You can export data from tables, queries, forms, and report objects.
In this example, we're going to export the Books table.
Go to the External Data tab again. Select the type of data that you want to export to. We're going to choose Excel again, and we're going to export our Books table.
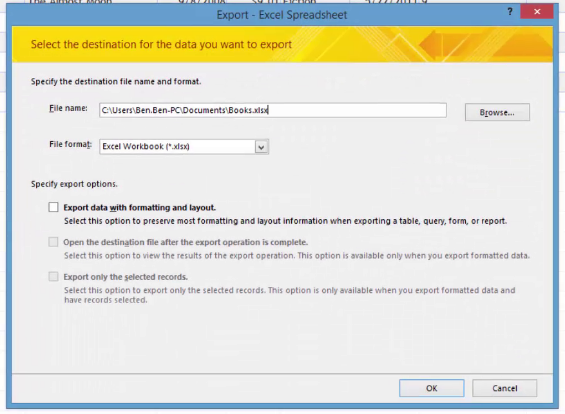
Let Excel know the name of the destination file. Then, select a file format, such as the Excel Workbook .xlsx format.
Then select an export option. We've selected Export Data with Formatting and Layout, and to open the destination file when completed. Click OK.
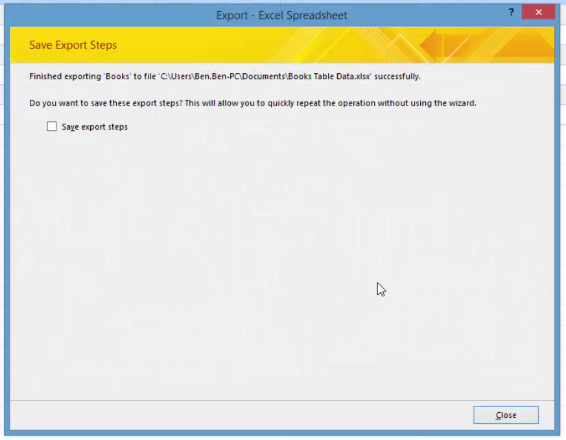
Your file is then exported. Once again, you'll have a chance to save your steps.