Using Calendars in MS Project 2013
In Project 2013, the calendar shows the various hours in a workday, the days in a work week, holidays, and nonworking days on which a project schedule is based. Project allows you to set Base, Project, Task, and Resource calendars. A resource is anything you use to accomplish a task or to advance (and complete) the project. Resources can be employees, equipment, etc.
How Calendars Work
It helps if you know the function of each calendar before you begin to use any of them. Part of successful project management is efficiency, so it is important to take the time to learn exactly what every aspect of this software offers you.
The four calendars Project gives you help you schedule and organize different aspects of the project. Also, the four calendars interact with each other to help you manage even the smallest aspect of the project.
-
The Base Calendar is the template calendar that all the other Project calendars are built from. There are three base calendars: Standard, 24 hours, and Night Shift. Standard reflects a default working day as 8 to 5 with an hour built in for lunch. This is Monday thru Friday. Twenty four hours allows work to go on around the clock, every day of the week. The night shift template sets the working times as 11pm to 8am with an hour for dinner and a Monday thru Saturday workweek.
-
The Project Calendar is the default calendar used for scheduling. It is also where you choose the Base calendar template that you will use for a project.
-
The Resource Calendar combines the Base calendar with any exceptions that you set for a resource. An example of an exception can be nonworking times.
-
The Task Calendar is where you can set exceptions for a certain task.
Whenever you create tasks and assign resources to them Project must base that work on a timing standard. For example, a workday, night shift, a week, etc.
An example is this: If you tell Project that a task will be completed in one workday, Project knows that a workday typically means eight hours. It can also be 12 or however many number of hours that you set up in your calendar. By the same token, if you set up a resource that will be used for two weeks of work, measuring weeks by a five day work week, it will show a timing of ten work days, not the standard 14 day period that typically comprise a two week period.
Just be careful. If you schedule a two week task, but the resource needed to accomplish that task is set for three weeks, the task will not show as completed after two weeks. It will be three weeks instead. This will all make more sense as we move forward and learn more about the program.
Setting Options and Applying Calendars
To start with, let's open the Project Calendar. Remember, this is where we choose the Base calendar that we'll use for a project. To access the Project calendar, go to Project>Project Information. You will see the following dialogue box appear:
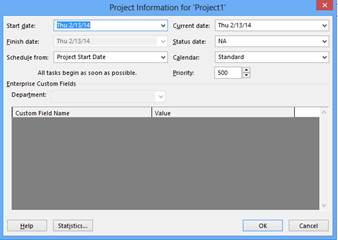
In the dialogue box above, you can choose the base calendar that you want to use in the Calendar field. You can also establish start and end dates for the project. Do not worry about anything else at this time. We'll discuss advanced options later, but for now you can set your calendar if you didn't do it when we entered in project information.
Click the OK button. This is the calendar that will now be used for your project.
Next, let's learn how to set options and make adjustments to Task and Resource calendars.
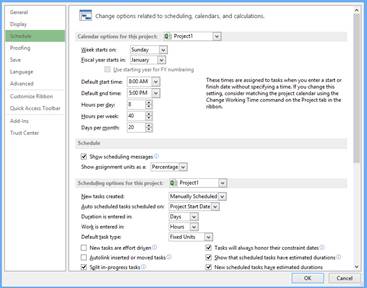
To do this, go to File>Options. Click Schedule on the left hand side.
-
To change the day the week starts on, go to the Week Starts On dropdown list to choose a day.
-
If you want to change the start of the fiscal year, go to the Fiscal Year Starts in dropdown menu and select a month.
-
You can change the work hours for a day by changing the Default Start Time and Default End Times.
-
You can also change the hours per day, hours per week, and days per month.
Click OK when you are finished.
Working with Task Calendars
If you want, you can make it so a task calendar uses a different base calendar that the one you chose for your project. When you do this, the task calendar that you use will overrule the base calendar for that particular task.
For example, if you choose the Standard calendar for your project, but a 24 hour task calendar, a task duration of 1 day would be 24 hours instead of one workday.
To change the calendar you use for a task, double click on the task name.
You will then see the Task Information dialogue box.

Click on the Advanced tab, then choose a new calendar from the Calendar dropdown list.
Click OK when you are finished.
Note that if you have a resource assigned to a task that has a modified calendar, the resource will only work during hours the two calendars (resource and task) have in common.
Modifying a Resource Calendar
You can only have a calendar for work resources. Material resources are charged by units used. To modify a calendar for work resources, display a view that shows the resource column, then double click a resource name.
You will then see the Resource Information dialogue box.
Make the changes you need to make, then click OK.
Setting Exceptions to Working Times
Let's say that on President's Day, you and your employees will only be working a half day. You can create an exception to the normal working time to reflect this.
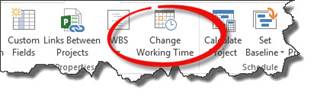
To do this, go to Project>Change Working Time.
This dialogue box will appear:
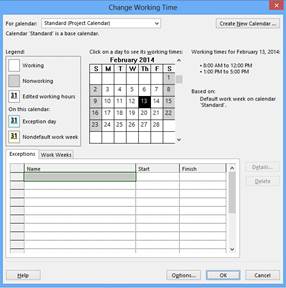
Locate the day on the calendar for which you want to create an exception.
Enter a name for the example in the Name field. Ours will be President's Day.
Now enter in start and finish work times for the day.
Click OK.
The Importance of Calendars
Organizing Tasks
In this article we are going to discover how to organize tasks to make them easier to manage in Project 2013 and as work commences on your project.
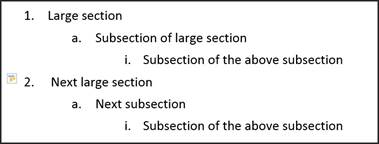
It helps if you think of your list of task as an outline. In an outline for a report, for example, you have an organizational structure that breaks larger sections of the report down into smaller sections until you've listed everything you want to include. Look at the outline we've created below.
Summary Tasks
The summary task is the captain of the ship, so to speak. It is the task that all your other tasks will fall under. Just like its name, it summarizes all the tasks that will be done. More often than not, it is also the title of the project and all other tasks will be born from it. A Summary Task does not have any work assigned to it.
To create a summary task, click to select a cell in the Task Name column. Typically this will be the very first cell under Task Name since summary tasks are above other tasks. If you already have a task listed first and want to insert a summary task above it, that's okay too. Just click to select the task that you want to place BELOW the summary task.
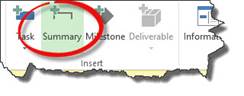
Next, go to Task>Summary, as pictured below.
As you can see, Project 2013 inserts the summary task.
Click inside the cell to name the summary task, as we did below.

Summary tasks have the little triangle to the left of them, as shown above. This arrow allows you to collapse the outline so you only see the summary task and not all the other tasks.
Below the summary task, you have your first parent task. Next will come subtasks. Do not worry if you are lost as to how to do this. You can indent and outdent tasks to organize parent tasks and subtasks.
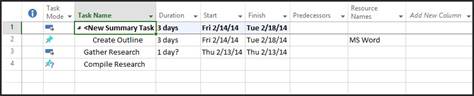
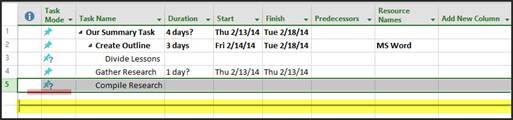
Let's look at our last snapshot again.

As you can see, when we created our summary task, it indented the Create Outline text, but not the other two that come below it. However, all three tasks (Create Outline, Gather Research, and Compile Research) are all parent tasks within our project, and we want them to be included under the summary task. What we need to do is indent the Gather Research and Compile Research tasks to make this happen.
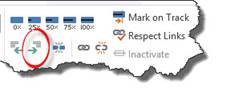
To indent a task, click the task to select it, then go to the Task tab under the ribbon.
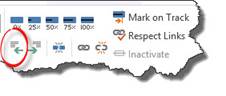
Click the Outdent Task button (circled above) to outdent a task, or move it to the left.
Click the Indent Task button (circled below) to indent a task, or move it to the right.
We've indented our tasks:

Creating Subtasks
Tasks (or parent tasks as we created in the last section) can be broken down into subtasks. When you create subtasks, you are basically creating a hierarchy of tasks.
For example, in our example, we entered "Create Outline" as a task. We may want to enter subtasks. These are tasks that will occur during the time frame of the "Create Outline" task and relate to the completion of the task.
To insert a subtask, first we are going to click to select the task that we want to appear BELOW the new subtask. When we create the subtask, in other words, it will appear above the task we selected. Right click on the task and choose Insert Task from the menu, as shown below.
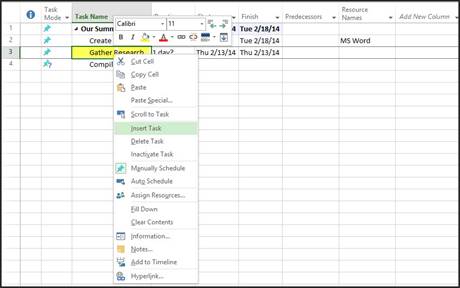
You will now see the new task:

Click in the cell and start typing the name of the new tasks. Our subtask for "Create Outline" is named "Divide Lessons."
Now, click the Indent Task button on the ribbon to indent the task and make it a subtask of Create Outline.

When you create a parent task with subtasks, you've created a family of tasks. In Project, this is called a phase. You can have as many phases as needed in a project.
Most projects will not go according to plan. That's not necessarily a bad thing, but when it happens, you need to know how to adjust your plan as well as the information you have recorded in Project. This may mean that you need to move some tasks around.
If you need to move a task further up or lower down on your outline, use the click and drag method and these steps:
-
Go to the Gantt Chart view.
-
Select the task you want to move by click its ID number (1, 2, 3, 4, etc.). Click and release. Do not hold down the mouse button.
-
Click on the dark border around the task row, as highlighted in pink below. Hold the left mouse button down and drag the task to where you want it.
-
A gray line will appear that shows the new task position, as highlighted in yellow below.
Let go of your mouse button to move the task.
The WBS code, or work breakdown structure code, is simply a code that is applied to your outline of tasks that makes different elements of your project easier to identify. These codes are automatically generated for you so that each task has a unique identity that is based on the order that it appears on your project.
Here's an example. The second task in the second phase of a project has the WBS code 1.2.2. This means that the task belongs to the first phase (all tasks do), is in the second phase, and is the second task.
To view the WBS code in your project:
Go to the Gantt Chart view.
Go to the "Add New Column" column, and look at the dropdown menu.
Select WBS.
You can see the WBS code in the snapshot below. We've highlighted it in yellow for you.