New to Slack?

Even if you just want to try Slack without a financial commitment, you can create a server for free and upgrade it later to a pricing plan that better meets your company. When you create a new server, you get a URL where you can manage and use your new Slack server. You can use the free plan and later upgrade should you determine that the server will help the company improve productivity and communication.
Creating a Slack Server
The first step in getting started with Slack is to create a new server. Before you create the new server, you should choose which email address that you want to use to link the account. If it's for a corporate account, the administrator should be a trusted employee and a business account used.
To create a new server, open a browser and navigate to the following Slack URL:
https://slack.com/create#email
Notice that the first step in creating a server is adding the administrative email. If this is a business server, using a business domain email will ensure that the server can be recovered if the employee leaves the company. Email administrators can redirect email from the original administrator email to a new one.
Type an email address where administrative message will be sent and then click the "Next" button to move to the next step. Before you can continue, you must verify the email address that you entered in the previous step. The next window displays a message to check your email account for a six-digit code Slack sent for verification.

It might take a few minutes for the email to arrive to your inbox. If you do not see the message within a few minutes, check the email account's spam box. Sometimes, messages will get sent to a spam box, and users must notify the email provider that the message is not spam. After you type the code into the web form, Slack automatically brings you to the next step.
The next step is to give your new Slack server a name. Slack asks you for the name of the company or team that will be using the server. This name will be shown in the server when users access it.
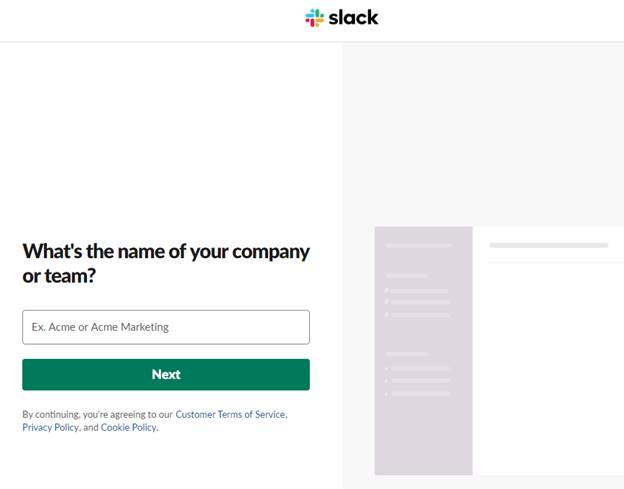
You can type any name that describes the business as a whole, or if you are using a server for internal department communication, you can describe the team that will be working with it. After you finish typing in a description, click the "Next" button to move to the next step.
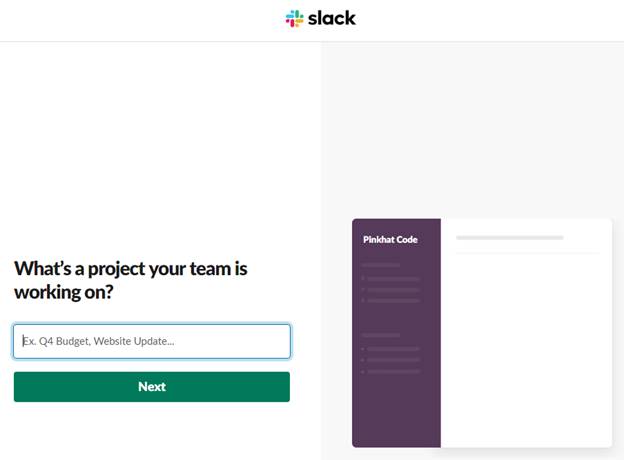
The next step is to describe the company or the project that the server will target. This can be anything that describes the server, but it cannot be left blank. Click the "Next" button to move to the next step.
The next step is to invite other team members. This step can be skipped if you don't know who you want to invite just yet. Don't worry. You can always invite other members later. These individuals can be someone within the company or another users outside of the company such as a vendor or contractor.
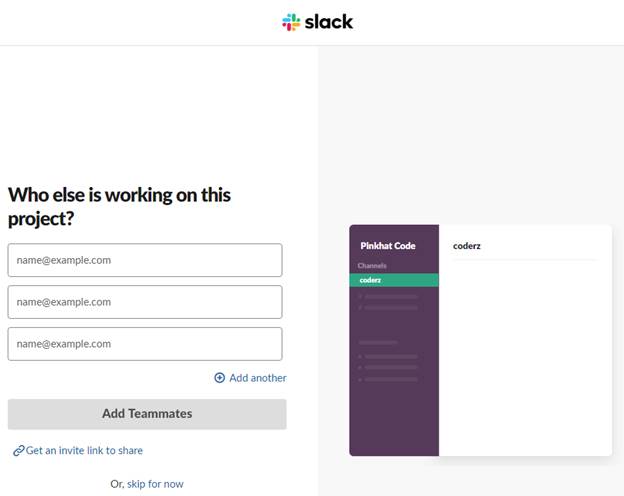
Any email addresses that you add in the text boxes will receive an invitation to join the server. If you choose to invite team members now, enter email addresses and click "Add Teammates" to send the invitation. You can get an invitation link to manually send to other users by clicking the "Get an invite link to share" instead. If you want to skip this process, click the "Skip for now" link at the bottom.
The next window shows a dropdown where you indicate what type of work your team or company does. In this example, "IT" is chosen from the dropdown. After you choose a company function, a list of optional cloud plugins is displayed. The items displayed can be easily integrated with Slack.
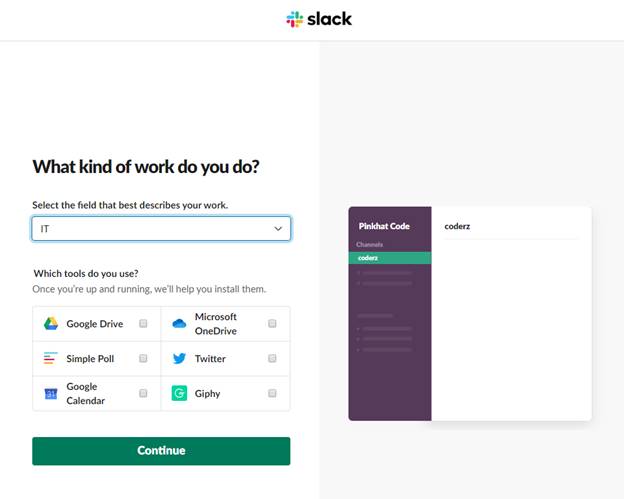
You don't need to choose any of these applications right now, but if any look interesting, check the boxes and click the "Continue" button. Any applications checked with be integrated into your Slack server when it's created.
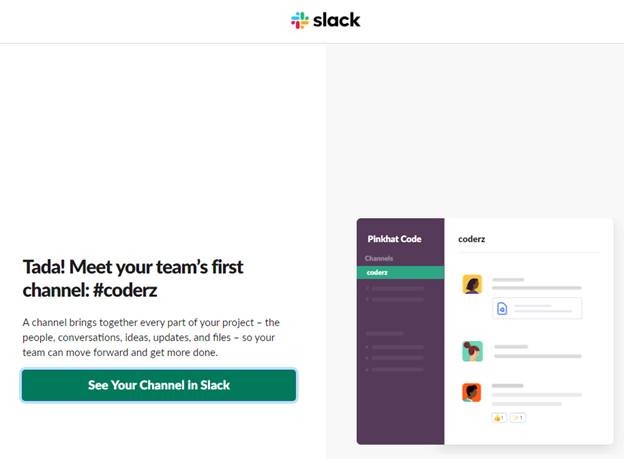
After you click "Continue," you receive a final confirmation that the Slack server was created, and you can now access it. Slack creates the initial channel based on the project name from a previous step. Click the "See Your Channel in Slack" button to open your new Slack server.
The tab in your browser navigates to the new Slack server, and you get a first look at your new server and the interface options. On a free pricing plan, you have limited options, but the interface buttons, images and tools are the same across all Slack pricing plans. The main difference between free plans and paid plans is the amount of space available for each user and the number of integrated tools that can be added to the server.
After the server is created, users can access the server from a web browser in the desktop or using the official Slack app. Slack is available as an app in the Apple Store for iOS or on Google Play for Android devices. If you choose to add the app to a mobile device, remember that any private messages and notifications will be sent to the device.
Basic Interface Components in Slack
Slack has a standard interface for every server, channel and user. It's this standard interface that makes it easy for users to go from server to server without the need for training. It's always the same regardless of the company the user works for. After you sign up for a new server, Slack opens a tab and you enter the server chat. You'll notice a panel on the left and the center chat section. The main interface panel is on the left side of the window.
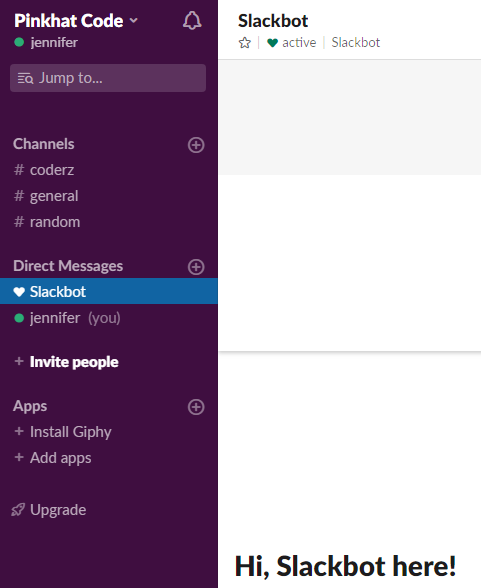
Notice that the top section of the left panel has the server name. Underneath the name of the server is the name you gave yourself when you signed up. This is your username that displays to other users who are in the Slack server.
The green dot to the left of your username tells people if you are online, offline or idle. In this example, the dot is green. A green dot indicates that the user is online. If you walk away from your computer for a time and have no activity in the Slack window, the dot will turn orange. An orange dot next to a username indicates that the user has the Slack tab open or the mobile app is running on a device, but Slack has not detected any mouse movements or typing. If the circle is transparent with no color, then you know that the user is offline. Offline indicates that no Slack tabs are open on the user's computer, and the user closed the Slack app on a mobile device.
Under the server name and your user account name is the list of channels that you've created for the server. When you initially create a Slack server, a general, random and customized channel are created. In this example, the channel "coderz" was created from input during the Slack server creation procedures. This is the name you gave the custom channel, but as the administrator, you can always change this name later. The "general" and "random" channels shown in the interface are created automatically by Slack. As the administrator, you can configure channels to only be available for certain people such as departments or teams involved with specific projects.
The next section in the left panel is the "Direct Messages" section. Your own username always shows in this section. You can identify your own username in this list because Slack shows "(you)" after your own account. Any users that you have conversed with in Slack will be shown in this section. As you message users in your Slack server, Slack logs and archives them so that you can always search and return to a specific chat conversation. For free accounts, you are limited to the number of messages that you can search, but paid versions will let you search tens of thousands of messages for information in both public chat sections and in your private messages.
Slack has its own bot installed with every new server creation. The "Slackbot" username that displays in the list of users can help you with new installations, configurations and any questions that you might have as you configure the server. If you indicated that you wanted third-party tools when you set up the Slack server, Slackbot prompts you to install the third-party application once the server is set up.
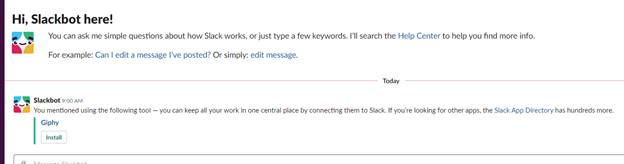
In this example, the Giphy app was checked during the Slack server creation process. Because this app was checked, Slackbot sends a message to the administrator to install the Giphy app in private messages. Giphy is a fun third-party app that lets users search for images related to a topic and posts it to the Slack server.
As your server ages, you'll have employees start and leave the company throughout the year. If you don't remove users, they will be able to read all messages until you delete the account from server access. The "Invite people" link opens a window where you can invite additional users to your server. After you invite people and they join the server, you can then configure them as a standard user or an administrator. You can give the user permissions to manage certain features of your Slack server. You can also add each user to channels where they should be able to interact with people in the specified channel group.
The "Apps" section displays the apps you've already installed or can install on the server. Just like the Slackbot private message, the apps checked off as apps of interest during the server creation process are shown in this section. Because Giphy was selected during the example server setup, the Giphy app is shown in the "Apps" section with a prompt to install the software.
Since this is the free version of Slack, the "Upgrade" link displays prompting users to upgrade to a paid version of the application. Small businesses and individuals can probably get away with a free version without too many limitations, but most businesses will need to upgrade to a paid version of Slack to allow for larger storage spaces and message archiving. The administrator can also search a larger collection of archived messages with a paid version.
Chatting in Slack
Slack is an enterprise chatting system, so the main feature available to users is chatting with other server users. When a user first enters the server, a message is sent to everyone in the general channel to let everyone know the user joined. When an administrator creates a new server, the first user to enter the server is the administrator account.

The input text box at the bottom of the window is where you type your messages. The message text box tells you what channel the message will be posted to after you send it. Anyone who has access to the channel will be able to read it.
The paperclip icon is what you click when you want to upload a new file to the Slack server. The file is stored on the corporate Slack storage space allocated for your company. On the right side of the message input box, the "@" symbol can be used to open a list of users who can be "pinged." Pinging a user means that you send them a notification that indicates you're posting a public message but need the user to see the message. Slack also lets you ping the channel (@channel), everyone online at the time (@here) or everyone on the server (@everyone).
Once you get used to Slack's interface, messaging users and chatting with people are easy. With Slack's ease-of-use, you can boost productivity and improve communication across all departments, teams, and the company as a whole. With Slack, employees can get answers and ask questions instantly without waiting for an email or making voice calls.