QuickBooks Online creates all sorts of forms. When creating forms that you and your customers view, it is important to make sure that they look good. A well-designed form will make your company stand out above others.
In this article, we will take a look at how you can customize forms. You will see all the options available and see how the master form style works and also how default template files work.
Additionally, you will learn about importing your own template files from Word. You will see how you can use special fields to make your template compatible with QuickBooks Online.
The Custom Form Styles Page
To start customizing forms that your customers will see, click on the gear-shaped Settings icon in the Header, then go to Account and Settings under the Your Company heading.
Click on the Sales tab and then on the Customize Look and Feel button.
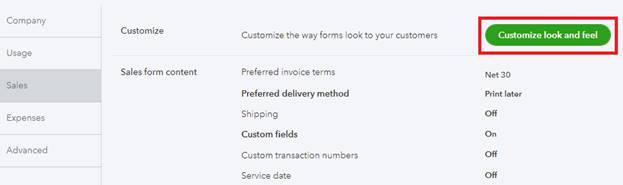
[Figure: Finding the Customize Look and Feel button]
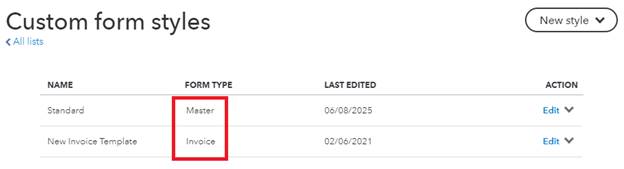
That will open up the Custom Form Styles page. Here you will see a list of saved styles. The default style is named Standard. This form is used for invoices, estimates, and sales receipts.
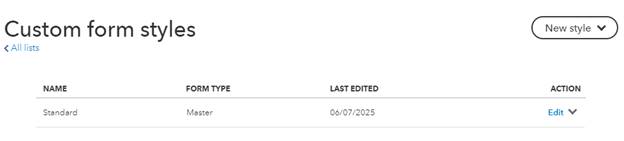
[Figure: Custom form styles list]
In the list, you can see columns for Name, Form Type, Last Edited, and Action.
You can edit the standard form if you just want to make minor changes while having all the templates look the same.
You can also create separate styles for invoices, estimates, and sales receipts. To start making a new style, click on the New Style button at the top right. The New Style button is a dropdown, so you will choose between an invoice, estimate, or sales receipt.
Making a New Invoice Form Style
First, let's make a new invoice. Choose Invoice from the dropdown and then the new invoice page will show up.
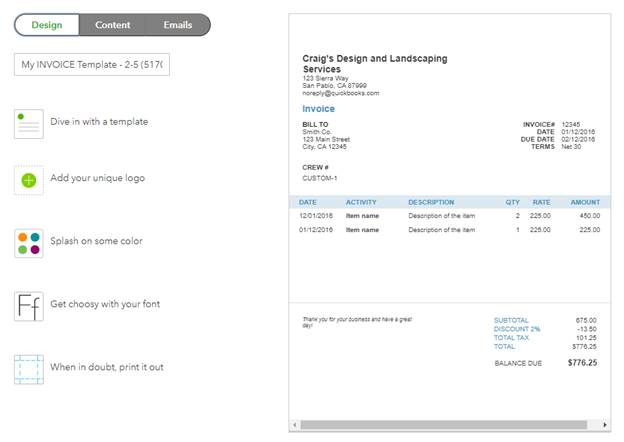
[Figure: A new invoice style]
The tabs at the top left let you switch between different settings. You can switch from Design, Content, and Emails.
Design Tab
At the top of the Design tab, you can name your template. Directly below, you can choose from several different premade styles in the Change Up the Template section. These include Airy New, Airy Classic, Modern, Fresh, Bold, and Friendly. Clicking on any template will let you preview it on the right.
Below the Change Up the Template is the Make Logo Edits section. Here you can add a logo and choose whether you want the size to be small, medium, or large. You can also align it to the left, right, or center. You can delete the logo by clicking on the plus button and then hovering over the logo and clicking the X icon. You can also just hide it by clicking where it says Hide Logo.
The next section is called Splash on Some Color. Here you can select a highlight color that will change header fonts and table background colors. If your company's color is not in one of the presets, then you can enter its hexadecimal value into the textbox. You can also search online for more colors based on hexadecimal values.
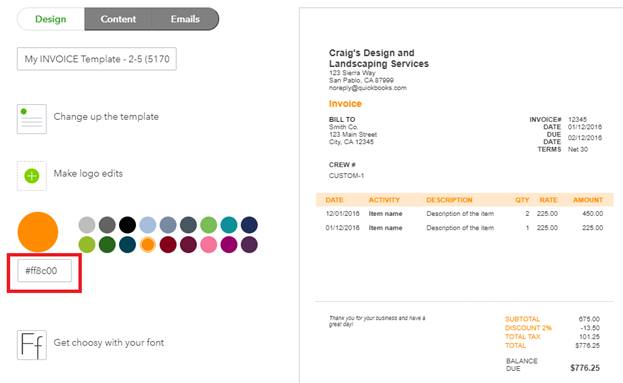
[Figure: Adding a custom color using hexadecimal values]
The next section is titled Select a Different Font. You can choose between Helvetica, Arial Unicode MS, Courier, and Times New Roman. You can also change the font size from here.
The last section in the Design tab lets you edit print settings. You can set the page margins, fit it to a window envelope, or use letterhead paper.
Content Tab
The content tab lets you make direct edits to the form. The form is divided into three sections: the header, the table, and the footer. Click on the pencil icon next to the section that you want to edit.
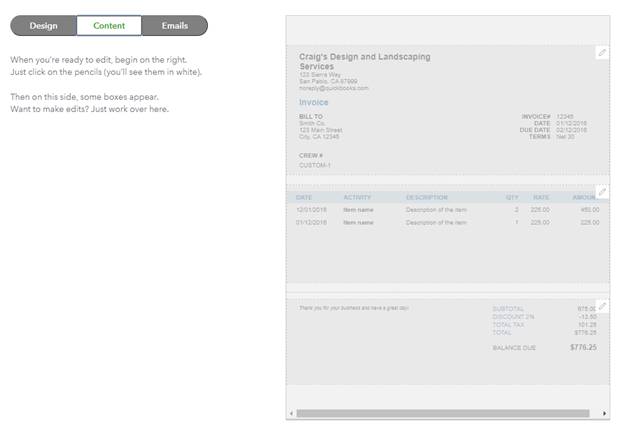
[Figure: The Content tab]
Header
In the header, you can edit the business name, phone number, and email. You can also add an address or website by clicking on the plus symbol next to each. You can also choose to not show any of those by unchecking the box next to each.
You can also change or not show the name of the form, so it does not have to be called an "invoice." Form numbers and custom transaction numbers can also be shown or hidden.
Also in the header, you can choose whether or not you want to display the billing address, shipping, terms, and due date. Lastly, you can add custom fields by clicking the plus icon next to the custom fields text.
Table
The Table section shows the line items of the invoice, along with a few other pieces of information.
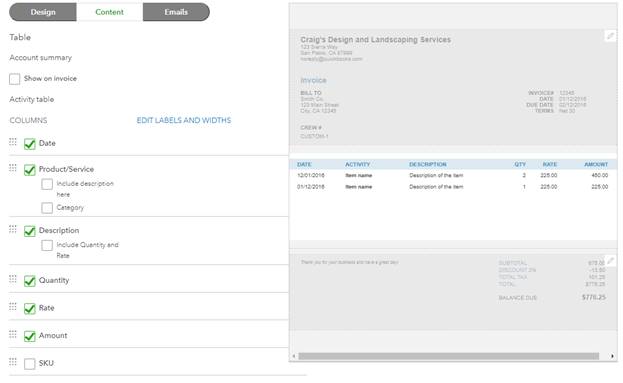
[Figure: Editing the Table section]
In the table section, you can start by deciding whether or not you want to show the account summary. Checking this will include the account summary table above the main table. It has the balance forward, new charges, and total amount due.
Next, you can choose with columns you want in the activity table. The available columns are Date, Product/Service, Description, Quantity, Rate, Amount, and SKU. Within the Product/Service column, you can also choose to include the description here instead of in its own column, and also decide if you want to include the category. In the Description column, you can choose to include the quantity and rate. If you select it here, it will also show up in the Product/Service column if you select to include the description there.
In addition to selecting each column, you can also change the order in which they appear by dragging the icons at the left of each one. Clicking on the Edit Labels and Widths also allows you to rename each column and set its width with a slider.
At the bottom, there are a few more options for activity. One is that you can group the activity by either day, week, month, or type. Grouping by week will ask you to specify the day of the week to start on.
Another option is to collapse activity rows. That will combine rows that have the same rate and description while omitting dates.
Some other options are to show progress on line items in email invoices, show markup on billable expenses, and show billable time along with the employee name with hours and rates.
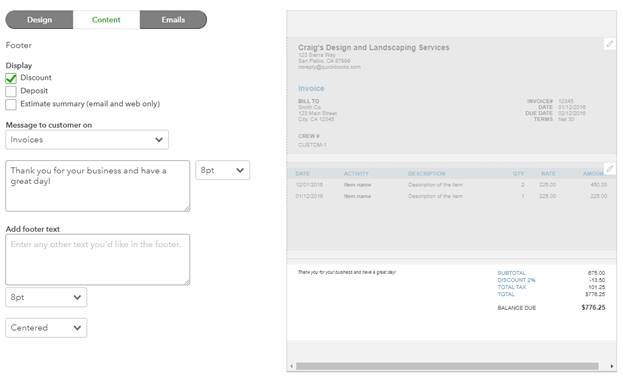
Footer
Clicking the pencil icon in the footer section will let you change how the customer sees the balance due and also adds spaces for leaving messages to customers.
[Figure: The footer in the Content section]
Display
The display section lets you choose if you want to display a discount, deposit, and estimate summary. The estimate summary only shows up on email and web invoices.
Message to Customer
In the message to customer section, you can enter a message to the customer and specify the font size that you want it to be in. This is a good place to write a thank you note or personalize note.
Add Footer Text
Finally, you can add some text at the very bottom of the footer. You can specify the font and align it to the left, right, or center. This can be a good place to write legal information.
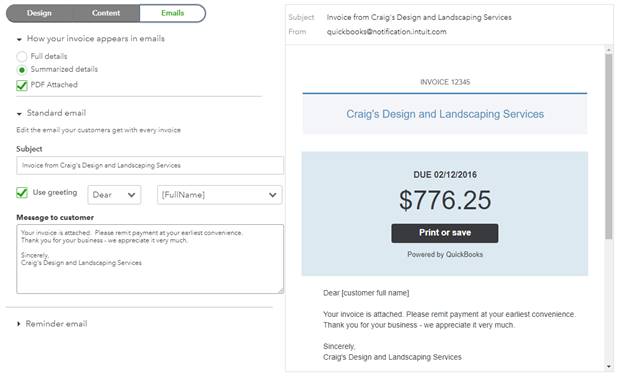
Emails
In the Emails tab, you can customize how the invoice will look in emails.
[Figure: Emails section]
How Your Invoice Appears in Emails
At the top of this section, you can choose how the invoice will appear in emails. You can choose to show the full details or summarized details. The full details will show all of the line items in the invoice. Also, choose if you want to attach a PDF of the invoice.
Standard Email
In the standard email section, you can first edit the subject line of your email.
Then, you can decide if you want to use a greeting at the top of the body of the message. If you do, you can choose to begin with "To" or "Dear" or just leave that part blank.
You can then choose how you will enter their name. You can choose to write their full name, their first then last name, their title plus last name, just their first name, their company name, or their display name.
In the Message to Customer field, you can edit the text in the body section of the email.
Reminder Email
In the reminder email section, you can make the same edits as you did in the Standard Email section. The subject and the body message are slightly different by default.
Preview and Finish
When you are all finished, you can preview and print the final invoice by clicking the Preview PDF button at the bottom of the screen. When everything is satisfactory, click the Done button.
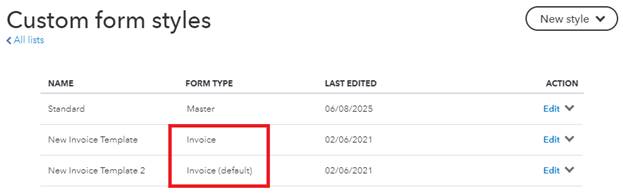
You will now see the new template that you made in the form styles list. Under the Form Type column, it will say Invoice while the original form style says Master.
[Figure: The new form in the form list with its form type]
In the list, you will notice that the Actions are different for each form type. With the Master form type, you can only choose Edit or Preview PDF in the Action field. With the new Invoice form, you have the options of Edit, Preview PDF, Rename, Delete, and Make Default.
Editing will open up the Customize Forms page where you can edit the form just as you did when you created it. The Preview PDF will open up a PDF page where you can download or print the PDF file. Rename and Delete both open up windows to perform their respective operations.
Make Default lets you choose which style is the default for each form type. To see how Make Default works, create another Invoice form style just as done above and save it. Afterward, select one of the invoice styles to be the default.
[Figure: Making a default invoice style]
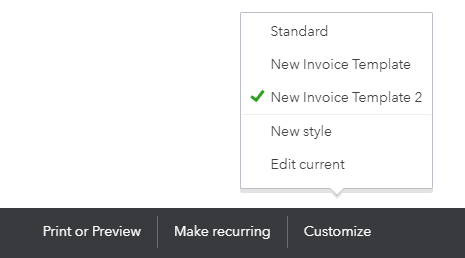
The default invoice style will say "default" next to it in the Form Type column. To see how this affects a new invoice, click on the New button in the left-side Navigation Pane and then choose Invoice under the Customers heading.
At the bottom of the new invoice form, choose the Customize button. You will see that the same styles that are in your Form Styles list pop up, as well as the options to make a new style and edit the current one.
[Figure: Choosing the form style in a new invoice window]
You will notice that the form style that you set to default will have a green check next to it to show that it is the active style. You can choose a new style for this invoice by selecting it here.
Using the Master Form Type
Editing the Master Form Type means that all other forms will inherit its features. For example, click on Edit in the Action column for the master form. Change the color to something distinctive and then click the Done button at the bottom of the screen.
Back at the Form Styles list, click on the New Style button and choose Invoice. When the window pops open, you will see that it has the same colors as your master form type. You can do this with any of the fields in the master, and the changes are inherited to any new form style.
Making a New Estimate or Sales Receipt Form Style
Making a new form style for estimates is nearly identical to making one for invoices. Click on the New Style button and choose either Estimate or Sales Receipts. Once the Customize Forms window opens, the only difference is that in the Email tab, there is no section to create reminder emails for these types of forms.
Importing Custom Form Styles
Even though QuickBooks Online gives you some professional-looking templates, you may want to import your own templates. This is possible by designing your own template in a .docx file and importing it. You can then edit your own template like you do with other native QuickBooks Online form styles.
To make the import process work, you need to use EZ Map Fields. These are pieces of text enclosed in angle brackets. When imported, QuickBooks Online knows to map those parts dynamically using its own information. For example, <companyname> in your template will be replaced with the company's name in QuickBooks Online.
A full list of EZ Map Fields can be downloaded from Intuit's website. Some of the most common include:
|
EZ Map Field |
Description |
|
Scalar Fields |
|
|
<companyname> |
Company name |
|
<companyaddress> |
Company address |
|
<companytin> |
Company Tax Identification Number (TIN) |
|
<businessnumber> |
Company Business Identification Number |
|
<companyemail> |
Company Email |
|
<companyphone> |
Company phone |
|
<companywebsite> |
Company website |
|
<customername> |
Customer name |
|
<billingaddress> |
Billing address |
|
<duedate> |
Due Date/Expiry Date |
|
<billingtaxnumber> |
Customer's Tax Registration number |
|
<shippingaddress> |
Shipping address |
|
<shipdate> |
Ship date |
|
<shipvia> |
Delivery/Ship via information |
|
<trackingno> |
Tracking number |
|
<message> |
Message displayed in invoice |
|
<duedate> |
Due Date |
|
<invoiceno> |
Invoice Number |
|
<date> |
Invoice Date |
|
<terms> |
Terms |
|
<custom1> |
Custom Field 1 |
|
<custom2> |
Custom Field 2 |
|
<custom3> |
Custom Field 3 |
|
<purchasesalelocation> |
Place of Supply (POS) |
|
<exchangerate> |
Exchange Rate |
|
<amountdue> |
Total amount due/Balance due /Account balance |
|
<dueamountinwords> |
Amount due in words |
|
<subtotal> |
Subtotal |
|
<discountbeforetax> |
Discount before tax |
|
<discountaftertax> |
Discount after tax |
|
<totaltax> |
Total tax/taxes |
|
<shippingcharge> |
Shipping charges |
|
<total> |
Invoice total due |
|
<amountpaid> |
Amount Paid/Payment |
|
<deposit> |
Deposit/Pre-payment/Down payment |
|
<totalofnewcharges> |
Total of New Charges |
|
Table Fields |
|
|
<srno> |
Row number |
|
<item> |
Item/Product/Service |
|
<itemdescription> |
Item, Product or Service Description |
|
<amount> |
Amount/Line total |
|
<qty> |
Quantity |
|
<rate> |
Rate/Price |
|
<servicedate> |
Service date |
|
<lineitemdiscount> |
Discount |
|
<tax> |
Tax/Taxes |
|
<sku> |
SKU |
|
<uqc> |
Unit Code/UQC |
|
<itemclassificationcode> |
HSN/SAC |
|
<accountsummaryamount> |
Account summary amount/balance |
|
<accountsummarydate> |
Account summary date |
|
<accountsummarydescription> |
Account summary description |
|
<acceptedby> |
Accepted by this person |
|
<accepteddate> |
Date Accepted |
In the EZ Map Fields, there are scalar fields and table fields. Scalar fields are independent and do not repeat. They should not be placed in the same table with table fields. They typically go in the heading section of the form.
Table fields can repeat and fit together as a group, such as a list of products. They go inside of tables such as the Activity Table or Account Summary fields.
Intuit also has sample files available online of invoices. You can use these files as starting points to see how to create your invoices.
When making your own templates, you should aim to use simple rows and columns. The supported fonts are Arial Unicode MS, Courier, Helvetica, Times, Symbol, and Zapf Dingbats. Additionally, files with audio, clip art, word art, animated GIFs, embedded files, hidden links, merging fields, files over 2 Mb, or older MS Word files that are not .docx.
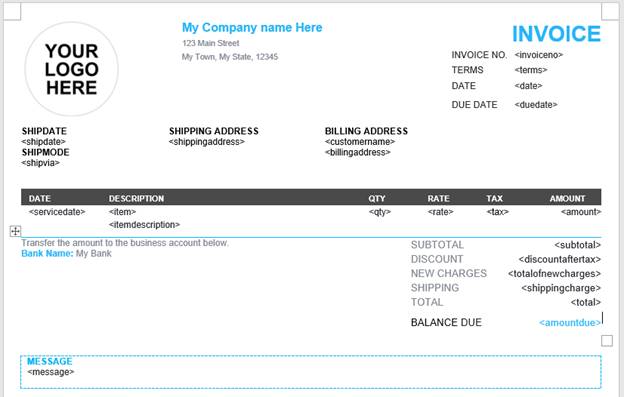
[Figure: An invoice template in Word with EZ Map Fields]
Once you have edited your template file with the correct EZ Map Fields, you are ready to upload it to QuickBooks Online. Before doing so, you need to enable importing custom form styles. You can do this by clicking on the gear-shaped Settings icon in the Header and then going to QuickBooks Labs.
On the QuickBooks Labs page, enable the Import Style plug-in.
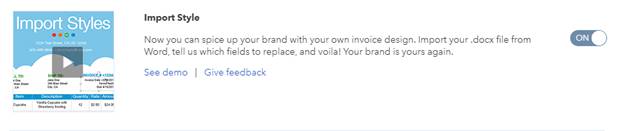
[Figure: Enabling the Import Style plug-in]
Now, when you click on the New Style button, you will see the ability to import a style from the dropdown.
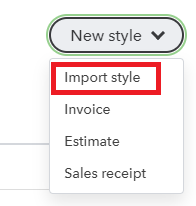
[Figure: Starting to import a style]
This will start a wizard that will first ask you if you want to create an invoice or an estimate. For this example, you will check Estimate and then click continue.
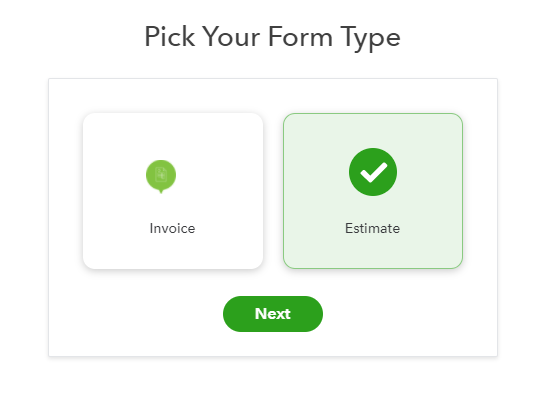
[Figure: Starting the import form template wizard]
The wizard will then give you some additional information about importing estimate style. Find the template file that you made previously and click the Browse button in the field where it says to upload your Docx file. Once you have selected the file, click on the Next button.
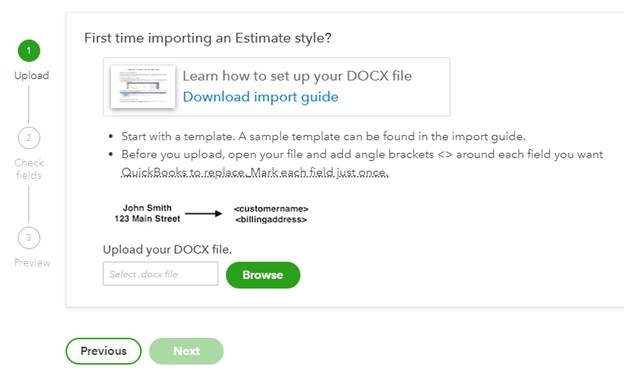
[Figure: Step 1 in importing an estimate style]
Next, the wizard will check if your file is formatted correctly. It will load a table that shows the fields in your file and their matching QuickBooks field. If everything matches, you will see a window that says "success" and the ability to map the fields will be grayed out. If you want to make changes, check the box that says I Want to Map My Template Fields. If not, click the Next button to continue.
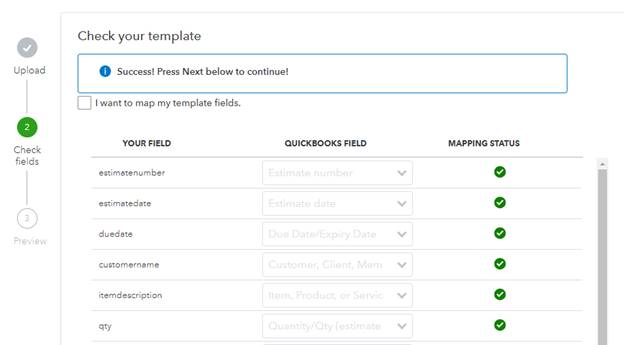
[Figure: Finishing the 2nd step in importing an estimate.]
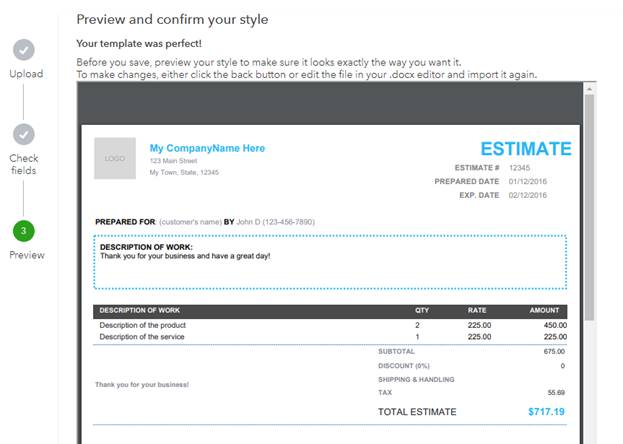
In the last step, you can preview your template to make sure that everything looks satisfactory. If there are any layout problems, you can go back to your template and try to simplify it and do this process again to see how it looks. If everything is fine, click on the Save button at the bottom.
[Figure: Step
Lastly, you will be asked to save the style. Give it a name and click the Save button again. Now, your template will show up in the Custom Form Styles. You will not be able to edit it in the Action menu, however, you can preview it, make it the default, rename it, and delete it.
Conclusion
In this article, you learned about making custom for styles. You saw that you could make styles for invoices, estimates, and sales receipts. You saw all the options that are available when making templates, in addition to learning how master and default templates work.
In addition, you learned about importing your own template files. You saw that there are special fields that are mapped from your template to QuickBooks Online's data.