Once you have Project 2016 installed, go ahead and open it on your computer. When you open Project 2016 for the first time, you have a few choices in how you want to get started. You can open a project you recently opened with Project. You can also start a new project.
When you open Project, you will see this window:
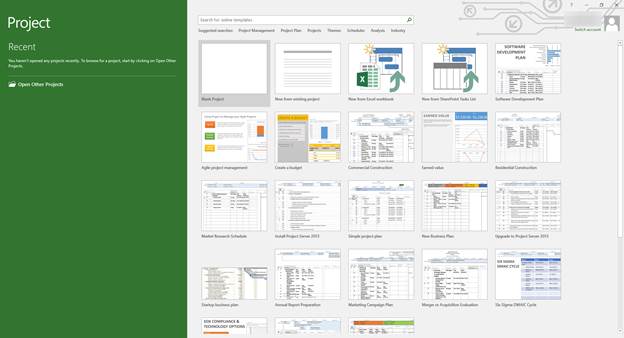
Any recent projects will be listed on the left under "Recent". You can also open other projects that are saved on your computer or on your OneDrive by clicking "Open Other Projects" on the left.
Any project that you create in Project will begin with a template, even if it's a blank template. A blank template doesn't have any graphics, formatting, or anything place. It's just a blank, empty project. However, it is still a template.
You can see the blank project template highlighted below.
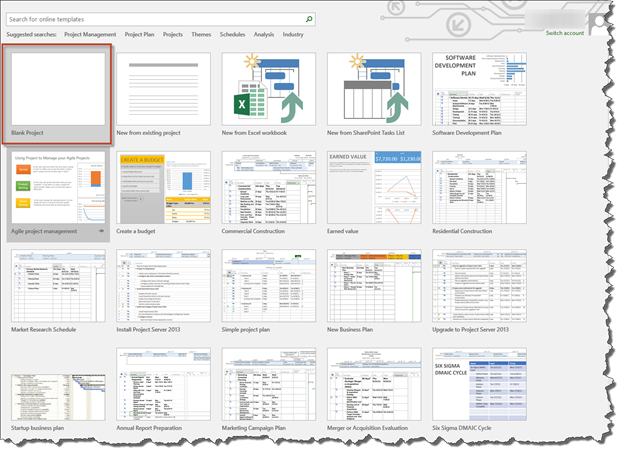
You can also choose predesigned templates that already have formatting and other features added. You can choose pre-designed templates by category - or by the type of project. In addition, you can create a project from an already existing project, an Excel workbook, or a SharePoint task list.
Use the search box above the thumbnails of the templates to search for one you want.
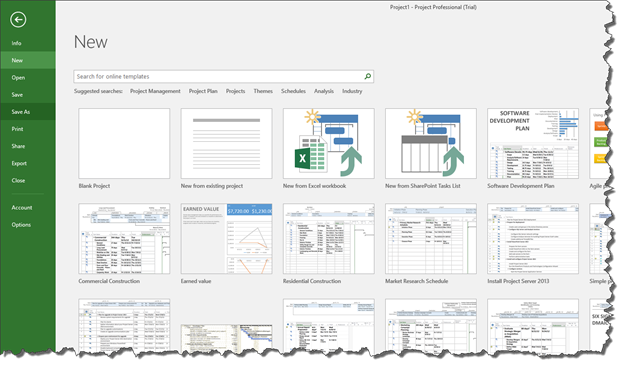
When you want to start a new project in Project 2016, you have two choices. You can either open a template or open an existing project. To open a new project, you can do so when Project first opens, or you can do so by clicking on the File tab in Project.
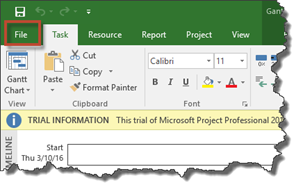
The File tab takes you to the Backstage View.
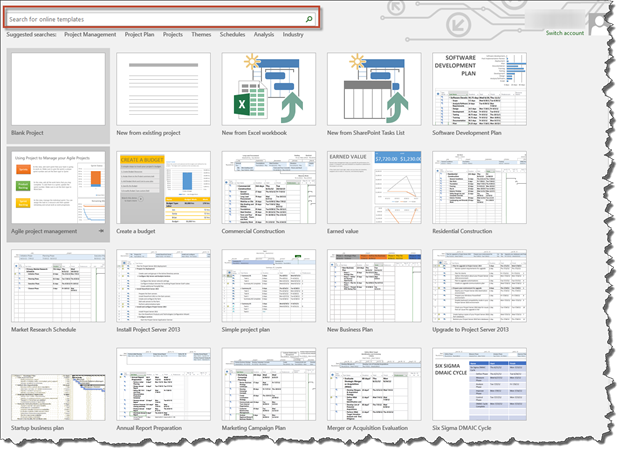
Click New in the column on the left, and you'll see the templates.

To start a new project, click on a template. We are going to click on Blank Project.
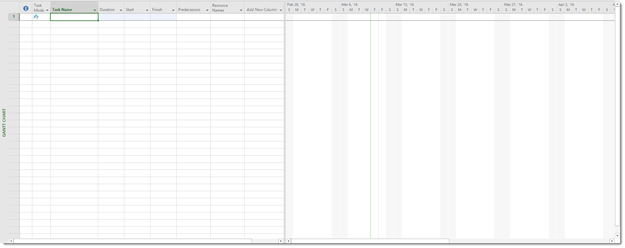
Project 2016 then opens, as shown below.
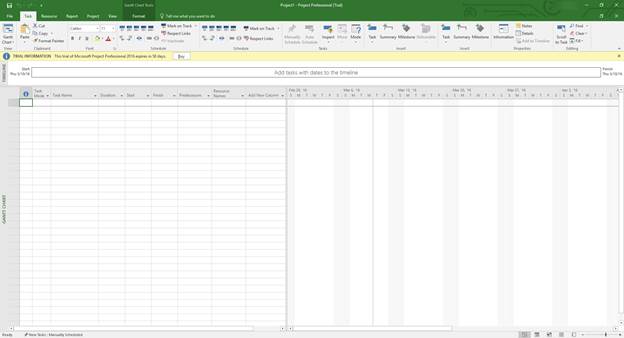
When you open a new project, the project will open in Gantt Chart view by default. The project is blank. All you have to do to get started is start entering tasks for the new project.
When you create a new blank project, you will see the Project window on your screen. It looks like this:

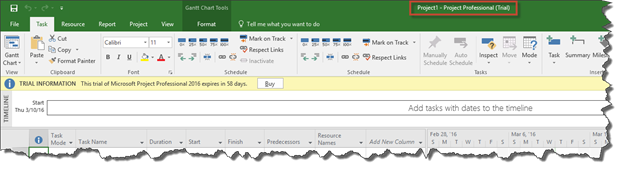
At the top left of the Project window, you will see the Quick Access toolbar, a feature shared by all Office products. We've highlighted the Quick Access Toolbar in yellow below.
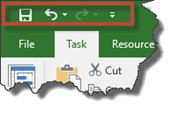
The Quick Access Toolbar gives you fast access to the tools that you use the most. For example, if you use a certain tool a lot, such as the Cut tool, you can add that to the Quick Access toolbar rather than having to use the Ribbon each time. In other words, you can choose which tools appear in the toolbar.
By default, the Quick Access toolbar contains shortcuts for the Save, Undo, and Redo features. However, you can customize the toolbar to display shortcuts for the tools you use the most.
To customize the Quick Access Toolbar, click the dropdown menu to the right of the toolbar. It looks like this:

When you click on it, you will see a dropdown list.
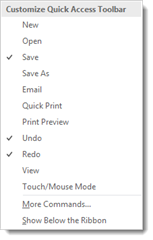
Click on the tools you'd like to add to the Quick Access Toolbar. The tools that have a checkmark beside them are tools that already appear on the toolbar.
By the same token, when you click on a shortcut, it will put a checkmark beside it, letting you know it appears on the Quick Access toolbar.
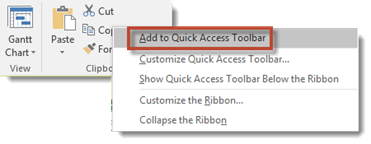
If you want to add a shortcut for a tool that doesn't appear in the dropdown list, go to the Ribbon, then follow the following steps.
- Find the tool that you want to add. Right click on the tool. In this example, we're going to add Copy under the Task tab. Click on the Task tab, then right click on the Copy button.
- Select Add to Quick Access Toolbar.
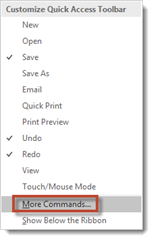
If you want to move a command button in the toolbar to a different location or group it with other buttons on the toolbar, click the dropdown menu on the right side of the Quick Access Toolbar. Select More Commands, as highlighted below.
You will then see this dialogue box:
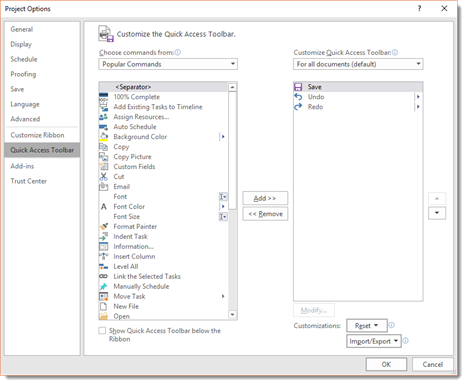
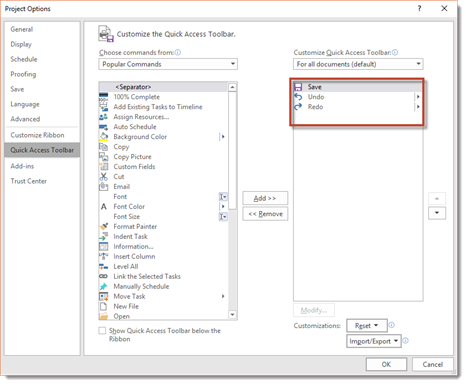
In the right column, you can see everything that already appears on the Quick Access toolbar - and in the order that the shortcuts appear.
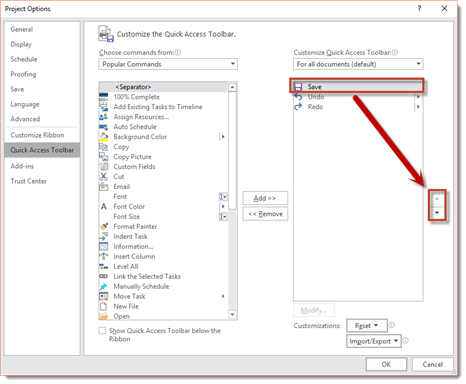
If you want to reorder the tools, click on a tool, then use the arrows to move it up or down.
If you want to group buttons together on the Quick Access toolbar, you can add vertical separators.
To do this, select the tool for which you want to appear above the separator. We've selected Save.
Now, click <Separator> from the list on the left.
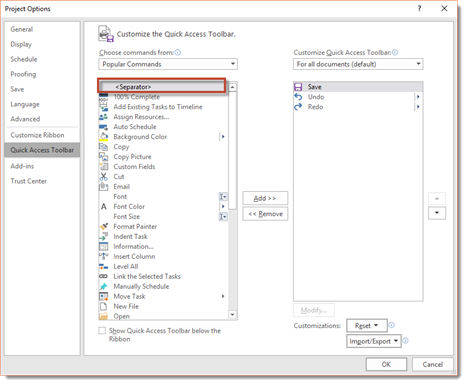
Click the Add button.
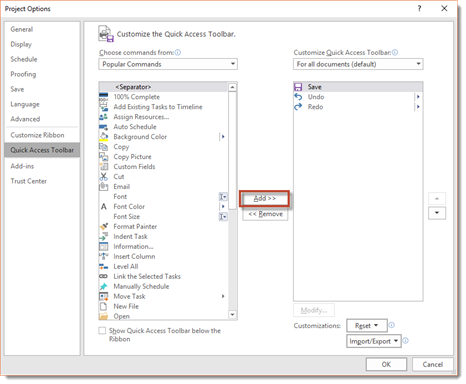
In addition to a separator, you can also add any of the tools that appear in the column on the left to the Quick Access Toolbar. Simply click on the tool to select it, then click the Add button.
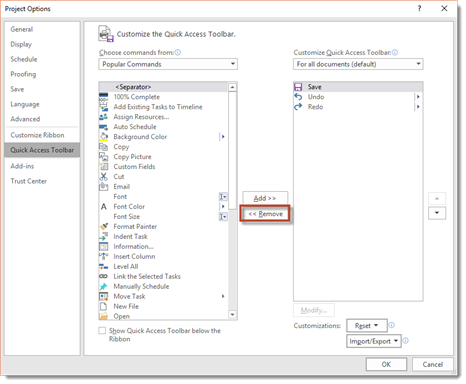
To remove shortcuts from the Quick Access toolbar, select the shortcut in the right column, then click the Remove button.
At the very top of the Project window, you will see the Title Bar. The Title Bar is helpful to be able to find because it shows you the name of the project that you currently have open. By default, the name of a new project is Project1. For each additional new publication that you open, the name increases by one digit: Project2, Project3, etc. If you start Project by clicking on an already existing publication on your computer, it will open automatically and your publication will be displayed in the Project window.
The Ribbon
You'll find the Ribbon directly below the Title Bar. The Ribbon is organized into tabs, then groups, and finally tools and commands. The tabs are located at the top of the Ribbon. The tabs in Project 2016 are File, Task, Resource, Report, Project, View, and Format.
The name of the tab gives you a general idea as to what groups and tools you'll find under that tab. For example, the Task tab contains tools that relate to tasks.
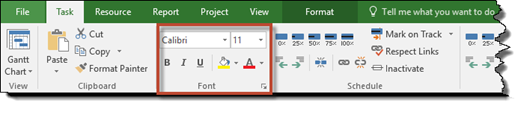
Let's click on the Task tab.

Each tab is broken down into groups. The groups contain tools and commands that relate to the name of the group. The Font group is highlighted below. This group contains tools to format fonts.
The Backstage View
The Backstage View is located under the File tab on the ribbon. When you click on the File tab, this is what you see:
The Entry Bar appears below the Ribbon. This is where you will enter tasks to the timeline.

The workspace is located below the Entry Bar. By default, the Project Screen is shown with the Gantt Chart View being the view that is displayed by default. You can change the view in the workspace by going to View on the menu bar.
Below the workspace is the status bar where you can use zoom or change the views.

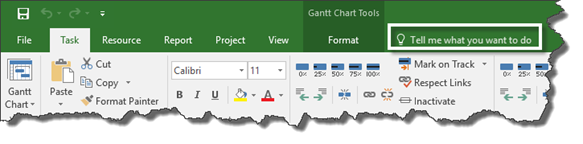
The Tell Me tool is new to Project 2016. Consider it the new "help" tool on steroids, because it not only provides help, it provides instant access to the tools that you need to accomplish any task within Project.
The Tell Me tool is located toward the left side of the screen above the ribbon.
We've highlighted in white in the snapshot above.
To use the Tell Me tool, simply type in what you want to do. For example, add a task.

As you can see in the snapshot above, a dropdown menu appears. The dropdown menu contains help topics related to the terms you typed into the box.
Of course, Insert Task is what we wanted help with, so we are going to select Insert Task.
A new task is then inserted above the task we have selected in Gantt Chart view.
There's no longer a need to search help files or watch a video to learn to do a task. Project 2016 does it for you.
Defining and Creating Projects
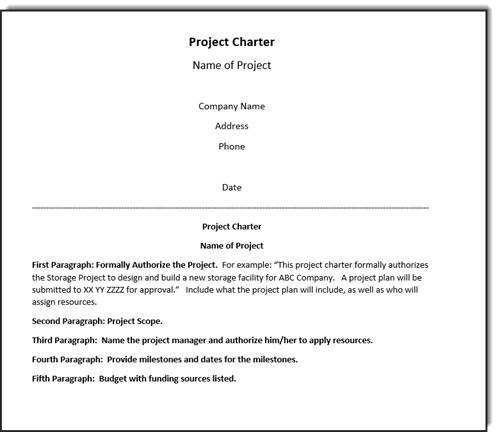
By definition, a project charter is a document that authorizes or recognizes a project. It is usually created by the project manager with the help of the project sponsor, and it functions as an agreement that states the purpose and objectives of the project. You will want to develop a project charter before you start to use Project 2016 so all of your objectives are laid out in front of you, and you know what needs to be done (and how). This is information you will need to successfully manage the project with Project 2016.
Your project charter should contain all or most of the points listed below, depending on the nature and scope of our project.
- The purpose of the project, as well as a description
- Objectives
- Requirements
- Milestones
- Budget
- The name of the project manager
You can use a simple Word document to create your project charter. Take a look at the basic template we've created below. You can use this for your project charter or create your own.
What Goes into a Project Scope
The project scope can be an independent document or part of a project charter, as shown in the last section of this article. A project scope is a document that helps you to plan out and visualize a project before the actual project ever begins. It contains project goals, deliverables, tasks, costs, and deadlines.
In addition, you'll want to include:
- Boundaries of the project
- The team members
- Process for verification and approval of completed work
- Guidelines for decision-making and changes to project
You'll use the information you enter into your project scope in Project, both to get started and to manage your project from beginning to end. If you bypass the project scope in favor of going straight to Project, you're likely to forget important details that will hamper your project's progress.
Planning for Tasks
A project is made up of tasks. Your project may have ten tasks, or it may have five hundred. Tasks are steps that must be completed. Each task moves you one step forward to completing the project. We can use the analogy of a staircase to better explain the relationship between tasks and projects.
You want to build a stairwell, and you know it must contain twenty steps. However, you have to build one step at a time in order to reach the top and complete the stairwell. Think of tasks as the steps to get you where you want to go with the project. That said, your tasks must be planned out in order for your project to be successfully completed.
If you want, you can open up Project 2016, create a new project, and immediately start entering tasks. You can plan and create your entire project within Project. However, for larger projects, this typically is not a successful way of doing things because you may overlook a task that needs to be done. You are more focused on entering data into the program and populating it with tasks instead of planning tasks to manage with the program so the project is successfully completed.
The fact is that tasks need to be planned out just as projects do. What tasks must be completed before other tasks begin? This question as well as others will be ones you want to answer before you start inputting information into Project 2016. You have to plan before you can manage, and you have to realize that Project 2016 is a project management program. You still have to plan.
To plan your tasks, it helps to create a Work Breakdown Structure, or WBS. This will be a visual representation of the hierarchy of the tasks associated with your project.
You create a WBS by looking at the project as a whole, breaking it down into large parts, breaking those large parts into smaller parts, and breaking down those smaller parts until you have exact deliverables - or tasks. In other words, what do you have to do to accomplish a large part of the project? What do you have to accomplish in order to accomplish these things, etc.? You can use an organizational chart or an outline to create a WBS.
Beginning a Project in Microsoft Project 2016
Once you've defined your project, it's time to begin in Project 2016. The first step in creating a project in Project 2016 is selecting a template to use. You can choose a pre-designed template, or simply use a blank one. For this article, we will use a blank template.
The next step after you've selected a template and created a new project is entering information about your project. This information includes the start and end dates for your project.
To enter this information, go to the Project tab, then click the Project Information button in the Properties group.
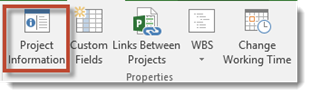
You will then see this dialogue box:

Enter the information about your project.
v Start Date, Finish Date. If your project is scheduled forward from the date it starts, only enter the start date. If you are scheduling back from the finish date (for example: scheduling to meet a deadline), enter a finish date.
v Schedule From. Tasks can be scheduled backward or forward. Typically, it is forward form the start date.
v Current date. This will match the settings on your computer. You can change that if you need to list a different date.
v Status Date. It is a good idea to set the current date in order to track progress. You will want to progress on the project in real time.
v Calendar. Click the drop-down box and select a calendar.
v Priority. You will want to set this if you have many projects and want to link them together. It can also be helpful if you use the resource leveling tool.
Click the OK button when you are finished.
Saving a Project
Once you've created a new project and entered the project information, it's time to save your project for the first time. Saving your project regularly reduces the risk of losing important information if something should happen with your computer.
That said, before you save your project for the first time, it's a good idea to create a folder in which to store your project files. Create the folder in a location on your computer, such as Documents. Give the folder a name which will easily identify it as your project.
Next, go back to Project, and click the File tab to go to Backstage View. You have two choices when you save a project. You can save it under the current file name in the current location - if you've saved the project before - by clicking Save on the left.
You can also go to Save As on the left if you're saving a project for the first time - or you want to rename your project or save it in a different location.
Let's select Save As.
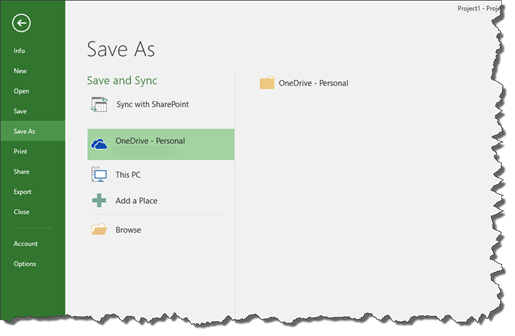
First, choose where you want to save the file.
You can:
- Save it to OneDrive, Microsoft's cloud storage.
- This PC - or your computer
- Or you can add a place, such as SharePoint.
Let's choose "This PC".
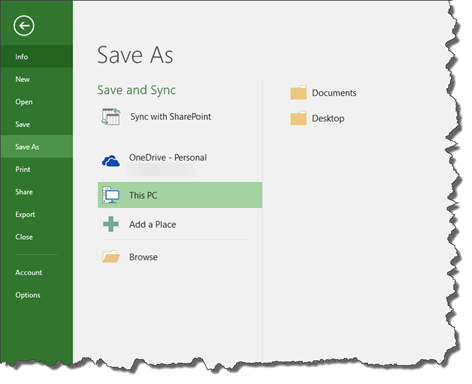
As you can see above, we can now see our Documents and Desktop folders. If the folder you created for your project is stored in one of these folders, click on the folder. If you don't see the folder, click the Browse button and locate the folder on your computer.
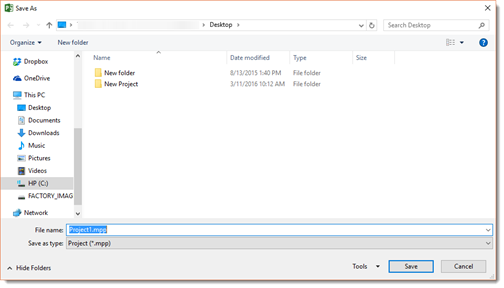
Locate the folder you created for your project, and double click on it. Ours is "New Project".
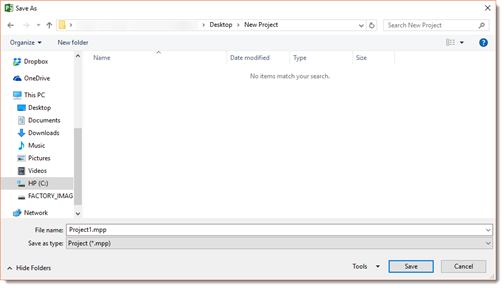
In the File Name field, enter a name for your project.
In the Save As Type field, choose a file format. MPP is the default file format and allows you to open and work on your project in Microsoft Project at a later date.
When you're finished, click Save.
Project 2016 File Types
File types are simply the formats you can use to save your project files. We encountered file types in the last section of this article when we used the Save As Command.
Project supports numerous file types. You can open and save aspects of your project in the following formats, however some formats only allow you to save information contained in Project fields.
- Microsoft Project Plan (MPP). This is the standard file format for your projects. It uses the .mpp extension.
- Microsoft Project 2007. MS Project 2016 supports the opening and saving of files from Microsoft Project 2007.
- Microsoft Project 2000-2003 file. MS Project 2016 supports the opening and saving of files from Microsoft Project 2000-2002, as well as 2003.
- Project Template (MPT) and Microsoft Project 2007 Templates.These are template files that save information you will use in other products. It is just like a template for a website, except it is for a project. It uses the .mpt extension. The global file (Global.mpt) is the master template. It can contain information for all projects, but it cannot save tasks, resources, or assignments.
- PDF files. This format is the portable document format. It has the extension .pdf.
- XPS files. XPS is Microsoft's version of a PDF.
- Excel Binary Workbook uses the file extension .xlsb.
- Excel Workbook or Excel 97-2003 notebook. You can export your field data to this format, but you cannot export entire projects.
- Text. This format is commonly used by word processing programs. It uses the .txt extension and is tab delimited. You can export field data to this format, but you cannot export entire projects.
- Comma-separated values (CSV). This format uses the .csv extension and is comma delimited. You can export field data to this format, but you cannot export entire projects.
- Extensible Markup Language (XML). This format is used to deliver rich and structured data. It uses the .xml extension. You can import and export data using this format. It can also be used to interchange data from Project between Project and other programs.ommand.