A task is either a predecessor or a successor. This means that a task either comes before or after another task. Many times, a successor task will not start until a predecessor tasks finishes. In other words, Task B will not start until Task A finishes. This means they have a timing relationship.
When two tasks have a timing relationship, they are a predecessor-successor pair. The predecessor's task schedule will have an effect on the successor's task schedule, especially if you are using the auto schedule relationship.
Whenever you create a dependency, it is a finish to start relationship by default. This means one task must finish before another begins. If you want that type of dependency, then your life just got a whole lot easier. If it is not the type you want, after you create the dependency link, you can edit it to change the type or build in lag or lead time - or essentially time in between the pair of tasks.
Let's learn to create a finish to start dependency.
Make sure you are in Gantt Chart view and that the two tasks you want to link are both visible.
Click on the predecessor's task bar, or the blue bar, in the Gantt Chart worksheet area.
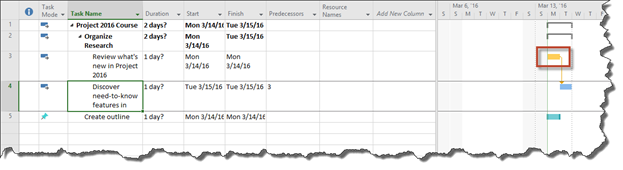
Now, do CTRL+ click and drag the predecessor's task bar (blue bar) to the successor's task bar. When you do, you will see a line drawn and a chain link symbol. You will also see a little box notifying you of the Finish-to-Start link you've created. See the snapshot below.
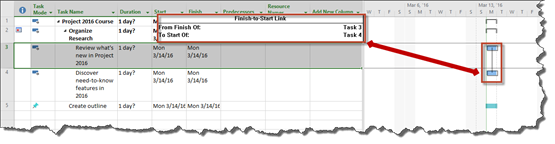
When you release your mouse, you will see a new column added. You will also note that the successor tasks has the number of the predecessor task in the Predecessor column (as highlighted below).
You can also create dependencies in the Task Information dialogue box -- or use this box to modify a relationship between tasks.
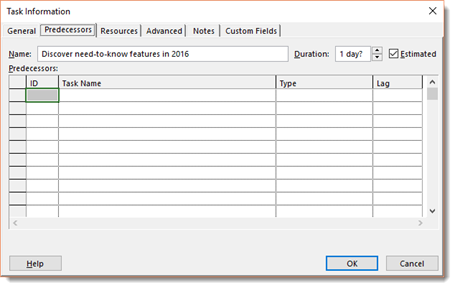
To do this, double click on the name of the successor task so the dialogue box appears. Our successor task is "Discover need-to-know features in 2016".
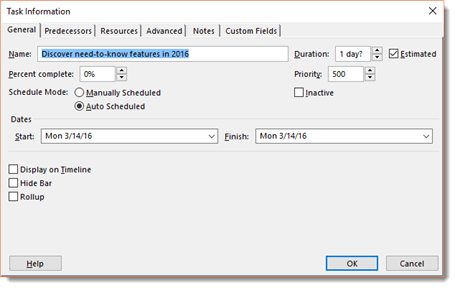
Click on the Predecessors tab, as shown in the next snapshot.
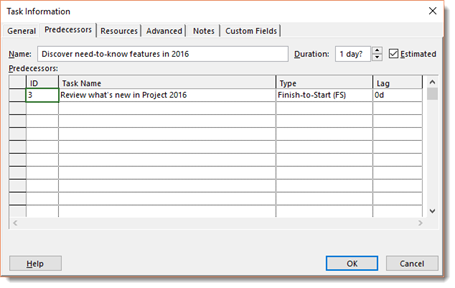
In the ID field, type the ID number for the predecessor task. In this case, we are going to make the predecessor for this task "Review What's New in Project 2016." This is task 3, and 3 is its ID.
Press Tab.
The task name and the default finish-start dependency type are entered for you automatically.
Click the Type field and click on the arrow to view dependency types. Then click the appropriate dependency.
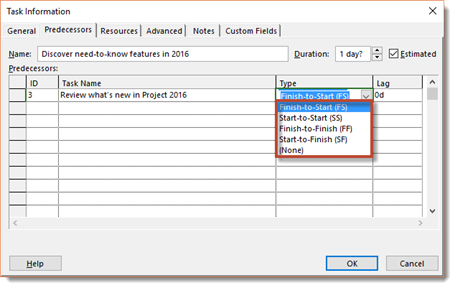
The dependency types are:
- Finish-to-Start. We've already covered this dependency. It is the easiest one to work with.
- Start-to-Finish. This relationship means that the start of one task determines the finish of another.
- Start-to-Start. The start of one task also determines the start of another task.
- Finish-to-Finish. The finish of one task determines the finish of another.
Click OK when you've selected the appropriate dependency.
Adding Lag or Lead Time to Linked Dependencies
Lag time occurs when you add time to either the start or finish of a predecessor task. This causes a gap in the timing.
Lead time, on the other hand, is when you subtract time from either the start or finish of the predecessor task. This causes an overlap between the two tasks.
To set lag or lead time, click the name of a task to open the Task Information dialogue box. Click the Predecessors tab.
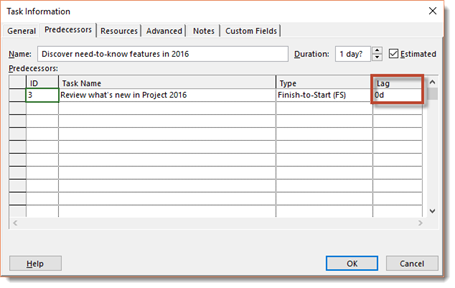
The field where you set lag or lead is in the Lag column (pictured above on the far right). This is located to the right of the dependency type column that we learned about in the last section.
To add lag, click up to a positive number. Or, for lead time, decrease to a negative number.
Remember, days are the default timing. You can change this to accommodate your timings.
Creating External Links
Linking tasks is defined as establishing a connection between tasks in separate schedules so that the task changes in the first schedule are reflected in the second. It is also to establish dependencies between project tasks. In this section, we are going to learn how to link to external tasks, such as those within another project.
When you insert a hyperlink into your project, you create a task that can be used to represent the timing and/or costs of another project or subproject in your plan. That said, you have to bring over timing and cost information yourself. It cannot be linked in from another project.
To insert a hyperlink, select the blank cell in the Task Name column where you want the link to appear.
Right click and choose Hyperlink from the context menu.
You will then see the Insert Hyperlink dialogue box.

Type a name for the hyperlink in the Text to Display box.
Next, select the appropriate file or web page, such as another Project file.
Click OK.
A hyperlink symbol will now appear in the Indicator field in Gantt Chart view. Just click on the symbol to open the file.
Working with Task Inspector
Tasks Inspector is a feature that lets you know what is driving the timing of your tasks. Since the timing of your tasks are affected by certain conditions, Task Driver will help you recognize these conditions. It is kind of like when you play a game of golf. Several conditions can affect your game such as the weather, your mood, and even your health at the time.
The conditions that affect the timing of your project can include:
- Actual Start Date or Assignments. This happens when you have entered a start date for a task, or you have assigned a resource to a task and the resource is not yet available.
- Constraints. This condition can happen when you apply a constraint to a task that won't allow it to start until a certain date.
- Dependency Relationships. A predecessor task can cause change to a task's timing.
To view the Task Driver information, go to the Task tab, then click the dropdown arrow below the Inspect button.
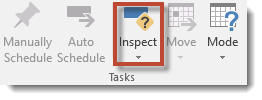
Select the task that you want to use for the Task Inspector.
We are going to choose Inspect Task.
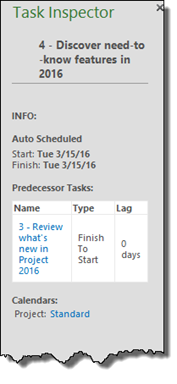
The Task Inspector opens on the left side of the window for the task we selected.
With the Task Inspector open, we can click on other tasks to inspect them.
Working with Task Paths
Whereas Task Inspector lets you see your task drivers in table format, Task Path will show you task drivers by highlighting them in Gantt Chart.
To see your task paths, go to Gantt Chart view, if you are not already there. Go to the Format tab and click the downward arrow on the Task Path button.
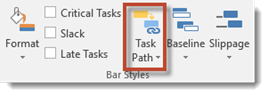
Select the task path you want to see from the dropdown menu.
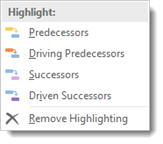
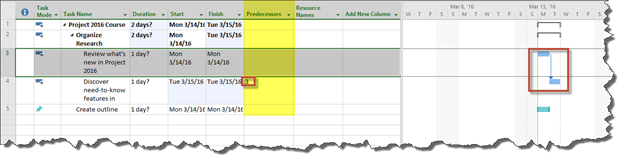
We are going to choose Predecessors.
You can see our predecessor task highlighted in yellow below.
Working with Resources
However, in order to complete tasks, you need resources. Resources, by definition, are costs associated with tasks. A resource can be a person, equipment, materials, or even a fee.
In this article, we are going to learn about resources in Project 2016 and how to apply them to your project.Adding Resources to the Resource SheetYou add resources to your project, not task by task, but by filling out a Resource Information Form located within Project. On this form, you will list the resource name, the rate per hour or cost per use, and the availability. You can also add other information such as the work group they belong to or an email address.
Remember, a resource can be a person or a thing. If it is a person, you can add their name or just a reference to them so you know who they are. An example would be labeling a person as "engineer."
You can even group resources that work together.
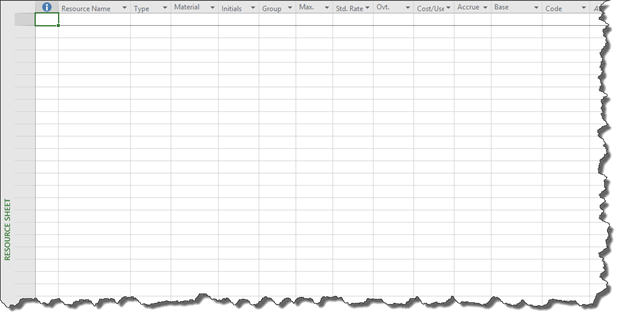
To add a resource, go to the View tab, then click the downward arrow on the Resource Sheet button.

You will see this dropdown menu:
Click on Resource Sheet.
You should now see the Resource Sheet in the work area, as pictured in the next snapshot.
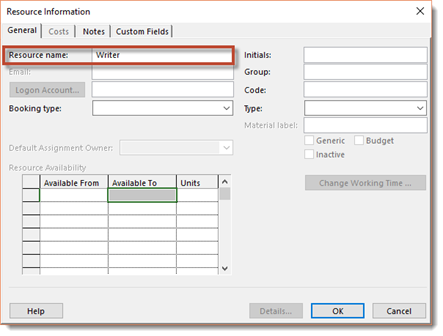
Next, double click on a blank cell in the Resource Name column.
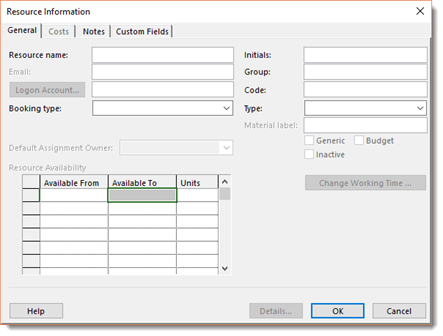
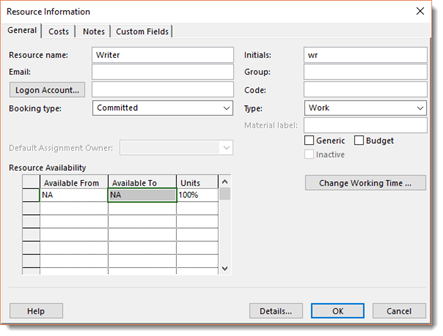
You will now see the Resource Information dialogue box (pictured below).
Fill in the resource name in the Resource Name box.
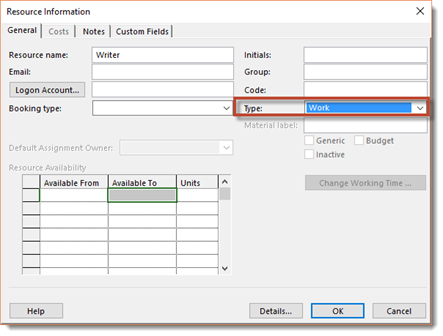
Choose the type of resource (work, material, or cost) in the Type field.
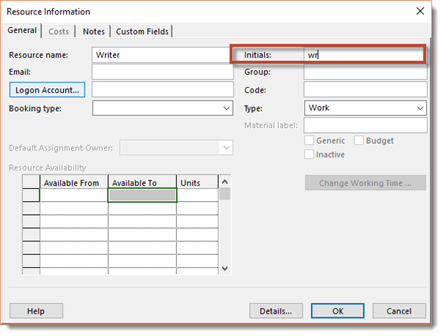
In the initials field, type the initials or abbreviation for the resource.
Enter any other information you need for this resource.
In the Group field, you would enter something if this resource is part of a group.
In the Material field (only available for material type resources), you might enter how much of the material or other important information.
If the resource is only available at certain time, enter this in the Resource Availability section.
Click OK to save the resource.
It is now added to your resource sheet.About the Types of ResourcesThere are three different types of resources in Project 2016. They are work, material, and cost resources. Let's take a look at what each of the three means to make it easier for you to decide what types resources you are using for your project.
Work. Work resources can be reassigned to different tasks, but they can't be depleted. A box of nails would be depleted, so it is not a work resource. However, an employee or contractor could be assigned to multiple tasks, but wouldn't be depleted, so would be considered a work resource.
Material. Material resources do not use working hours, and they can be depleted. They have unit costs. Examples of material resources are wood, books, etc.
Cost. A cost resource might be shipping charges. You can use a cost resource to apply a cost every time you use the resource.Adding Cost Rates for Work ResourcesTo add the cost rate for a work resource, open the resource sheet, then click on the resource name in the Resource Name column.
In the row for this resource, go to the Std. Rate and Ovt. Rate fields. Enter in the standard and overtime rates for the resource.

That said, there may be times when one rate is not going to cover all the times you use this resource. For example, you might want to charge a different rate for volume work, the type of work, or the location of the work. You can make it so you can set different rates by using the rate-table feature.
To use the rate-table feature, double click on a resource name to bring up the Resource Information dialogue box.
Under the Cost tab, click the "A" tab.
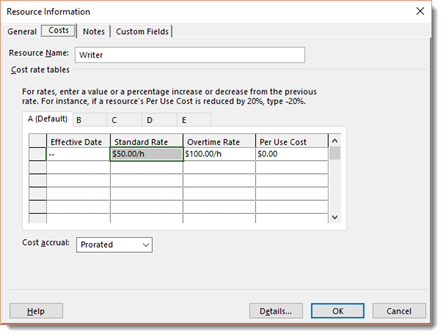
Enter an effective date for when the rate change takes effect.
In the Standard Rate and Overtime Rate columns, enter in the rates.
If you want to enter additional sets of pay rates for this resource, click the B tab, etc., and repeat the steps listed above.
Click OK when you are finished.Add Per-Use Costs for Work ResourcesTo enter a per-use cost instead of a rate for a work resource, go to the resource sheet.
Go to the View tab, then click the downward arrow below Tables in the Data group.
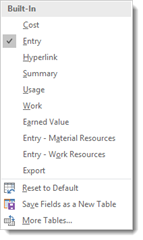
Select Entry.
In the Cost/Use field under the Cost/Use column in your resource sheet, enter in a cost.

Entering Rates for Material Resources
Material resources do not use working hours, and they can be depleted. They have unit costs. Examples of material resources are wood, books, etc.
To enter a cost rate for a material resource, go to your resource sheet.
Click on the View tab, then the downward arrow below Tables in the Data group. Select Entry just as we did in the last section.
In the Resource Name field, select a material resource or create a new one. Make sure Material is selected in the Type column.
To enter a rate for the resource, go to the Std. Rate field, enter in a rate.
To enter a fixed cost, use the Cost/Use field as we did in the last section.

Assigning Fixed Costs to Tasks
Some tasks will have a fixed cost. This means that no matter how many resources you assign to them, they're going to cost the same to accomplish. You do not have to assign resources to these types of tasks.
To add a fixed cost to a task:
In Gantt Chart view, go to the View tab, and click the dropdown arrow for the Table button. Select Cost from the menu.
Look at your worksheet in Gantt Chart View:
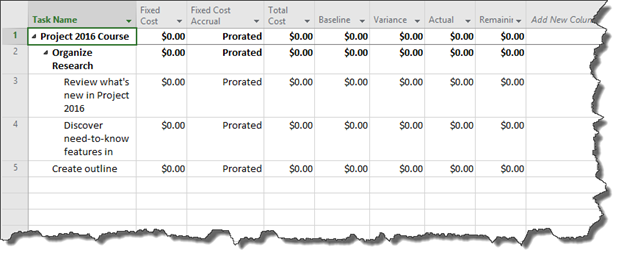
Click on the Fixed Cost cell for the task for which you want to apply a fixed amount.
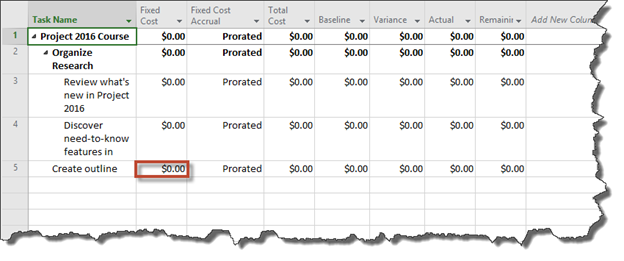 Enter the amount. It is that easy!Assigning Hourly Rates to Resources
To assign hourly rates to resources, go to the Resource Sheet View, then click the View tab. Click on Resource Sheet.
Click the Std rate column for the resource to which you want to add a cost. Then, type a dollar amount. If you are using a rate other than hours, type a slash after the dollar amount, then add the unit such as month or minute.Assigning Resources to TasksOnce you have your resources added to the resource sheet, you can start assigning them to tasks.
Perhaps the easiest way to assign a resource to a task is to use the Assign Resources button under the Resources tab in Gantt Chart view.
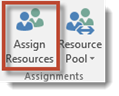
To assign a resource to a task, start by clicking on the task for which you want to assign a resource.
Next, click the Assign Resources button.
You will see the Assign Resources dialogue box.
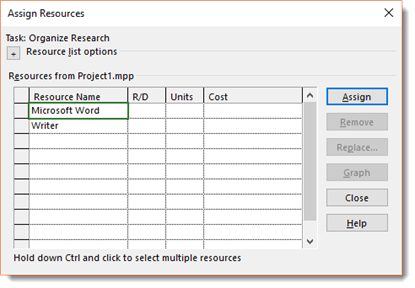
Select the resource that you want to use from the Resource List options.
Next, add the units of the resource that you will be using. If it is a work resource, the default is 100%. A material resource is assigned in units such as gallons, consulting sessions, yards, or tons. When you assign it to a task, you put how many units of the resource will be devoted to the task.
If it is a cost resource, it incurs a set cost every time you assign it. For example, if you have a resource called Licensing Fee and give it a cost of $100, it would be one unit when you assign the resource (or 100%) - to reflect one charge of $100.
Remember, units are written in percentages.
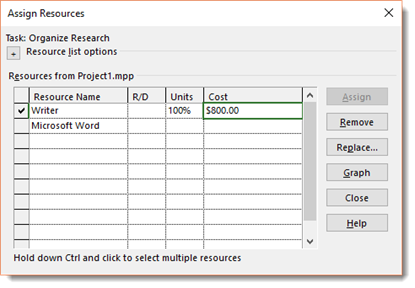
If you need to add more resources for this task, repeat the above steps until all are added.
Click Assign, then Close to save the assignments.Resources and Task Completion TimesBy default, effort driven scheduling is turned off in Project 2016. This means that no matter how many resources you assign to a task, the duration of the task will stay the same. However, with fixed-unit or fixed-work task types, the duration should change if the resources affect the time it takes to complete it.
For example: The task is to paint the office. You've listed a 2-day duration. However, you hire two painters to paint the office. These two painters are listed as two different resources on your resource sheet in Project 2016. Having two painters reduces the duration of the project to one day. They will get two days of work completed in just one day.
In order to make scheduling the task work along with the resources, click on the task, then use the Auto Schedule button found in the Schedule Group under the Task tab.
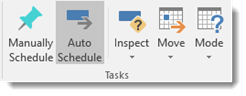
This changes it to an auto-scheduled task instead of manually scheduled in your task table in Gantt Chart view. You can see the scheduling icon in the Task Mode column.

(Manually scheduled tasks have an icon that looks like a pushpin.)
Next, double click on the task to open the Task Information dialogue box.
Click on the Advanced tab.
Now put a check in the box beside Effort Driven.
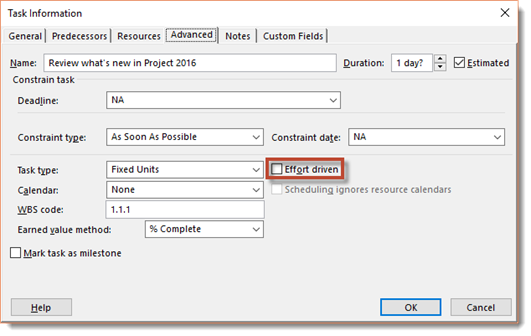 Click OK.The Resource Calendar
Your calendar shows working times and your Resource calendar will show when resources are available and the times you've scheduled to use them. It is very critical to the completion of your project (and the timeliness) that you keep your calendar up-to-date. But now that we know this about the calendar, it is time that we actually examine how it actually works.
You create your Resource calendar from the Base calendar, choosing Standard, 24 hours, or Night Shift. After you specify the Base calendar you want to use, you can specify the exact working hours. You can also select specific days when the resource is not available. Maybe, for example, your engineer is not available on Wednesdays.
To modify a working time for a resource and modify a calendar, double click a resource name to bring up the Resource Information dialogue box.
Click the Change Working Time button.
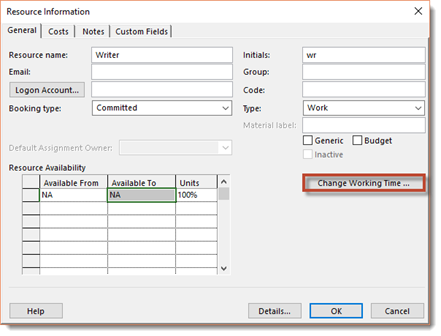
You will then see the Change Working Time dialogue box.
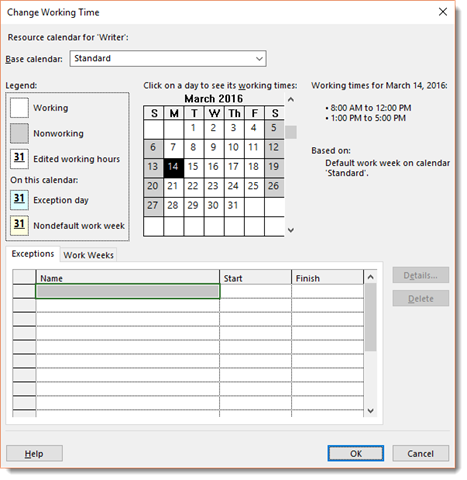
Click on the day that you want to change on the calendar. Then click the Work Weeks tab.
Now, click a blank row and enter a name for the exception.
Click the Details button.
Choose either Working or Non Working times. This means you will select whether you are going to specify working or not working times for this resource.
Enter a time range in the To and From fields. Select the recurrence pattern, or how frequent this exception will occur. You can choose daily, weekly, monthly, or yearly. Now set the range of recurrence.
Click OK twice to save your changes and close both dialogue boxes.