Microsoft Visio 2016 is a program used to create diagrams and drawings of all types and for all purposes. Unlike the basic diagram functions found in other Office programs, such as Word or Excel, Visio offers advanced drawing and diagram functions that can be useful for almost anyone, from home based users, to businesses, and including people such as architects and interior designers.
You can use Visio 2016 to create diagrams and presentations such as:
-
Process diagrams. These types of diagrams describe a process and details the steps that are in the process. It can also include conditions and resources. Processes could be accounting procedures, customer service procedures, or even the development phase of a new product.
-
Engineering drawings to represent a mechanical or electrical part, or engineering diagrams that are schematic representations of the system.
-
Architectural drawings. Visio can even open and save DAD .dwg files. You can use Visio to create drawings for domestic residence, commercial buildings, office layouts, etc.
-
Workflow diagrams. This is a flowchart that uses icons to represent people, processes, and activities that go on a sequence, such as recruitment or the handling of complaints.
-
Network diagrams, which typically represent groups or clusters of things that are related to computing, such an active directory, rack diagram, and website maps.
-
Timelines are typically used for project management. They consist of a bar that's labeled with dates, represented by points. You can create a timeline to create a Gantt Chart or a rack diagram.
Downloading MS Visio 2016
Visio can be purchased one of two ways. You can purchase Visio 2016 through Microsoft for a one-time charge. However, if you do not want to fork out a large sum of money at once, you can also purchase a subscription of Visio Pro through Office 365. The subscription requires that you pay a monthly fee; however, you get all the benefits of Visio 2016 with the subscription-based version.
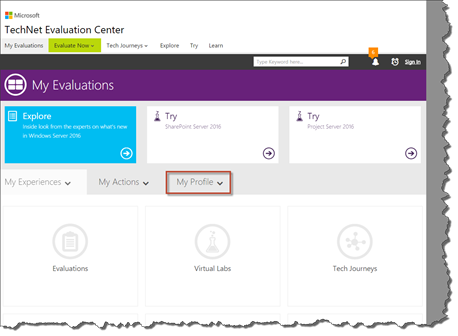
You can also download a free trial of MS Visio 2016 if you just want to learn the software, but not purchase it � or if you want to try it before you buy it. You can download a free trial of Visio without downloading any of the other Office programs. Simply go to the Microsoft's Technet Evaluation page located at https://www.microsoft.com/en-us/evalcenter/. If you haven't already, you will be asked to fill out a profile for Microsoft.
You will be asked for basic information, such as your name, address, and phone number. In addition, you will be asked some questions about your download requirements for Visio 2016. Microsoft will as you if you want to download the 32 or 64 bit version of Visio 2016. Be careful here. You should select the one that matches any other versions of Office (or Office programs) that you have on your computer. You should not choose the one that matches your operating system. If you choose the wrong one, Microsoft will instruct you to uninstall other Office programs from your computer during the Visio installation process. You do not want to have to do this.
Once you're finished filling out your profile, click Try, as highlighted below.
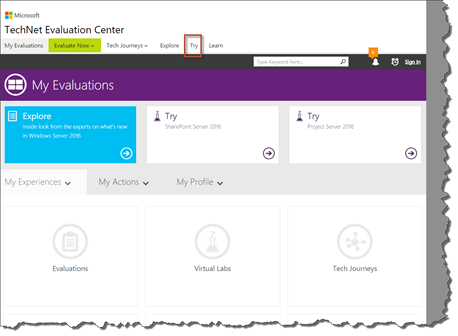
Select Microsoft Visio.
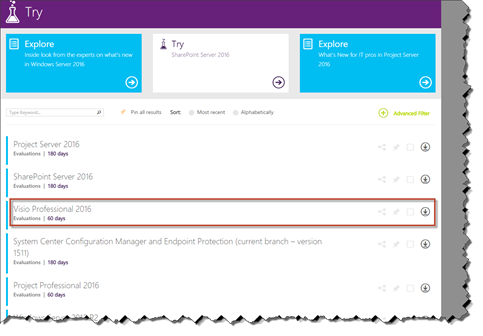
Click the download button on the right, as shown above.
Follow the instructions on the screen.
You will then see your product key. You will need this for the free evaluation.
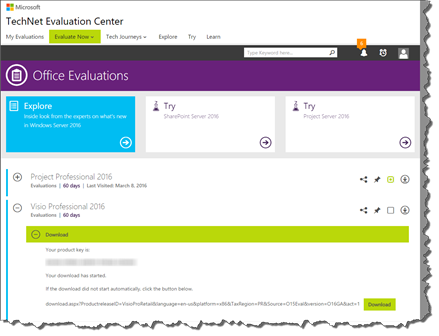
Click the Download button.
You will then download the .exe file for Visio. Run the .exe file to install Visio.
A dialogue box will appear on your screen to let you know that Office is being installed. Don't worry, and think Microsoft is reinstalling Office 2016 or 365. It's not. It's only installing Visio. This process can take a few minutes.
Once Microsoft lets you know that it's finished installing Visio, locate the program on your computer and open it.
You will see this dialogue box appear after Visio opens.
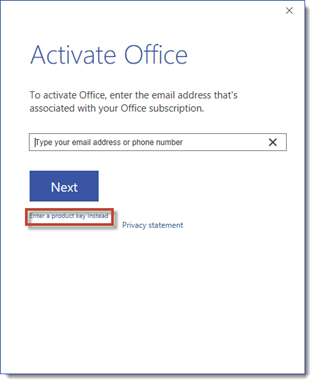
Do not sign into your Microsoft account. Instead, click the Enter a Product Key Instead link, as highlighted above.
Enter the product key you received before you installed Visio.

When you're finished, the continue button will change to an Install button.
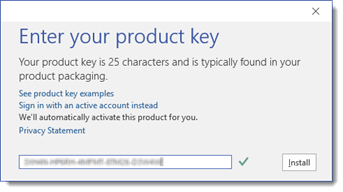
Click the Install button.
Once it's finished installing, you will be asked to agree to accept Microsoft's license agreement.
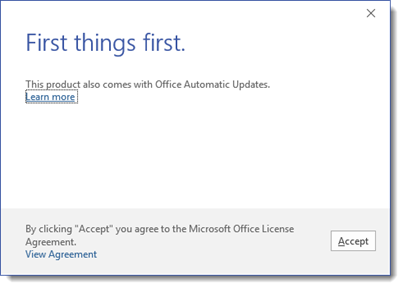
Click Accept.
Visio is then ready for you to use.
What's New in Visio 2016
Before we delve into learning all about Visio 2016 and how it works, let's talk about some of the improvements that have been made to this version. This section of the article is specifically for those of you who've used prior versions and are anxiously waiting to learn what changes have been made.
-
Starter Diagrams. Instead of starting with a blank diagram, you can now start with a starter diagram, then add your own text. To use a starter diagram, click the File tab, then New in Visio. Search for one of these:
Work Flow Diagram
Timeline
Organization chart wizard
Gantt Chart
Cross-Functional Flowchart
Basic Network Diagram
Basic Flowchart
Audit diagram
-
Connect to Excel in One Step. Instead of having to make several clicks to connect a diagram to Excel, you can now do it in just one step. You can also swap data graphics easier. Just go to the Data tab in Visio, then Quick Import.
-
The Tell Me feature. We like to call it Help on steroids. Instead of searching through help files to learn how to complete a task in Visio, you can now let the new Tell Me feature do it for you.
-
The Basic Electrical Template is now compliant with the IEEE standard. To use this template, go to File>New in Visio, then find the Basic Electrical. There are also shape "smarts" with this template. If you drag a shape onto a connector, they will snap together automatically. The connector will split in two, then the two will attach to the ends of the shape. You will also notice that a lot of the shapes number themselves as you place them.
-
The Home Plan Template now contains new and modern shapes. The Floor Plan, Site Plans, and Office Layout templates also contains new shapes.
Navigating Microsoft Visio 2016
Being able to navigate a software program is one of the keys to being able to master it. It's important to know where to go to find what you need to do. This includes finding tools that enable you to complete tasks, as well as setting options and saving files. Because navigation is indeed so critical, we're going to devote this entire article to teaching you to navigate through Visio 2016.
The Ribbon
The Ribbon in Visio 2016 is where you'll find all the tools and commands you'll need to use the program. It was first introduced in Visio 2010, although the Ribbon appeared in other Office programs starting with 2007. It replaces the toolbars that were found in those earlier versions.
The Visio 2016 Ribbon is pictured below:

The snapshot above shows you the tools and commands located under the Home tab. The other tabs are File, Insert, Design, Data, Process, Review, and View. You can see all these in the snapshot above.
Whenever you click on a tab, the Ribbon displays all the tools and commands available under that tab.
We can see the Home tab above. Let's click on the Insert tab.

As you can see, all the tools and commands under the Insert tab are now displayed in the Ribbon.
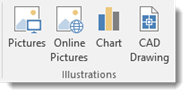
That said, the tools and commands shown in the Ribbon are broken down into groups. Under the Insert tab (pictured above), we have five groups: Pages, Illustrations, Diagram Parts, Links, and Text.
The Illustrations group is pictured below.
The Quick Access Toolbar
The Quick Access Toolbar is where you'll find commands that you use the most often. The Quick Access Toolbar is located at the top left of the screen, as pictured below:

The Save, Undo, Redo, and Touch/Mouse commands are located in the Quick Access Toolbar. However, if you click the downward arrow on the right side, you can add more commands.

The commands that currently appear on the Quick Access toolbar have checkmarks beside them. To add more commands, click More Commands in the context menu pictured above.
You will then see the Visio Options dialogue box.
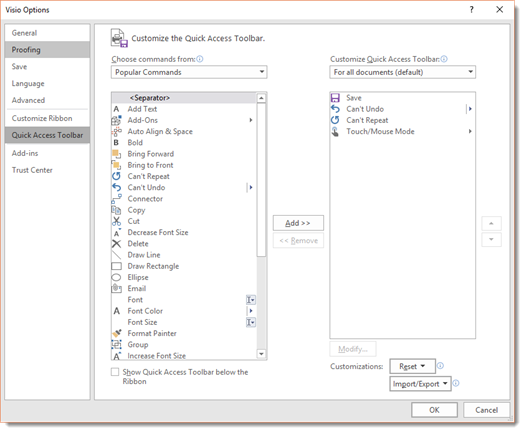
In the right column, you can see everything that already appears on the Quick Access toolbar � and in the order that the shortcuts appear.

If you want to reorder the commands so they appear in a different order on the toolbar, click on a command, then use the arrows to move it up or down.

If you want to group buttons together on the Quick Access toolbar, you can add vertical separators.
To do this, select the tool for which you want to appear above the separator. We've selected Save.
Now, click <Separator> from the list on the left.
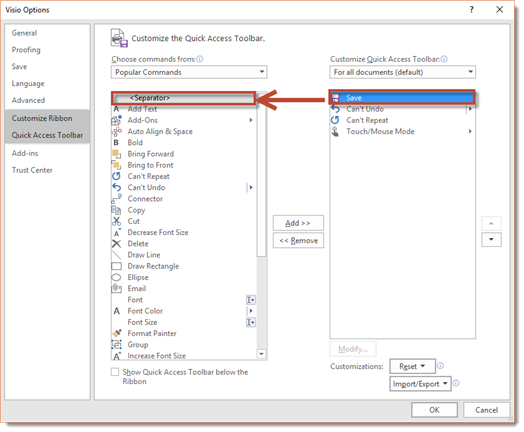
Click the Add button.

In addition to a separator, you can also add any of the tools that appear in the column on the left to the Quick Access Toolbar. Simply click on the tool to select it, then click the Add button.
To remove shortcuts from the Quick Access toolbar, select the shortcut in the right column, then click the Remove button.
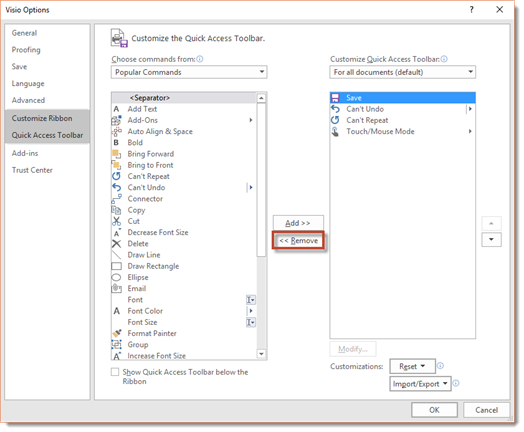
Click the OK button when you're finished.
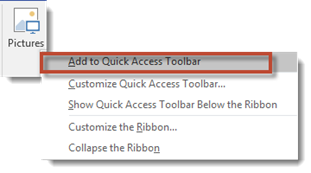
You can also add commands to the Quick Access Toolbar from the Ribbon. If you want to add a shortcut for a command that doesn't appear in the dropdown list, go to the Ribbon, then follow the following steps.
- Find the command that you want to add. Right click on the command. In this example, we're going to add Pictures under the Insert tab. Click on the Insert tab, then right click on the Pictures button.
- Select Add to Quick Access Toolbar.
Working with Visio 2016 on a Tablet
If you're using Visio on a tablet, you can adjust the spacing between buttons on the Ribbon to make it easier to use. You do this by activating Touch mode.
To do this, click or touch the Quick Access Toolbar button: 
Select Touch/Mouse Mode if it doesn't already appear on your Quick Access Toolbar.
You can now see the button in the Quick Access Toolbar, as shown below:

Now, touch or click the button and choose Touch.
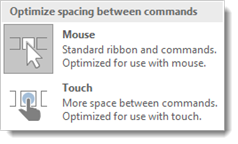
There is now more space between commands on the Ribbon.
The Backstage View
The Backstage view is located under the File tab. It looks different than other tabs that you might click on. That's because the Backstage view is where you'll manage your files and set your options for Visio. Whereas the other tabs in the Ribbon allow you to work on different aspects of your project, the Backstage View is where you'll work on it as a whole.
The Backstage View is pictured below.
The Backstage view contains various pages that are listed on the left in the blue column. Each page contains options related to the page.
Let's talk about each of these commands and how you'll use them when working with Visio 2016.
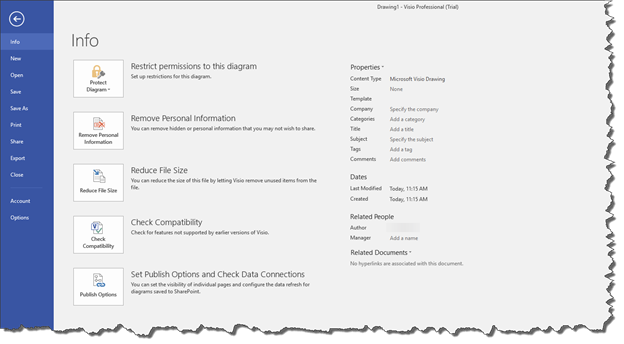
Info
The Info page is pictured above.
This page has four buttons:
-
Remove Personal Information
-
Reduce File Size
-
Check Compatibility
-
Set Publish Options and Check Data Connections
You'll use the Reduce File Size button if you're worried about the file size.
You'll use the Check Compatibility button to check your diagram for features that won't be compatible with earlier versions of Visio.
On the right side of the Info page, you'll see information about your current document.
The New Page
The New page is where you'll go to create a new document. It is also where you can access all the templates that come with Visio 2016.
The New page is pictured below:
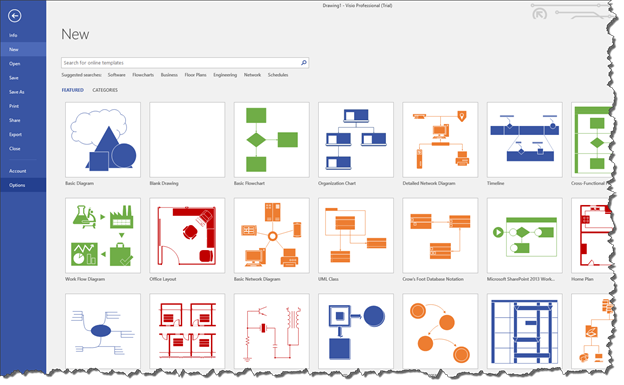
To select a template, click on a thumbnail of the template. You can also use the search box located above the template thumbnails. Enter in search terms to look for a certain type of drawing or diagram.
Whenever you click on a template, even a blank diagram or drawing, you'll see this window:

In this window, you'll be asked to set the measurement unit you want to use.
-
Metric drawings are sized using International Standards Organization (ISO) paper sizes. The default size is typically A4.
-
US Units are sized using US Units. The default size is 8.5X11 inches.
Click the Create button to open the template.
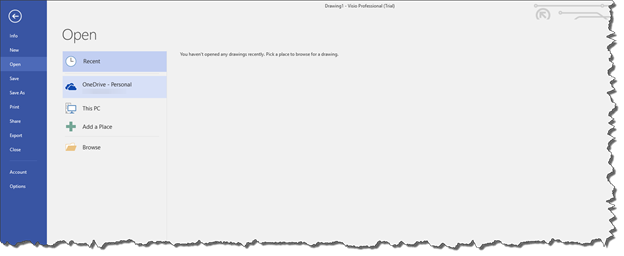
The Open Page
The open page is where you can access Visio files that you have saved on your computer or remote locations, such as OneDrive (formerly SkyDrive).
Any recent Visio documents that you've had open in Visio will display under Recent Drawings.
Simply choose the location where the file is stored under Open, then locate the file in that location to open it.
The Save and Save As Pages
The Save and Save As pages allow you to save your Visio drawings.
If you click the Save page, you will save the file under its current name, file type, and to its current location. You use the Save page when you've edited an existing Visio file and want to save the latest version.
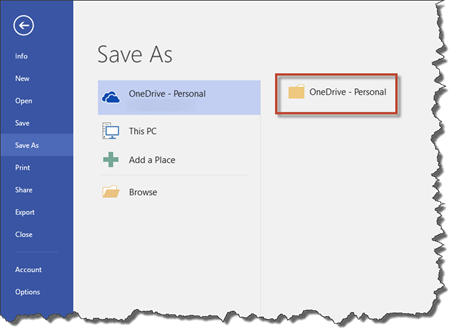
The Save As page allows you to name the file you're going to save, select a file type, and then select the location where you want it stored.
The Save As page looks like this:

Under Save As (pictured above), choose where you want to save the file. You can choose OneDrive (formerly SkyDrive), your computer, or you can add a place, such as a network location.
In the snapshot above, we've selected OneDrive.
Next, we click on our OneDrive folder, as highlighted below.
We then see the Save As dialogue box.
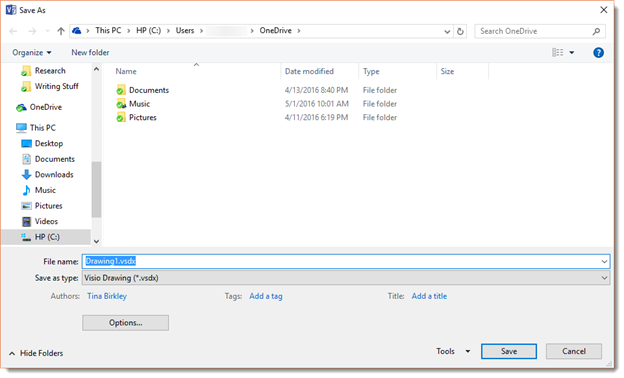
Select a folder on your OneDrive where you want to save your Visio file.
Name your file in the File Name field. The default name is Drawing1.
Select a file format in the Save as Type field.
Click the Save button.
The Print Page
The Print page is pictured below. 
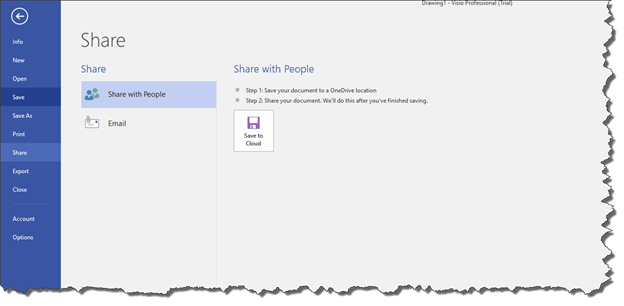
The Share Page
The Share page allows you to share your drawing. You can click Invite People to share your drawing through email or social media. However, you first have to click the Save To Cloud button to save your drawing to either OneDrive or SharePoint.
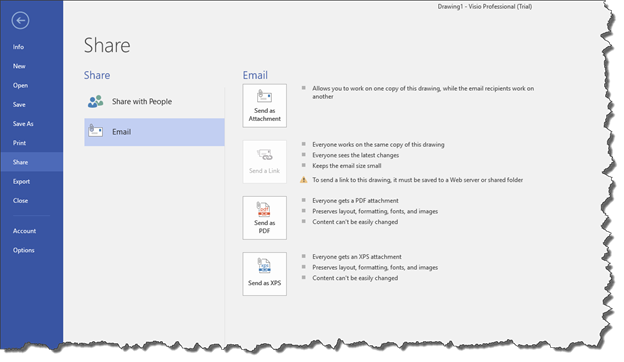
You can also email your drawing using an option shown on the ride side of the page (when you click Email).
The Export Page
The Export page allows you to create a PDF or XPS (Microsoft's version of PDF) version of our drawing, as well as several other formats.
The Close Page
This technically isn't a page. If you click Close, it will simply close your active diagram.
The Account Page
This page contains information about your Microsoft Account (formerly Live ID). There are links that allow you to edit your account details or switch to another account.
Options
If you click Options, you'll see a dialogue box that contains settings for Visio 2016. You may not ever need to change these settings, but it's helpful to explore this dialogue box and see the many options that are open to you when using Visio 2016.

Getting Help Using the New �Tell Me' Tool
Tell Me is a tool new to Visio 2016 that allows you to tell Visio what you need help doing. This feature will guide you through the steps you need to take to complete a task. Consider it the new "help" tool on steroids, because it not only provides help, it provides instant access to the tools that you need to accomplish a task.
The Tell Me tool is located toward the left side of the Visio screen above the ribbon.

Simply type in what you want to do. For example, increase font size.
As you can see in the snapshot below, a dropdown menu appears. By selecting Font Size, we can change the font size right there from the menu. There's no longer a need to search help files or watch a video.
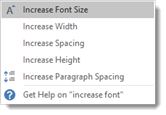
Let's click Increase Font Size in the dropdown menu.
We had already selected the text box in our drawing.
Visio 2016 increased the font size for us.

There's no longer a need to look up how to do something in Visio if you forget. The Tell Me tool will do it for you.
Visio 2016 Terms and Definitions
It's important that you understand the terms we'll use � and what they mean in Visio 2016. Knowing these terms, as well as the definitions, will make learning to use and master the program a lot easier.
These terms with their definitions are listed below.
-
A master is an object in a Visio stencil. You'll choose a master from a stencil. You can use the masters that come with Visio or download some from the Internet.
-
Stencil. A stencil is a collection of masters. Think of it like this. You buy a set of paints. The entire set would be the stencil (in Visio terms). Each individual jar of paint would be a master (again, in Visio terms).
-
A shape is an object on a drawing page. You can create shapes by dragging a master, as well as in other ways. A shape can be a line, a polygon, or an image. It can also change appearance or behavior as the data values change.
-
A template is a Visio document that contains preset dimensions and measurement units. It may also contain stencils, background pages, and designs. It could also contain shapes or text.
-
A workspace is a collection of Visio windows and settings, such as the drawing window and zoom settings. It can include the Size & Position, Pan & Zoom, and Shape Data windows. Visio saves the workspace on your screen when you save the file.
The Drawing and Shapes Window
Whenever you create a new drawing or diagram, you'll see two windows open below the Ribbon. These are the Shapes window (which appears on the left) and the Drawing window (which appears on the right). The Shapes window is where you will see your stencils.
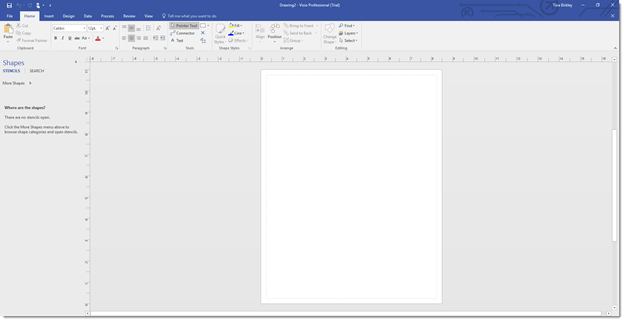
The Drawing window is where your drawing will appear. There are rules at the top and left of the window that show inches, millimeters, or a unit that you specify.
You'll find page controls on the lower left hand side of the Drawing window, as highlighted below.

-
In the snapshot above, you can see Page-1. This is your page tab. If you have more than one page, the tabs will display the name of each page. The active page will be in a different color. You can click a tab to go to that page. Right click on a page name to access page management options, including the Duplicate Page feature.
-
To the right of the page name, you'll see "All" with an upward arrow. This will display a list of all the pages. The active page is highlighted.
-
Click the plus sign with a circle around it to insert a new page.
Below both the Shapes and Drawing windows, and at the bottom left of the Visio window is the status bar.

If nothing is selected on your page, you will see from left to right:
1. The page number of the active page
2. The language (ours is English)
3. Macros (to record a macro)
4. The Presentation Mode to view the diagram in Full Screen
5. The Zoom slider to zoom in or out, and the zoom level shown as a percentage.
6. The Fit Page to Current Window button and the Switch Windows button (to switch to another Visio window).