In addition to adding text, charts, pictures and graphics to your MS PowerPoint 2003 presentations, you can also add multimedia such as movies, music, and audio clips.
Adding a Movie to a Presentation
MS PowerPoint 2003 can be used to create movies, documentaries, and educational presentations. One or several audio/video files can be inserted into any presentation for this purpose. You can either use clips (they are actually animated gifs) that PowerPoint provides with its software, or you can insert your own.
To insert a clip from PowerPoint 2003's Clip Organizer
The animated GIFs that are available with your PowerPoint 2003 software are found in the Clip Organizer.
Display the slide where you want to show the clip.
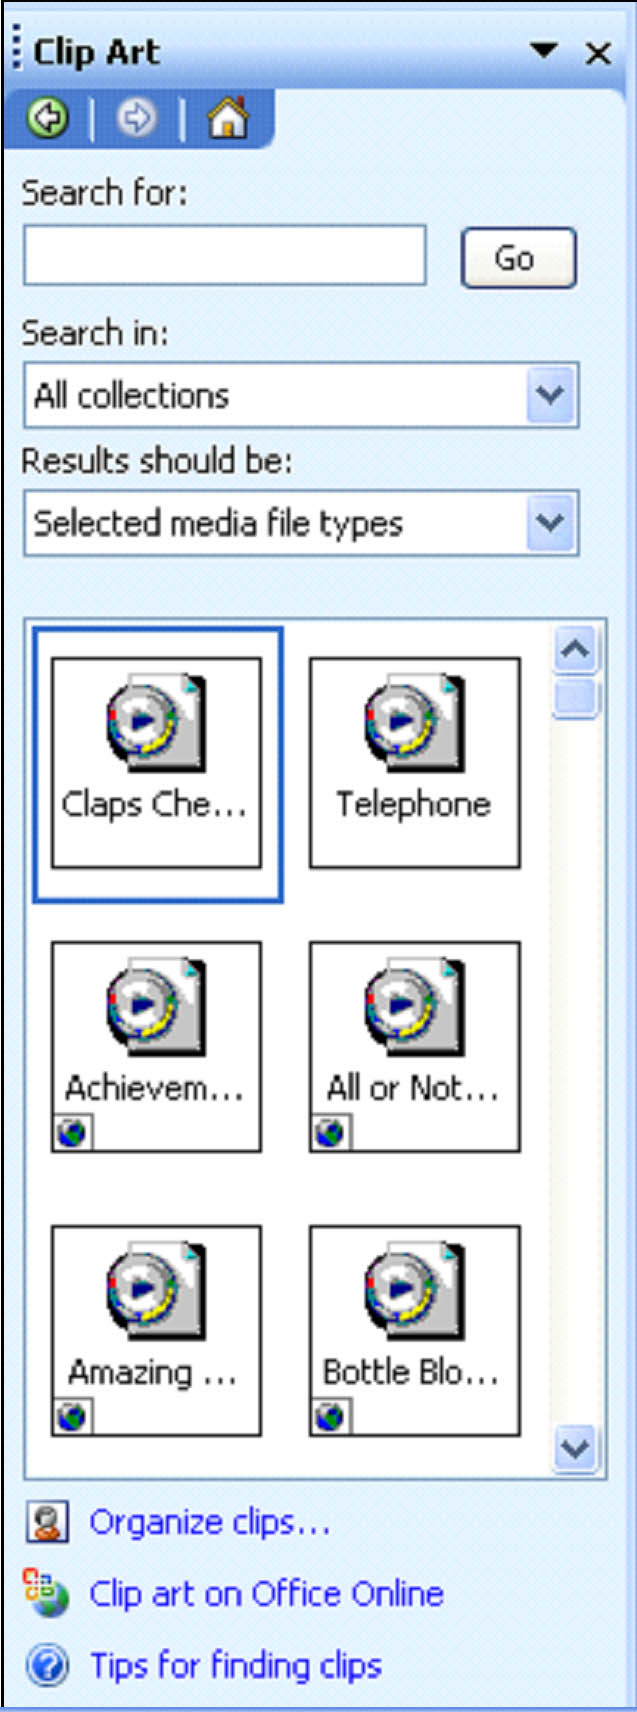
Go to Insert> Movies and Sounds > Movie from Clip Organizer.
The animated clip art gallery will be displayed in the task pane, as shown below.
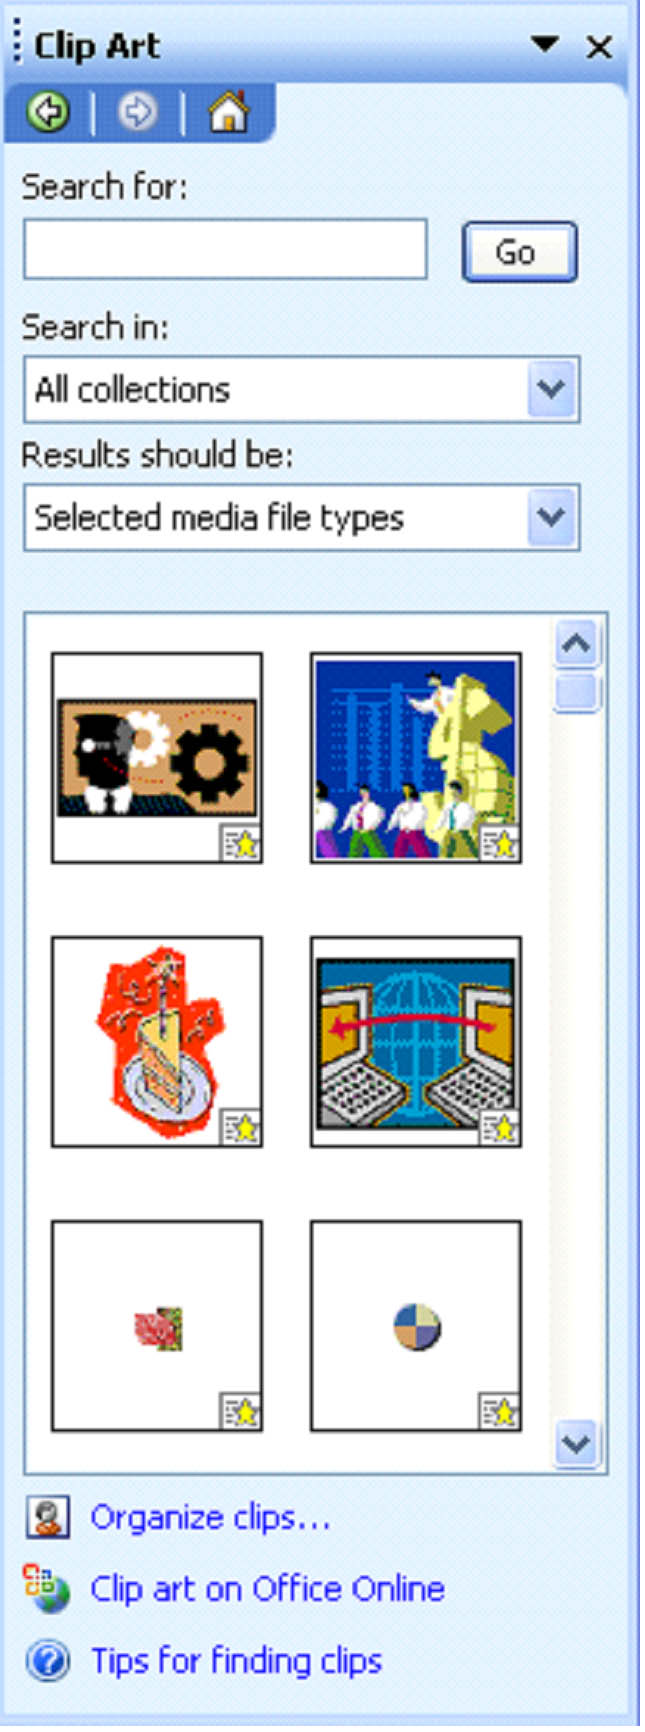
You can use the search to locate clips on your computer or on MS Office Online.
Click the clip that you want to add to your slide.
To Insert Movies and Audio/Video Files From Your Computer
You will need to insert a movie or video clip into a blank MS PowerPoint 2003 slide.
To insert a movie onto a slide:
Select the slide where you want to insert the movie.
Go to Insert> Movies> Movie from File. If you're practicing using our example, the file name you are looking for is CC.

Select the movie that you want to play and click OK.
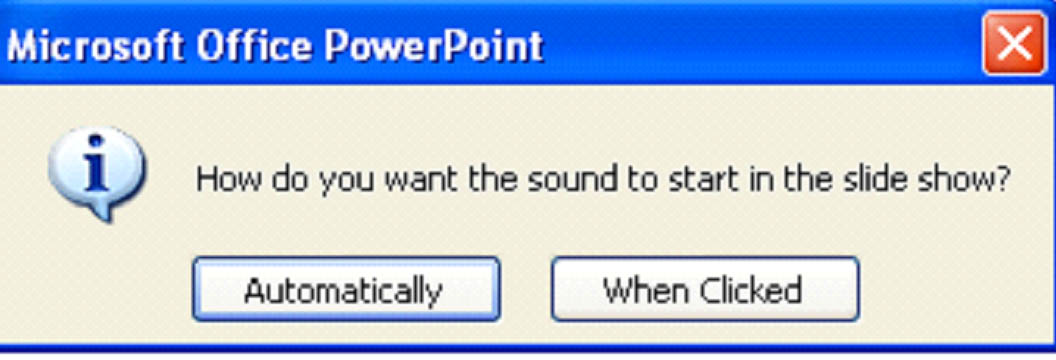
If you select an animated GIF, the file will play automatically on the slide. However, if it's any other type of file, PowerPoint will ask to specify when the movie should start playing.
In the example below, we've inserted a movie file onto the slide. Because it wasn't an animated GIF, a dialogue box popped up asking when the movie should start.
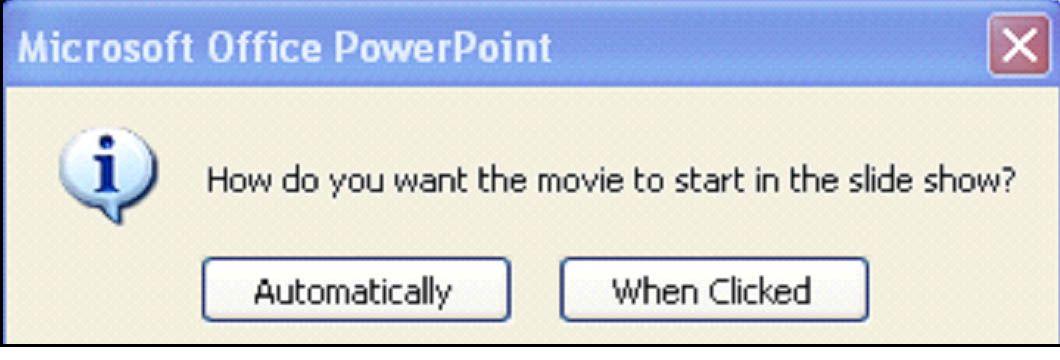
Click either Automatically to have the movie start on its own when this slide is shown, or When Clicked if you want the audience to be able to start the movie.
Resizing the Video
It might turn out that the video that you insert is bigger than your slide, or it may be way too small for your audience to see. Either way, it's no big deal. You can resize the video.

Select the video to make it active, then resize it using the resizing handles, or circles, on the corners of the file. Drag the corners until you get the size you want. By dragging only the corners, you keep the right proportion of height to width so you do not damage the quality of the video. If you do not keep the right proportion � if you enlarge the video's height but not width, for example � the picture will become distorted.
Modify the Way a Video Plays
You can manage the volume of the movie as well as numerous other options. Changes can be made with just a few clicks of the mouse.
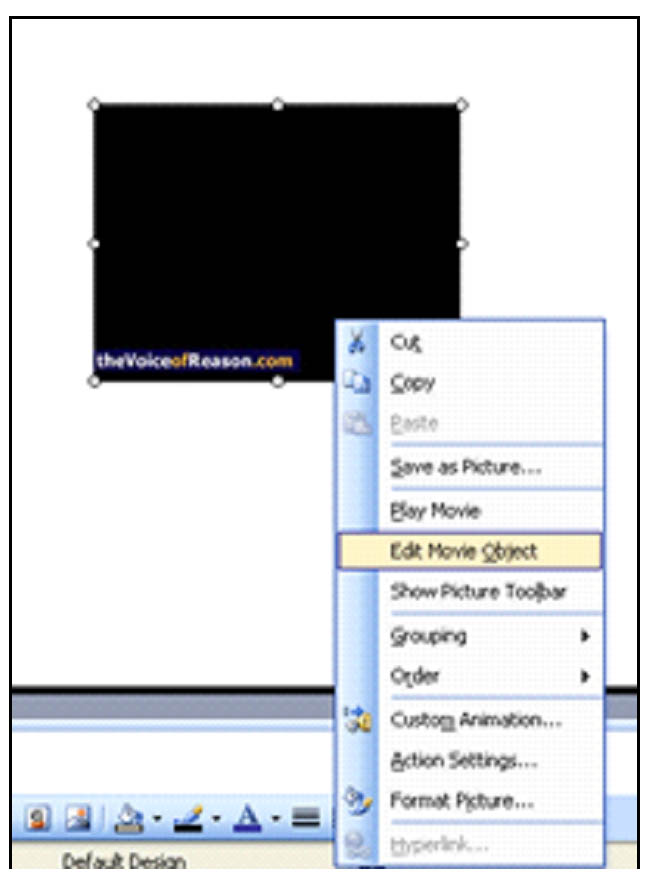
Let's start by right clicking the video that's on the slide. Select Edit Movie Object from the drop down menu.
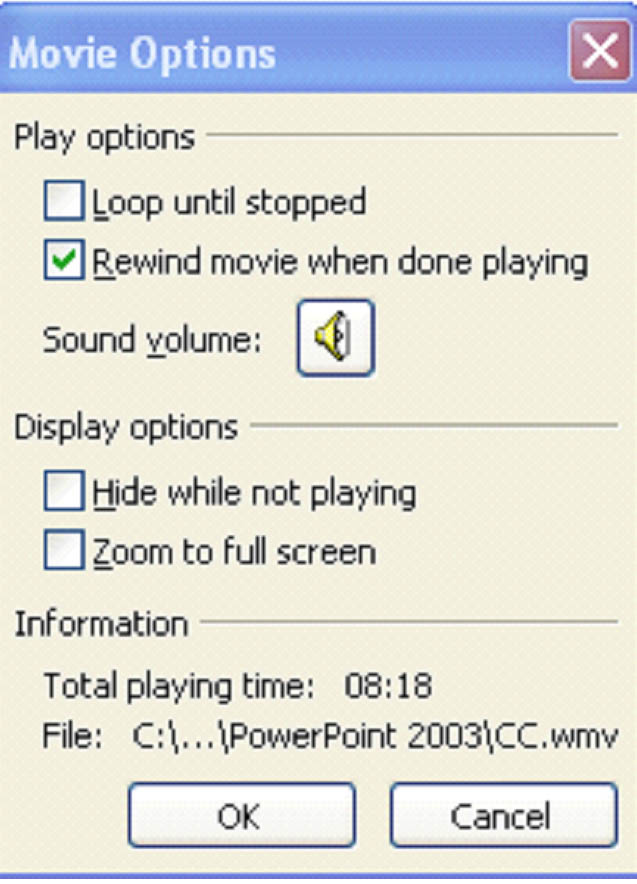
A dialogue box will appear that looks like this:

In the Play Options section, we can determine if the movie repeats over and over again, if it rewinds after its finished, and we can also adjust the volume.
Loop until stopped. Check this box if you want the movie to play again after its finished.
Rewind movie when done playing. This resets the movie back to the beginning, but it will not play again until the play button is clicked.
Sound volume. Click this to adjust the volume of the movie. You'll be able to slide the volume bar up or down to increase or decrease the volume.
In the display options section, you can specify how the video is displayed.
Hide while not playing. If you don't want the video to show on the slide when it's not playing, check this box.
Zoom to full screen. When the video is started (either automatically or by clicking), it will zoom to full screen.
The Information section tells you how long the movie will last, as well as the file name.
Once you've selected the options you want, click OK.
Here are the options we've selected for this example:
Add Custom Animation
It's a lot of fun to add video to your slides because you can add custom animation and sounds to them. Do you want your audience to hear applause? Do you want them to hear a drum roll at the beginning? You can add it using PowerPoint.
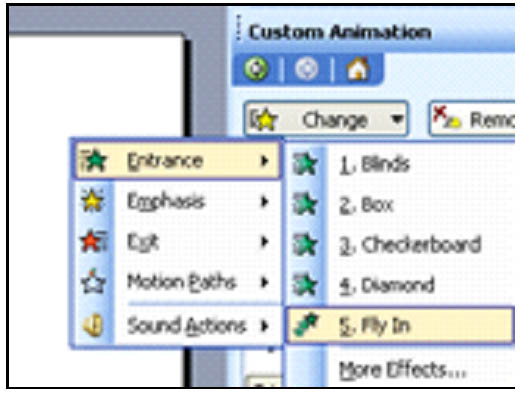
Again, right click on the video. This time, select Custom Animation. The menu will open in the task pane, as pictured below.

Click the Change button to add a special effect when the video appears. A special effect is an effect that happens when the audience first sees the video box on the screen. It can happen before the video starts, as emphasis, when the video is finished, or just give it a motion path on the slide.
Note: You can also right click on the video and select Effects to add special effects, such as flying, to your video. Feel free to play around with these effects one by one to see what each does. It's truly the only way to learn how you want to design your presentations in the future. Don't hesitate to use special effects such as these. It keeps your presentation alive and interesting.
For this example, we're going to choose upon Entrance then Fly In, as shown below. The video screen will appear to fly onto the slide and into its place.
Once you've selected a special effect, it's now time to add custom animation.
Let's go through the Modify section and learn how to select and apply custom animation to your video.
The Start box determines when your animation is played.
On Click. The animation starts when it is clicked.
With Previous. The animation starts at the same time as any other animations.
After Previous. The animation starts at the end of the previous animation.
Now, right click on the file in the Trigger section. A drop down menu will appear. This is where you will select any triggers that start the custom animation, as well as the animation you want to use.
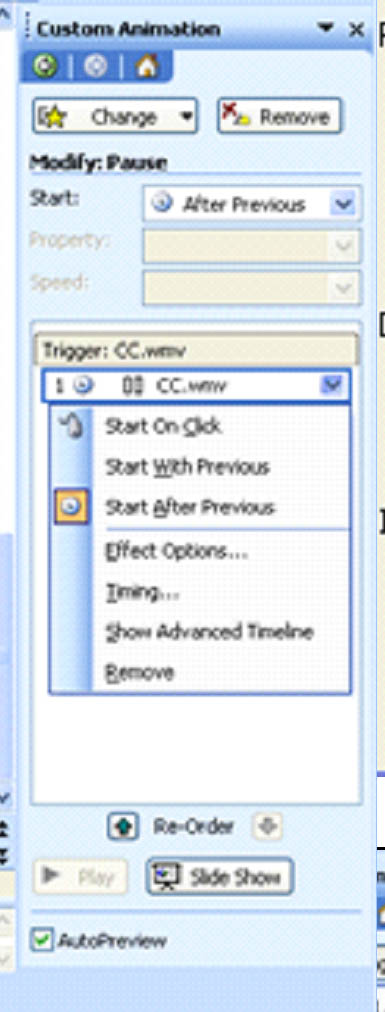
Select Effect Options, then click the Timing tab.
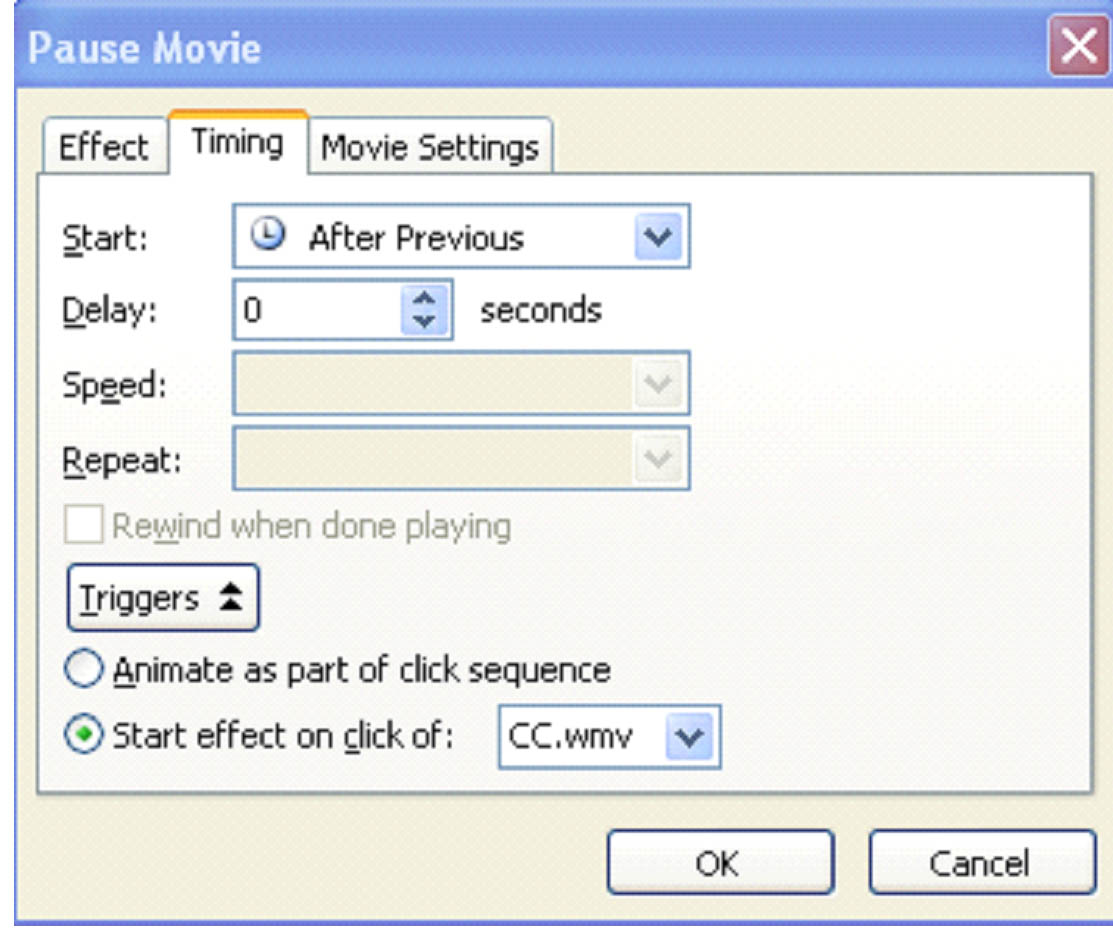
We've selected After Previous. This means after the previous effect. Since we don't have any, it will play at the beginning of the video.
Delay. If you want a delay before the custom animation takes effect, specify the amount of seconds.
Speed. The speed of the animation.
Repeat. Do you want the animation to repeat?
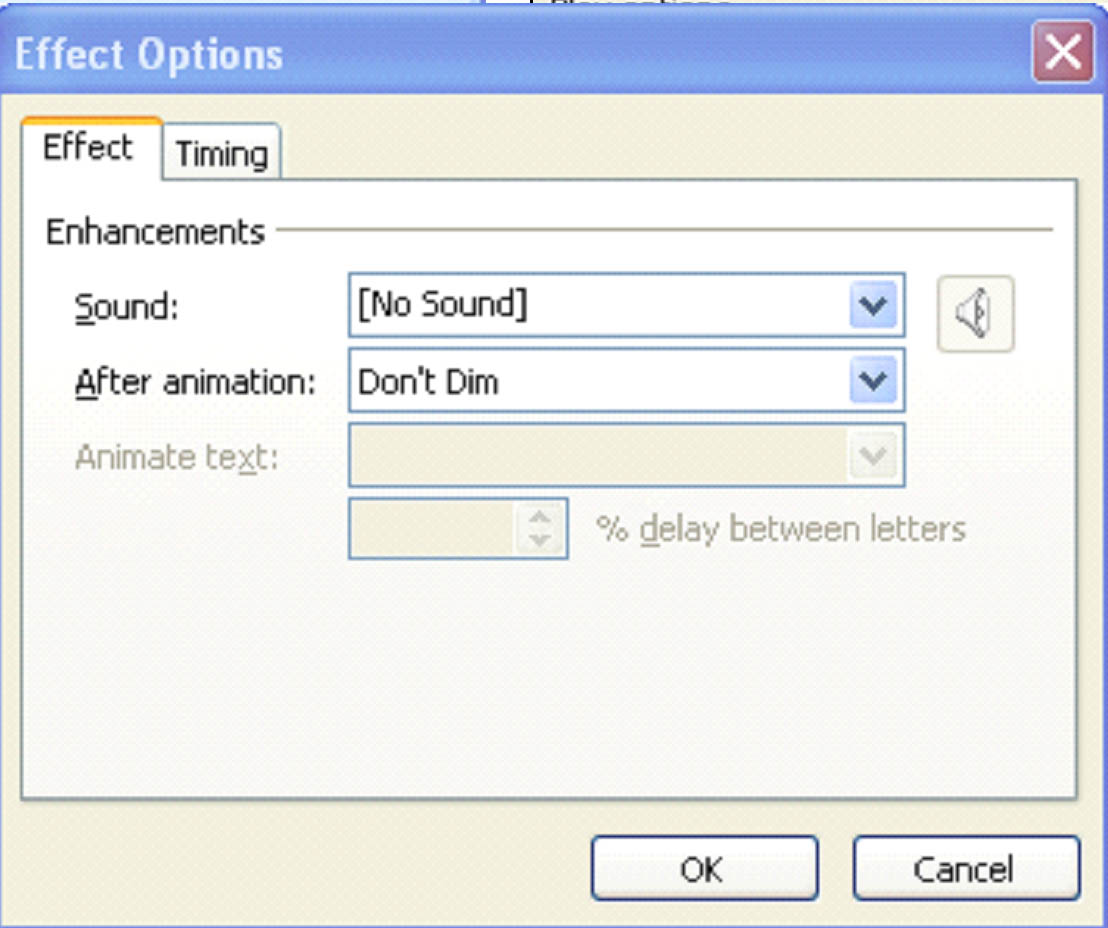
After you set your preferences, click the Effect tab.
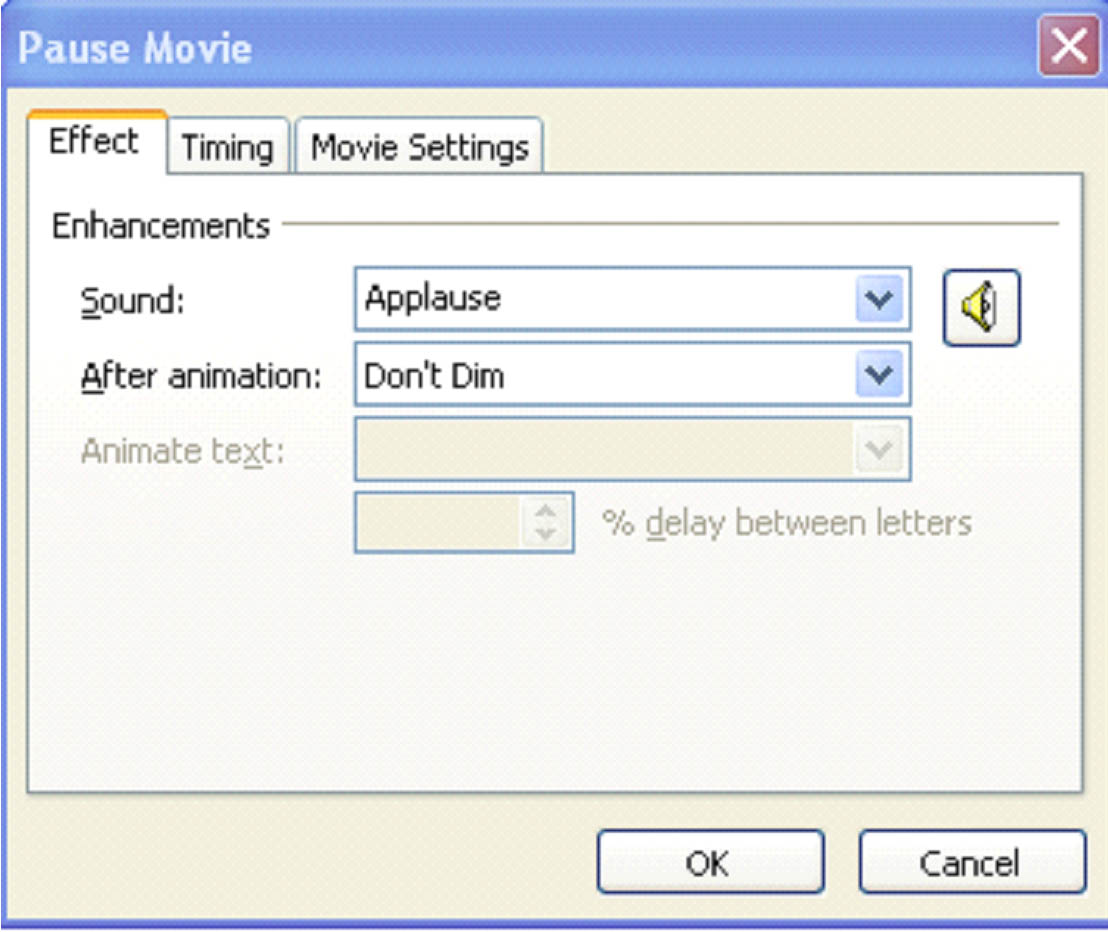
Choose the effect you want from the Effect box in the Enhancements section. For this example, we've chosen Applause.
Then, select the options for the sound effect:
After animation. Do you want the screen to dim or change colors after the animation is played? This is where you will specify that. However, for this example, we're not going to dim the screen or change colors.
Animate text. For some custom animations, you can also have text. This is handy if you want to add an advertisement or instruct them on where to go to learn more.
Click OK when you're finished.
The video will now play with the applause at the beginning.
Insert a Sound or Audio File
Sound files, as with movies, can be located in the Clip Organizer or anywhere on your computer or network drives. You can insert any sound that you want into a PowerPoint 2003 presentation.
To insert a sound from the Clip Organizer
Go to Insert> Movies and Sounds> Sound from Clip Organizer.
The sound files will be displayed in the task pane.
Select the file to be inserted into the slide by clicking on it.
A window will then pop up and ask you when you want the sound to start playing.
Click on your choice.
The sound is now automatically inserted into your PowerPoint presentation.
To Insert a Sound or Audio From File
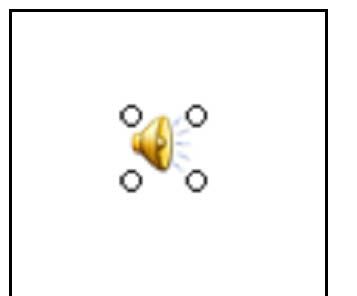
To insert a sound or audio file from your computer or network folders, go to Insert> Movies and Sounds> Sound from File.
As with the Clip Organizer, select if you want the sound to play automatically or when clicked. (We've chosen when clicked.)
A little speaker will now appear on your slide, as pictured below. You can resize the speaker or move it to another location.
Manage Playback Settings
Right click on the sound icon to do any of the following things:
To adjust to volume, select Edit Sound Object.
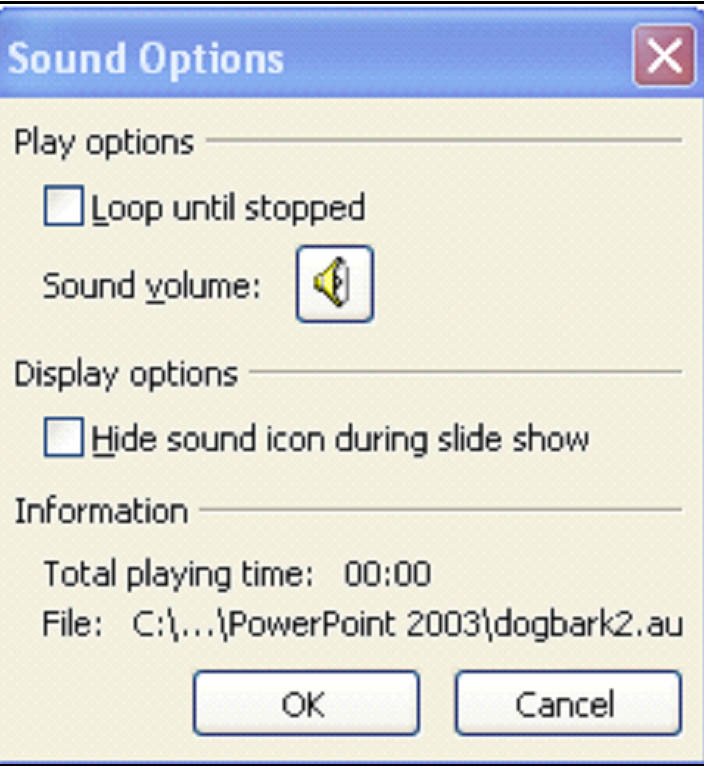
You can also use this dialogue box to loop the sound (continuous play) and hide the sound icon during the slide show.
If you want to change the way a clip plays, right click on the sound icon and select Custom Animation.
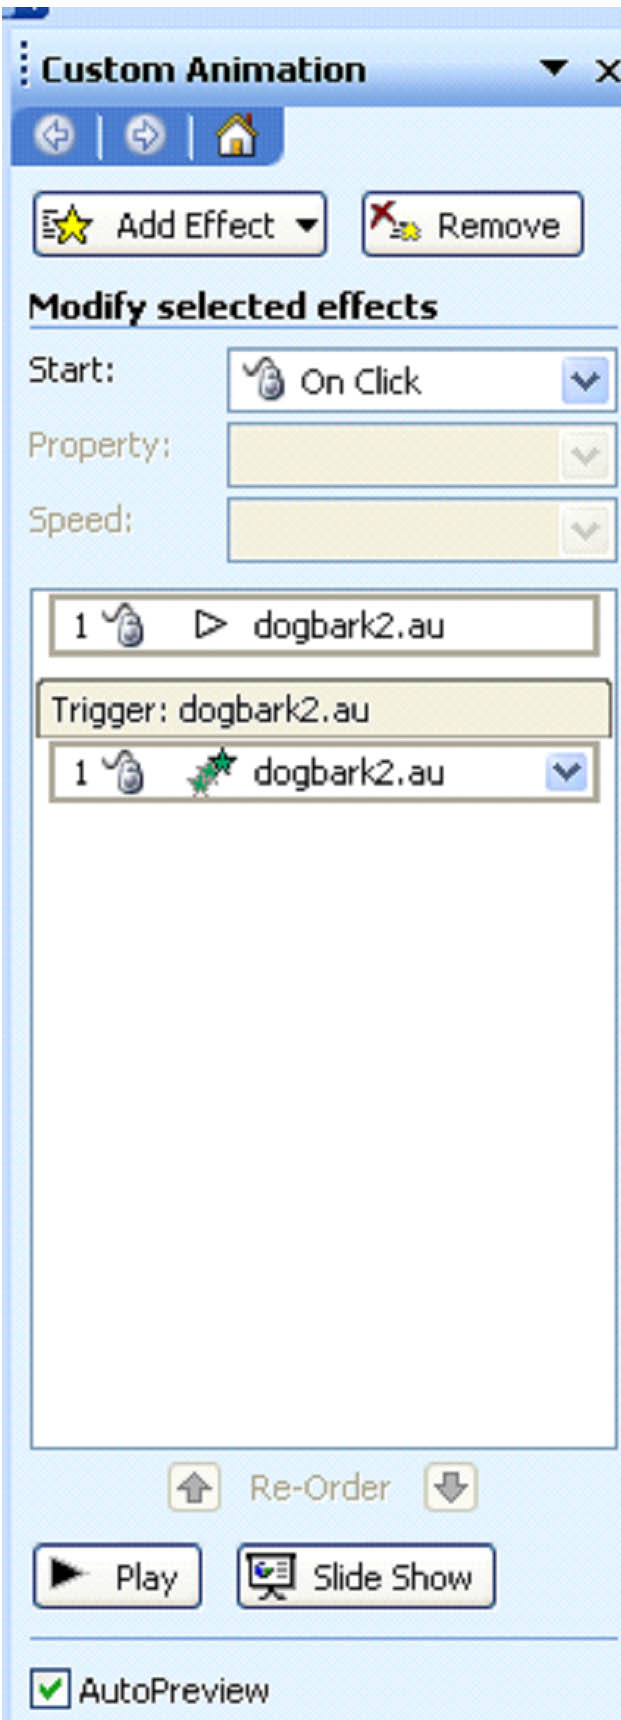
Much like with movies, you can add special effects, custom animations, and specify when you want the sound to start.
Record a Sound
MS PowerPoint 2003 also gives you the option of recording your own sounds and inserting them into the slide show. These sounds can be in the form of custom animations or even a narration for the entire slide show.
To record sounds, you must have a microphone attached to your computer.
When you're ready to begin recording a sound, go to Insert> Movies and Sounds> Record Sound.
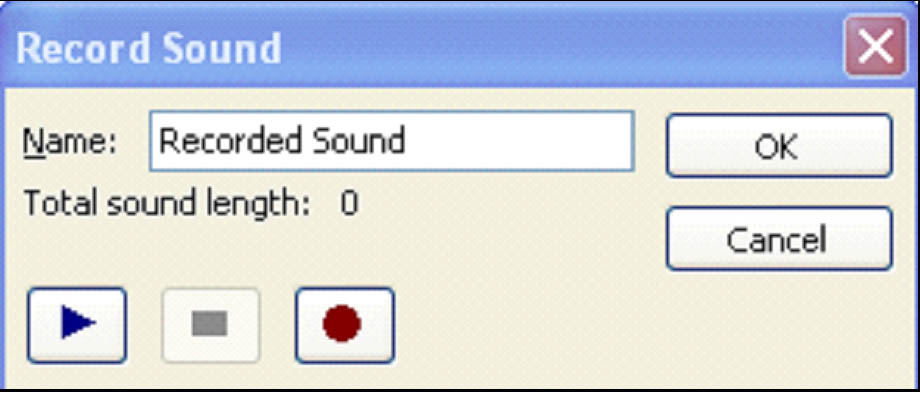
Give the sound file a name in the Name box, then press the record button to begin.
Recording Narration
Once you've created your presentation, you may want to add narration to parts or all of the show. MS PowerPoint 2003 makes it easy for you to record narration to go with your slides.
Go to Slide Show> Record Narration.
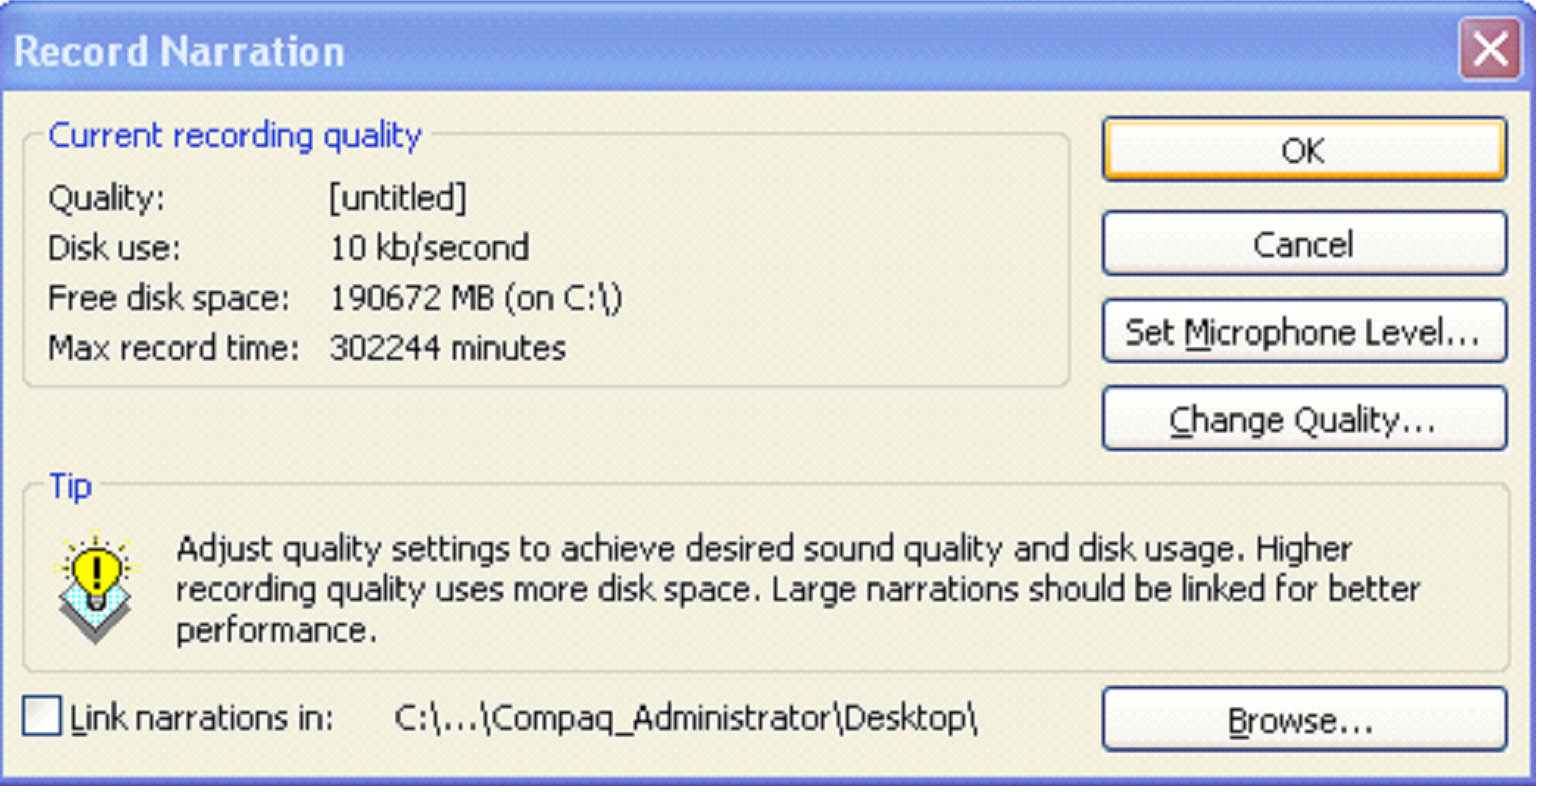
Before you record, you can set the microphone level and adjust the quality.
Click OK.
MS PowerPoint 2003 will now start recording. At the same time, it will show your first slide. Use the forward and back arrows at the lower left hand corner of the slide show to navigate through your presentation as you record your narration.
Note: The narration will be saved to the location specified at the bottom of the window above. If you want to change that location, click Browse and select where you want it saved.
Use CD Music
Do you want to use one of your favorite songs from a CD in your presentation? PowerPoint 2003 makes it easy to insert the track you want into a slide.
First, insert the CD into your CD-ROM drive. You do not have to rip tracks from the CD.
Go to Insert> Movies and Sounds> Play CD Audio Track.

Specify the tracks that you want to use in the Clip Selection section.
When you've finished making all your selections, press OK.
The CD audio track is now inserted into your slide. You can edit it the same way that you would any sound file.