Key Terms
o Solderless breadboard
o Digital multimeter
o Oscilloscope
o Printed circuit board
Objectives
o Identify some common instruments and devices for designing, building, and testing electronic circuits
o Introduce a general procedure for building circuits
If you pursue electronics as a hobby or even as a vocation, you'll likely do more than just drawing circuit schematics. When you're making the jump from theory to reality, you'll need some tools beyond just pencil and paper to ensure that you are able to build, test, and troubleshoot your creations. Although this article is by no means a complete guide to building electronics, it does offer some helpful tips and avenues of further investigation.
Computer Modeling
After you have developed a circuit idea--but before building a prototype--you might consider using computer software to model your circuit. Although in many cases you may find it easier to just build a prototype, you can easily destroy some sensitive electronic components (for instance, integrated circuits) if you aren't careful. In such circumstances, electronics-modeling software can help. As with most of the tools we'll discuss in this article, the cost of such software can range from free to extremely expensive (far more than a hobbyist would be able to pay). Start simple: find an easy-to-use, free program, then move to more complicated programs as necessary. But always remember that computer programs are designed to model the behavior of electronics approximately; there's no substitute for actually building a circuit.
Prototyping
A solderless breadboard is an invaluable tool if you're building lots of prototypes. This device allows you to connect wires and electronic components easily and temporarily by simply inserting the wires into small holes designed to secure a good connection. Typically, all the holes in a given row or column are all connected electrically, allowing you to connect multiple components together.
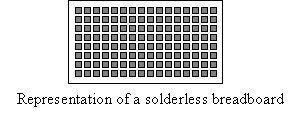
Breadboards come in different sizes and configurations. In addition, you can purchase kits containing wires specifically designed for use with breadboards, as well as component kits that give you a variety of capacitors, resistors, and other components.
Circuit Testing Equipment
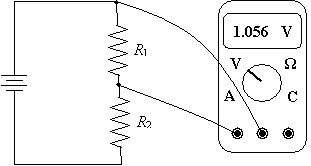
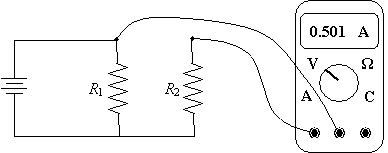
When you're measuring current, you need to place the multimeter in series with the portion of the circuit for which you want to measure the current. For example, the arrangement below yields a measurement of the current through resistor R2. (The multimeter is designed to have a very low resistance when operating in this mode, thereby preventing a significant voltage drop across the multimeter, which can affect the behavior of the circuit.)
Another useful--but often very expensive--instrument for analyzing circuits is the oscilloscope. You may have seen one, either in real life or on television, as they are in some sense the quintessential electronics test and measurement device. An oscilloscope has a variety of controls and a screen that shows a waveform--it is particularly useful for circuits in which the voltage varies over time (for instance, the power source voltage changes).
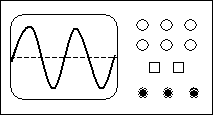
The principles of measurement using oscilloscopes and those using multimeters are essentially the same--oscilloscopes simply provide more information and greater control to the user. Traditional oscilloscopes can cost thousands of dollars, and those for professional use (particularly for high-frequency circuits) can cost tens of thousands of dollars or more. But with computing power becoming ubiquitous, some companies have designed oscilloscopes that are designed to piggyback on your computer (through a USB port, for example), relying on the computer's processing capability, the monitor, and specially designed software to emulate an oscilloscope. Even standard oscilloscopes are falling in price. Thus, some of these oscilloscopes are much more affordable, particularly for hobbyists.
Building Circuits
Once you've designed, built a prototype of, and tested your circuit, you can move to the final stage: construction of the real thing. The details of building circuits is beyond the scope of this article, but there are several considerations you'll probably deal with. First, you'll need to decide how to house the circuit. To protect the electronics and provide some aesthetic appeal, you'll have to decide what to put the circuit in (a plastic case, for instance). Furthermore, you'll probably have to use printed circuit board, which provides both a firm, strong surface to build the circuit on as well as a means of creating conducting pathways (in effect, wires) on the board. If you open most electronic devices, you'll find a "board" with components and metal pathways--this is a printed circuit board (PCB).
Designing good PCBs requires great care. And once you've designed the board, you generally use solder to connect components (like resistors) to the board. Solder is a metal that melts when heated high enough (using a soldering iron), and it cools to form an electrical connection. Soldering, like designing good PCBs, is a skill that takes practice--as well as care, since you can easily injure yourself with the soldering iron, hot solder, or the acid used to etch the PCB.
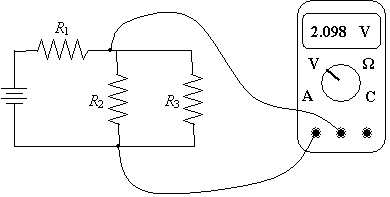
Practice Problem: A technician wants to measure the voltage drop across resistor R2 in the circuit below. Where should she connect the cables from her multimeter?
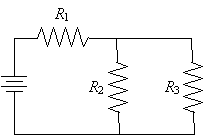
Solution: To measure the voltage drop, the technician must connect one cable "above" R2 and one "below" R2. Note that the voltage drop across R2 and R3 is the same; as long as the cables are attached on either side of R2 (but not between the power supply and R1), the technician will get the right measurement.