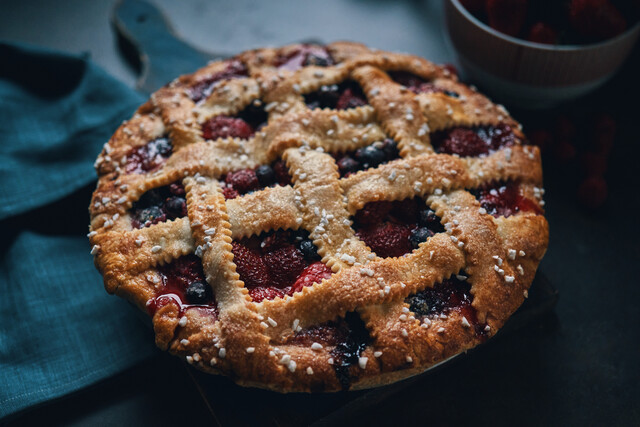
It is no secret that humans love sugar. Since the time were are born we crave sugar, so it should come as no surprise that most abundant breads in variety, texture, and presentation are "sweet breads." This category is so large that it can include muffins, cakes, doughnuts, and simple loaves of fruit bread. For the simplicity of this article, we will focus on traditional loaves of sweet bread, such as banana nut bread.
Objectives:
1. Learn about the different types of sweet brad loaves
2. Learn a few crowd-pleasing recipes for sweet breads.
Fruit and Vegetable Sweet Breads:
Sweet breads are a great way to make use of produce that is not being eaten whether it is because you have a large crop of a certain fruit or vegetable in your garden or simply because you bought too much of one item at the grocery store. Bananas are a great example because they age quickly after purchase and many times people resort to throwing away mature bananas rather than eating them. Brown, mature bananas have a much higher concentration of sugar than their younger counterparts and are especially delicious in banana nut bread.
Banana Nut Bread:
This delicious recipe uses mature bananas, walnuts, and a variety of complex spices to add richness and depth. It is great for sharing, inexpensive, and can be made during any time of the year. Banana bread is best if served the day after baking, as it becomes extra moist especially if wrapped tightly in plastic wrap. This bread is delicious frozen and reheated as well. Many bakers will make large batches in order to save time and have banana bread to last them a while.
Following recipe makes 1 loaf�
Ingredients:
1 � cups of all-purpose flour
� teaspoon salt
1 teaspoon baking soda
2 large to large eggs, room temperature
� teaspoon of pure vanilla extract
1 stick of unsalted butter, softened (plus extra for greasing pans)
1 cup of granulated white sugar
3 mature bananas, peeled and mashed (about 1 cup)
� cup of walnut pieces, toasted
1 teaspoon cinnamon
� teaspoon ginger
Steps:
1. In a medium mixing bowl, sift together flour, baking soda, cinnamon, ginger, baking soda, and salt. Set aside.
2. In a small mixing bowl or a glass measuring cup, whisk together eggs and vanilla. Set aside.
3. Lightly brush a 9in x 5in bread pan with butter. Coat with a sprinkle of flour if desired (will help loaf not to stick).
4. Preheat oven to 350�F.
5. Cream butter and sugar together with an electric mixer until light and fluffy. Slowly pour the egg mixture into the butter and sugar mixture. Mix until well incorporated.
6. Add the bananas and stir well.
7. Pour in the flour mixture and mix until just incorporated.
8. Fold in nuts and pour batter into your prepared pan.
9. Bake until a loaf passes the toothpick test � toothpick comes out clean (about 50-55 minutes).
10. Cool the loaf in the bread pan for about 10 minutes before transferring to a wire rack if available.
11. Allow loaf to cool completely before slicing and serving or wrapping in plastic wrap to enjoy the next day.
Pound Cakes:
Pound cakes are heavy sweet bread loaves, served in thick slices with a variety of toppings. They are very similar to fruit and vegetable sweet breads in texture and composition. Pound cakes were originally known as such because they consisted of one pound of butter, one pound of flour, and one pound of sugar. Today, there are many variations such as lemon pound cake which combines both pound cake and a sweet fruit bread.
Lemon Pound Cake:
Lemon pound cake is a delightful bread for summertime with its crisp, sweet citrus flavor. A simple lemon glaze can be dripped over the top to give it a little sparkle and a lot of flavor. This recipes is easy to follow and delicious to taste.
Following recipe makes 1 loaf�
Ingredients:
1/2 cup of butter, melted
1 cup of sugar
2 large eggs, beaten
1/3 cup + 1 tablespoon of fresh lemon juice
1/4 teaspoon of salt
1 1/2 cups of flour
1 teaspoon of baking powder
1/2 cup of milk
1/4 cup of sugar
Steps:
1. Preheat oven to 325�F.
2. In a large mixing bowl, whisk together sugar and butter until light and fluffy.
3. Add eggs and 1 tablespoon of lemon juice and mix well.
4. Mix in salt, flour, and baking powder.
5. Add milk and stir until well incorporated.
6. Grease and dust 9in x 5in bread pan.
7. Bake at 325�F until top is golden brown (about 1 hour) or until it passes the toothpick test � toothpick comes out clean.
8. In a small mixing bowl, whisk together 1/3 cup of lemon juice and � cup of sugar.
9. Use a toothpick to poke holes in the top of the loaf and drizzle lemon juice and sugar glaze over the top of the loaf after it has cooled for 10 minutes.
10. Serve warm or cool.
Conclusion:
Sweet breads have a huge range when it comes to ingredients, styles and flavor. Some of the most characteristic and easily made are fruit and vegetable breads and pound cakes. They are a simple way to use up extra produce and please a crowd.
Quick Breads
"Quick bread" is a term used to describe any and all breads that are made without yeast as a leavening agent. They are leavened chemically, usually with baking powder or baking soda, and can be with sweet or savory. Technically, most sweet breads (section 8) are also quick breads. There are many different types of quick breads and they tend to be easier to make than their yeast-leavened cousins, as their name implies.
Objectives:
1. To learn about a few different kinds of quick breads
2. To learn a few recipes for delicious quick breads to add to your recipe collection.
How Quick Breads are made:
Quick breads are leavened without the use of yeast, but they are leavened all the same. The two most common types of leavening agents used in the preparation of quick breads are baking soda and baking powder. Baking soda is sodium bicarbonate and baking powder is sodium bicarbonate mixed with a weak acid. Sodium bicarbonate works to leaven bread by reacting with acids in the recipe to release carbon dioxide which causes the batter to bubble and rise. This bubbled appearance is especially characteristic of quick breads like pancakes and waffles.
Different Kinds of Quick Breads:
Quick breads can be either sweet or savory. Some of the most common types of quick breads are pancakes and biscuits. They tend to be quite simple to make and take much less time than yeast breads because the sodium bicarbonate does not need to be given time to rise before baking.
|
Beer Bread: Beer bread is interesting in that it can be made both as a quick bread and as a yeast bread. Since it has beer, it does include some brewer's yeast already. This particular recipe is the quick bread version (both versions are delicious!) which includes baking powder and 1 can of beer. Beer bread contains the warm, yeasty flavor of beer the alcohol cooked out. Following recipes makes 1 loaf� Ingredients: 3 cups of all-purpose flour 3 teaspoons of baking powder 1 teaspoon of salt 1/4 cup of sugar 1 (12 oz) can of beer � cup of butter, melted Steps: 1. Preheat you oven to 375�F. 2. In a large mixing bowl, sift together flour, baking powder, salt, and sugar. 3. Slowly add beer and mix until well incorporated 4. Pour batter into a greased loaf pan and pour butter over the top of the mixture. 5. Bake at 375�F for 1 hour. 6. Allow to cool for at least 15 minutes outside of the oven before slicing and serving. Optional: This bread is very dense (not a brick!) and has a crispy crust. If you prefer a softer bread, then mix the butter into the batter rather than pouring it on top. Conclusion: There is a huge variety when it comes to different types of quick breads. Some are savory and some are sweet, but the general rule is that they are leavened with chemicals (such as baking powder or baking soda) rather than with yeast. This means that they are much quicker and much easier to make than yeast breads. Many of the popular sweet breads on the market today are actually quick breads. They are an easy way to make delicious bread without the work of kneading and waiting for dough to rise. Many gluten-free varieties, as you will learn in section 11, could also fall under the category of quick breads as they do not contain yeast. |
Unleavened Breads
Many unleavened breads have strong symbolic significance to certain religious groups and traditions. Matzo, for instance, is a Jewish bread that is served during the celebration of Passover. Also, the Eucharist that is served at Catholic mass is an unleavened bread that is spiritually important to those taking part in the communion. The reason for the significance of these breads may simply be because they are the oldest breads of which we have record. Their consumption dates back to the dawn of the Agricultural Revolution roughly 10,000 years ago. Unleavened breads are also very simple to make since they require no leavening agents and very little ingredients of any kind.
Objectives:
1. Learn about different types of unleavened breads.
2. Learn how to make a few different unleavened breads from around the world.
How Unleavened Bread is Different:
Unleavened breads, or flat breads, are made without any chemical or yeast leavening agents. They are flat, as the name suggests, and are often close to crackers in texture. Every culture in the world has its own type of unleavened bread and here we will discover a few of them. The most basic unleavened bread consists simply of flour and water (greatly improved with a bit of salt).
Herbed Flat Bread:
This is a variation on a very simple flatbread made in the United States and Europe. Adding extra olive oil or roasted garlic are great ways to give this bread a little nudge. It can be served as crackers with dip or soup, or used as a base for open-faced sandwiches or pizza.
Following recipe makes 20 servings�
Ingredients:
� teaspoon of sugar
1 � cup of all-purpose flour
1 teaspoon of sea salt
1 tablespoon of fresh thyme leaves, chopped
1 tablespoon of rosemary leaves, chopped
� cup of water (you may need more)
1 teaspoon of olive oil
Steps:
1. In a medium-sized food processor, combine sugar, flour, tale, rosemary and thyme. Pulse to combine well.
2. Add the water in a steady stream until the dough begins to form a ball.
3. Turn it out onto a board and knead it 15 to 20 times in order to ensure that it is well mixed and smooth.
4. Roll the dough gently into a ball on your floured surface and divide into 20 even sections.
5. With a rolling pin, roll each section into a very flat circle.
6. Preheat the stovetop over a medium to high heat. Do not use oil.
7. Cook each bread piece on the pan or griddle until it bubbles up a little (1-2 minutes). Do not touch the bread while it is baking.
8. Flip the bread and bake on the other side for another 1-2 minutes.
9. Repeat steps 7 and 8 with each remaining portion of dough.
10. Serve immediately while still warm.
Matzo:
You can easily purchase matzo in the store, but it is much more flavorful and delicious when made from scratch � just like all of the other bread recipes here. Matzo is traditionally served at the Jewish Passover, as it is forbidden to eat any bread with leavening agents of any kind while eating chametz.
Following recipe makes 12 crackers�
Ingredients:
2 � cups of all-purpose flour
1/3 cup of olive oil, extra virgin will be more flavorful
� teaspoon of kosher salt
� teaspoon of fine sea salt
Optional: � - 1 teaspoon of sesame seeds
Steps:
1. Set a baker's stone on an oven rack in the middle of the oven and heat the oven to 500�F for about 45 minutes. If you do not have a baker's or pizza stone, set a large baking sheet in the middle of the oven until hot. It is highly recommended that you use a baker's or pizza stone.
2. Using a food processor, combine 2 � cups of flour, salt, and oil. While the processor is still running, slowly add water in a steady stream.
3. The dough will come together and it should fell soft and supple. If it is sticky, then you should add more flour (1 tablespoon at a time).
4. Divide the dough ball into 12 even portions on a floured surface.
5. Using a floured rolling pin, roll out each portion carefully (about 8 inches in diameter). It should be just thin enough to see through.
6. Lightly sprinkle with sea salt and press in with your hands, very gently.
Optional: lightly sprinkle with sesame seeds and press in with your hands, very gently.
7. Prick all over the top with a fork. This will prevent the crackers from bubbling too much.
8. Flour a wooden peel generously so that it can easily transfer the dough to the baker's stone in the oven. If you do not have a wooden peel, you may use the back of a baking sheet which also must be very generously floured.
9. Bake until lightly golden on both sides and crisp (about 2-3 minutes total). Turn once during baking.
10. Re-bake any matzo that is not crisp. This is more likely to occur if baked on a baking sheet. Reduce the oven temperature to 250�F and bake for 15-20 minutes longer.
11. Place on a cooling rack and bake each remaining matzo dough the same way.
12. Serve immediately or store up to three days in an airtight container.
Corn Tortillas:
Corn was one of the most abundant crops, and still is, in the Americas prior to European conquest. The corn tortilla, an unleavened corn bread, was and is a very popular food item in the region due to its simplicity of preparation and variety of uses.
Following recipe makes 8 tortillas�
Ingredients:
1 cup of masa harina (finely ground corn meal)
� - � cup of hot water (heated on the stove, not from the tap)
� teaspoon of salt
Steps:
1. In a medium to large mixing bowl, combine the masa harina and salt.
2. Slowly add the hot water and mix until a dough forms and you can shape it into a ball.
3. Start by stirring with a spatula, then knead a few times with your hands.
4. Form into a ball and let rest for 30-60 minutes.
5. Divide dough into 8 sections and roll into balls.
6. Cut a plastic bag around the edges so that you have two pieces (or use parchment paper.
7. Place a dough ball between the two pieces of plastic and use a plate or a pan to flatten them into a circle. Do not make them too thin or the will tear when you cook them.
8. Slowly peel back the pieces of plastic, being careful of the edges, then pull off the plastic completely.
9. Drop onto a hot cast iron, or non-stick, pan.
10. Allow tortilla to cook for one minute and then flip. Cook for another minute. It should puff up while cooking. If it does not, then flip it again and cook another 30 seconds to one minute.
Optional:
To make tortilla chips: after allowing the tortillas to cool, cut them into 4 to 8 even sections. Heat vegetable oil in a pan on the stove top on high until it sizzles with sprinkled with water. Turn down to medium-low. Fry the tortilla pieces on both sides until crisp (about 1 � 1 � minutes per side). Sprinkle with salt while still hot. Allow to cool completely and serve.
Conclusion:
Unleavened breads may not be exactly what people think of when they think of bread, but they are steeped in a very culturally significant and traditionally rich form of bread baking. Every culture around the world has its own styles and variations of unleavened breads, and when you make them in your own kitchen you can feel like you are taking part in an ancient cultural act.