Graphics and images are a very important part of your website. In fact, they are a very important part of any website. They are what makes your site visually appealing to look at. They make your site attractive. They add color, accentuate a layout, and pull the design of your site together. In addition, they also provide additional information to visitors. Without them, your site would be nothing more than pages of endless text. Visitors would quickly get bored and move on to another site that was more visually appealing.
In this article, we're going to learn about graphics and images that you can place on your website, including:
-
Selecting graphics and images for your site
-
Image types
-
Vector and raster images
-
Image formats
About Graphics and Images
It goes without saying that you're going to want to place graphics and images that relate to the topic of your site on your pages. You would never want to place an image of a stack of pancakes on a site about fixing cars, or a picture of a monkey on a site about dogs. The images and graphics you choose for your site should always tie into the theme or topic of your website and also the page you're placing them on.
When you start to decide what graphics or images you want on your website, you're going to have several choices to make. Let's talk about where you can get those images and graphics (in the formats you need or want).
1. The first choice you have is creating your own graphics and images. Graphics are typically computer-generated images that are drawn using a graphics program. In other words, these are graphics you create from scratch. You can also use images that you own. Images are typically photographs. If you own them, you probably took the photo or were given ownership of the photo by the person who took it.
2. You can also find public domain graphics and images or purchase the right to use other graphics and images. Public domain graphics and images are free of copyright. Other graphics and images are copyrighted to the creator or owner. You'll have to pay a fee to use those graphics and images.
3. You can use a photo or graphics editing program, such as Adobe Photoshop, to edit or manipulate graphics or images. These programs will allow you to change the colors, remove certain aspects, add special effects, and the list goes on. However, just because you edit or manipulate a photo does not mean you do not have to worry about copyright issues.
Websites such as Fotolia.com and Istockphoto.com allow you to purchase rights to numerous photos and graphics. You can then use the photos and graphics on your site. In addition, you can google public domain images and graphics to try and find what you need that's free to use.
Image Types and Formats
There are two types of images (and graphics) that you will use on your website. They are raster and vector. Raster images are comprised of pixels, or little dots. Vector images, on the other hand, are made up of curves. They have four vector points with one point in each corner of the image. The dots are connected with curves, then the curves are filled with color and effects.
Let's take a look at the characteristics of raster and vector images to help you understand them better.
Raster Images
Raster images, such as photographs, are the most commonly used type of images in website design. They don't scale well. If you try to enlarge them or shrink them, you'll typically lose some of the quality because they are made up of pixels, and those pixels get resized instead of the image as a whole. With raster images, there is only one layer, meaning the image is flat. However, they have a smaller file size than vector images, meaning they are quicker to transfer and take up less space on your web server.
Vector Images
Vector images are commonly used for print design. Vector images can be resized without losing quality. They can also be edited fairly easily because they have layers, whereas raster images are flat. You can edit the different layers to change the look of the graphic. Because they have layers, they also have a larger file size. This can make it hard to use vector images on a website. Most graphics you create from scratch using a program such as Adobe Illustrator will be vector images. If you want to use them on your website, save them in a raster format first.
Image Formats
The formats you will use for graphics and images on your website will be raster images because they are smaller in size than vector type images.
Below is a list of some of the most popular raster image formats with a brief description of each. These are the image formats you should use on your website.
-
JPEG is the best format to use for images such as photographs because it has more colors. This is great for smaller images, such as images on a page that accompany text.
-
GIF is the best format to use for graphics. It has 256 colors, which is more than enough for most graphics.
-
PNG is a combination of JPEG and GIF. You should use this for larger images on your site, such as headers, etc.
Vector formats are AI, CDR, and EPS. However, you should always save a vector image in a raster format before uploading it to your site.
Remember, the larger the file size of a graphic or image, the longer it will take to load on your page.
What You Will Need for WordPress
Even if you choose to use public domain images or buy them from an image library, such as fotolia.com, you will need an image editing program to resize the images to make them fit in with your site. You may even want to crop images or add special effects.
Of course, you can purchase a subscription to photo editing programs such as Photoshop. However, if you're not ready to make that sort of monetary commitment at this time, there are also free programs you can download and use. These free programs aren't as feature-rich as the ones you would buy, but they can serve the purpose if you just need them to resize images and make very basic changes.
Below is a list of some of the free image editing programs available online. We've put an asterisk beside the two that we've used with success in the past.
-
Paint.net*
-
GIMP*
-
PhoXo
Understanding Fonts and Colors
The biggest decisions you will make when designing your site or decisions that will affect the look and feel of your website. Although content is very important, the way your website looks will determine whether visitors stay to look at the content � or leave your site just as quick as they can "X" out.
That said, the two big things that will influence the way your site looks are the color and the fonts that you choose.
We'll talk about:
-
Choosing colors for your website
-
The RGB color wheel
-
The color models
-
Creating colors using codes
-
About fonts
-
Web safe fonts
-
Installing fonts on your computer
Let's Talk about Color
The colors you choose for your website will be based on either your own personal preferences or colors that represent your business or organization. For that reason, we're not going to spend time telling you which colors are best to use, because every website, person, and industry is different. You'll make the color choices that represent you or your purpose the best.
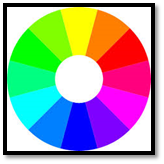
The Color Wheel
When choosing colors, there are tools you can use to make sure that the colors you choose will complement each other. Graphic design programs use a RGB (red, green, blue) color wheel to do just this.
The RGB color wheel divides colors into three groups. These three groups are:
-
Primary colors which consists of the three main colors: red, green, and blue.
-
Secondary colors that are the colors you get when you mix two primary colors together. For example: red plus blue equals purple.
-
Tertiary colors are colors that are created when primary colors are mixed with secondary colors. Examples of tertiary colors are cyan (blue-green) and magenta (red-purple).
The RGB color wheel is pictured below:
You can use the color wheel to choose the color scheme you will use on your website. A color scheme typically consists of two main colors.
You can choose complementary colors, or a pair of colors that are opposite each other on the color wheel, such as blue and yellow. You can also choose analogous colors. These are colors that are grouped together on the color wheel, such as yellow and green.
You can find a free RGB color wheel to use at http://www.colorspire.com/rgb-color-wheel/.
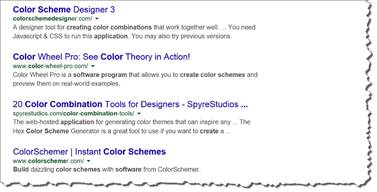
There are also plenty of software programs, both free and premium, that will help you to choose your color scheme. You can do a Google search on "create color scheme software" and see the myriad of results.
NOTE: Since programs, associated costs, and effectiveness change at such a quick pace (much like technology), we cannot recommend any one certain program to you for this aspect of website creation. However, as you can see by the snapshot below, locating resources is as easy as bringing up your favorite search engines. We recommend reading reviews before purchasing any software program, as well as making sure your anti-virus software is up-to-date before downloading any program from new source.
About Color Models
There are two color models that are used in web design. They are the RGB and hex (hexadecimal) systems. Of these two systems, the hex system is the most popular and is used with CSS (cascading style sheet). That said, let's discuss the two color models more in depth so you understand and can use them in designing your website.
RGB
The RGB model represents the colors that you see displayed in electronic devices like mobile phones and computer monitors. With the RGB model, it's said that you can create any color you want by using different amounts of red, green, and blue � the three colors that make up RGB. It goes without saying that since you're designing a website that will be displayed through a computer monitor or mobile device, the RGB model will be the basis for the colors in your web design.
RGB colors are represented by three numbers. Each of these three numbers reveals how much red, blue, and green makes up the color. The numbers go from zero to 255. Think of the numbers as coordinates on a map. If you take 50 red, 100 green, and 75 blue, those coordinates will all intersect at a certain color. In other words, those numbers make up the color you've created. Just for fun, that color is shown below.

To achieve a red, green, or blue color, you set the color you want to create (let's say it's red) to 255, and the other colors are set to a value of zero.
Hex
The hex color color uses hex codes. The hex codes represent the colors in the RGB color model.
Take a look at the snapshot below using the color wheel from the Colorspire site.
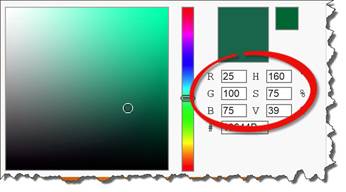
We've circled the RGB values in the snapshot above.
Below the RGB values is the hex code.
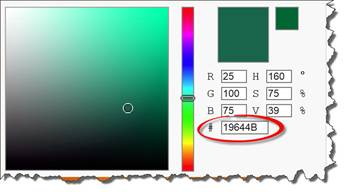
In a hex code, the colors � red, green, and blue, are each represented by two hexadecimals. Those hexadecimals are combinations of 0-9 and A-F.
Below are the hex codes for some common colors.
|
Color |
Hex Code |
|
White |
#FFFFFF |
|
Black |
#000000 |
|
Red |
#FF0000 |
|
Orange |
#FFA500 |
|
Yellow |
#FFFF00 |
|
Green |
#008000 |
|
Blue |
#0000FF |
|
Indigo |
#4B0082 |
While it's not necessarily important that you learn or memorize these hex codes, it is important that you learn to recognize a hex code when you see it in a cascading style sheet.
About Fonts
Fonts are the typeface that you'll use for the text on your website. You'll have text in the body of your website, but you also may have it on graphics, logos, and other images. As you create your website, you'll be able to determine the size and color of the font that you use. Perhaps you want to put a headline in large red font, but an article in small black. These are customizations that are easy to make to any font, no matter what type or style of font it is.
For the most part, fonts are grouped into categories based on their style and type. You will find these categories below.
-
Serif fonts are decorative. They have tails or curlicues on the edges of the letters.
-
Sans-serif fonts don't have decorative edges. They have straight edges instead. In addition, they are easier to read on electronic devices.
-
Script and decorative fonts look like cursive or hand writing. They're not a good choice for content because they can be hard to read unless they're extremely large.
-
Monospace fonts have letters that are all the same height and width. Monospace fonts are usually used for coding, but not for display on a website.
Discovering Web Safe Fonts
Web safe fonts are fonts that are automatically installed in the majority of browsers that your visitors will use. This means you visitors will be able to view these fonts on your website without any issues.
Let's put it another way. They are called web safe fonts because, if you use one of these fonts, you will know that the font you've chosen for the text will be the font that is displayed to your visitors.
If you choose not to use a web safe font, and the font you choose is NOT installed on the visitor's browser, the visitor will then see the default font used for their browser. They will not see the font you've chosen to use. This can affect the overall experience you're trying to deliver to your visitors when you choose your fonts. For that reason, you want to always try to use web safe fonts in your style sheets and body content.
Below is a list of some of the fonts that have been designated as web safe fonts. This means they are installed on most browsers.
|
Font |
Font Style |
|
Arial, Arial Helvetica, Arial Black |
Sans-serif |
|
Georgia, Times New Roman |
Serif |
|
Tahoma, Geneva |
Sans-serif |
|
Comic Sans MS |
Cursive |
|
Palatino, Palatino Linotype, Book Antiqua |
Serif |
|
Courier New, Lucida Console, Monaco |
Monospace |
|
Trebuchet MS, Verdana |
Sans-serif |
Finding Fonts to Use
Web safe fonts aside, there are thousands of fonts out there that you can use as you design your website. You can find these fonts online and download them, usually for free. Once you've downloaded a font, it's easy to install it on your computer so you can use it for your website.
Below is a list of some of the more reputable sites to find and download fonts:
1. Google Fonts � www.google.com/fonts
2. Urban Fonts � www.urbanfonts.com
3. Fonts.com (this is not a free site)
Follow the instructions to download the font. Typically, what you will download is a compressed or zipped folder. Make sure you save it in a location on your computer where you can easily find it.
Installing Fonts on Your Computer
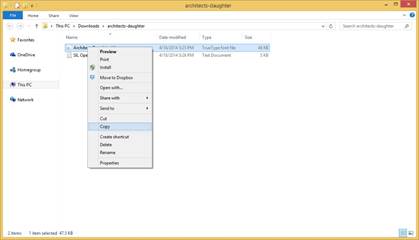
To install the font you've downloaded on your computer, first unzip the file and save the unzipped file to a location on your computer.
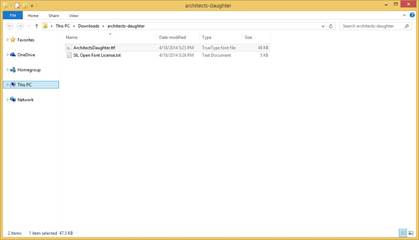
Next, right click on the unzipped file. Select Copy.
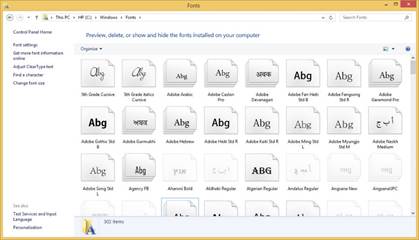
Go to C:\Windows\Fonts on your computer.
Right click on your mouse inside the Fonts directory. Select Paste to paste the file.
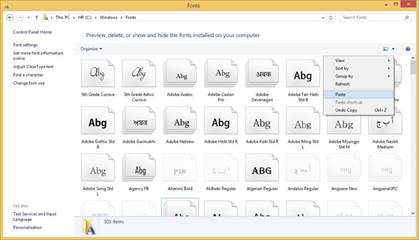
The font will then be installed.