
The main component of a Slack server is channels and channel users. Channels let you section off the server into different projects and departments, so users and administrators can keep conversations organized. Slack automatically creates a general channel where all new users to the server can start chatting, but every Slack server usually has at least one other channel to organize messages and make it easier for users to find information. Administrators must create, manage and (sometimes) delete channels while the server is in operation.
Creating a Server Channel
Because channels are sections of a server, they are usually created based on departments and projects. You can also use both department and project channels and add users who would need to communicate in both sections. For large servers, it might be better to design the way that you want to set up channels or create rules around channel setup procedures. You could also have guidelines around naming schemes and the way you maintain channels until they are no longer needed. It's easier to create a channel than delete it, so it's important to decide which channels would help boost productivity rather than confuse users as to where information can be found.
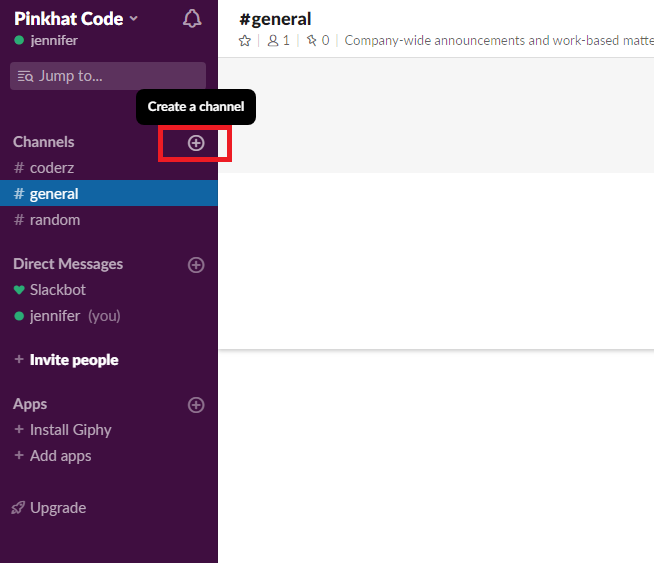
The icon to create a new channel is in the left interface panel next to the "Channels" label. This icon is not displayed when you are not an administrator of the server, so standard users will not be able to manage the server's channels without permission. After you click the "Create a channel" button, a configuration window displays in the Slack interface.

Every channel starts with a hashtag symbol. This symbol displays at the beginning of the "Name" text box where you give your new channel a name. This name is what displays in the left Slack server interface panel, so you should ensure that the channel name describes its purpose. For instance, if it's a channel that will house conversations for a project, the channel name should be the project name so that users will recognize its function. If the channel will be for a department, then the channel name should reflect that it's a department's conversation section. Users who do not have access to the channel will not see it in their own Slack interface, so you do not need to be concerned with hiding channel names from other, unauthorized users.
Slack channel names cannot have any spaces, so if you press the spacebar while creating the name, it will not register. Instead of space characters, you can use hyphens. For this example, the channel "DevOps" was created. Under the input text box for the channel name is the "Description" text box. This information is displayed underneath a channel name to help users identify the channel's purpose. This text box can have spaces and any characters that will help users understand what conversations they will find in the channel.
By default, a new channel is public. A public channel can be seen by any user in the Slack server. Users on the server can also post messages to public channels. If you don't want all users to see the channel, then you must turn on the "Make private" setting. This setting is the last section in the "Create a channel" configuration window. When a channel is private, only users who are invited to the channel will be able to participate in conversations.
After you are finished configuring the new channel, click the "Create" button. Slack creates the new channel and automatically adds you to it if it's a private channel. If the channel was created as a public channel, then all users can now see it in their Slack interface. Before you use the channel, Slack asks you if you want to add any team members to the new section.
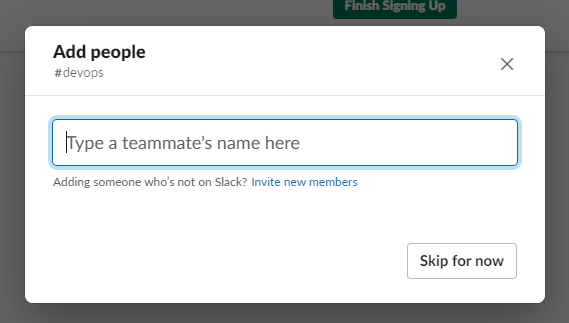
If the user who you want to invite is not on Slack, click the "Invite new members" link to send an invite in email to the recipient. If the channel is public, then you don't need to invite anyone. You can always add other members later if you decide new and additional people should be in the channel. If you don't want to invite people or the channel is public, click "Skip for now." The channel is created, and the administrator (you) is added to the channel.
Editing Channel Settings
After the channel is created, you can make a few more changes to its configurations. At the top-right section of the Slack interface, you'll see a gearbox to the left of the "Search" text box. Click this gearbox, and a dropdown list of options displays.
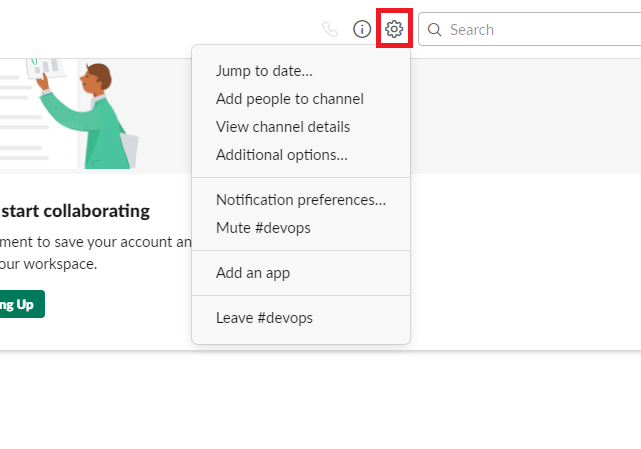
Standard users also have a gearbox at the top of a channel window, but they cannot perform any of the administrative tasks. For instance, a standard user cannot mute a channel or add an app to its functionality. Standard users can jump to a date to read messages, view channel details and even leave the channel. Users can always leave a channel if they no longer want to be a part of it, but administrators can add them back.
Channels are simple sections of a Slack server, so you don't need to perform many configurations to get them running the way you want them to. Once channels are created, you just need to manage the users and any apps included within the channel. Users can also be removed from channels instead of removing them from the entire server.
Click the "View channel details" option from the gearbox dropdown menu. A panel opens on the right side of the Slack server with information about the channel. You'll also notice a list of items that can be clicked and reveal more information about the channel.

For instance, click the "Pinned Items" option, and a list of pinned messages can be reviewed. Since the administrator (you) is the only person in the channel, only one member will display if you click the "1 member" item. Any apps installed in the channel can be reviewed by clicking the "Apps" menu item. Shared files can be reviewed by clicking the "Shared Files" item. Shared files are any documents uploaded to the channel. These documents do not include cloud documents such as files created on Google Drive or Dropbox.
Click the "Notification Preferences" option to see a menu list of items. If you are on a desktop version of the application, the first section gives you the option to enable or disable browser notifications. This means that if browser notifications are enabled, you will see a popup window on your desktop when a message is sent in the channel. This configuration section is useful for servers that have users posting and pinging regularly every day at any hour of the day. If you have the app on your mobile device, you would receive these notifications at all hours of the day including when you are sleeping.
Click the "Edit Preferences" button in the "Notification Preferences" dropdown to see a list of options in a separate window. This window is where you set up your notifications for channel messages including any pings that include @channel or @here user callouts.
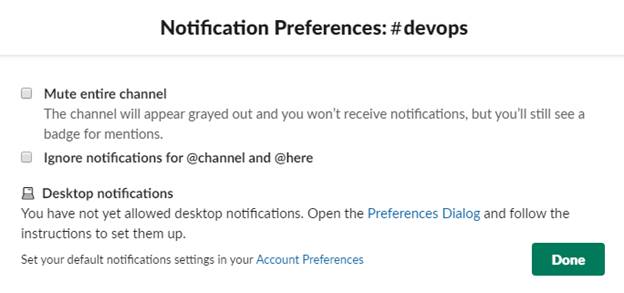
The first checkbox labeled "Mute entire channel" will stop the notifications from making a sound on your device including a desktop computer. Notice that the description for this setting says that you will see a badge but won't get the sound notifications. Use this option when you need to silence a busy channel as you are away.
You can also ignore notifications from @channel and @here, which can be sent from anyone with permission in the channel. These notifications are sent when a user pings the entire channel or anyone online and available on the server. These notifications could be general and not necessary for some users, so it can be convenient to mute these messages so that they don't interrupt your work. If you are on a desktop computer, you can also turn on notifications by clicking the "Account Preferences" link. Channel preferences and account preferences overlap a little, but channel settings only affect the way you interact with the current channel. Account preferences change the way your entire account interfaces with Slack.
After you are finished making changes to the channel settings, click the "Done" button, and you're returned to the main Slack interface. Click the gearbox icon again and click the "Additional Options" menu item. This selection opens a configuration window with additional settings that can be applied to the channel.
The options in this configuration channel are only open to administrators or users with permission to edit channel settings. Each configuration module has a short description under its label. This description helps you identify what will happen when you choose the configuration setting or make changes to it.
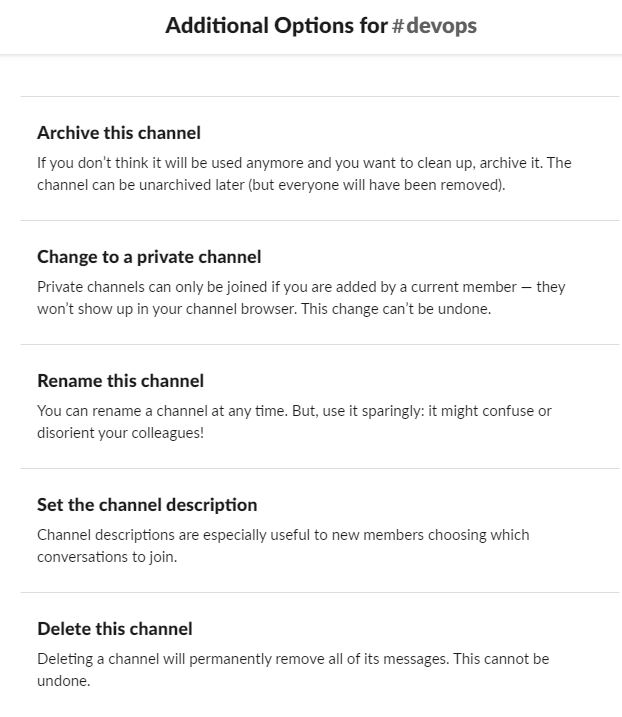
The first option is to archive the channel. Archiving messages does not erase them, but it stores them in a safe location should you ever need to reference them again. It's beneficial to archive channels that you no longer need such as those created for projects that are now complete or teams that have been dissolved. You can still reference messages later, but they will not take up space on your server after you archive them.
After you create a public channel, you may want to change it to a private one. The "Change to a private channel" setting will flip the channel's settings from public to private. Remember that you must invite users to the channel after you change it to private. Private channels only show up in a user's interface if they are invited to it. Anyone currently chatting in the channel will be removed, so take this issue into consideration before you change the channel settings to private.
Projects, teams and department names change as a company grows. Editing a channel's name to reflect changes to a project, team or department name will help new employees find the channel as they are added to the Slack server. Any name you give the channel should be easily identifiable by users who must communicate in a specific channel, especially if it's a private channel where only invited users can view and post messages.
If you change the channel name, you may also want to change the channel description to match the new name. You shouldn't recycle channels and combine content topics, but you might have a legitimate reason to change the channel name with a new description that reflects the new purpose. The "Set the channel description" option lets you change the current description to a new one.
Occasionally, you might want to remove a channel without archiving messages. In most cases, archiving the channel is the better option, because you'll store the channel's messages as a backup in case you need them. For instance, you might create several channels when you first set up a new Slack server but later figure out that you no longer need a channel that you initially created for a specific team. You don't need to archive any messages because the channel was never used, and few messages were sent to it. If you click "Delete this channel," then you will be prompted for verification that you truly want to delete the channel. Confirm that you want to delete the channel, and then Slack will remove it from your server. Any users currently in the channel will also be removed and will no longer see it in their list of available channels.
As you work with channels in Slack, you'll notice that they are small organizational components of a larger Slack server. A Slack server contains every user within the organization, but creating channels organizes messages among teams and departments. After you create several channels, you must manage them and archive channels that you no longer need. This can be done by setting up moderators and other users who can maintain the channel and perform any maintenance on them. As the administrator, you can invite and remove as many users as you need.